
Unisphere Management
Unisphere Management
-
Creating and managing replication in Unisphere is easy and intuitive. All replication operations, including configuring of synchronous replication network interfaces, replication connections, and replication sessions can be performed in the Unisphere GUI. With the help of easy-to-follow wizards, replication can be configured quickly by IT generalists or advanced users alike. Replication can also be configured using Unisphere CLI, or REST API. For more information about configuring and managing replication using Unisphere CLI, refer to the Unisphere Command Line Interface Guide found on Dell Online Support. For more information about REST API, refer to the Unisphere Management REST API Programmer’s Guide found on Dell Online Support.
Configuring Replication
When configuring synchronous block replication, the following components need to be configured and were previously discussed in this paper:
- FC connectivity between the synchronous replication interfaces on the local and remote system
- Synchronous Replication Management Port Interfaces
- A Replication Connection
- A Replication Session
The first step above is completed by directly connecting the synchronous replication FC ports of two systems together or zoning the ports together over the fabric as outlined in the Synchronous Replication Interfaces section.
The following sections will outline the remaining steps needed to configure remote replication in Unisphere. Each of the following operations are completed from a particular page in Unisphere. Each page will be discussed in detail below. For more information about using Unisphere to configure and manage replication, refer to the Unisphere Online Help.
Synchronous Replication Management Ports
To create the synchronous replication management ports, you must first go to the Interfaces page, which is found under Protection & Mobility in the left pane in Unisphere. For releases prior to Dell UnityOS version 4.1, the Interfaces can be found as a tab in the Replication page, under Data Protection. Figure 4 below shows the Interfaces page. From this page, you have the option to create or delete mobility interfaces, refresh the current page, or edit a configured mobility interface. In the example below, no mobility interfaces have been created. Only one pair of synchronous replication management ports needs to be created on the source and destination system. Mobility Interfaces may be shared network interfaces for import and replication related data or management traffic using the virtual management port. In this section, the mobility interfaces will be referenced as replication interfaces.

Figure 4. Interfaces page
To create a replication interface, click the Create Interface button, shown as a + sign in the Interfaces page. Once selected, the Create Interface wizard appears, which is shown in Figure 5. For synchronous block replication, you must create the Synchronous Replication Management Ports on the system, which are used for management connectivity between the source and destination system. In the Ethernet Port drop-down list, select Sync Replication Management Port. The status of the ports will be shown in parentheses. Both system management ports, also used for Unisphere management, will need to be cabled to the network for these links to work properly.
Next, configure an IP address for SPA and SPB to be used for synchronous replication management. Note that VLAN tagging is not supported on these interfaces. Once done, click OK.

Figure 5. Create Interface window
Once the synchronous replication management ports are created, they will be shown on the Interfaces page as shown in Figure 6. From here the status of each port is shown, currently operating normally as denoted by the green circle checkmark. To delete a synchronous replication management port, select the port and click the Delete Interface icon, which is shown as a trash can on this tab. To edit a replication management port, to change the IP address for example, select the Edit icon, which is shown as a pencil icon on this tab.

Figure 6. Synchronous replication management interfaces
Creating a Replication Connection
The next step in configuring synchronous block replication is to create a Replication Connection with another system. This configures a private replication connection for the pair of systems. To create the Replication Connection, you must first go to the Replication page, which is found under Protection & Mobility in the left navigation pane in Unisphere. The Replication page has the Sessions and Connections tabs. From the Replication page, select the Connections tab. Figure 7 below shows an example of the Connections tab, without any replication connections configured. From this tab, you have the option to create or delete a replication connection, refresh the current page, or edit a configured replication connection. From this tab, you can also select Verify and Update, which will verify the selected replication connection still exists with the remote system and update the connection details if any changes were made.

Figure 7. Replication Connections page
To create a Replication Connection, select the Create Replication Connection icon, which is displayed as a + sign on this tab. The Create Replication Connection window appears, as shown in Figure 1. In this window, you must specify the Remote System’s Management IP Address, which is the IP used to access Unisphere, and the Unisphere User Name and Password. Also, in this window you must enter the Password used to log in to Unisphere on the system you are configuring the replication connection on. Lastly, you must select the Connection Mode that will be used between the systems. In the drop-down list, you have the option to choose Asynchronous, Synchronous, or Both. When configuring synchronous replication between two systems, select Synchronous. If asynchronous replication will also be used for replicating data to other storage resources, select Both, as both synchronous and asynchronous replication will be used. After entering the required information, click OK. Dell Unity Asynchronous and Manual Replication are discussed in the Native Asynchronous Replication section.

Figure 1 Create replication connection window
After selecting OK, a Job is generated to create the replication connection. The job has multiple steps, which includes registering the remote and local system with its peer, refreshing the connection on both systems, and validating the connections on the local system. Once the job completes, the replication connection will be shown on the source and destination system.
Figure 8 shows the Replication page Connections tab once the replication connection is created. In this example DR System is the name of the remote system the connection was configured with. The System Type, replication Mode, Management IP Address, and Local and Remote replication Interfaces will also be displayed. The Remote Interfaces displayed for synchronous block replication will be the IP Addresses configured for the synchronous replication management ports on the remote system. The Verify and Update button is also shown and is used to update the replication information for the selected connection.

Figure 8. Replication connection established
Creating a Replication Session
To create a replication session, you must enable replication on the storage resource you want to replicate. This can be done at time of creation, or on an existing storage resource. Figure 9 shows an example of creating a new LUN and enabling Synchronous remote replication on it. From the Replication step, check the checkbox in front of Enable Replication to configure replication. For Synchronous replication, select Synchronous from the Replication Mode drop-down box. When Synchronous is chosen as the Replication Mode, the Replicate To box will automatically be populated with the name of the system with which a synchronous Replication Connection has been configured. After completing this step, click Next and continue with the LUN creation. For thin clones, consistency groups and VMware VMFS datastores, a Replication step exists in the creation wizards for each with the exact look and configuration options as the one shown in Figure 9.

Figure 9. Create LUNs wizard – Replication step
When the Destination Configuration box is selected in the Replication step, the remote storage resource’s configuration can be customized. The Reuse destination resource option allows for recreating a replication session to an existing resource on the destination. Figure 10 below shows an example of this window.

Figure 10. Destination LUN Configuration window
After synchronous replication is configured on a new storage resource, you can view information about replication from the resource’s properties window. From Unisphere, select the storage resource in question and click Edit or double-click the name of the storage resource. From the properties window, view the Replication tab. An example of this tab is shown in Figure 11. On this tab, you can view the following information:
- The replication Session Name
- The replication Mode
- The Local Role of the storage resource, which can either be listed as the Source or Destination
- The Sync State
Also shown is a pictorial representation of the replication session. The picture shows which storage resource is available for I/O, which direction the data is replicating in and its current state, and the destination storage resource and the system name, IP Address, and the destination LUN name. As the state of the replication session changes, this figure will update to reflect the new state.
Also shown on the Replication tab are buttons for each Replication Operation. This tab is also used to display asynchronous replication operations, so all replication operations for both synchronous and asynchronous replication are displayed. Not all replication operations are supported on each mode of replication, so only operations supported on the current replication mode will be selectable. Also, only certain operations are available depending on what the current state of the replication session is in, so only these options are available for selection. In Figure 11, the current session is Active and replicating for the Production System to the DR System. Available replication operations include Delete, Pause, and Failover.

Figure 11. LUN properties – Replication tab
Replication can also be configured on an existing storage resource. When replication is not configured on the storage resource, viewing the Replication tab in the storage resource’s properties window will show what is displayed in Figure 12. To configure Replication on the storage resource, select Configure Replication.

Figure 12. Replication not configured
After selecting Configure Replication, the Create a Session wizard is launched. An example of this wizard is shown in Figure 13. On the Replication Settings step, you need to customize which Replication Mode either Asynchronous, Manual, or Synchronous replication will be used. For Synchronous Replication, select Synchronous. Next, select the destination system by selecting the correct system in the Replicate To drop down box. The Reuse destination resource option allows for recreating a replication session to an existing resource on the destination. After the previous selections have been made, click Next.

Figure 13. Create a Session
The Destination step of the Create a Session wizard is now shown. An example of this step is shown in Figure 14. From here, you can customize the storage resource’s Name that will be displayed on the destination system, the Pool it will use, and the Tiering Policy on the destination system’s Pool. For existing storage resources, you can customize this exact same information. Similarly, when creating a replication session on an existing consistency group, you can customize this same information for each LUN contained within the consistency group. After editing the available information, click Next.

Figure 14. Create a Session – Destination step
The Summary step is now shown, and an example of this screen is displayed in Figure 15. Here you can see a summary of the settings that will be used to create replication. If anything is incorrect, you can select Back to correct the wanted setting. To create the replication session, click Finish. A Summary step will also be shown when creating a replication session on other supported storage resources.
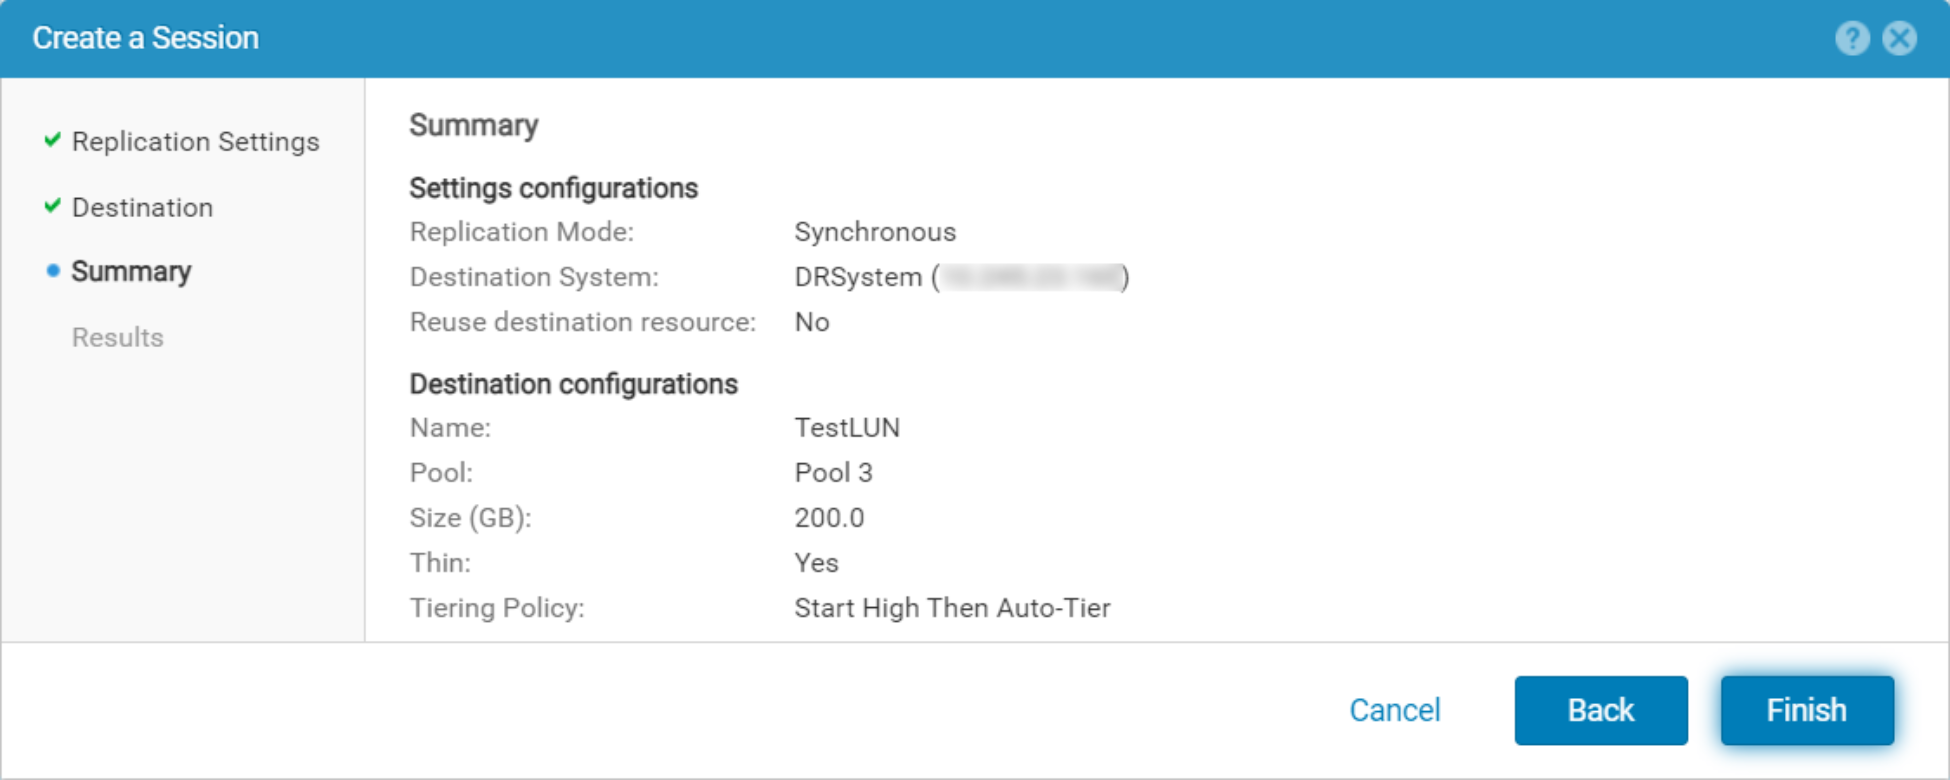
Figure 15. Create a Session – Summary step
The Results step is the last step in the Create a Session wizard. This step shows the Overall Status of each of the jobs to create the replication session. The steps to create the replication session include creating the storage resource on the destination system, allowing the remote storage resource to finish the creation process, and lastly creating the replication session. You can either wait for the Overall status to say 100% Complete or close the window at any time by clicking Close. Closing this window will not impact the creation process since it is a background job in Unisphere.
Figure 16 shows the Replication tab in the LUN properties window after enabling replication. After enabling replication on an existing device, a full synchronization may need to be completed. If the Reuse destination resource option was selected and a common base snapshot is found, a full synchronization can be avoided and only the differences will be replicated. During this process, the Sync State shows Syncing. This operation may take time and will be based on the amount of data that is needed to be copied to the remote system, and the available bandwidth of the link between the systems.

Figure 16. Sync State – Syncing
Figure 17 shows the Replication tab after the full synchronization. Notice that the Sync State now shows In Sync.

Figure 17. Sync State – In Sync
Viewing the Replication Sessions
All replication sessions on the system can be viewed from the Sessions tab within the Replication page. This includes synchronous, asynchronous, and manual replication sessions. To browse this page, click Replication under Protection & Mobility in Unisphere. For releases prior to Dell UnityOS version 4.1, the Replication page can be found under Data Protection. Figure 18 shows an example of the Sessions tab with multiple replication sessions created on the system. In this example, multiple LUNs, consistency groups, NAS Servers, and file systems are all being replicated. From this window, you can easily see information regarding each session. The following is a list of information displayed on this screen:
- The Replication Session Name
- The current State
- The Source, which includes the source system and the source storage resource
- The Resource Type
- The Replication Mode
- The Destination, which includes the destination system name and the destination storage resource
- The Replication Session ID
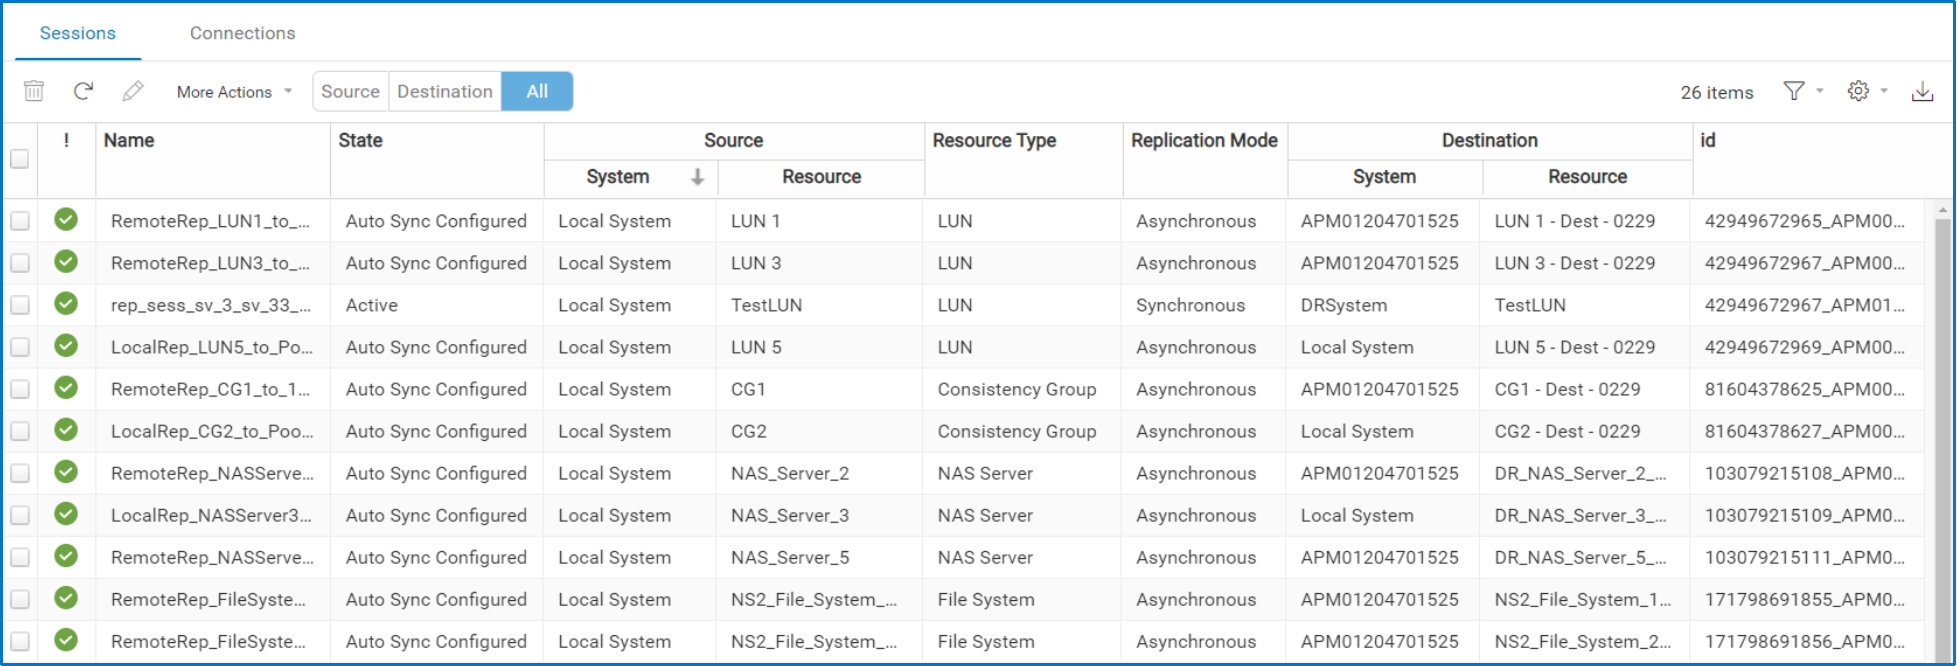
Figure 18. Replication Sessions
From the Sessions tab, you can also issue replication operations on the sessions. After selecting the checkbox for a replication session in the list, select More Actions to view the replication operations available for that session in its current state. In Figure 19 below, you can see that only Pause and Failover are valid options based on the selected resource’s replication session state.

Figure 19. Replication Actions