
Creating a protection policy with replication rules
Creating a protection policy with replication rules
-
To create a replication session in PowerStore Manager, first set up a protection policy with an underlying replication rule. A protection policy is a collection of different local or remote protection rules that are assigned to resources on the PowerStore cluster. Protection policies can contain between zero and four rules for scheduled snapshots. The policies also contain a single replication rule for remote replication to a system that is defined in remote systems. Select Protection > Protection Policies, as shown in Figure 30
Figure 30.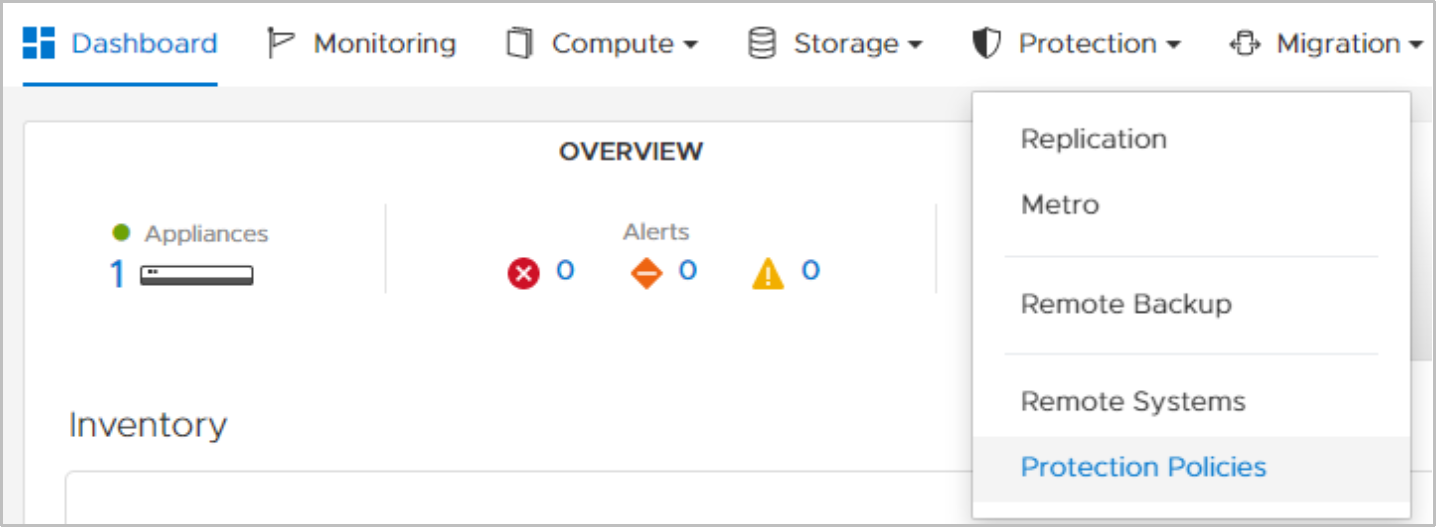
Figure 30. Protection Policies
In the Protection Policies window (Figure 31
Figure 31), you can create protection policies and rules and manage existing policies and rules. The following example shows how to create a protection policy with replication to a previously configured remote system. In the Protection Policies window, click CREATE to begin the configuration.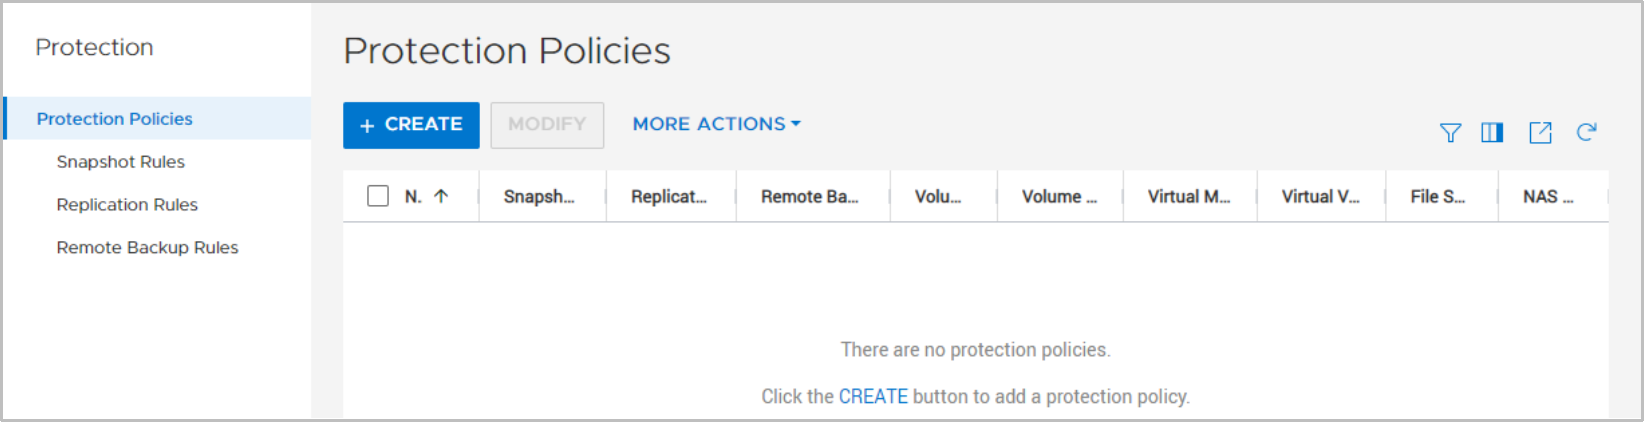
Figure 31. Protection Policies list
Because the Protection Policy is only the top-level object, which is assigned to a storage resource, only a policy Name is required. Use a meaningful name such as one that contains the remote system. Further down in the window, you can select an existing replication rule, or you can click CREATE to create a rule in the Replication Rules area.
The following information is required. Each step corresponds with a number that is shown in Figure 32
Figure 32.- Enter a Name for the protection policy.
- In the Replication Rules section, click CREATE to create a replication rule.
In the Create Replication Rule window, set the following:
- Replication Rule Name
- Destination Remote System
- Replication Type – Asynchronous or Synchronous (PowerStoreOS 4.0 and later)
- RPO – shows 0 (zero) for synchronous replication
- Alert Threshold – Asynchronous replication only
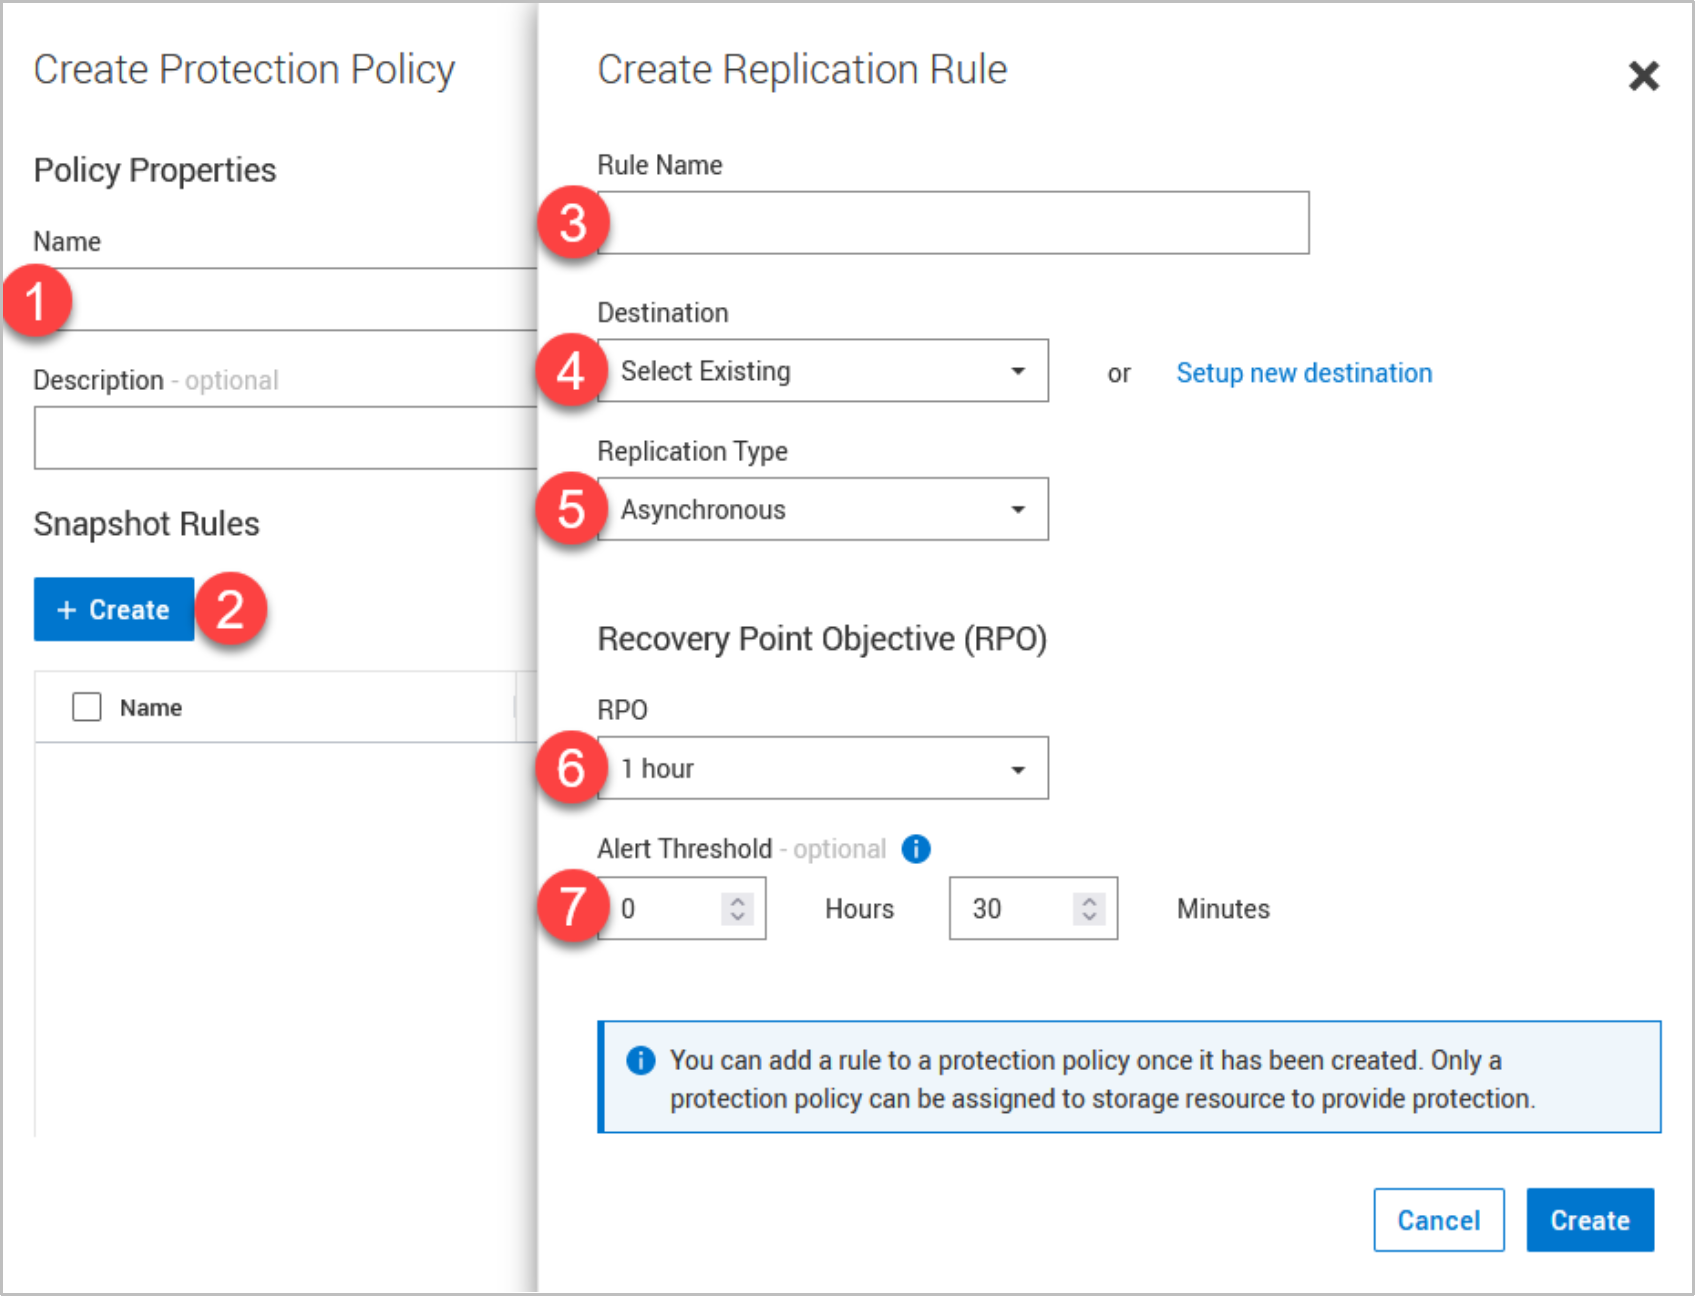
Figure 32. Create replication rule
When all steps are finished, you can use the protection policy to protect storage resources with configured parameters.
Assign protection policy
The last step to establish a replication session is to assign the protection policy to a new or existing storage resource. This resource can include a volume, volume group, thin clone, or NAS server. A protection policy assigned directly to a file system will not implement any replication rules if they exist. To enact file system replication, the protection policy with the replication rule must be applied at the NAS server level. The following steps show assigning a protection policy on a volume. The required steps to assign a protection policy to a volume group, thin clone, or NAS server are the same. These steps can be applied either when creating or by modifying an existing storage resource.
Some limitations apply when creating the replication sessions. The replication session creates a storage resource with the same attributes on the destination as the source. Therefore, the name of the storage resource must not be used on destination. For example, it is not possible to create a replication session for a volume with the name Volume when a volume with the same name exists on the destination.
For volume groups configured with write-order consistency, all volumes inherit the protection policy as defined for the volume group. It is not possible to have individual policies set on different volumes. When a policy with replication is used for a volume group with write-order-consistency, only one replication session for the volume group is created. For volume groups without write-order consistency, members can have different protection policies that result in individual replication sessions. Setting a protection policy for a whole group when write-order consistency (WOC) is configured, is only possible when no individual volume has a protection policy assigned. Because the replication configuration can differ between WOC and non-WOC volume groups, there are also restrictions on changing this volume group attribute if the group or any members are protected.
New storage resource with policy for replication
To create a replication session for a new storage resource, begin with the creation process. To begin the process for volumes, select Storage > Volumes, and click CREATE (see Figure 33
Figure 33).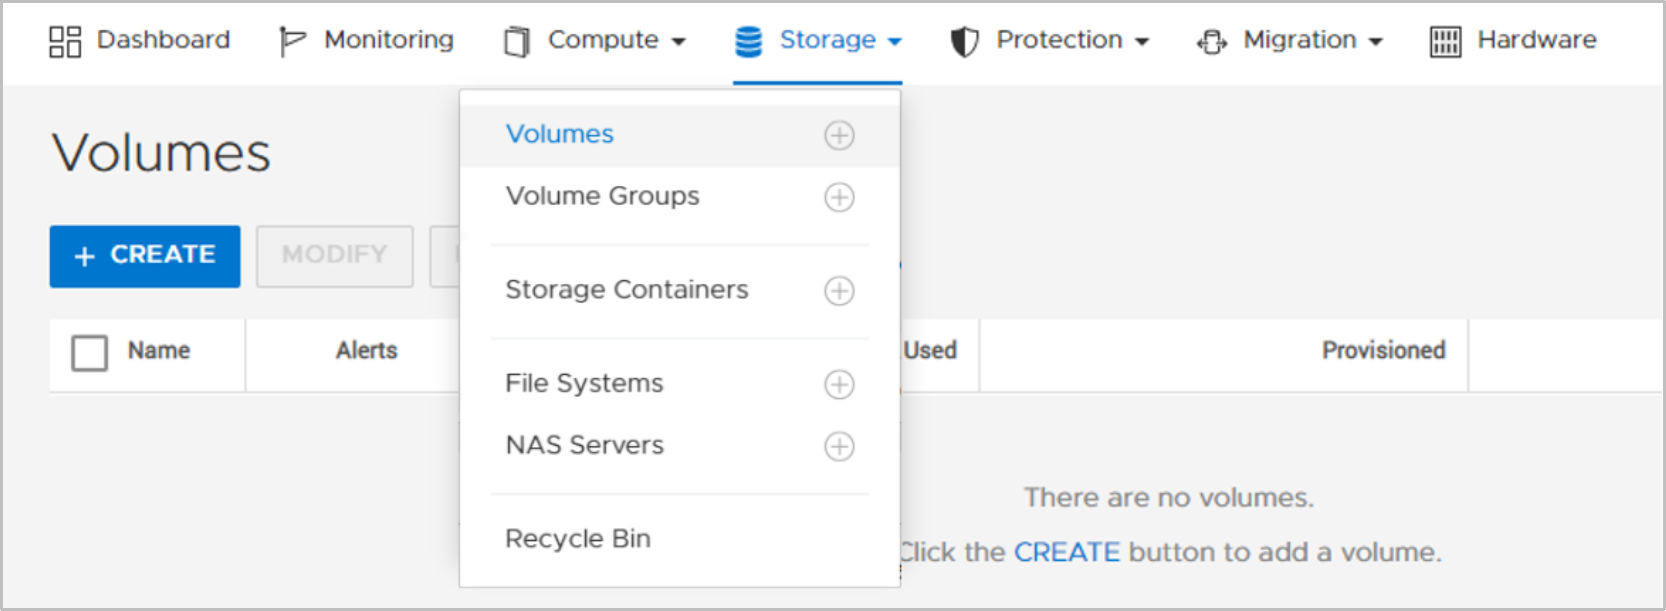
Figure 33. First step: Assign protection policy
In the Create Volumes window, enter the following information. Each number below corresponds with the number in Figure 34
Figure 34.- Name for the new Volume
- Application Category
- Application name or type
- Quantity of new volumes to be created
- Volume Size
- Protection Policy
To protect the new volumes with the protection policy, select the drop-down menu Volume Protection Policy (Optional). This menu shows all local available protection policies.
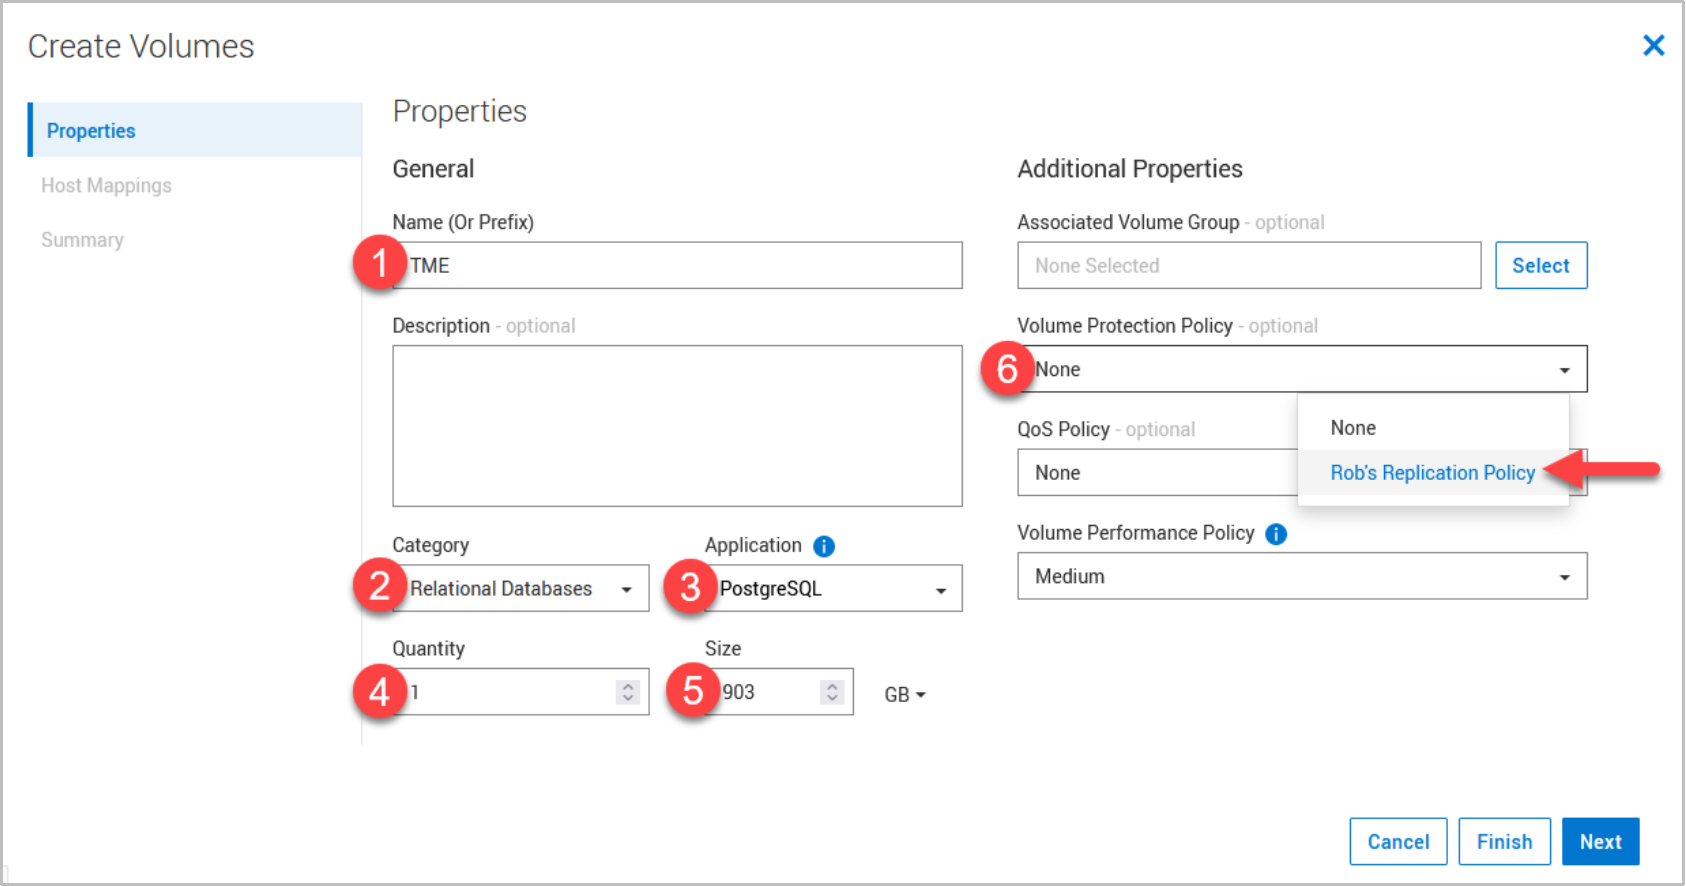
Figure 34. Second step: Assign protection policy
Complete the remaining steps to finish the configuration.
When a Volume Group with a protection policy and underlying replication rule is created, empty Volume Groups are created on the source and destination system before members are added. The members do not replicate until the next manual or RPO scheduled synchronization.
Protect existing storage resources
The following steps show how to assign a protection policy to an existing volume. The steps are similar for existing volume groups, thin clones, and NAS servers.
- Open the Storage Resource page where the volumes or volume groups are listed, and select one or more resources to which to assign the protection policy.
- Select PROTECT > Assign Protection Policy, as shown in Figure 35
Figure 35.
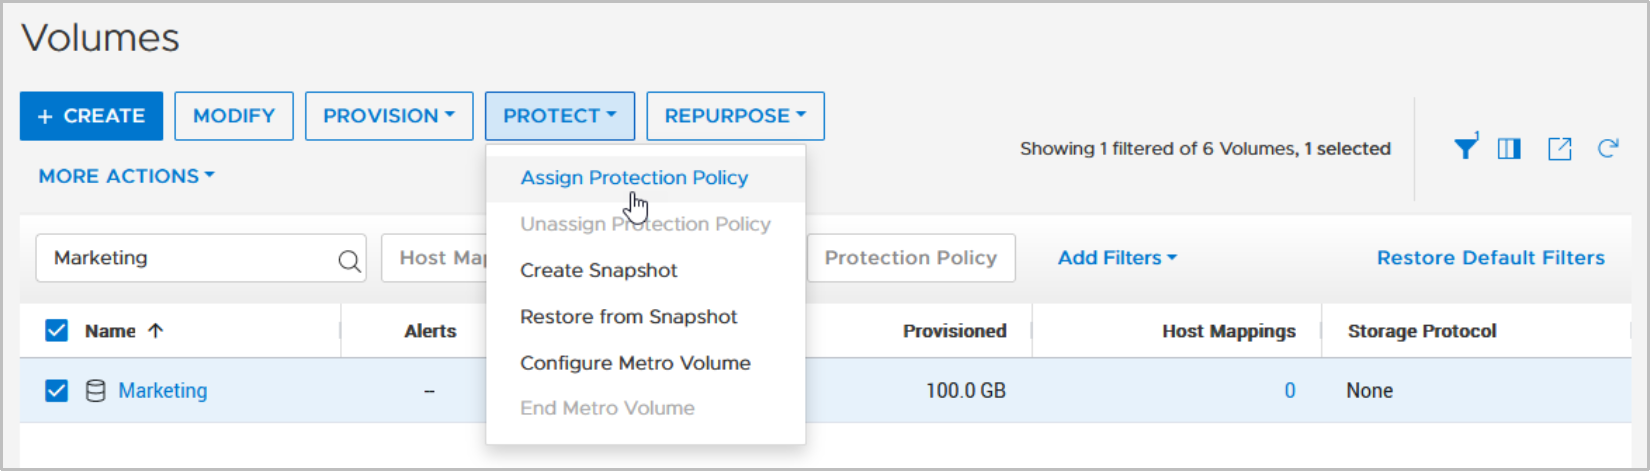
Figure 35. Assign protection policy to existing storage resource
- Select the appropriate protection policy and click Apply to apply it to the previously selected storage resources.
After the policy is applied, the initial synchronization starts immediately.
Viewing the replication sessions
All replication sessions on the system can be viewed from the Replication page. To view this page in PowerStore Manager, select Protection > Replication. Figure 36
Figure 36shows an example of the replication sessions overview with multiple replication sessions that are created on the system. This example shows the replication sessions for volumes and volume groups. A replicated thin clone is displayed in the same way as a volume. This page shows the information regarding each session and includes the following details:- Replication Session Status.
- Source System including the source system and the source storage resource.
- Destination System including the destination system name and the destination storage resource.
- Resource Type.
- Protection Policy.
- ETA (estimated time) when the current synchronization will be finished. The ETA displays “- -“ if an active sync is not occurring.
Only one session can be selected at a time. The state of the selected session determines which buttons above the table are available. When no session is selected, the buttons are unavailable. Figure 36
Figure 36shows the Replication page on the source system.The Replication page for the source resource shows the following buttons:
- PAUSE REPLICATION to pause the replication
- SYNCHRONIZE to initiate a manual replication between regular RPO cycles
- PLANNED FAILOVER to manually initiate a failover during a planned maintenance window
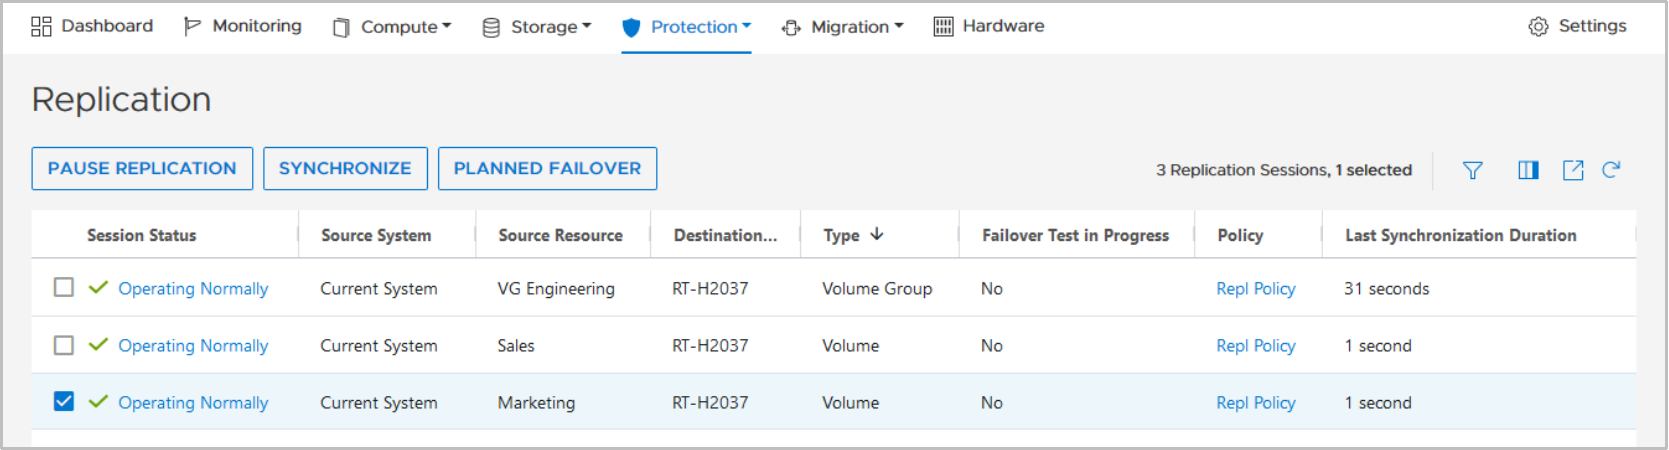
Figure 36. Replication window for block source resource
For file replication, the NAS server replication session is shown at the top level. You can expand the session by clicking the down arrow to the left of the session. Once the session is expanded, all underlying file system replication sessions for that NAS server are shown (Figure 37
Figure 37). The replication sessions for the file systems are disabled because file system replication sessions do not support individual management. All operations are performed at the NAS server level and are applied to every underlying file system replication session.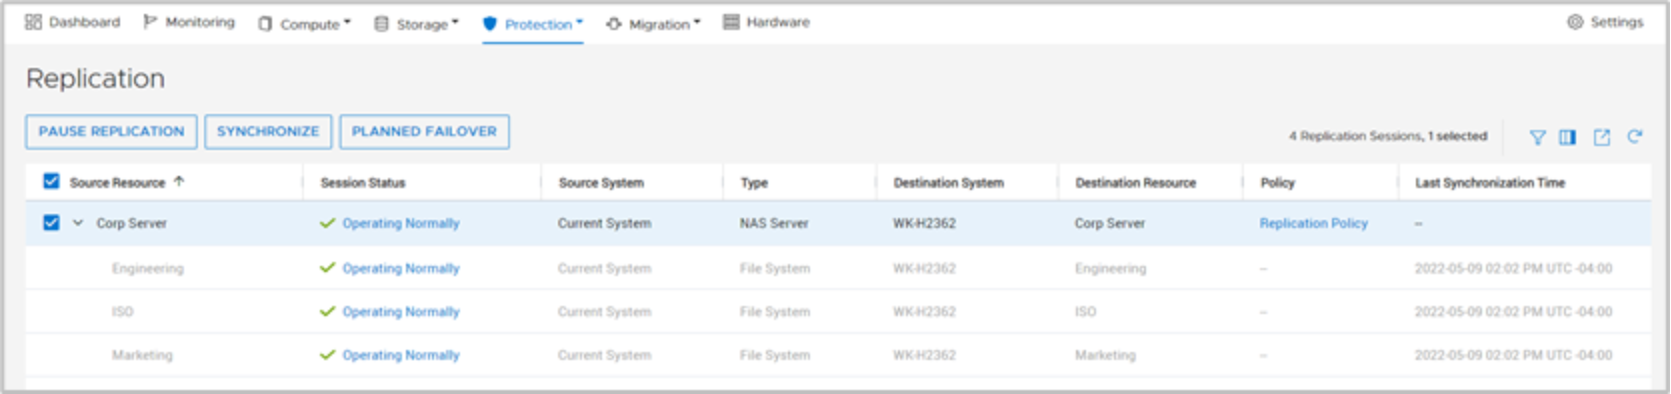
Figure 37. Replication window for NAS server and file systems
The Replication window for the destination resource shows different active buttons when a session is selected (Figure 38
Figure 38):- PAUSE to pause the replication.
- FAILOVER to start an unplanned failover.
- FAILOVER TEST to initiate a failover test for block storage resources.
The operation FAILOVER TEST is not supported for file resources and will not be shown when a NAS server is selected on the destination system.
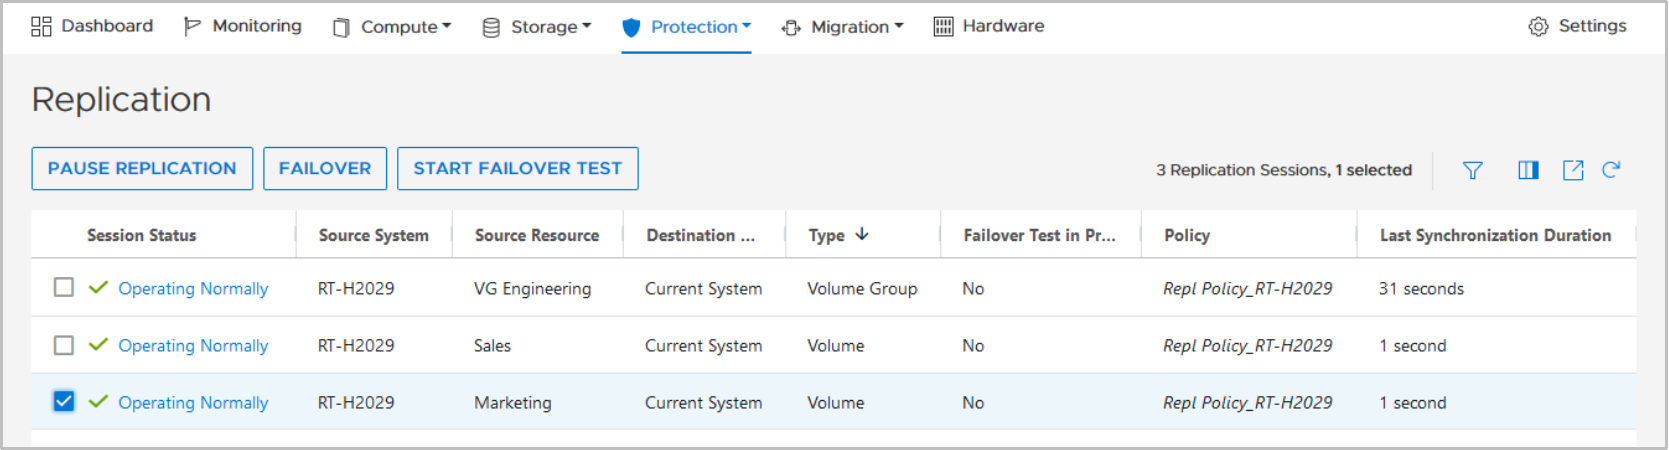
Figure 38. Replication window for destination resource
When you click Failover, a message is displayed to warn you that there is no final synchronization before the failover occurs. A planned failover must be run on the source if a final synchronization is needed.
For a more detailed view of the replication state, you can use the individual session states to view the selected replication session. This window displays a Session Summary, as shown in Figure 39
Figure 39. The local storage resource is always tagged with Current System.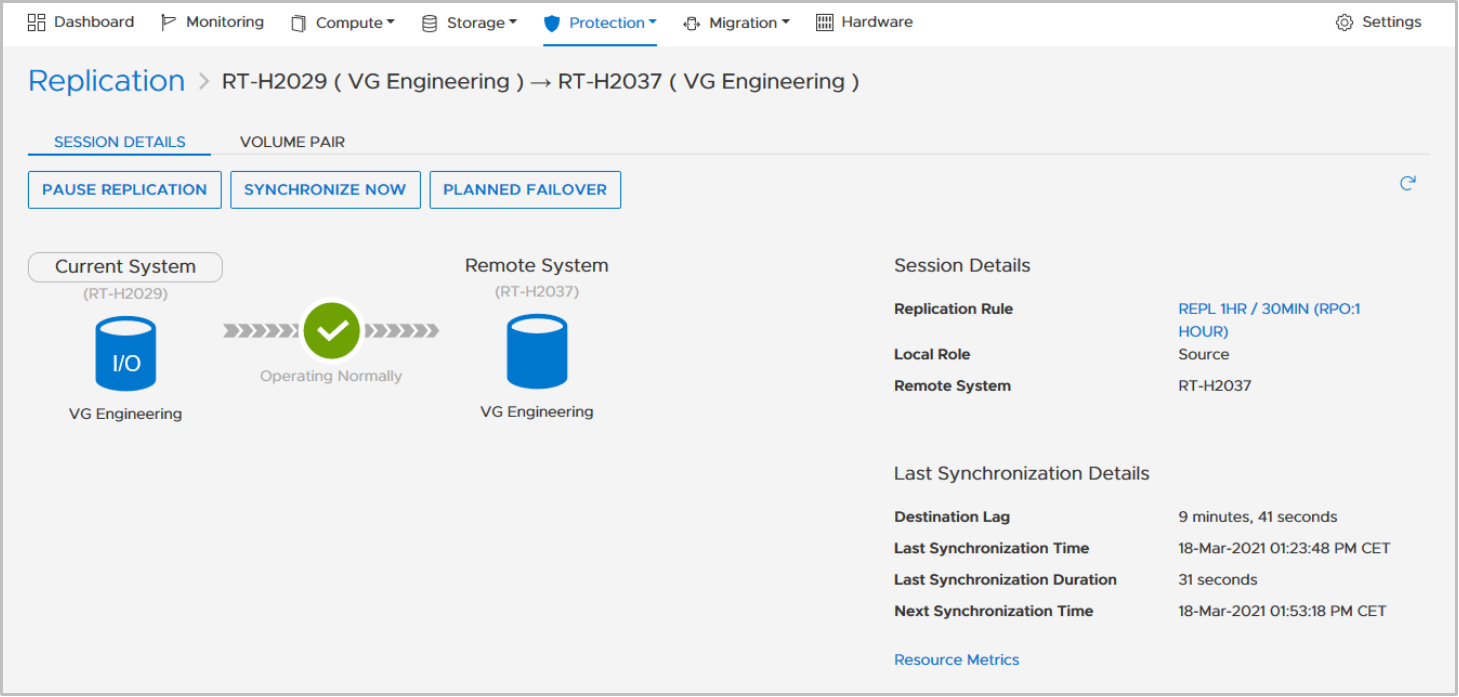
Figure 39. Replication Session Summary
When working in the volume or volume group properties pages, it is also possible to see and control the corresponding replication session. Figure 40
Figure 40shows the Volume Group replication page, which looks the same for a volume or a thin clone. To see the replication info, in the Storage Resource view, select the Protection tab, and then, as shown in Figure 40Figure 40, select the Replication tab.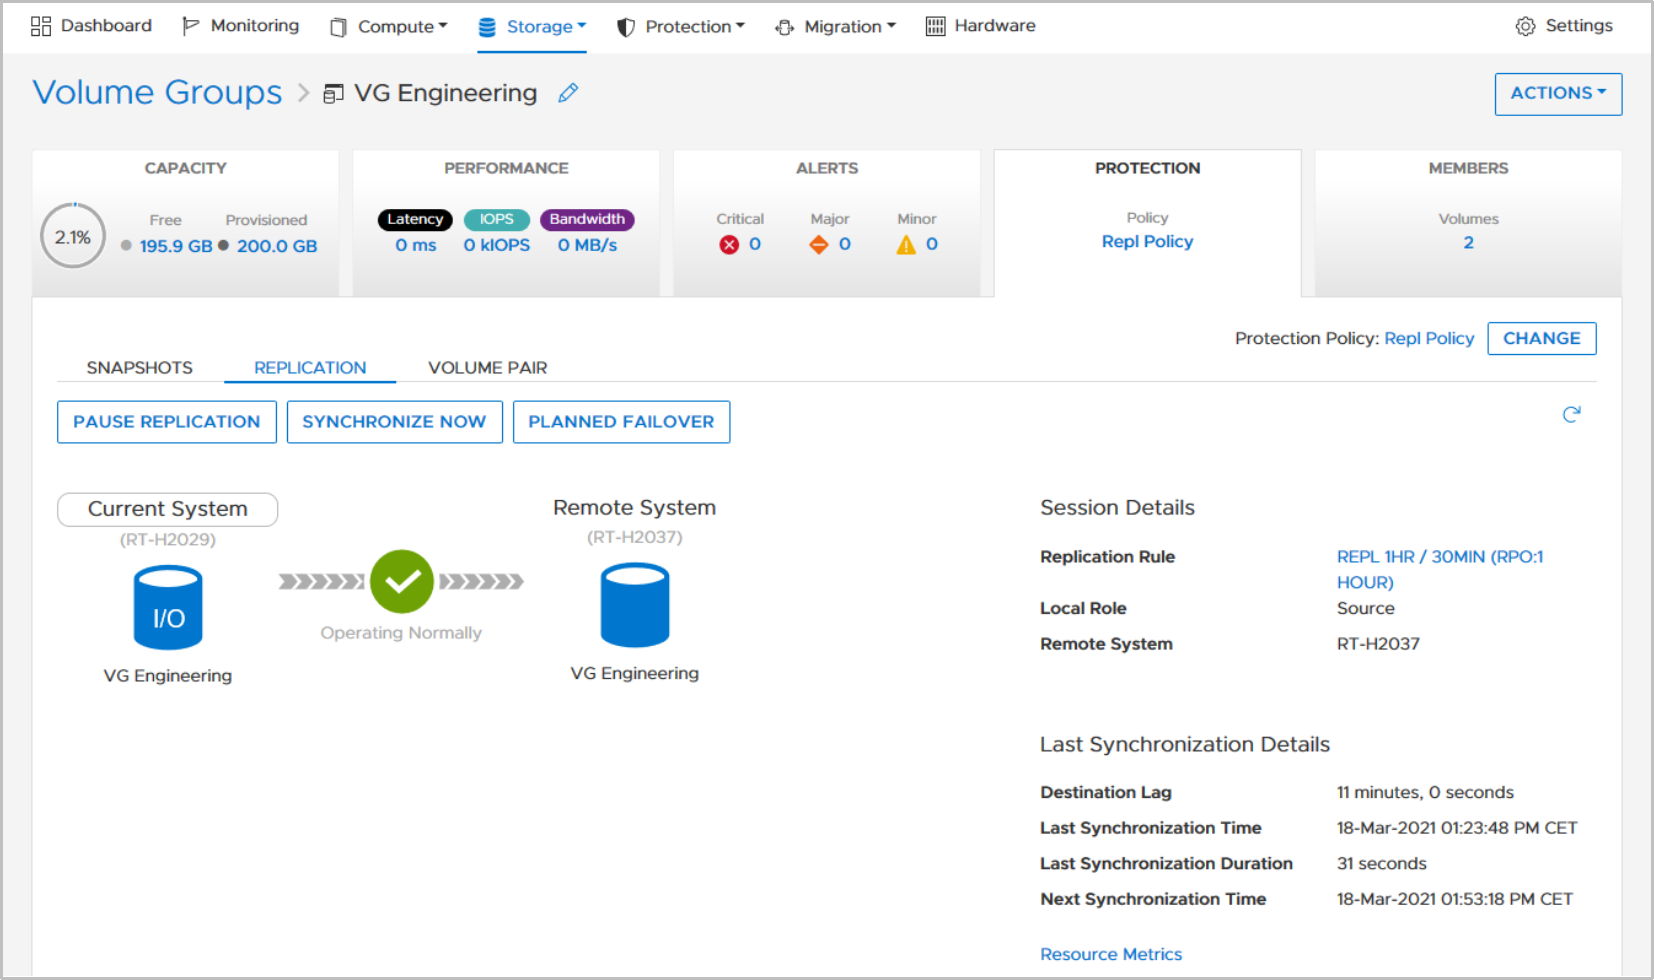
Figure 40. Volume Group details Storage Resource > Protection view
Besides the replication status, replication performance statistics are also available on the Performance tab (Figure 41
Figure 41) of the Storage Resource for volumes, volume groups, and thin clones. The following data is included:- Replication Remaining Data
- Replication Bandwidth (Normalized)
- Replication Transfer Time
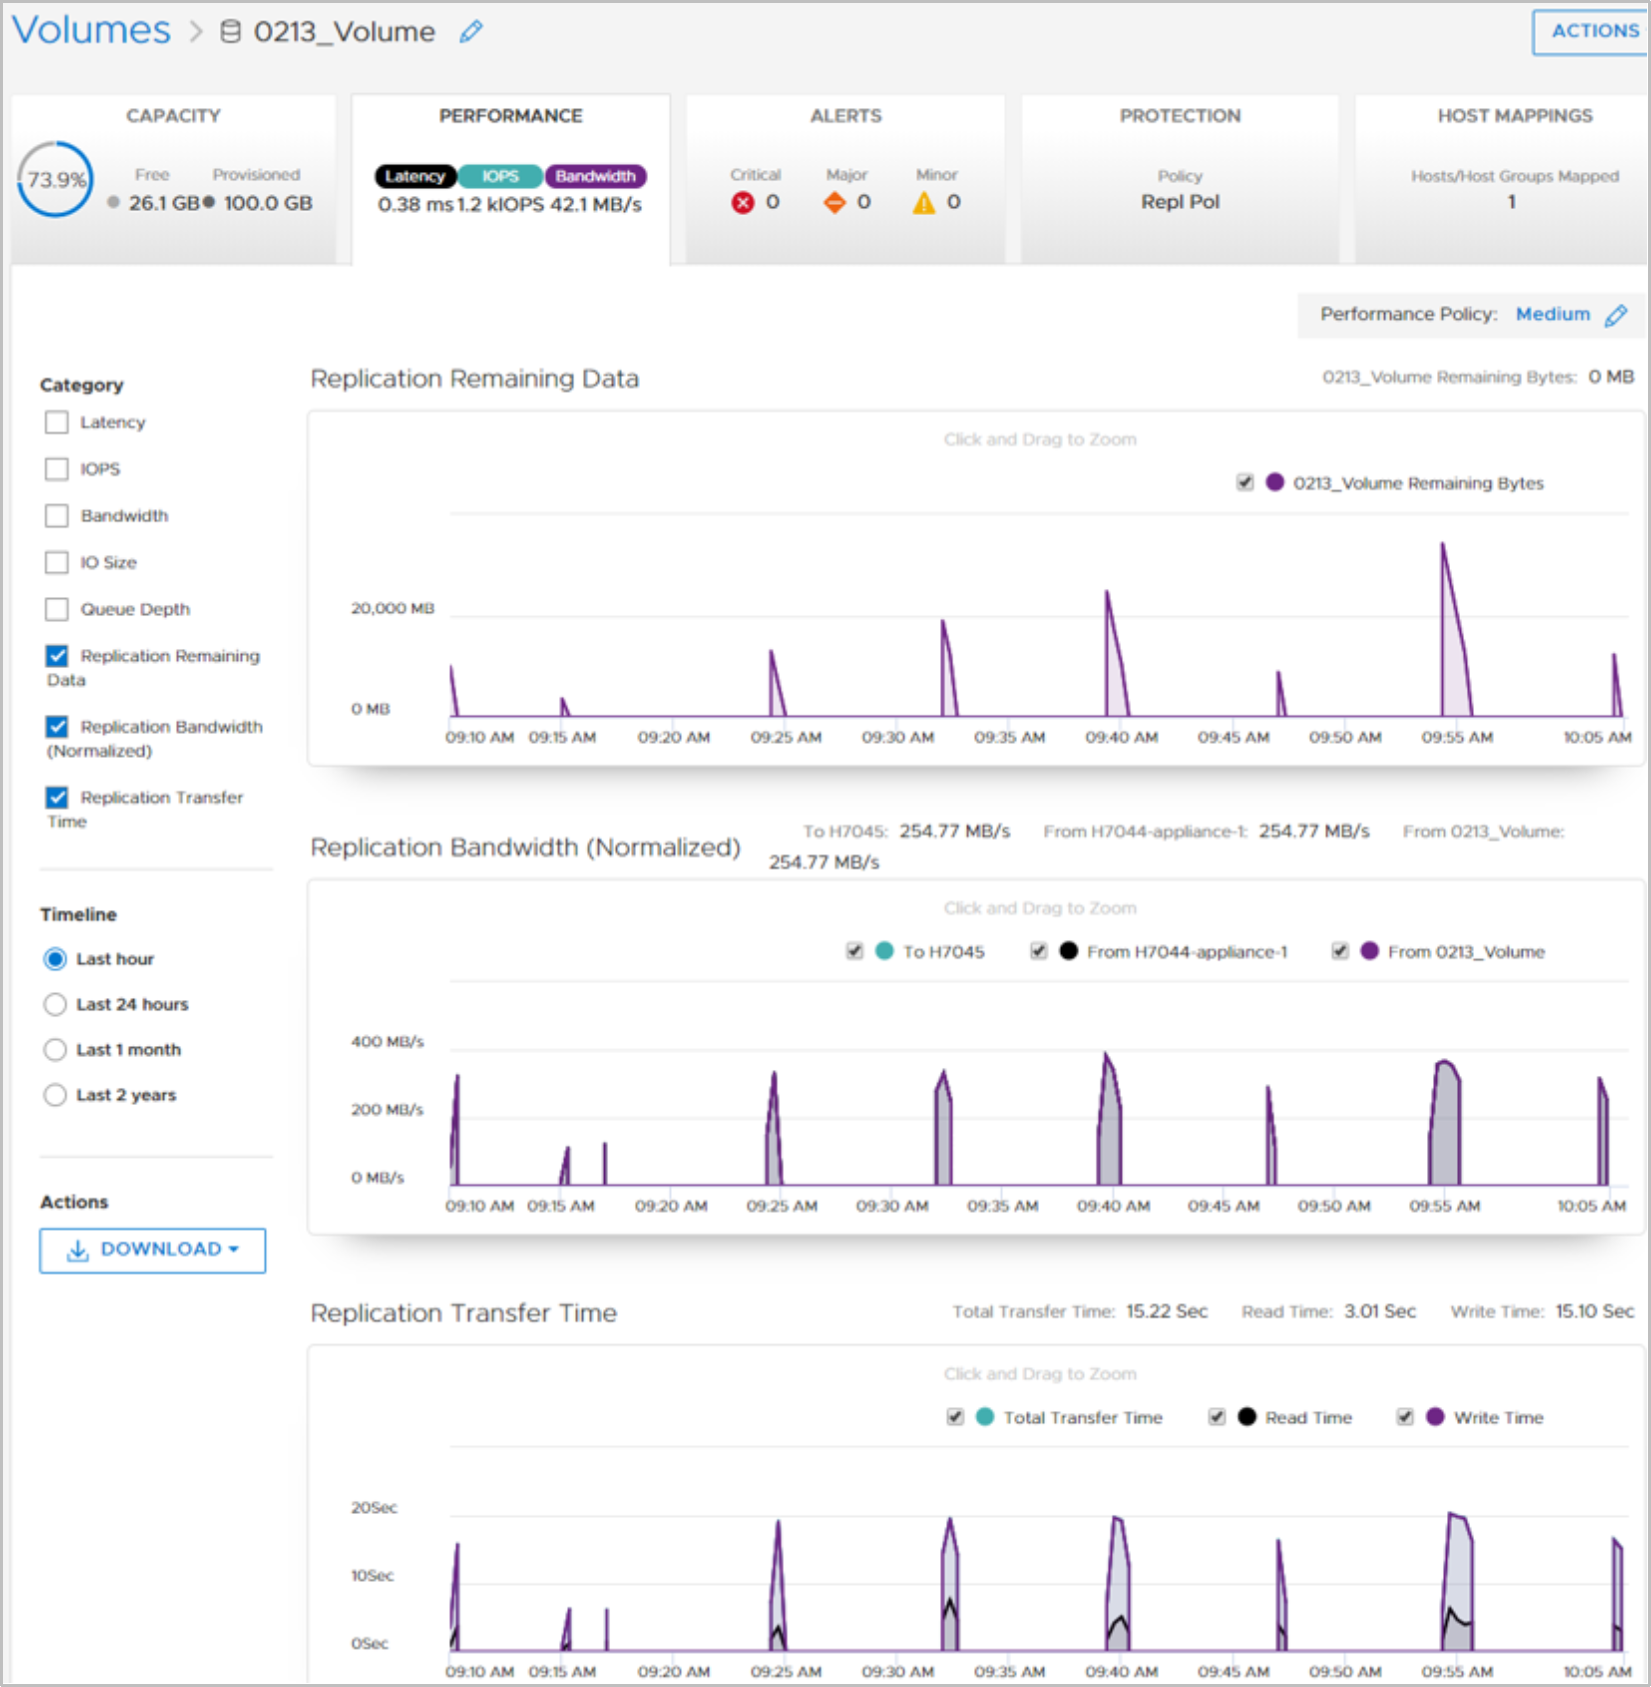
Figure 41. Replication performance view