
Universal agentless block import
Universal agentless block import
-
PowerStoreOS 4.0 added support for Universal storage systems to be imported via the agentless block import method, which does not require a host plug-in to be installed. The Universal system can either be a legacy Dell or third-party storage system. See the PowerStore Simple Support Matrix document for supported types of universal source systems. This import type requires a disruptive window as part of the host path flip to PowerStore. Minor manual configuration is required on the universal source storage system because there is no control path connection to the source system from PowerStore. The user will need to manually map and mask block resources from the source storage system to PowerStore. Resource names will also need to be defined during the import process since PowerStore only sees the WWN and resource size.
Agentless import requirements
The following requirements must be met before migrating to PowerStore:
- The universal source system must be in a good state and not running a software upgrade.
- The software or operating environment (OE) version for the universal source system must be supported.
- See the document Importing External Storage to PowerStore Guide on Dell.com/powerstoredocs.
- User needs to create a new host entry for the PowerStore on the source universal system. This is because universal import does not utilize a control path connection to the source system.
- Utilize either WWPNs for FC or iSCSI initiators for iSCSI.
- Add the volumes to this host entry that will be imported to PowerStore.
- Add initiators from all nodes and appliances of the PowerStore cluster to the host entry
- The host entry on the source system for PowerStore should have an OS type of Linux or an equivalent
- The volumes should be visible to all the initiators on the host, some array types offer an attribute that alters visibility of volumes to single path or multi-path
- The following front-end connectivity is required:
- Connectivity between the client and source system, and the client and PowerStore can be either iSCSI or Fibre Channel (FC). If the backend connection is FC, the frontend connection must also be FC. If the backend connection is iSCSI, the frontend connection can be either FC or iSCSI.
- For FC, zoning may be required.
- The following back-end connectivity is required:
- PowerStoreOS 4.0 supports either iSCSI or Fibre Channel (FC) for the data transfer between the universal source storage system and PowerStore.
- If the backend connection is FC, the frontend connection must also be FC. If the backend connection is iSCSI, the frontend connection can be either FC or iSCSI.
Agentless import workflow
This section describes a high-level overview of the agentless import workflow.
Step 1: Setup
Perform the following actions before importing storage resources:
- Configure FC or iSCSI front-end host connectivity to PowerStore
- Create a host entry for PowerStore on the universal source system and provide access to the volumes you wish to import to it
- Configure FC or iSCSI backend connectivity between universal source storage system and PowerStore
Step 2: Import
Complete the following steps to perform the import:
- Add the Universal source system to PowerStore and fetch the volumes (via iSCSI or FC)
- Create the import session by selecting the universal source system and clicking the Import Volume button which steps through the following:
- Select and name volume(s)
- Select the named volume(s) for import
- Add to volume group (optional)
- Map volumes to a PowerStore host
- Set schedule and choose the cutover method
- Assign protection policy (optional)
- Review and begin import
- When you click the Begin import button, the system takes the following actions:
- An import session is created. The state changes from In Progress to Ready to Enable Destination Volume with the source volume as read/write. The destination volume(s) are in a write disabled state but have been created on the PowerStore.
- Before you Enable Destination Volume, take the host application offline and unmount the source volume on the hosts. The user should also remove the mapping between the host and source system manually. The import operation is disruptive to the host I/O access.
- Select More Actions > Enable Destination Volume.
i Confirm that the host application has been stopped or taken offline.
ii The source volumes go into a read-only state.
iii Click the Enable Destination Volume button.
iv When the import session is in a Ready to Start Copy state
v Rescan the host to discover the destination volume and mount the destination volume on the host. The volume is now in a read/write state. Now the host I/O access is restored and the application can be brought online.
vi Select More Actions > “Start Copy”
vii A background copy of the data from the source system to the PowerStore system starts.
viii The import session state changes to Copy In Progress.
ix Any new writes are made to PowerStore and forwarded to the source system to ensure rollback.

Figure 10. Agentless import
Step 3: Cutover
A cutover is allowed when the import session is in a Ready to Cutover state (the universal source system and PowerStore are synchronized).
- The cutover operation finalizes the import process.
- If automatic cutover wasn’t selected, the user needs to select “Cutover” to complete the import operation.
- The background copy between the universal source system and PowerStore stops and forwarding of writes also stops
- When the cutover is complete, no rollback is possible
- The user should then remove the volume mappings to the PowerStore from the universal source system
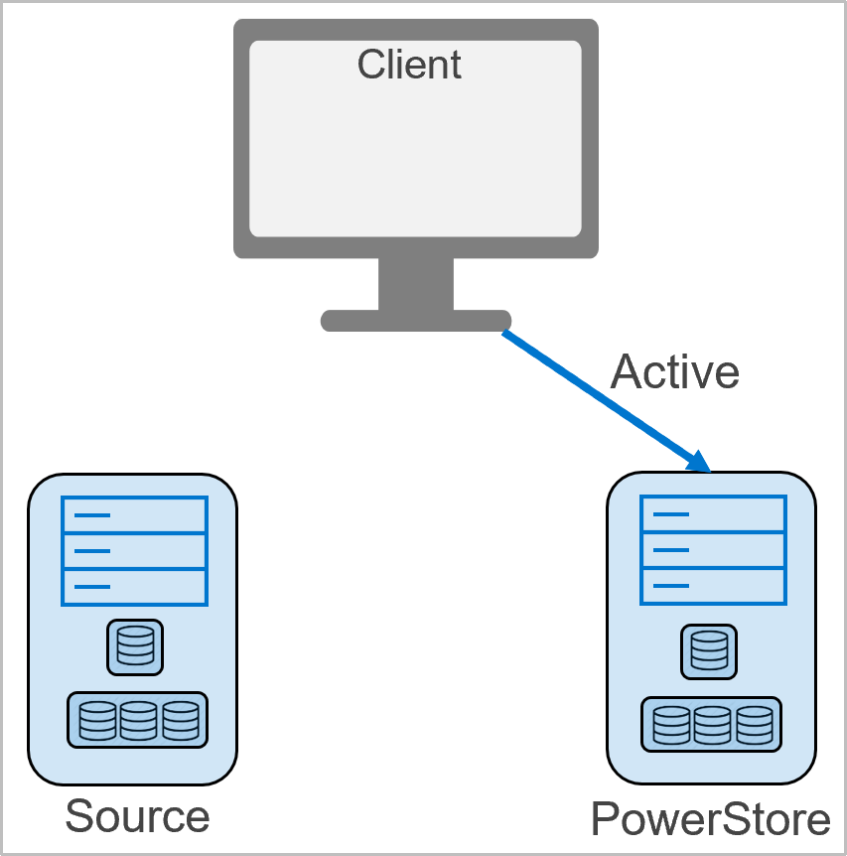
Figure 11. Agentless cutover