
Management
Management
-
You can manage the Import External Storage action from the PowerStore Manager UI, REST API, and PowerStore CLI (pstcli).
In PowerStore Manager, click Migration > Import External Storage (see the following figure).


Figure 14. Import External Storage
To add the source storage system as a remote system, click Add Remote System as shown in the following figure.
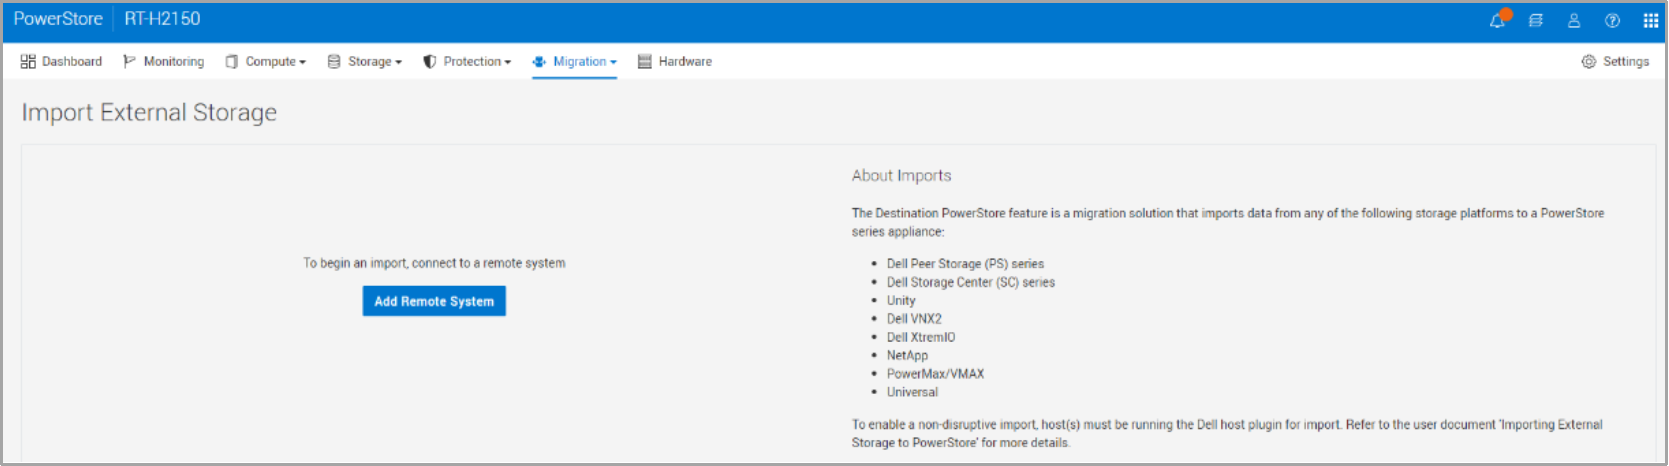
Figure 15. Import External Storage page
When adding the source array, Figure 16 shows an example of some of the fields that need to be entered.
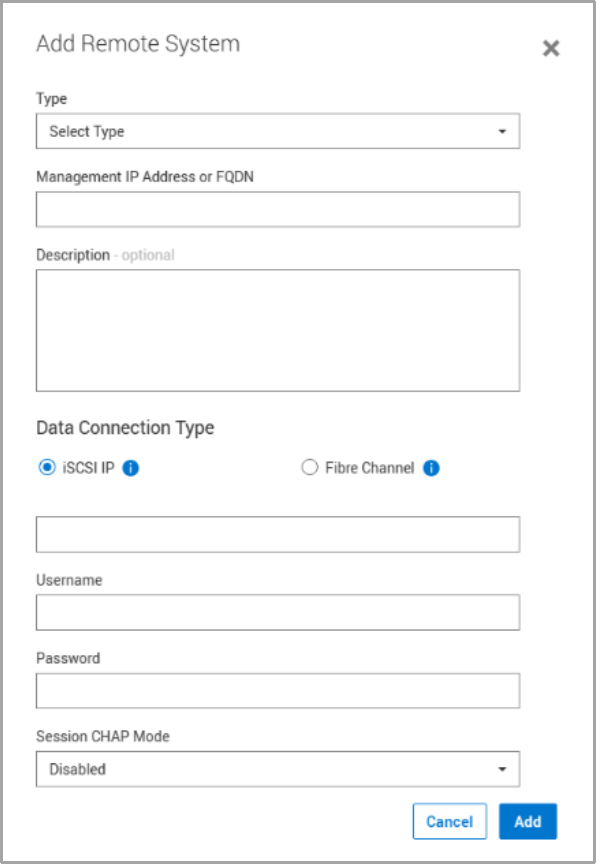
Figure 16. Add Remote System
The required and optional parameters for adding a source array vary depending on the source system, as shown in the following table.
Table 5. Parameters per source system
Source system type
Parameters
Universal
Name
Management IP Address or FQDN
Description (Optional)
Data Connection Type
- iSCSI IP addresses (Enter iSCSI IP)
- Fibre Channel (FC) (Select Target WWN)
Discovery CHAP Mode (optional, if using iSCSI)
Session CHAP Mode (optional, if using iSCSI)
PS Series
Group management IP address
Description (optional)
Data Connection Type
- iSCSI IP address
Management credentials (username and password)
Discovery CHAP mode (optional)
Session CHAP mode (optional)
SC Series
Management IP address
Description (optional)
Data Connection Type
- iSCSI fault domain IP address or
- Fibre Channel (FC)
Management credentials (username and password)
Session CHAP mode (optional)
Dell Unity
Capability
- Block
- Unified
Management IP address (Dell Unisphere IP address)
Description (optional)
Data Connection Type
- iSCSI interface IP addresses or
- Fibre Channel (FC)
Management credentials (username and password)
Session CHAP mode (optional)
Service Account Username (Unified)
Service Account Password (Unified)
VNX2
Capability
- Block
- File
- Unified
Block and Unified parameters
SPA or SPB IP address or FQDN
Description (optional)
Data Connection Type
- iSCSI IP addresses
- Fibre Channel
Management credentials (username and password)
Session CHAP mode (optional)
File and Unified parameters
File Connection Address (Control Station IP Address)
Description (Optional)
File Admin Username
File Admin Password
XtremIO
Cluster Name
Management IP address or FQDN
Description (Optional)
Data Connection Type
- iSCSI IP addresses
- Fibre Channel (FC)
Management credentials (username and password)
Discovery CHAP mode (optional)
Session CHAP mode (optional)
NetApp
SVM Name (NetApp Storage Virtual Machine)
Management IP address or FQDN
Description (Optional)
Data Connection Type
- iSCSI IP addresses
- Fibre Channel
Management credentials (username and password)
Session CHAP mode (optional)
PowerMax
VMAX
Name
Management IP address or FQDN
Port
Description (Optional)
Data Connection Type
- Fibre Channel (FC)
Management credentials (username and password)
The following pages are under Import External Storage as shown in the following figure:
- Remote Systems
- List of all the remote systems for block and file imports
- Block Hosts
- Applies to non-disruptive imports
- Hosts with the host plug-in installed
- Block Imports
- Lists of import sessions for block resources
- File Imports
- Lists of import sessions for file resources
- File Import Interface
- Interfaces to be used by file import
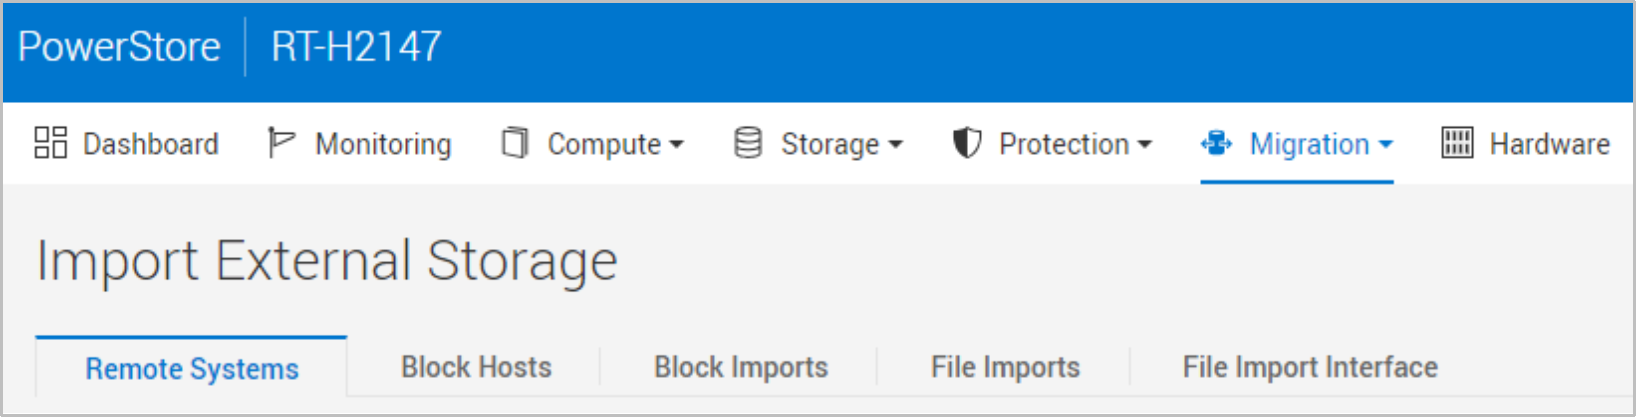
Figure 17. Import External Storage tabs
When you add the source system, you can import storage resources by selecting the source system and clicking Import Volume or Import NAS Server, depending on the resource to be imported (see Figure 18).
Import Volume
The following steps show the workflow of importing block resources. Once a source system is selected, click Import Volume.
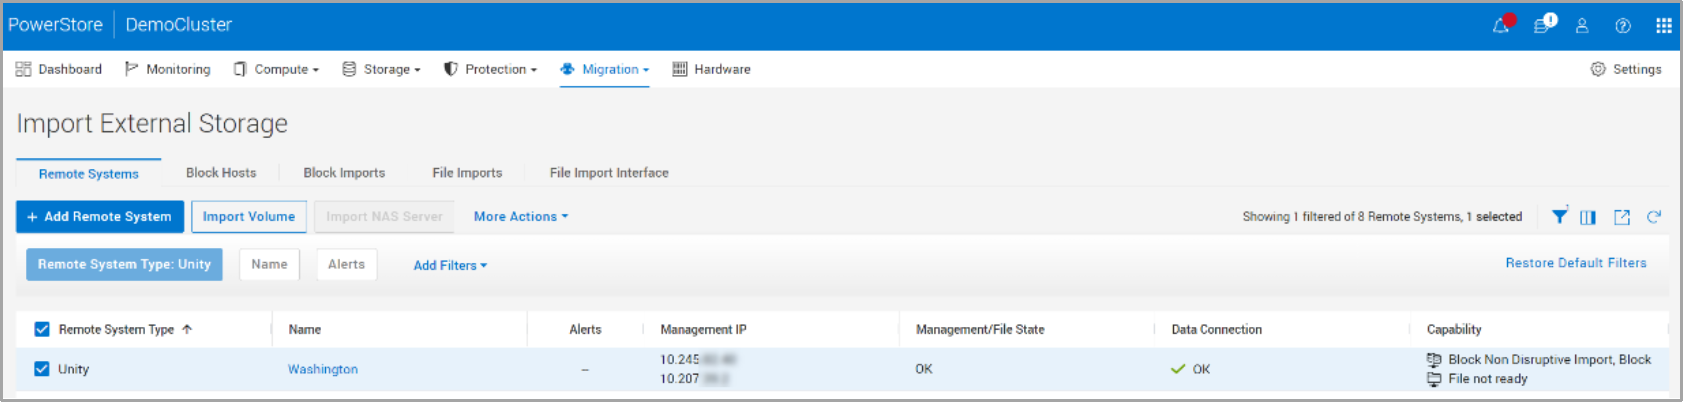
Figure 18. Import Volume
The following figure shows the Import Volumes from Source Array wizard.
In the Overview step, review the description for the two types of imports and click Next.
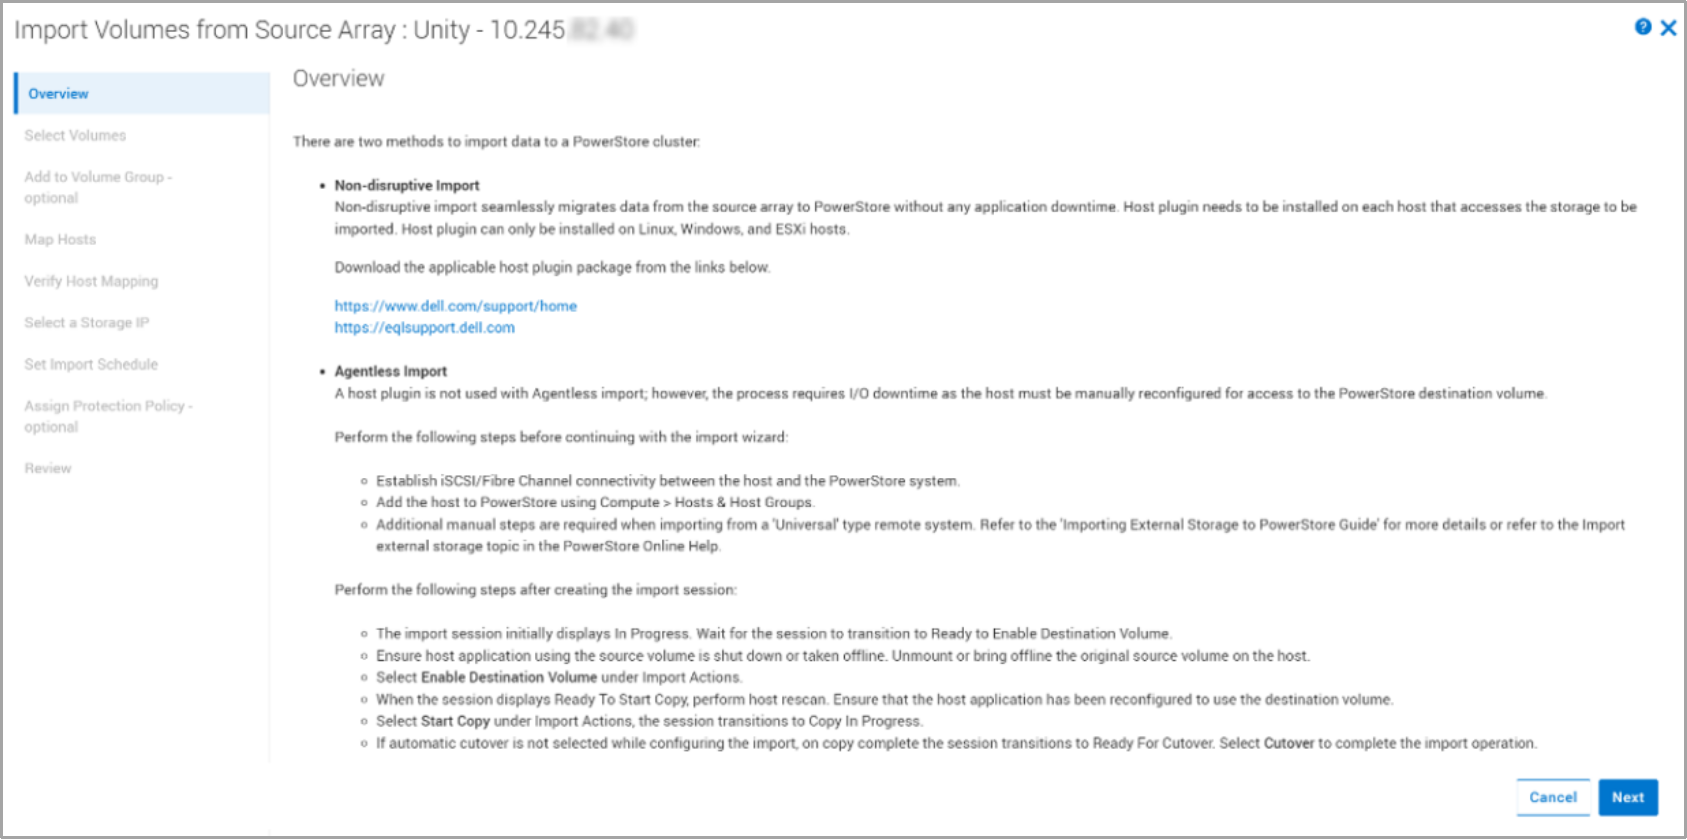
Figure 19. Overview step
In the Select Volumes step, select the source resources to import.
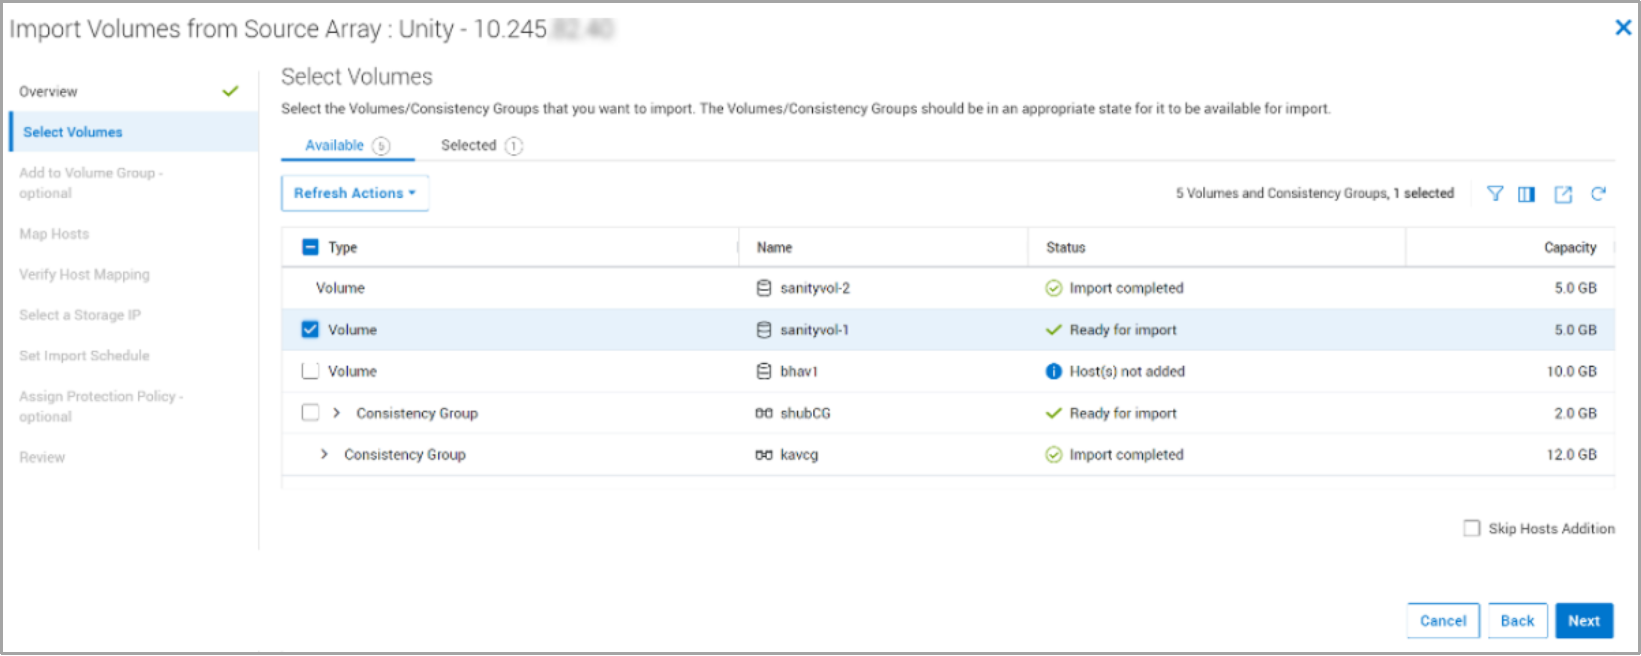
Figure 20. Select Volumes step
In the same step, as shown in the following figure, you can refresh the status of hosts (for non-disruptive import) and the volumes to reflect any recent changes. These changes could include the addition of new volumes in the source or the change in the mapping to the hosts.
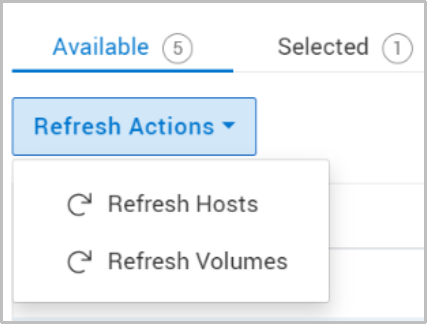
Figure 21. Refresh Actions under the Select Volumes step
In the Add to Volume Group (Optional) step, you can add the selected source resources into a PowerStore volume group as shown in the following figure.
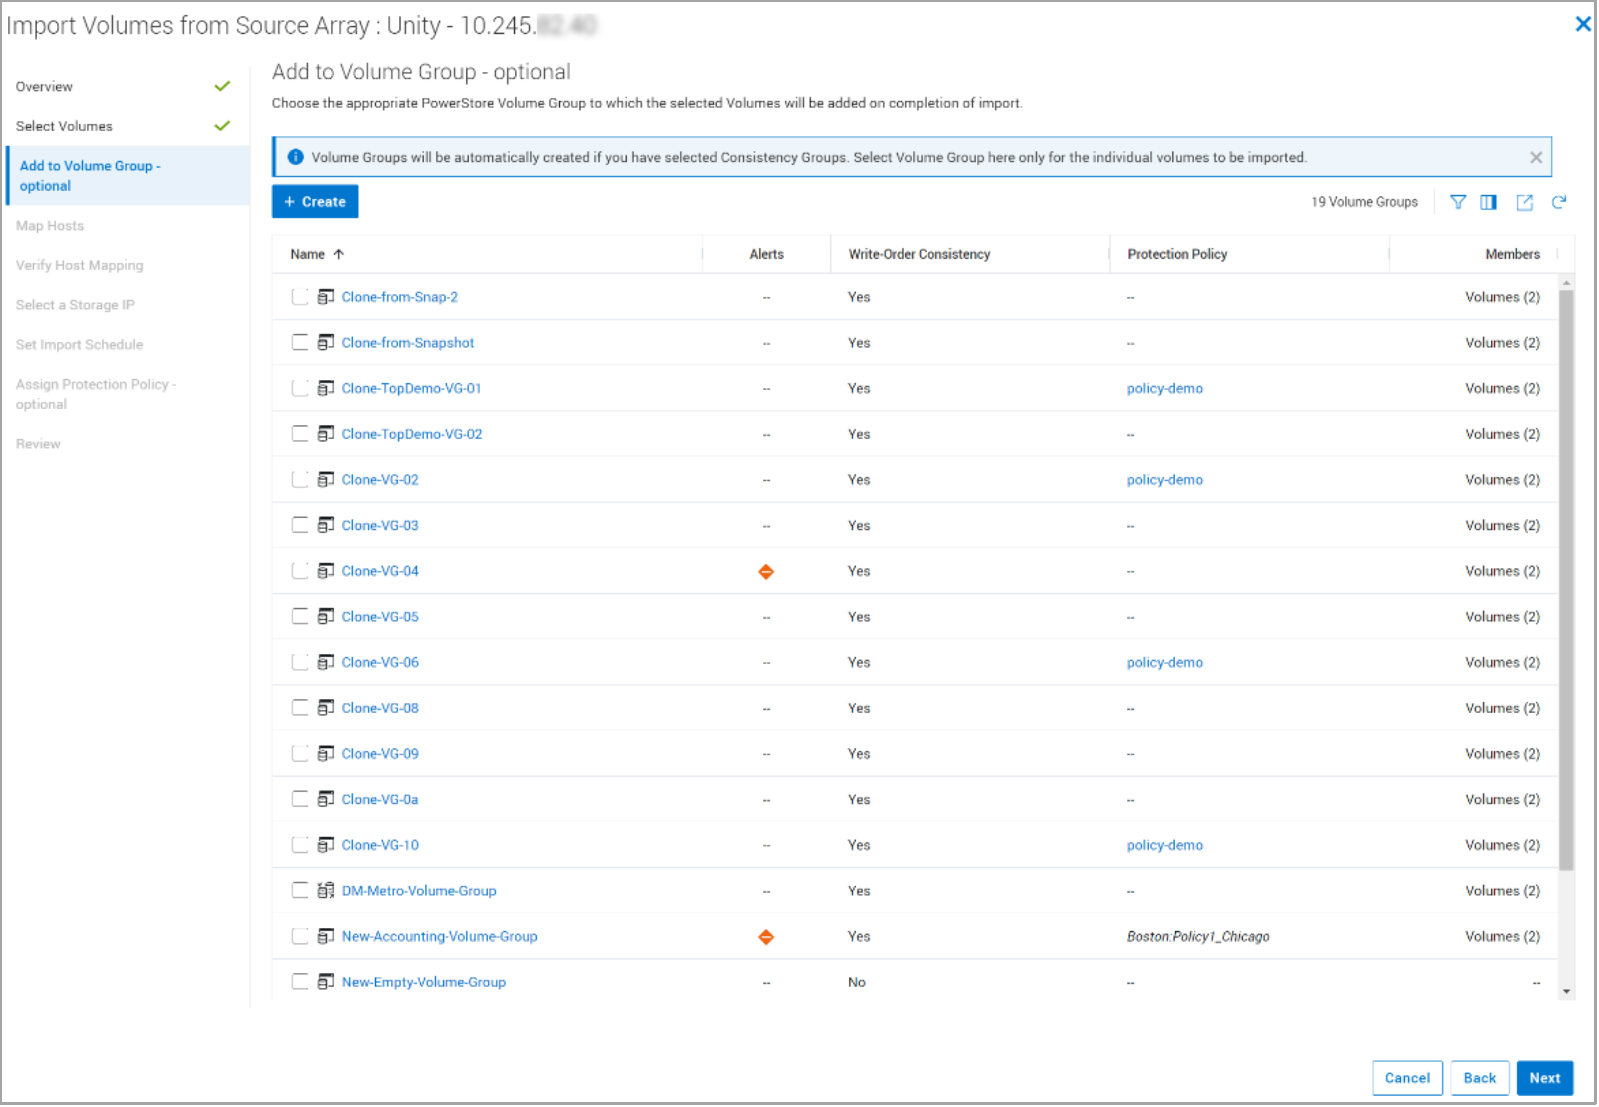
Figure 22. Add to Volume Group (Optional) step
In the Map Hosts step, use the Add hosts (with Host Plugin configured) for non-disruptive import option to add the clients in which the host plug-in has been installed and configured.
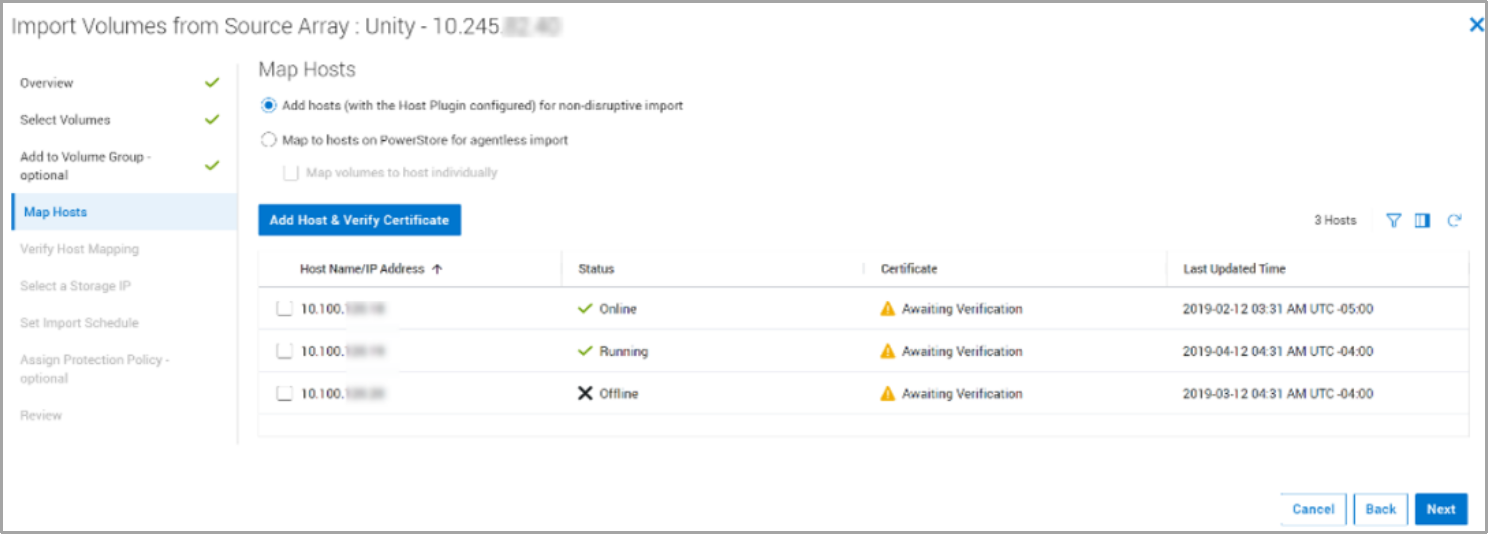
Figure 23. Map Hosts step: Non-disruptive import
When adding the clients as host, you must provide the client IP address, the port that was configured to be used for the import, and the operating system (OS) type.

Figure 24. Add Hosts side panel
When the hosts are added, the system verifies the mapping of the hosts to the selected source resources, as shown in the following figure.
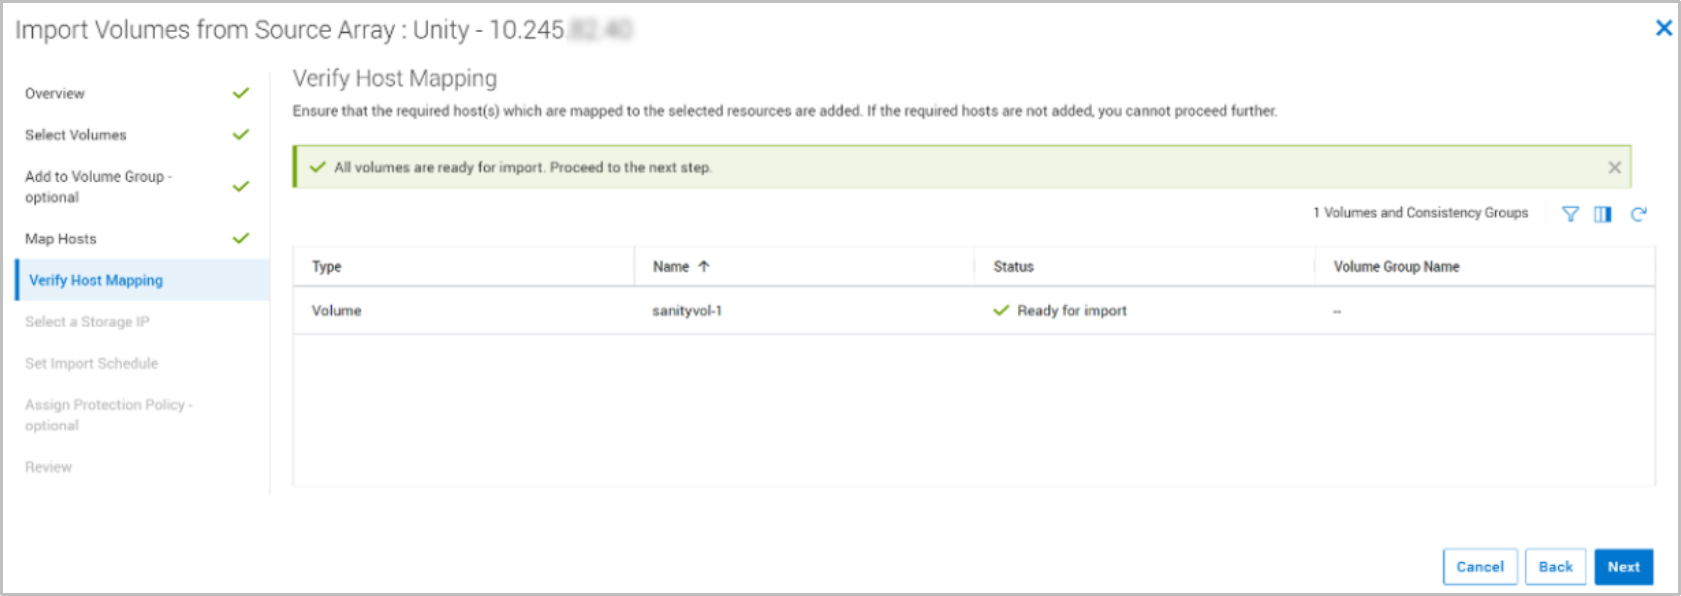
Figure 25. Verify Host Mapping step
In the Map Hosts step, with the Map to hosts on PowerStore for agentless import option you can map the resources to be imported to hosts already added to the PowerStore.

Figure 26. Map Hosts step – Agentless import
In the Set Import Schedule step (Figure 27), you can choose to start the import immediately or at a specific date and time, or you can choose automatic cutover.
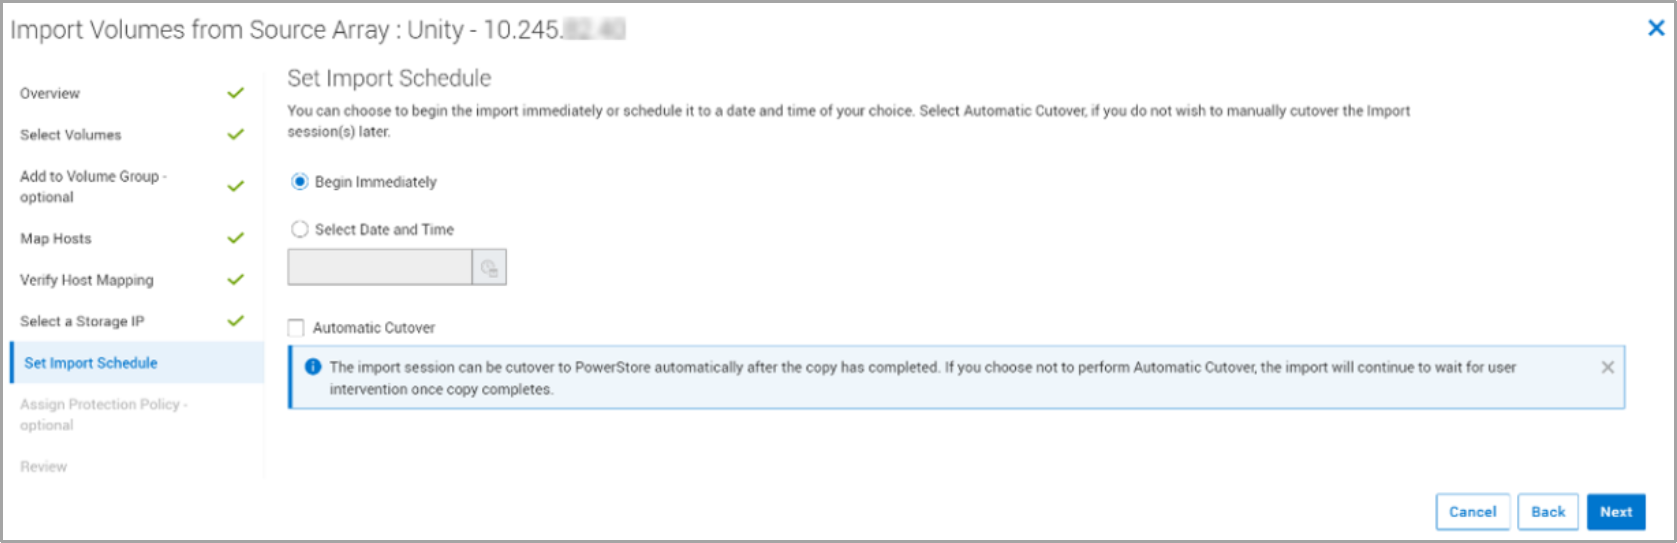
Figure 27. Set Import Schedule step
In the Assign Protection Policy step (Figure 28), you can apply a protection policy to the storage resource once it is in PowerStore.
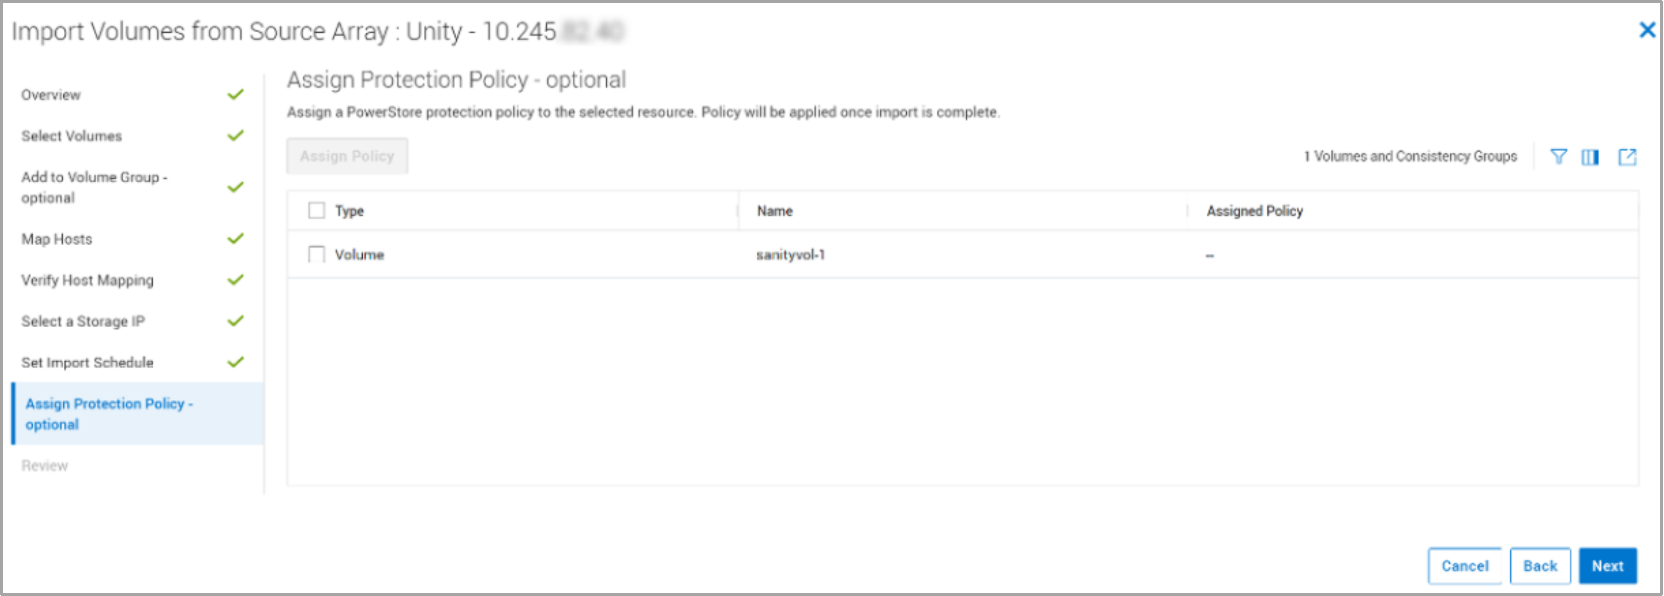
Figure 28. Assign Protection Policy step
The Review step shows a summary of all the options that are selected and provides the option to view the assigned policies in the source system.

Figure 29. Review step
The Source Array Assigned Policies tab shows the source system’s protection policies applied on the resources that are to be imported. The protection policies shown would not be imported but the user can export them as a CSV or XLSX file for reference as shown below.
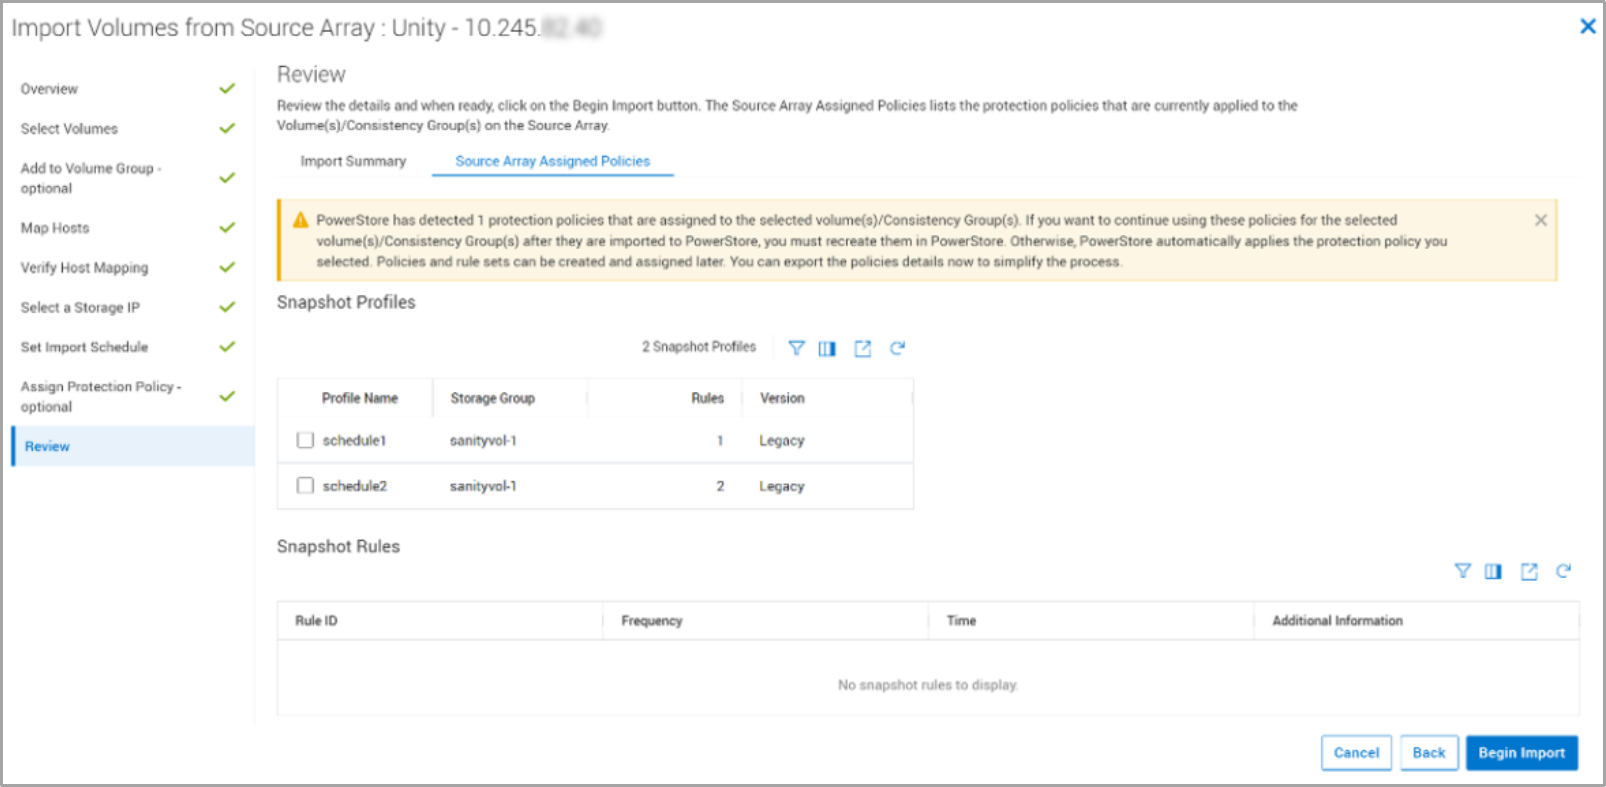
Figure 30. Source Array Assigned Policies tab
When a storage resource is set to be imported, click the Begin Import, as shown in Figure 30, to create an import session. The import session enables managing and monitoring the life cycle of the import.
The following table shows the actions that are allowed in an import session. Actions are enabled depending on their current state.
Table 6. Import actions
Action
Description
Cancel
- Cancels import session and goes back to source
- Terminates a session that has not been cutover
- Disables access to the destination volume
- Deletes the destination volume or volume group associated with the import session
Cutover
- Cuts over the resource in PowerStore
- Stops background copy and removes host mappings from source
Note: After a cutover has been completed, it cannot be canceled and it is not possible to revert to the source resource.
Pause
- Suspends a copy-in-progress import session
- Only pauses the background copy; host I/O is still mirrored
Resume
- Resumes a paused session
- Starts the background copy again from where it was paused and continues the host I/O mirroring
Cleanup
- Removes an import session in clean-up-required state
- Removes an import session that had a failure
Actions applicable to agentless import
Enable Destination Volume
Note: Before you select this action, ensure the host application accessing the source volume or volumes is shut down. Also, ensure the host mappings are removed from the volume or volumes in the source system.
- Enables destination resource for writes
- Connectivity with the source system goes into inactive state
For each import session that is in the Ready To Enable Destination Volume state, select the import session, and select Import Actions > Enable Destination Volume to progress each import session to the Ready to Start Copy state.
Start Copy
Note: Ensure the host application is reconfigured to access and use the destination volume or volumes in PowerStore.
- Starts the background copy and continues the host I/O mirroring
For each import session that is in the Ready to Start Copy state, select the import session, and select Import Actions > Start Copy to progress each import session to the Copy In Progress state
When an import session is in the state Copy In Progress, click the State column to view more details about the import session.
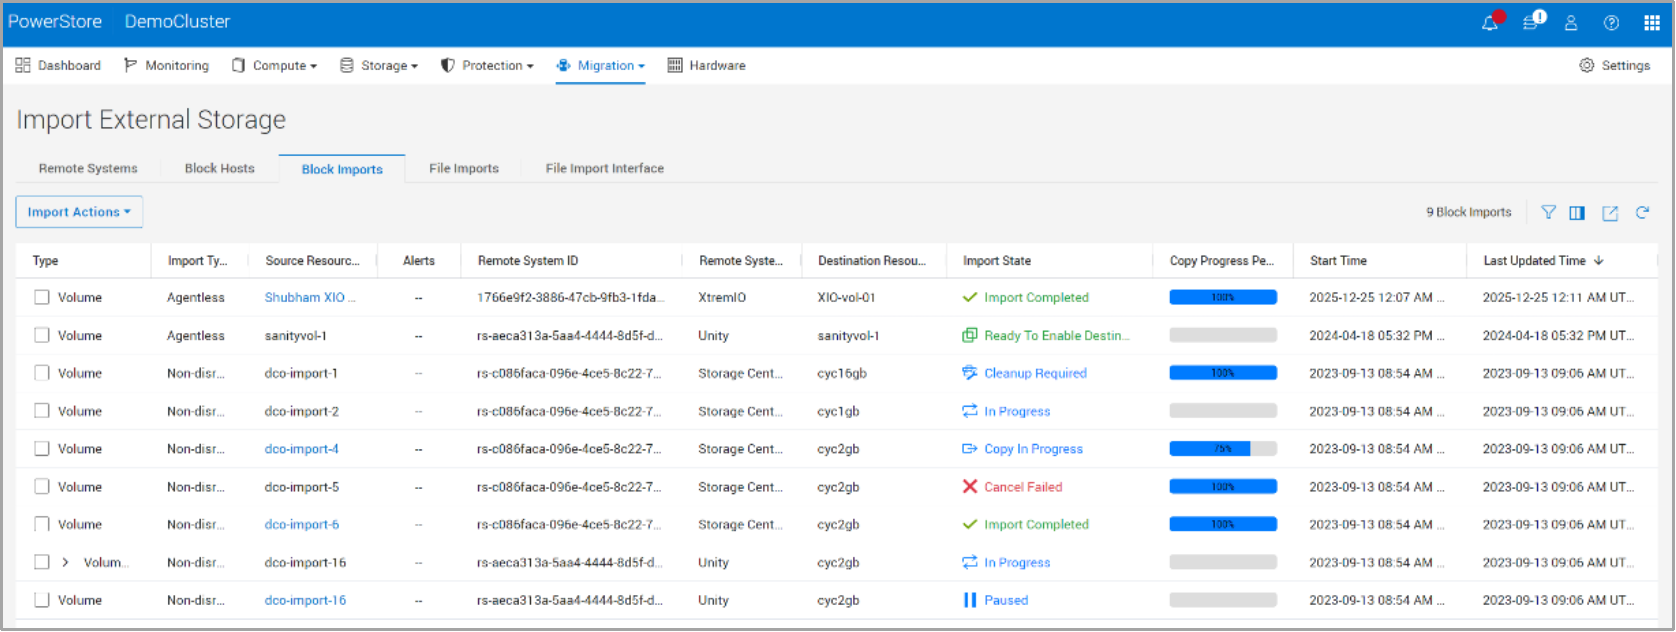
Figure 31. Copy in Progress import session
Click Copy In Progress in the Import State column to see the details, as shown in the following figure. The details window shows the import progress and lists the percentages of the completed data and remaining data to be imported.
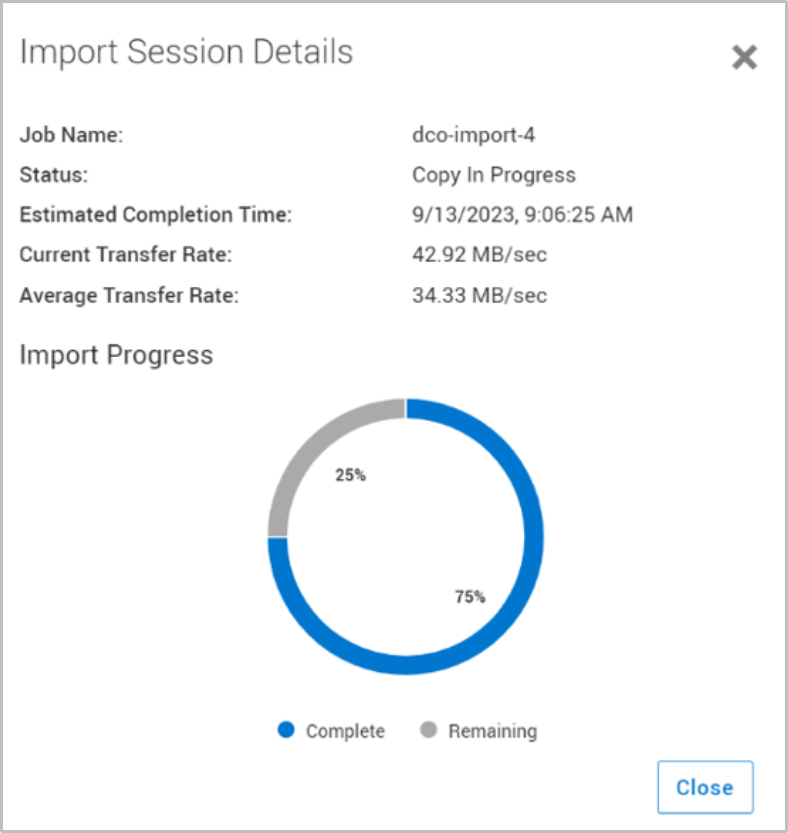
Figure 32. Import Session Details window
The following figure shows the actions available for an import session in the Copy In Progress state.
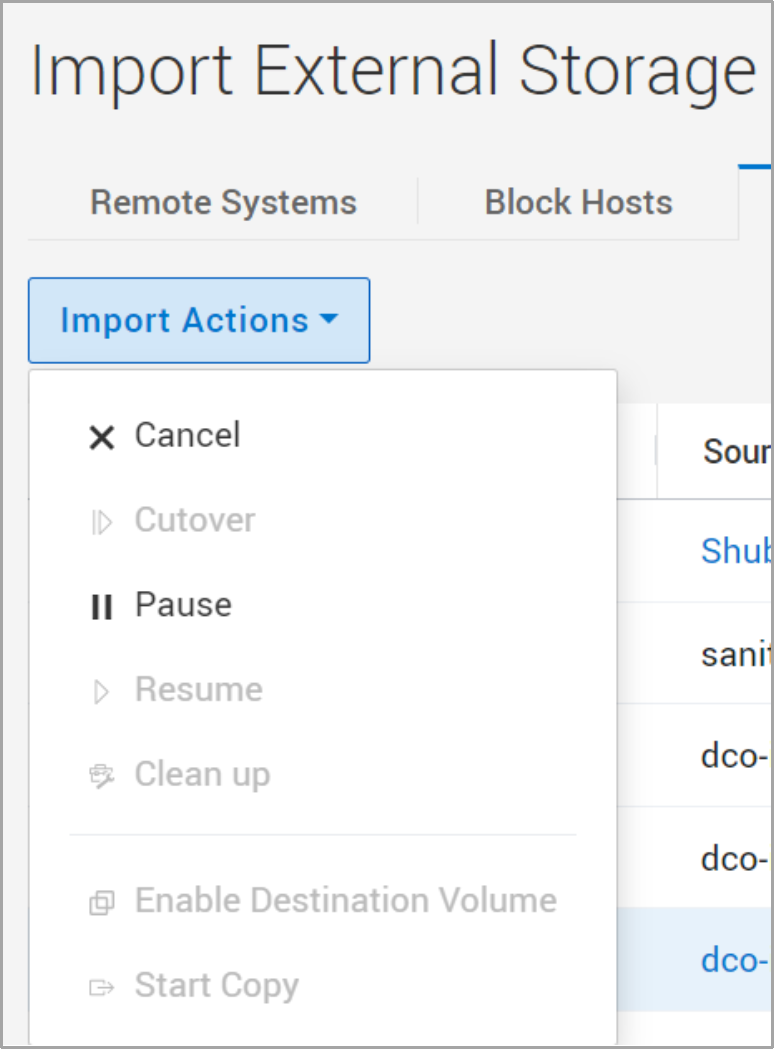
Figure 33. Import Actions menu
Import NAS Server
The following steps show the workflow of importing file resources. Once a source system is selected, select the Import NAS Server button.
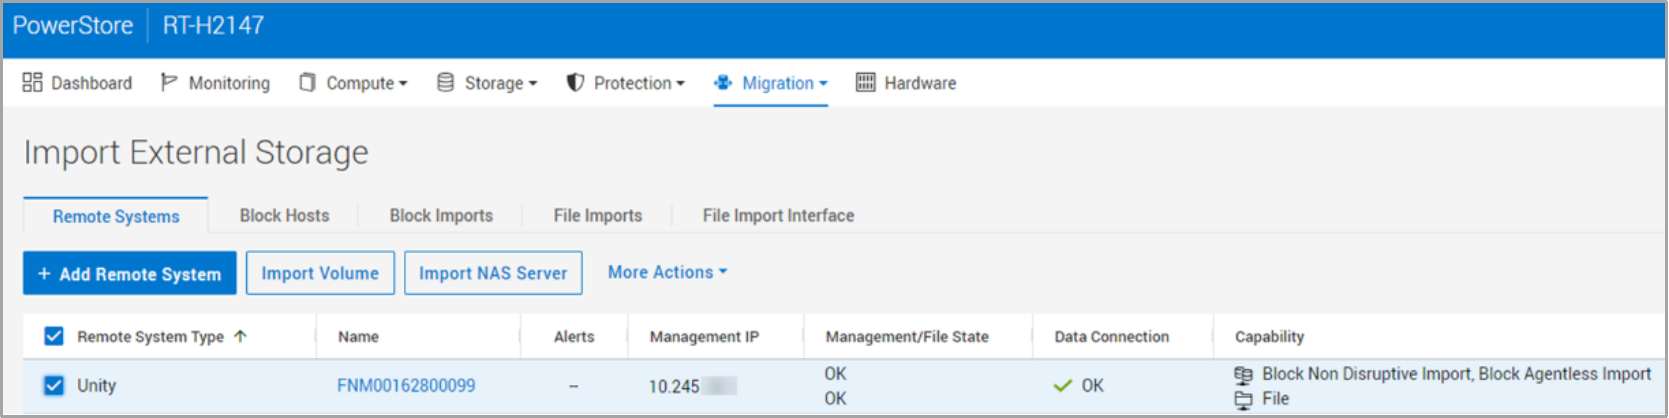
Figure 34. Import NAS Server
Figure 35 shows the Import NAS Servers from Source Array wizard.
In the Select NAS Servers step, select the source resource to import and click Next.
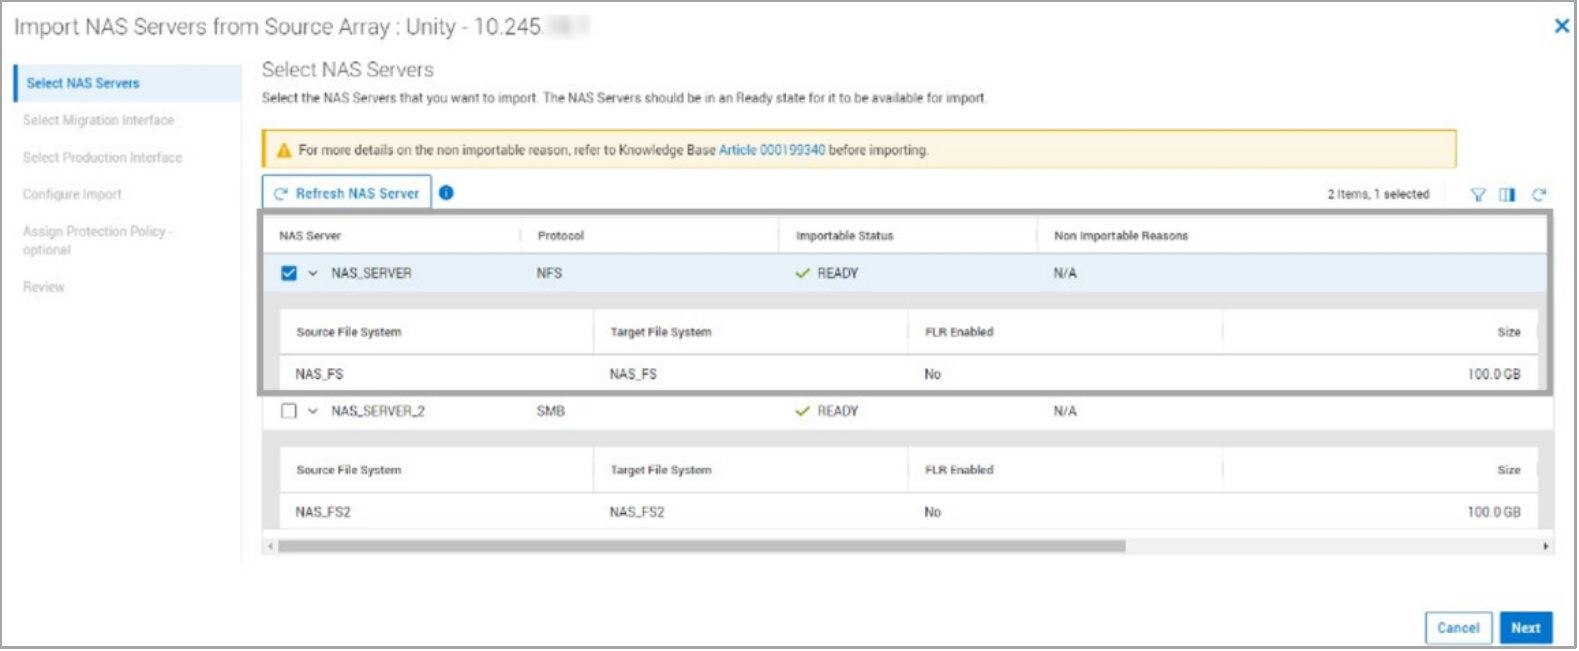
Figure 35. Select NAS Servers step
In the Select Migration Interface step, select the file migration interface and click Next.
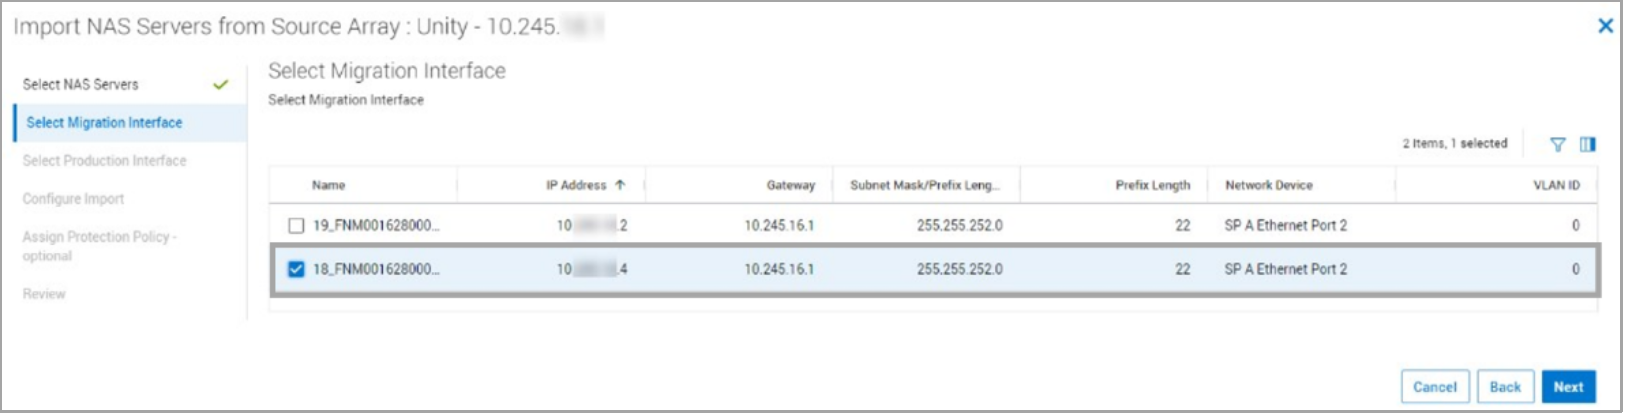
Figure 36. Select Migration Interface step
In the Select Production Interface step, select the file production interface and click Assign Network Interface.
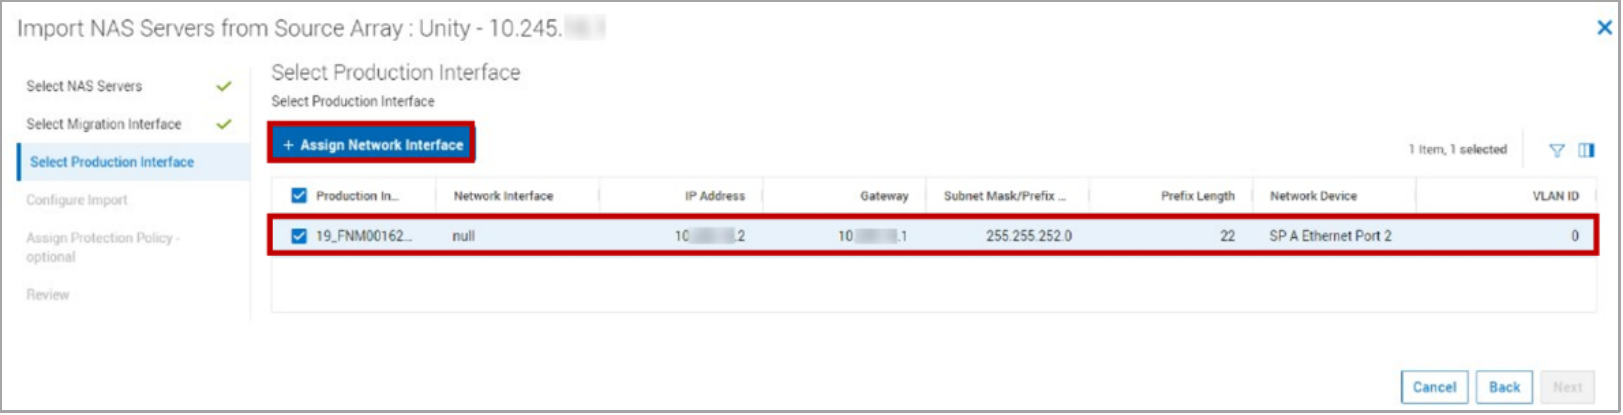
Figure 37. Select Production Interface step
The Assign Network Interface slide out will pop up and choose the desired network interface, click Apply and click Next.
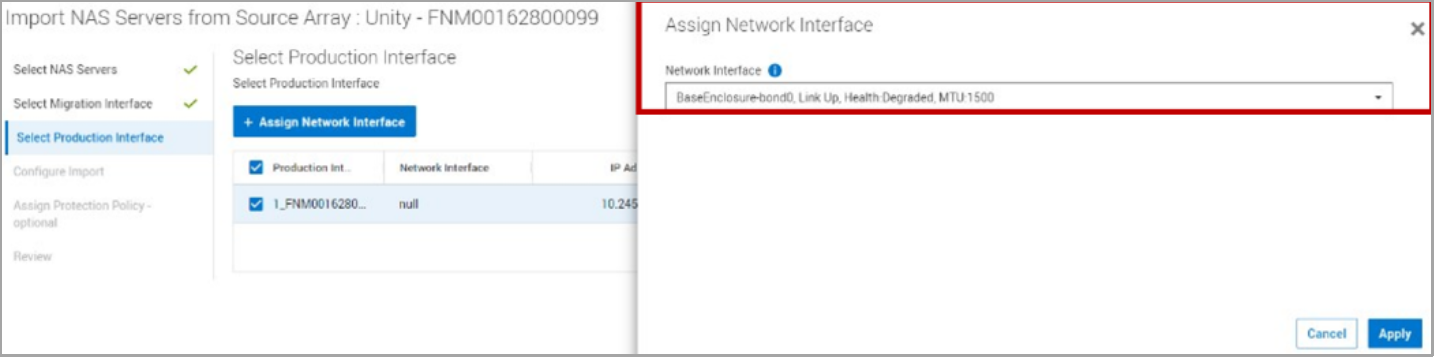
Figure 38. Assign Network Interface step
In the Configure Import step, you provide a name and description for the file import session, set when the file import will begin, and specify the interface that will be used for the import traffic.
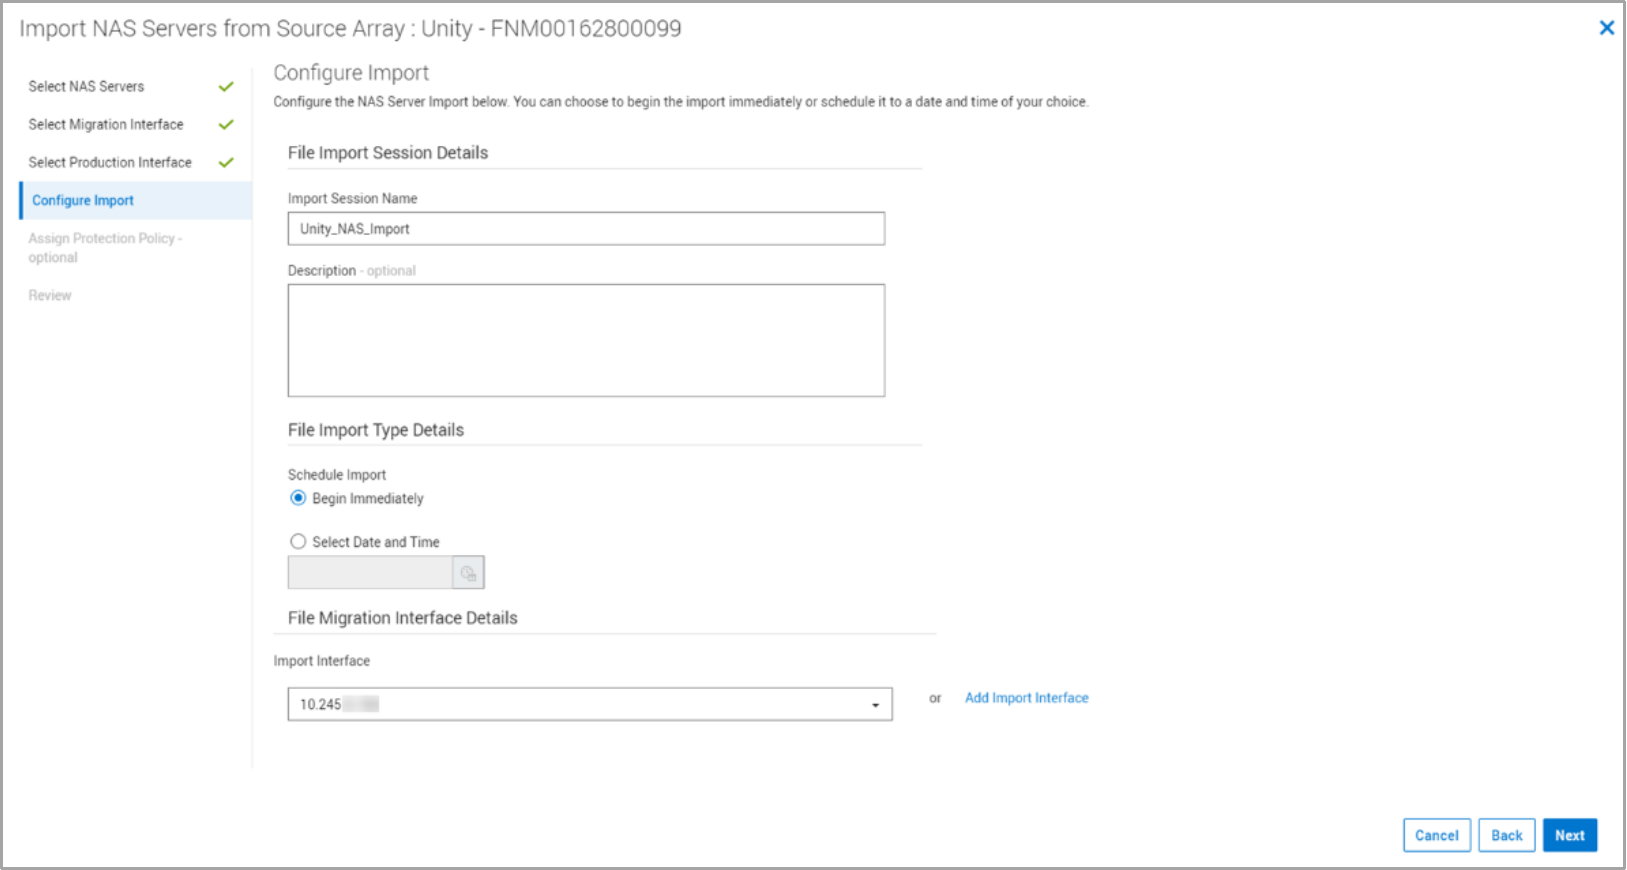
Figure 39. Configure Import step
In the Assign Protection Policy step, you can apply a protection policy to the storage resource once it is in PowerStore.
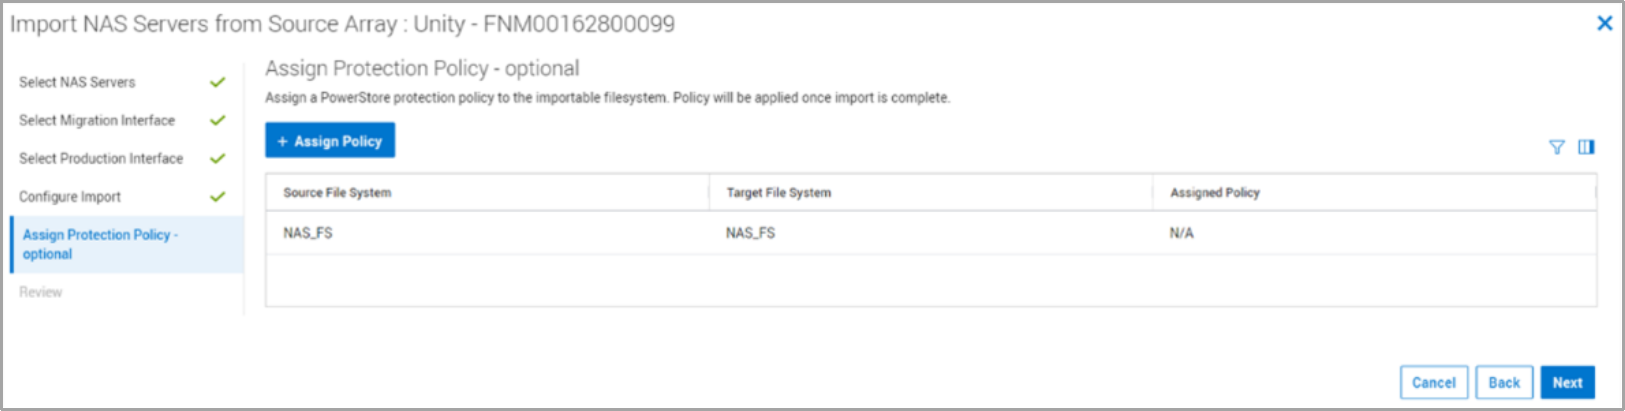
Figure 40. Assign Protection Policy (Optional) step
The Review step shows a summary of all the options that are selected.
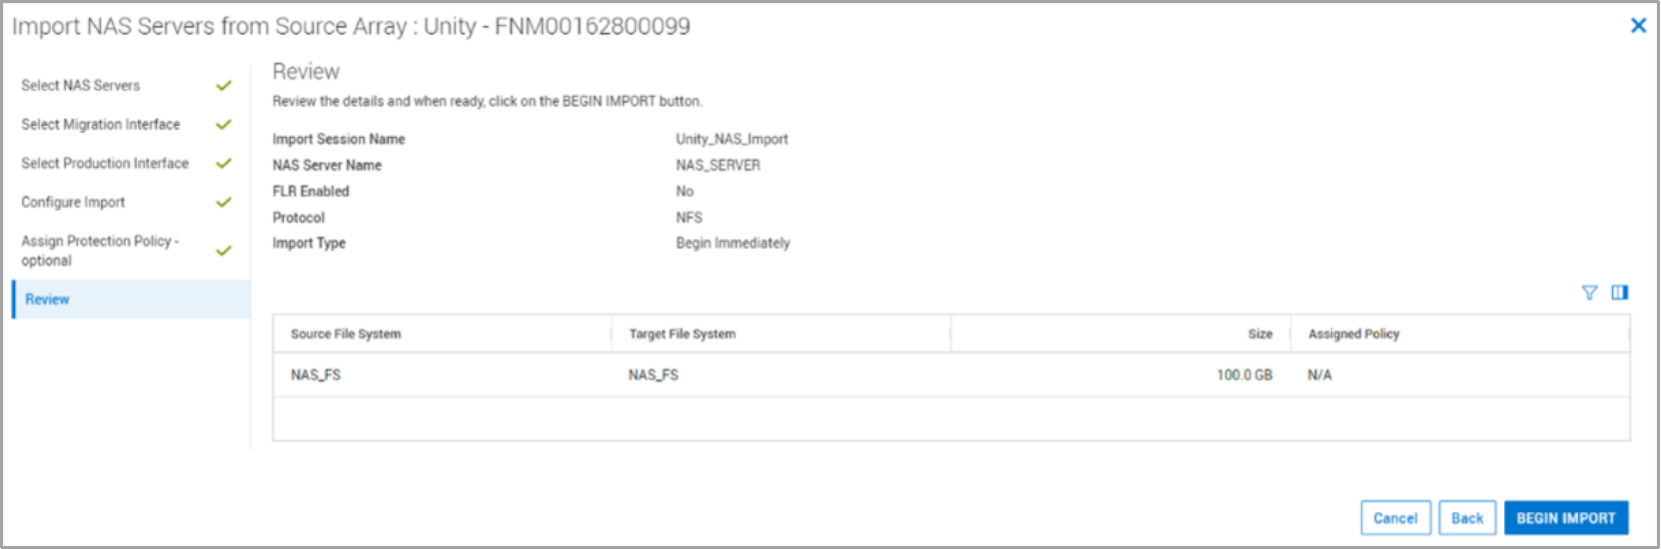
Figure 41. Review step
Click Begin Import, which displays File Imports, where you can manage and monitor the life cycle of the file import.
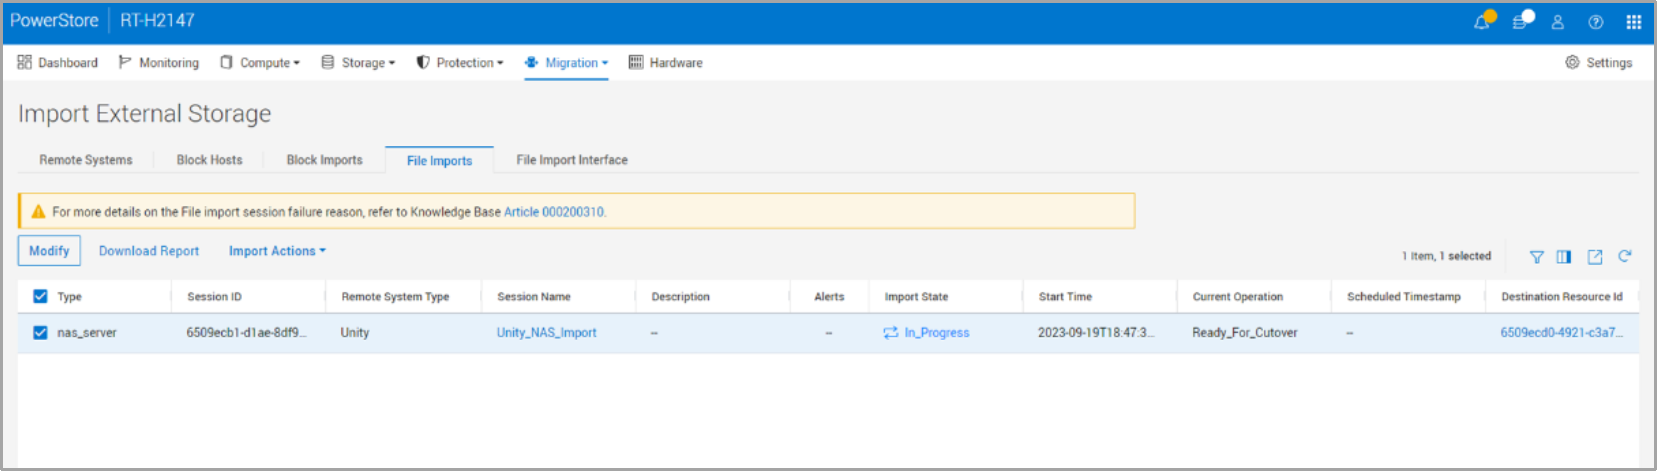
Figure 42. File Import sessions
The following table shows the actions that are allowed in an import session. Actions are enabled depending on their current state.
Table 7. File Import actions
Action
Description
Cancel
- Cancels import session and goes back to source
- Terminates a session that has not been cutover
- Disables access to the destination file system
- Deletes the destination file system associated with the import session
Cutover
Note: Before you select this action, ensure the host application has access to the source file systems.
- Enables destination resource for host access
- Connectivity with the source system goes into inactive state
- Cuts over the resource in PowerStore
Pause
- Suspends a copy-in-progress import session
- Only pauses the background copy; host I/O is still mirrored
Resume
- Resumes a paused session
- Starts the background copy again from where it was paused and continues the host I/O mirroring
Commit
- Stops background copy and cleans up source
Note: After a commit has been completed, it cannot be canceled, and it is not possible to revert to the source resource.
The following figure shows the actions available for an import session in the Ready to Cutover state.
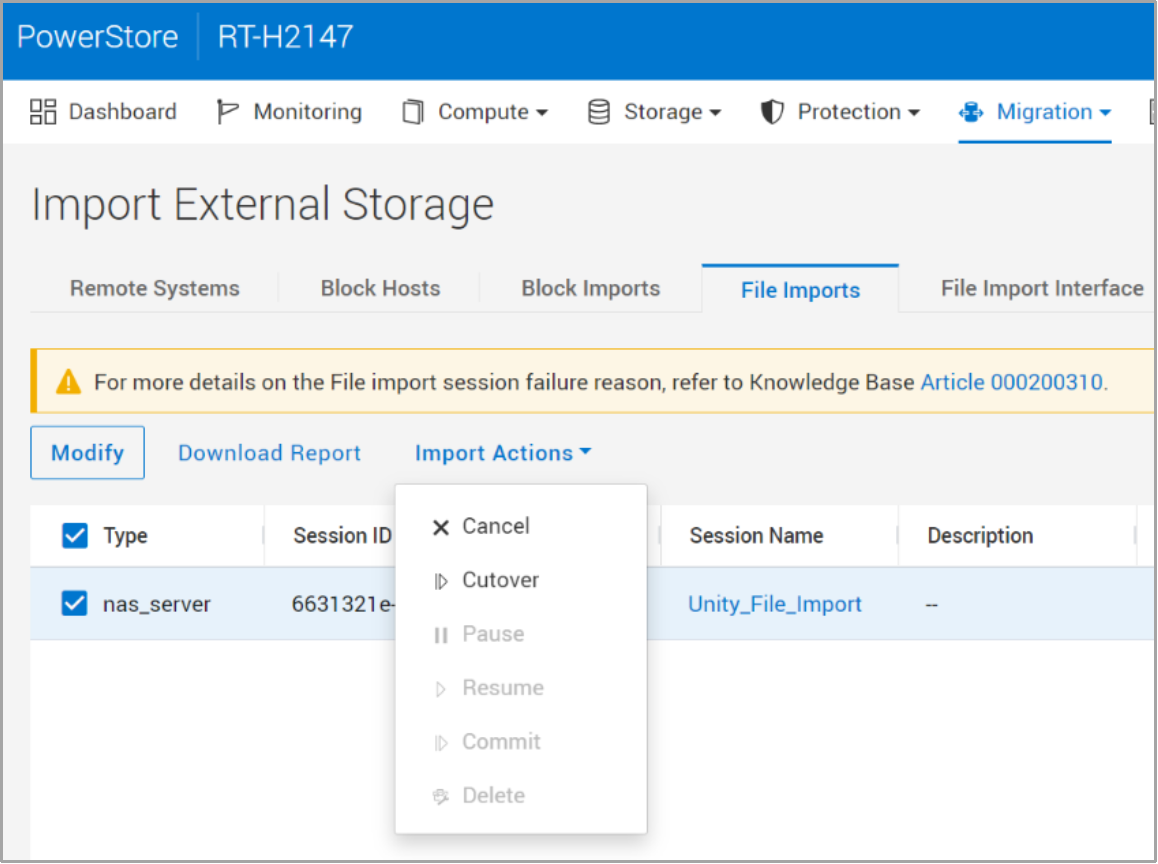
Figure 43. File Import actions
As previously stated, you can also manage an import session from the REST API and the PowerStore CLI (pstcli). The following figure shows the different REST API queries that you can use for managing an import session from the REST API. For more details, see the document Dell PowerStore REST API Guide on Dell.com/powerstoredocs.
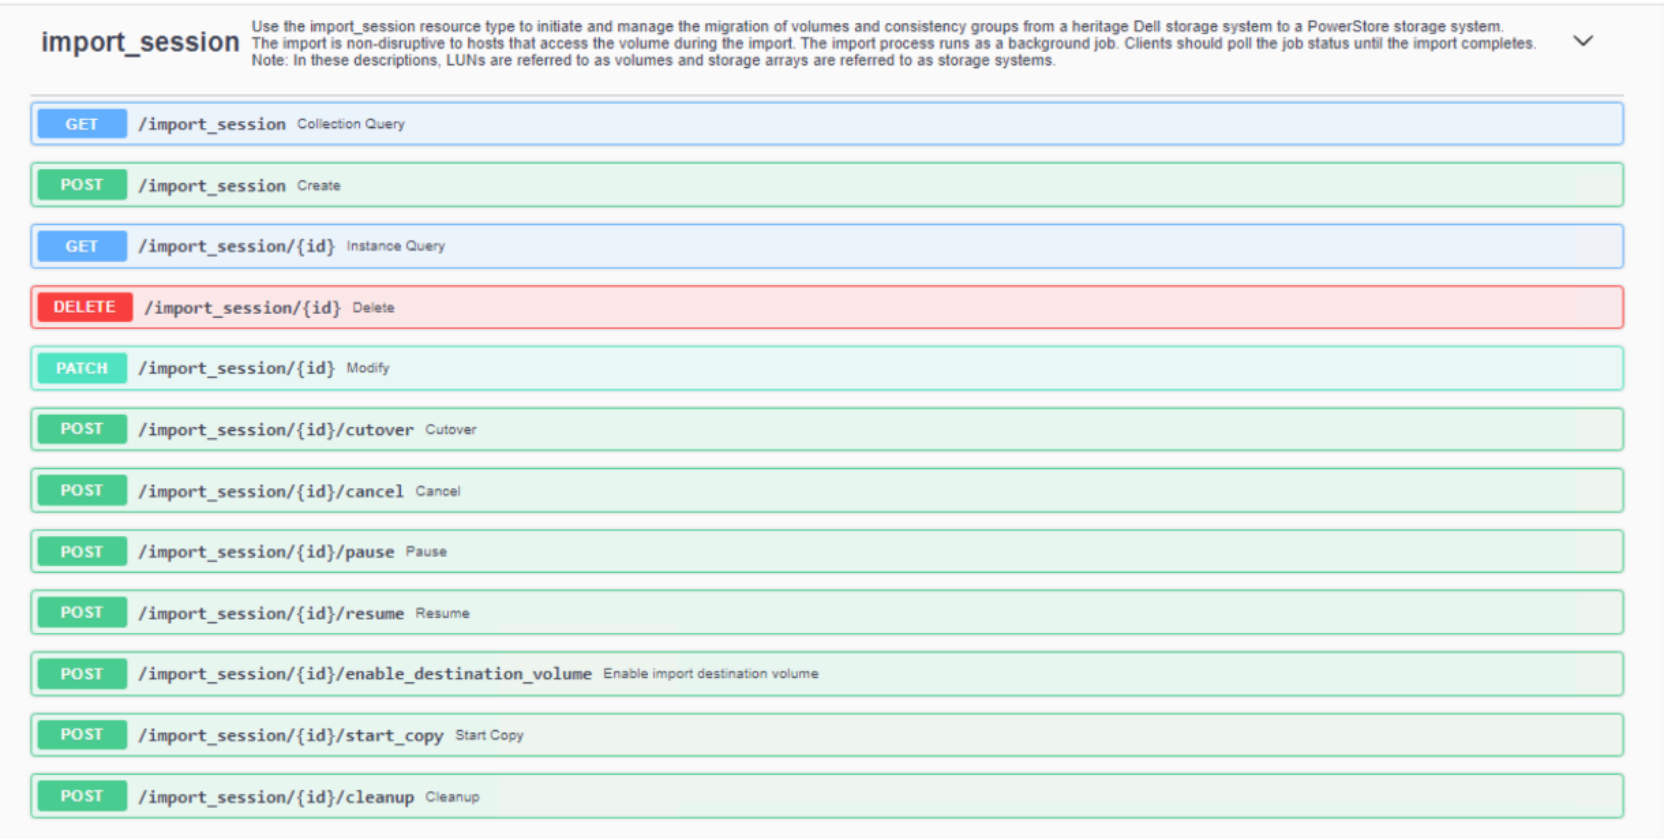
Figure 44. REST API import session queries
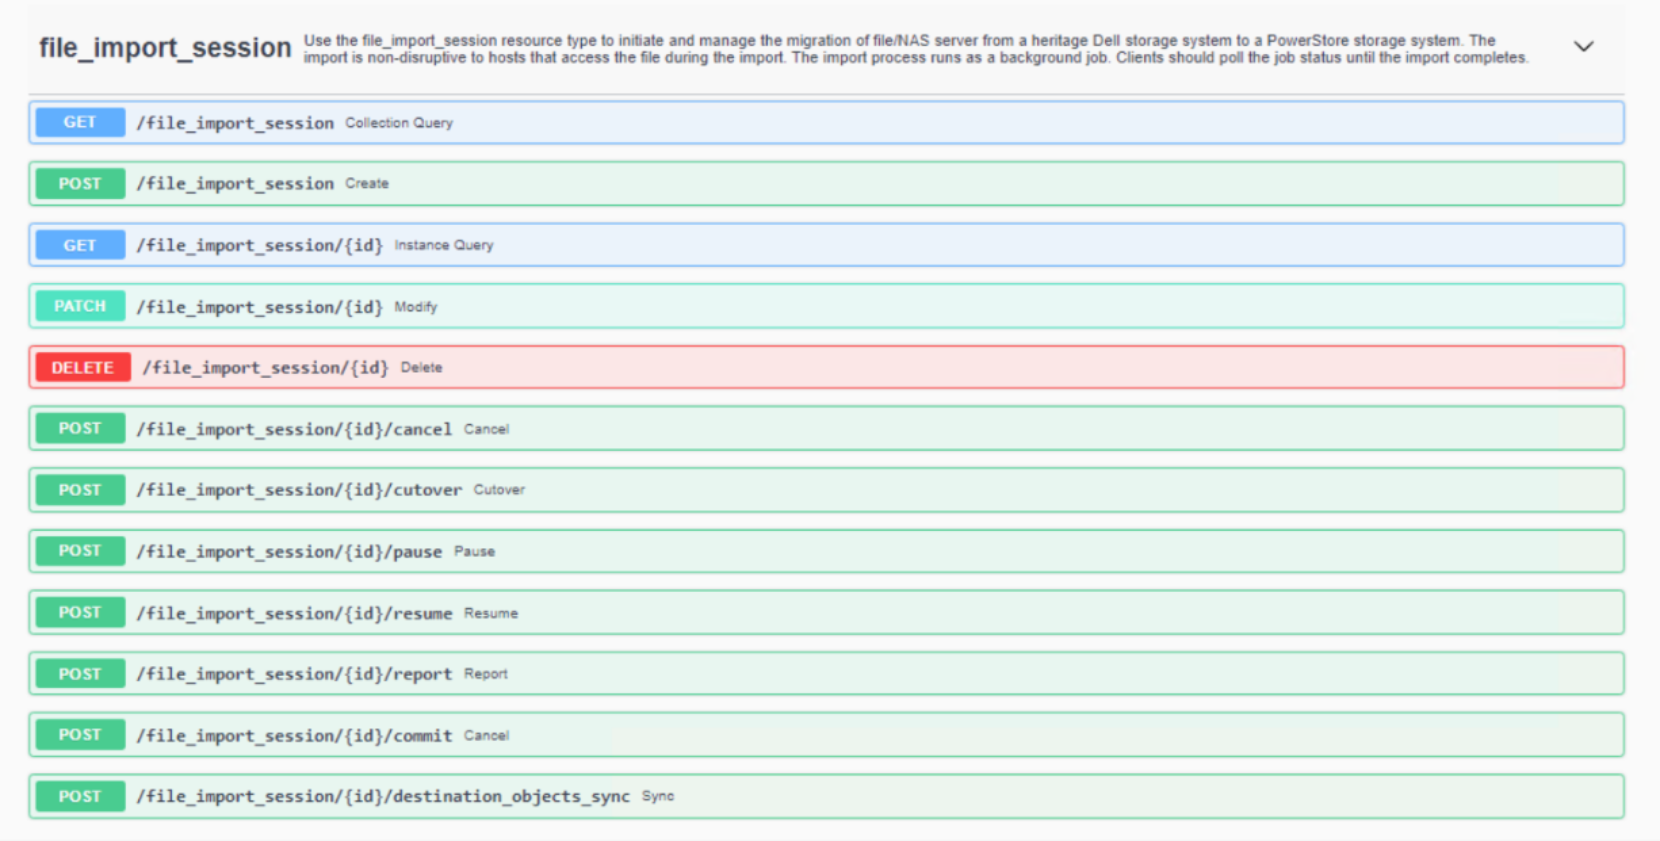
Figure 45. REST API file import session queries
Imports can be managed with the PowerStoreCLI (pstcli) migration commands. For more details about the PowerStore CLI, see the document Dell PowerStore CLI Guide on Dell.com/powerstoredocs. For a list of specific migration pstcli commands run pstcli -d localhost -u admin -p password help Migration