
File import
File import
-
PowerStoreOS 3.0 and later added support for native VNX file import. File import supports NFS and SMB file systems. Multiprotocol file systems are not supported. PowerStoreOS 4.0 and later added support for native Dell Unity file import.
Requirements
The following requirements must be met before migrating to PowerStore:
- The source system must be in a good state and not running a software upgrade.
- The software or operating environment (OE) version for the source system must be supported.
- A software upgrade may be required before starting the import. See the document Importing External Storage to PowerStore Guide on Dell.com/powerstoredocs.
File import terminology
The following table provides definitions for some of the terms that are used in the non-disruptive import section.
Table 4. Agentless file import terminology
Term
Definition
Cutover
Action of setting the destination PowerStore system as the primary
Cancel
Action of stopping the import, removing any progress that has been completed, and rolling back to the primary storage system.
Commit
Final step in setting the destination system as the primary with no option to cancel (rollback) to the source system
VNX File import workflow
This section describes a high-level overview of the VNX file import workflow.
Perform the following actions before importing storage resources:
Step 1: Prepare VNX
- From the source VNX:
- Add a migration network interface for IMT:
- Create migration interface.
- Interface must be named nas_migration_<name>.
- Attach the interface to migration VDM.
nas_server –vdm vdm_fro2 –attach nas_migration_vdmfro2
- When importing a CIFS server:
- Interface must have a different DNS subdomain than CIFS server.
- Add the interface to CIFS server:
server_cifs vdm_fro2 –add compname=vnx2compnamefro,domain=windows.emc-fr,interface=nas_migration_vdmfro2,dns=migration.windows.emc-fr
- Update parameters essential for CIFS import
- acl.mappingErrorAction
• Defines the rules for unknown mapping between SID, UID, and GID on ACL settings.
- acl.extacl
• This parameter is a bit list which enables special capabilities around ACL management.
• Allows migrating of UNIX ownership necessary for preserving Quota.
- smb1.disabled
• This parameter must be set to 0 to ensure smb1 is enabled
- Review mandatory parameter values:
server_param server_3 –f cifs –info acl.mappingErrorAction
Server_param server_3 –f cifs –info acl.extacl
Server_param server_3 –f cifs –info smb1.disabled
Set new values
server_param server_3 –f cifs –modify acl.mappingErrorAction –value 11
server_param server_3 –f cifs –modify acl.extacl –value 28
server_param server_3 –f cifs –modify smb1.disabled –value 0
- Ensure local groups are enabled, and set two options:
- Set local Administrator password using Computer Management.
- Create a local admin user using Computer Management.
- Must be added to Administrators group
- Ensure time is synchronized with destination:
- Within 5 seconds
- Recommend using NTP
- Ensure correct version of code:
- VNX version 8.1.21.266 and newer
- Ensure that all interfaces used by the VDM are attached to the VDM. Use the following command to attach interfaces to the source VDM:
nas_server –vdm <vdm name> –attach <interface name>
Step 2: Prepare PowerStore
- Verify NTP settings:
- Ensure same NTP as VNX
- Native File Import requires a File Mobility Network on PowerStore:
- A public routable network based on the 1 GbE management ports
- Provides control plane communication between PowerStore SDNAS and source VNX
- File Mobility Network is not used for the import data traffic
- Also used for file asynchronous replication
- PowerStore establishes SSH connection with VNX over the File Mobility Network
- Configure File Mobility Network
- Configured under Settings > Network IPs > FILE MOBILITY
- Uses the existing Management Network configuration
- Requires new IPs on the existing Management Network range
- Supports IPv4 and IPv6
- Requires three IPs:
- Cluster IP Address
- Node A IP Address
- Node B IP Address
- User must manually MAP NETWORK after configuring IPs
Step 3: Add Remote System
- Add the source system to PowerStore Manager from Migration > Import External Storage.
- Type: VNX
- Capability: UNIFIED or FILE
- SPA or SPB IP Address or FQDN
- Data Connection Type: iSCSI or Fibre Channel
- Username and password
- File Connection Address (control station)
- File admin username and password
- As the remote system is added:
- Source system information is validated
- Source VDMs are discovered
i File systems
ii Network interfaces
iii Configuration settings
- Prechecks identify import capability per VDM
- The procedure can be repeated on demand for an existing connection.
- Discover: Discovers resources on source array that can be imported
- Verify and Update: Verifies connectivity to source and attempts to reconnect
- Add File Import Interface:
- Created under Migration > Import External Storage > File Import Interface
- Used for data migration from source migration interface
- Can optionally be created during Import NAS Server wizard
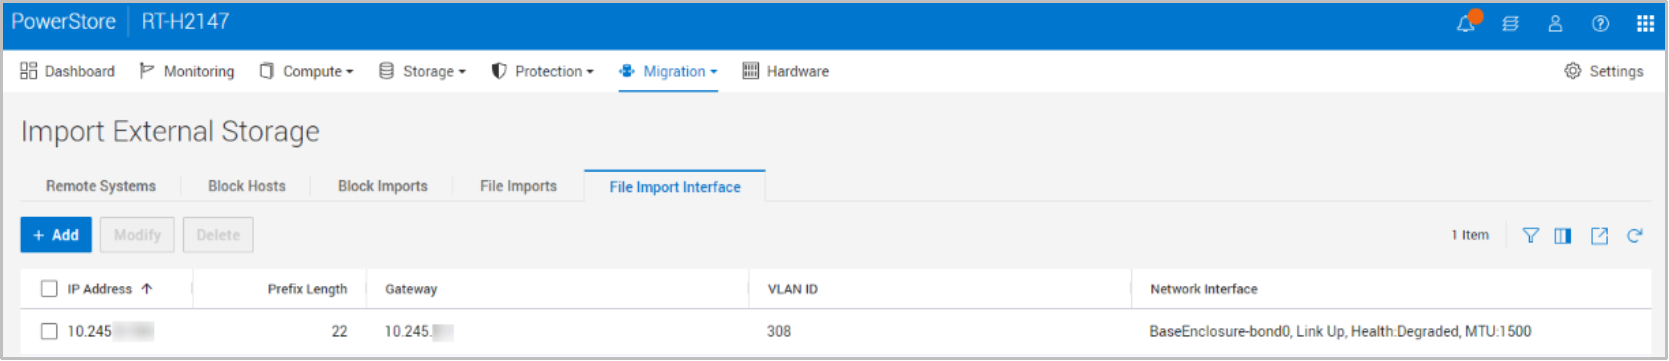
Figure 12. Migration > Import External Storage > File Import Interface
Step 4: Create Import Session
Complete the following steps to perform the file import:
- To create an import session, select the added source system and click the Import NAS Server button, which steps through the following:
- Select NAS Servers: Allows selection of the source file resources to import: Virtual Data Mover (VDM) and its NFS and SMB file systems.
- Select Product Interface: Set the file interface to be used for production host access.
- Configure Import:
i Set the import session name and description.
ii Set when the import begins, either immediately or at a set date and time.
iii Set the file import interface to be used for the import traffic. The file import interface can be added in this step.
- Assign Protection Policy (Optional): Assigns the existing protection policy in PowerStore to the source resource after the import completes.
- Review: Shows a summary of the selected options and shows the Begin Import button to start or schedule the import.
Step 5: Cutover Import Session
When you click the Begin import button, the system takes the following actions:
- An import session is created, with an initial copy step in which:
- Host is accessing the data from the source system.
- PowerStore automatically creates the destination NAS Server.
- Cold data is transferred to PowerStore as part of the background copy. Cold data is data that has not been updated in the last 60 minutes.
- The import session state changes to In Progress.
- The import session state changes from In Progress to Ready to Cutover with the source volume as read/write.
A cutover is allowed when the import session is in a Ready to Cutover state (the source system and PowerStore are synchronized).
- Select More Actions > Cutover.
- Confirm that the host still has access to the file systems.
- Click the Cutover button.
- Hosts start accessing the data from PowerStore.
- The background copy and the forwarding of writes continues.
- Any reads for data already copied to PowerStore through the background copy are serviced from PowerStore.
- For any reads of data still in the source system, PowerStore recalls the data from the source, copies it to PowerStore and services the request to the host.
Step 6: Commit Import Session
- After all the data is transferred, the import session goes into a Ready to Commit state.
- Select the import session, and click the Commit action.
- The background copy and the forwarding of writes stops.
- When the import session is committed, there is no rollback.
- The source system is cleaned up.
Unity File import workflow
This section describes a high-level overview of the Unity file import workflow.
Perform the following actions before importing storage resources:
Step 1: Prepare storage systems for file import
Unity
- Unity OE 5.0.3 and later code – Check the PowerStore Simple Support Matrix for specifics as this can change.
- Ensure a new or unused production IP interface is created on the NAS_SERVER’s that will be used for migration purposes only
- Ensure that SSH is enabled
- If importing SMB NAS servers, the user needs to login to Unity and run a service command to update the parameter acl_extacl to 28 (default is 0)
- This parameter is a bit list which enables special capabilities around ACL management.
- Allows migrating of UNIX ownership necessary for preserving Quota.
- Ensure time is synchronized with PowerStore destination:
- Within 5 seconds
- Recommend using NTP
- iSCSI IP(s) configured
PowerStore
- PowerStoreOS 4.0 and later– Check the PowerStore Simple Support Matrix for specifics as this can change.
- Verify NTP settings:
- Within 5 seconds of Unity
- Recommend using same NTP as Unity
- Native File Import requires a File Mobility Network on PowerStore:
- A public routable network based on the 1 GbE management ports
- Provides control plane communication between PowerStore SDNAS and source Unity
- File Mobility Network is not used for the import data traffic
- PowerStore establishes SSH connection with Unity over the File Mobility Network
- Configure File Mobility Network
- Configured under Settings > Network IPs > FILE MOBILITY
- Uses the existing Management Network configuration
- Requires new IPs on the existing Management Network range
- Supports IPv4 and IPv6
- Requires three IPs:
- Cluster IP Address
- Node A IP Address
- Node B IP Address
- User must manually MAP NETWORK after configuring IPs
- Add the source Unity system to PowerStore Manager as a remote system from Migration > Import External Storage.
- Type: Unity
- Capability: Unified
- Management IP Address or FQDN
- Data Connection Type: iSCSI IP
- iSCSI IP (multiple can be inputted if separated by a comma)
- Management Username and password
- Session CHAP Mode
- Service username and password
- As the remote Unity system is added:
- Source system information is validated
- Source NAS servers are discovered
– File systems
– Network interfaces
– Configuration settings
- The procedure can be repeated on demand for an existing connection.
- Discover: Discovers resources on source array that can be imported
- Verify and Update: Verifies connectivity to source and attempts to reconnect
- Add File Import Interface:
- Created under Migration > Import External Storage > File Import Interface
- Used for data migration from source migration interface
- Can optionally be created during Import NAS Server wizard

Figure 13. Migration > Import External Storage > File Import Interface
To create an import session, select the added Unity source system and click the Import NAS Server button, which steps through the following:
- Select NAS Server: This will automatically import all associated file systems
- Select the migration interface: This is the new or unused IP interface on the NAS_SERVER that will be used for migration purposes only
- Select the production interface: This is the production Unity NAS_SERVER IP(s) that will be moved over to PowerStore with this import process
- Assign the PowerStore network interface to this production interface
- Configure import details:
- Set the import session name and description.
- Set when the import begins, either immediately or at a set date and time.
- Set the file import interface to be used for the import traffic. The file import interface can be added in this step.
- Assign Protection Policy (Optional): Assigns the existing protection policy in PowerStore to the source resource after the import completes.
- Review: Shows a summary of the selected options and shows the Begin Import button to start or schedule the import.
Step 3: Cutover Import Session
When you click the Begin import button, the system takes the following actions:
- An import session is created, with an initial copy step in which:
- Host is accessing the data from the source Unity system.
- PowerStore automatically creates the destination NAS Server and file systems.
- Cold data is transferred to PowerStore as part of the background copy. Cold data is data that has not been updated in the last 60 minutes.
- The import session state changes to In Progress.
- The import session state changes from In Progress to Ready to Cutover with the source volume as read/write.
- A cutover is allowed when the import session is in a Ready to Cutover state (the source Unity system and PowerStore are synchronized).
- Select More Actions > Cutover.
- Confirm that the host still has access to the file systems.
- Click the Cutover button.
- Hosts start accessing the data from PowerStore.
- The background copy and the forwarding of writes continues.
- Any reads for data already copied to PowerStore through the background copy are serviced from PowerStore.
- For any reads of data still in the source system, PowerStore recalls the data from the source, copies it to PowerStore and services the request to the host.
Step 4: Commit Import Session
- After all the data is transferred, the import session goes into a Ready to Commit state.
- Select the import session, and click the Commit action.
- The background copy and the forwarding of writes stops.
- When the import session is committed, there is no rollback.
- The source system is cleaned up.