
SQL Server deployment platforms
SQL Server deployment platforms
-
SQL Server is now available and supported on several different platforms. PowerStore presents several flexible options for various SQL Server deployments.
Windows
When deploying SQL Server on Windows on PowerStore, storage volumes, virtual volumes (vVols) and file support through SMB are available. When using SMB storage for SQL Server, ensure the Sync Writes Enabled and Oplocks Enabled are turned on for the file system. See the Windows Host Connectivity Guide for instructions about configuring host access on Windows.
SQL Server on Windows deployment
SQL Server on Windows is deployed with an executable (exe) file which can be found on the Microsoft SQL Server website. Deployment is done by downloading the SQL Server exe file for the intended version and running the executable. The SQL Server deployment wizard will walk through several available options. Storage layout can either be customized during the install or after install once the SQL Server instance is running. When performing large enterprise deployments, there is an unattended install option available to automate the installation.
Linux
When deploying SQL Server on Linux on PowerStore, be sure to follow Microsoft Installation guidance for deploying SQL Server on Linux for supported Linux versions, minimum requirements, and general recommendations. Currently, Red Hat Enterprise Linux, SUSE, and Ubuntu Linux distributions are supported. The partnership of Dell Technologies, Microsoft, and RedHat provides a platform with full end-to-end enterprise support. Therefore, Red Hat Enterprise Linux (RHEL) has quickly become a platform of choice for deploying SQL Server on Linux.
SQL Server on Linux deployment
Once the Linux host is presented to the array, storage volumes can be presented to the host. Because Linux is a relatively new platform for SQL Server, an example is provided here for configuring a Red Hat Enterprise Linux host to consume PowerStore block volumes. This example uses multipath, which is a best practice for resiliency. For complete instructions about how to configure Linux hosts and multipath, see the Linux Host Connectivity Guide.
After the storage volumes have been provisioned to the host, run the following command to make the volumes visible to the host:
#/usr/bin/rescan-scsi-bus.sh –a
Identify the volume name in the mapper folder by listing the multipath WWNs and searching for the volume WWN from PowerStore. The volume WWN is visible in the PowerStore volumes list under Storage > Volumes. For example, if the WWN for the new volume is 68ccf0980018e6c92364df1970e08d33, the following command will identify the multipath device to use:
# multipath -ll | grep 68ccf0980018e6c92364df1970e08d33
The volume will need to be formatted before use. See the Microsoft SQL Server documentation for supported file systems. Currently, XFS and EXT4 are supported. In this example, XFS is being used. For XFS, the mkfs.xfs command is used to format the volume passing the correct multipath device as the parameter.
# mkfs.xfs /dev/mapper/mpathdb
Create a mount point for the XFS file system that will serve as the parent directory for the SQL Server data files:
# mkdir /var/opt/mssql/data5
To ensure the file system mounts automatically after a system reboot, add a mount entry in the /etc/fstab file. The mount entry consists of six fields contained on a single line separated by a space: device, mount point, file system type, options, backup operation, and file system check order. When mounting a file system used for SQL Server, it is a Microsoft best practice to include the noatime mount option, which prevents the system from updating file access times and therefore improves system performance. The fields backup operation and file system check order will be left at the default of 0 and can be changed as needed. Based on our example, the new entry in the /etc/fstab file would look like this:
/dev/mapper/mpathdb /var/opt/mssql/data5 xfs defaults,noatime 0 0
Once the entry for the new mount is created, running the mount command will read the file and refresh the mounted devices. Even if the mount was manually created, it is a good idea to run the mount command after updating /etc/fstab to ensure there are no errors. If there are errors in the file, it could prevent Linux from booting properly.
# mount -a
Finally, before SQL Server can access the new file system, permissions need to be set. In a production environment, follow the security best practices for your organization when assigning permissions and ownerships to mount points. This example uses the same default permissions and ownership from the SQL Server installation by copying the permissions from the /var/opt/mssql/data folder and applying them to the new mount point:
# chmod --reference /var/opt/mssql/data /var/opt/mssql/data5
At this point, the new volume is ready for SQL Server to use. See Linux Host Connectivity Guide for further instructions on configuring storage volume access on Linux.
Containers
Running SQL Server inside Docker containers is a deployment option that was introduced with SQL Server 2017. By default, the database storage is inside the container and is ephemeral in nature. If databases need to be persisted beyond the lifetime of the container, external storage must be presented. External storage is presented to a container through a bind mount which is a local file system folder or mount from the operating system that is presented to the container at startup. Follow the preceding storage guidance for either Windows or Linux to create file system folders or mount points to present as a volume bind mounts to containers.
SQL Server container deployment
Deploying SQL Server inside Docker containers is simple. Here is an example of running SQL Server inside a container followed by a brief explanation of the parameters:
# sudo docker run -e "ACCEPT_EULA=Y" -e "SA_PASSWORD=********" -p 1401:1433 -v /root/sql1/tpcc_data:/var/opt/mssql/data2 -v /root/sql1/tpcc_log:/var/opt/mssql/log2 --name sql1 -d mcr.microsoft.com/mssql/server:2022-latest
Table 3. Docker run parameters
Parameter
Description
-e
Sets environment variables, in this case options for licensing and the SA password are set
-p
Publishes the SQL Server port 1433 inside the container as 1401 on the host
-v
Bind mount for a volume. In this example, three are specified. The format is local mount:container mount
--name
Name of the container, otherwise it will be assigned a random identifier
-d
Container image to run. If it does not exist, it will try to locate it from any configured repositories and download it
Kubernetes
Due to the clustered architecture of Kubernetes, there are special storage considerations when running SQL Server instances or SQL Server Big Data Clusters on Kubernetes. Kubernetes has created its own method of dealing with persistent storage in a Kubernetes cluster using persistent volumes.
Dell Container Storage Modules (CSM) for PowerStore enable integration and automation of PowerStore storage resources to Kubernetes. PowerStore storage integrates with Kubernetes through the PowerStore CSI driver. The PowerStore CSI driver and CSI drivers for other Dell Technologies products can be found on GitHub.
Whenever possible, perform storage operations through Kubernetes. In some cases, modifying CSI volumes directly on the PowerStore appliance can cause CSI operations to fail or volumes to be orphaned. For example, CSI volumes added to a volume group need to be removed from the volume group before the CSI driver can delete them.
In addition to the CSI driver support for PowerStore, there are PowerStore CSM modules available for observability and replication. The PowerStore CSM Observability module provides storage performance metrics to Kubernetes that are stored in Prometheus and can be viewed with tools such as Grafana. This allows full end-to-end visibility of storage metrics without the involvement of the storage administrator.


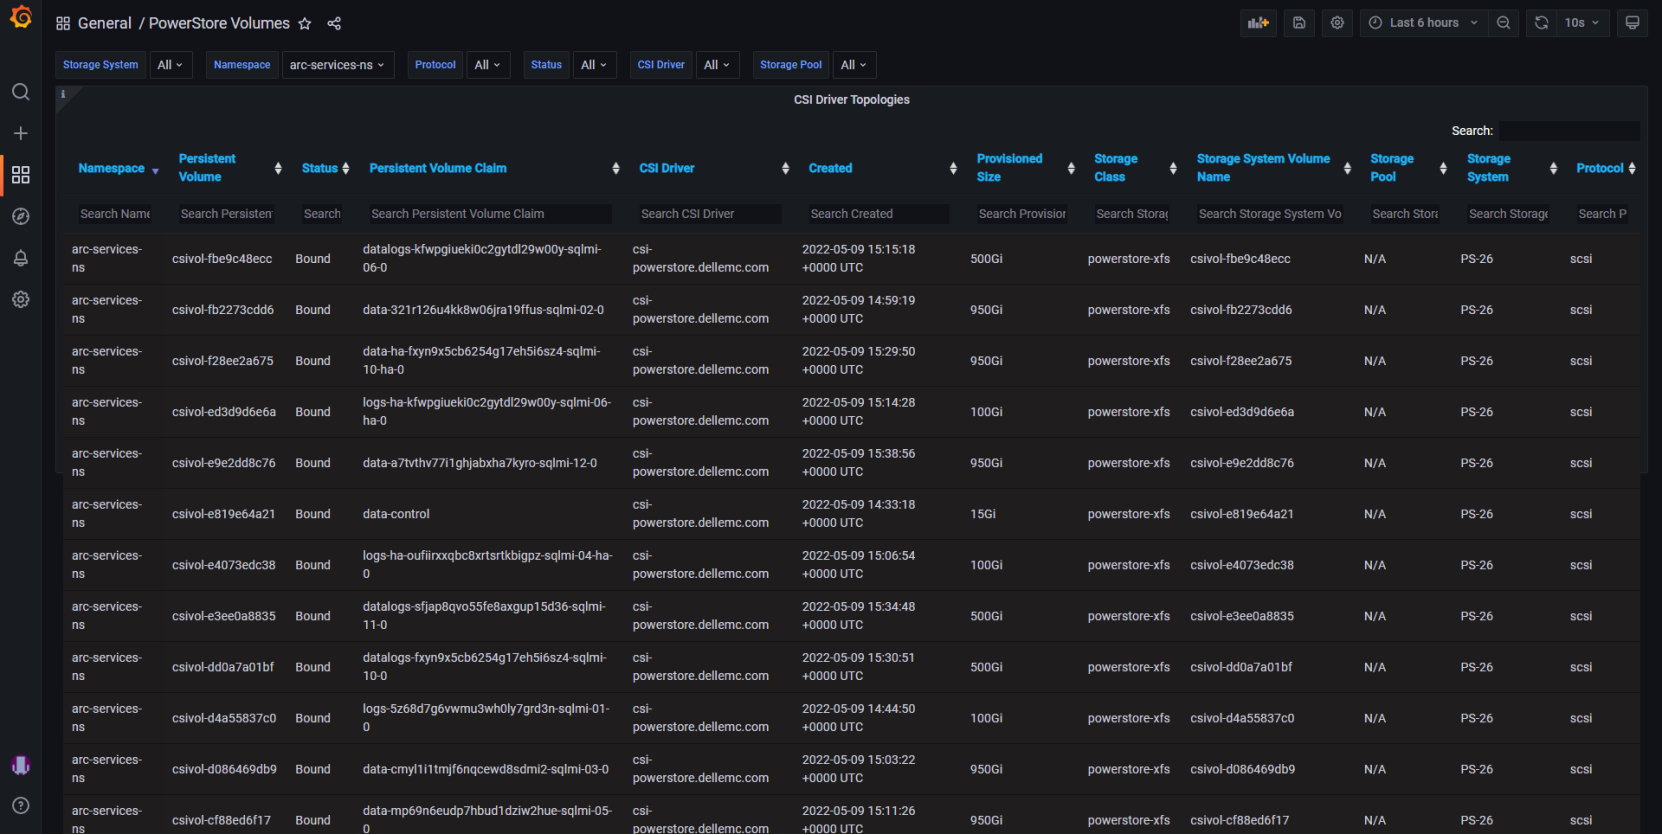
Figure 2. PowerStore volume topology in Grafana
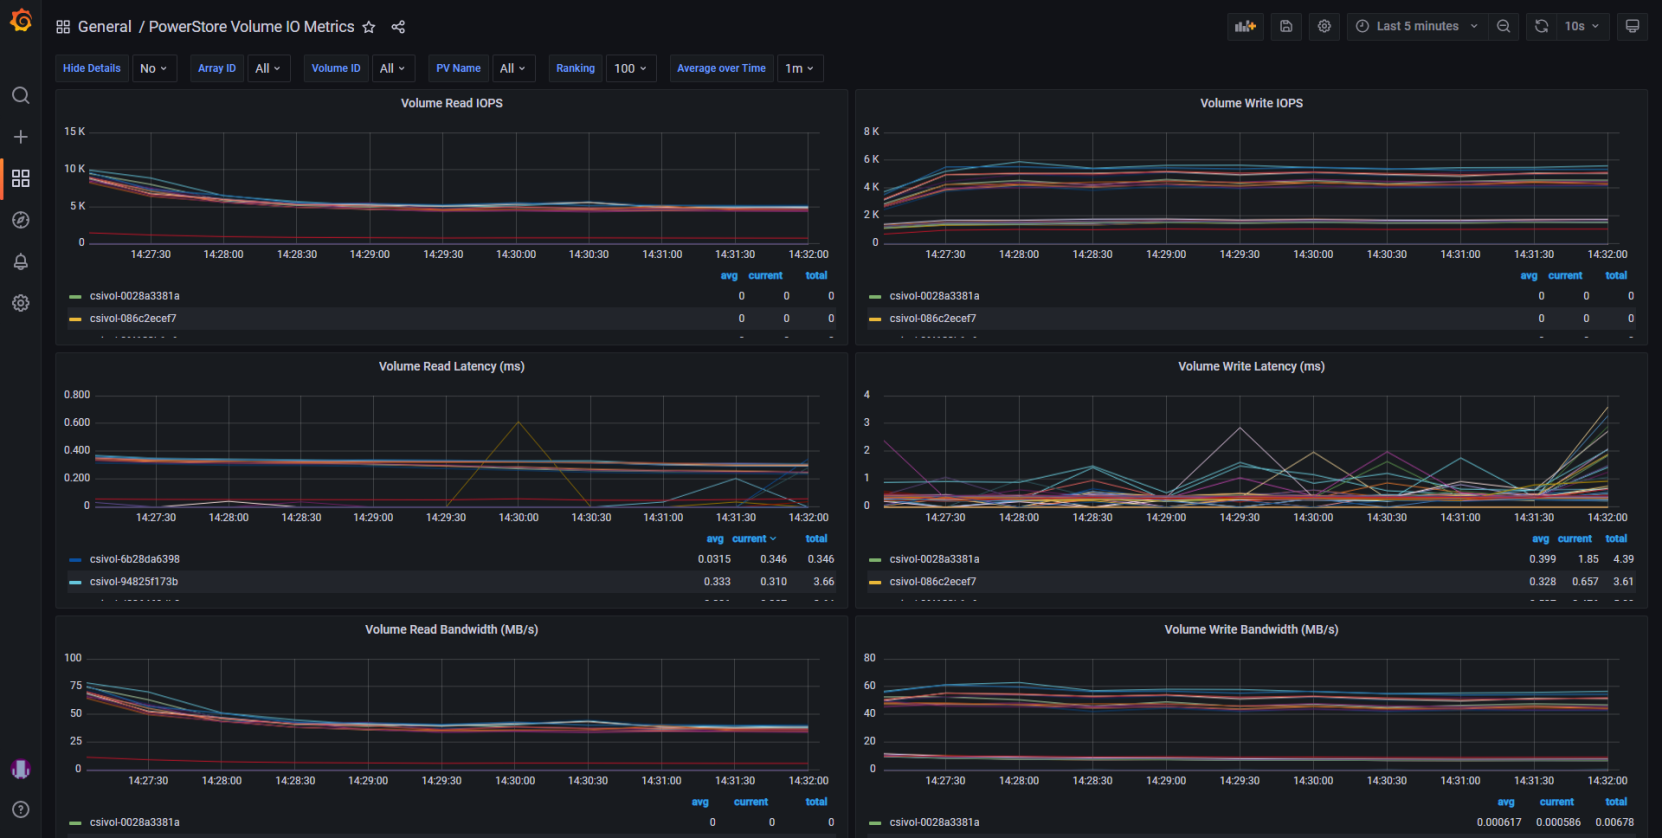
Figure 3. PowerStore volume performance metrics in Grafana
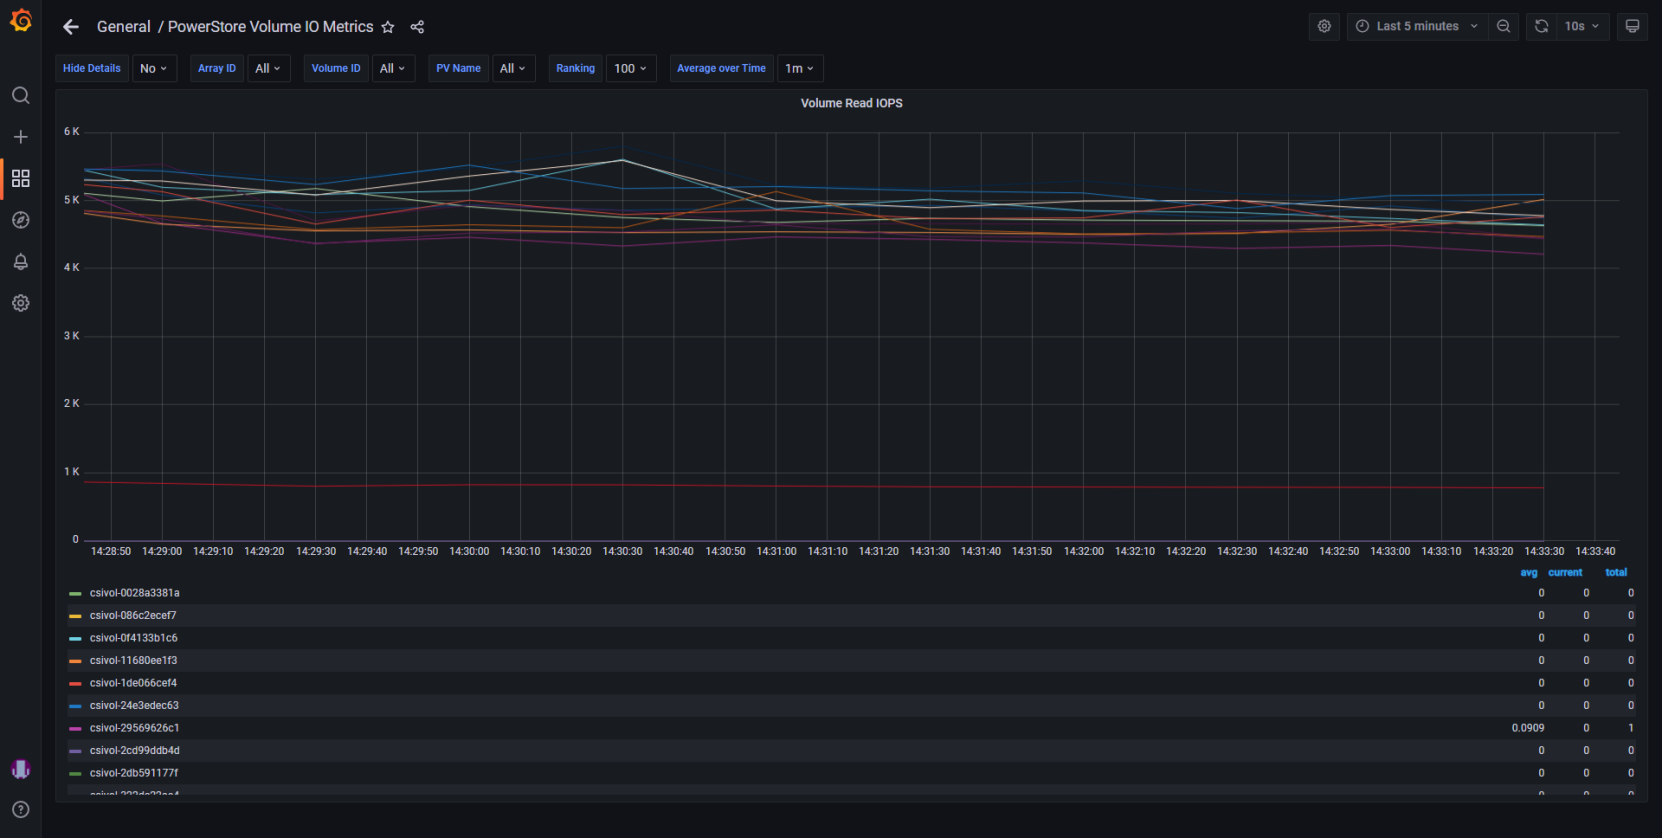
Figure 4. PowerStore read IOPS by volume in Grafana
The PowerStore CSM Replication module allows control of array-based replication features from the K8s control plane. Volume can be replicated and failover and reprotect operations can be performed.
The capabilities of the Kubernetes CSI specification are constantly evolving to support new enterprise storage features. Use the latest Dell Technologies PowerStore CSI driver and keep up to date on new releases. The latest documentation for Dell Technologies CSM modules for all Dell storage products can be found at https://dell.github.io/csm-docs/docs/.
SQL Server Kubernetes deployment
PowerStore storage for SQL Server running on Kubernetes is deployed and managed almost entirely through Kubernetes. The PowerStore CSI driver translates Kubernetes storage provisioning commands into PowerStore storage provisioning commands that are orchestrated on the storage appliance. Because common storage provisioning tasks such as creating, deleting, and expanding volumes are done through Kubernetes, the DBA or Kubernetes administrator can provision storage without knowing the details of PowerStore or requiring direct access. This ability enables self-service of common storage provisioning tasks.
Once the PowerStore CSI driver is deployed, one or more Kubernetes storage classes will be created. These storage classes describe the details of the CSI driver, encapsulate the connectivity and protocol options of the storage, and contain defaults for common storage provisioning values. Here is an example of powerstore-xfs storage class definition:
allowVolumeExpansion: true
apiVersion: storage.k8s.io/v1
kind: StorageClass
metadata:
annotations:
meta.helm.sh/release-name: powerstore
meta.helm.sh/release-namespace: csi-powerstore
creationTimestamp: "2023-10-07T13:33:14Z"
labels:
app.kubernetes.io/managed-by: Helm
name: powerstore-xfs
resourceVersion: "221004"
selfLink: /apis/storage.k8s.io/v1/storageclasses/powerstore-xfs
uid: cd013881-522e-4e16-bbd0-1f3c31315c94
parameters:
FsType: xfs
provisioner: csi-powerstore.dellemc.com
reclaimPolicy: Delete
volumeBindingMode: Immediate
Kubernetes storage is provisioned as Persistent Volumes and Persistent Volume Claims. More information about Persistent Volumes and Persistent Volume Claims can be found at Kubernetes.io. For example, to create three volumes for a SQL Server pod running on Kubernetes, the definitions are stored in a YAML file:
# cat pvc.yaml
kind: PersistentVolumeClaim
apiVersion: v1
metadata:
name: mssql-data
annotations:
volume.beta.kubernetes.io/storage-class: powerstore-xfs
spec:
accessModes:
- ReadWriteOnce
resources:
requests:
storage: 8Gi
---
kind: PersistentVolumeClaim
apiVersion: v1
metadata:
name: mssql-data2
annotations:
volume.beta.kubernetes.io/storage-class: powerstore-xfs
spec:
accessModes:
- ReadWriteOnce
resources:
requests:
storage: 5Gi
---
kind: PersistentVolumeClaim
apiVersion: v1
metadata:
name: mssql-log2
annotations:
volume.beta.kubernetes.io/storage-class: powerstore-xfs
spec:
accessModes:
- ReadWriteOnce
resources:
requests:
storage: 2Gi
To create the persistent volume claims, the preceding YAML file is used as input. Running the following command will create the volumes on PowerStore and create a volume alias that can be used when creating the SQL Server pod.
#kubectl create -f pvc.yaml
Next, to deploy SQL Server a definition file is also used. The persistentVolumeClaim attributes in the definition file refer to the Persistent Volume Claims created in the previous step.
#cat sql.yaml
apiVersion: apps/v1
kind: Deployment
metadata:
name: mssql-deployment
spec:
replicas: 1
selector:
matchLabels:
app: mssql
template:
metadata:
labels:
app: mssql
spec:
terminationGracePeriodSeconds: 30
hostname: mssqlinst
securityContext:
fsGroup: 10001
containers:
- name: mssql
image: mcr.microsoft.com/mssql/server:2022-latest
ports:
- containerPort: 1433
env:
- name: MSSQL_PID
value: "Developer"
- name: ACCEPT_EULA
value: "Y"
- name: SA_PASSWORD
valueFrom:
secretKeyRef:
name: mssql
key: SA_PASSWORD
volumeMounts:
- name: mssqldb
mountPath: /var/opt/mssql
- name: mssqldata
mountPath: /var/opt/mssql/data2
- name: mssqllog
mountPath: /var/opt/mssql/log2
volumes:
- name: mssqldb
persistentVolumeClaim:
claimName: mssql-data
- name: mssqldata
persistentVolumeClaim:
claimName: mssql-data2
- name: mssqllog
persistentVolumeClaim:
claimName: mssql-log2
---
apiVersion: v1
kind: Service
metadata:
name: mssql-deployment
spec:
selector:
app: mssql
ports:
- protocol: TCP
port: 1433
targetPort: 1433
type: NodePort
To deploy SQL Server inside a Kubernetes pod, first a secret is created to store the password:
#kubectl create secret generic mssql --from-literal=SA_PASSWORD="*******"
Next, using the preceding YAML file as input, kubectl create will deploy the SQL Server instance on Kubernetes:
# kubectl create -f sql.yaml
Azure Arc-enabled SQL Managed Instance
Arc-enabled SQL Managed Instance (MI) is the Arc-enabled data service that deploys SQL Server, using Azure, to an on-premises Kubernetes cluster. Because Arc-enabled SQL MI deploys an availability group, shared (read/write many) storage is required in addition to block volumes. PowerStore with combined block and file is uniquely suited to run these workloads on a single appliance. Dell Technologies and Microsoft performed a joint performance and scalability study on running Arc-enabled SQL MI on PowerStore. For complete details, see the paper Dell PowerStore with Azure Arc-Enabled Data Services. Dell Technologies has completed rigorous testing with PowerStore and Azure Arc through the Azure Arc-enabled data services validation program and is a validated partner for Azure Arc-enabled data services running on PowerStore and several other Dell Technologies solutions.