
Create and manage a Metro Volume
Create and manage a Metro Volume
-
This section shows how to create a Metro Volume configuration in PowerStore Manager. To create and manage a Metro Volume in the PowerStore REST API or PowerStore CLI, see the API and CLI guides at PowerStore Product Documentation & Videos.
The examples use the following:
- Two PowerStore clusters PowerStore-A, and PowerStore-B with remote system configuration for replication
- A single vCenter appliance vcsa.lab
- ESXi hosts esx-a, and esx-b connected to local PowerStore only for
Non-Uniform host access, mapped to Metro Volume Sales - ESXi hosts esx-c, and esx-d connected to local and remote PowerStore for
Uniform host access, mapped to Metro Volume Engineering - Heartbeat volumes are mapped from each PowerStore to all ESXi Servers to satisfy vSphere HA
- A standard Volume Technical Marketing Engineering is mapped to hosts esx-c, and esx-d and prepared for Metro Volume configuration as VMFS datastore in vSphere vCenter
Figure 17 shows the host connectivity options in PowerStore Manager, and Figure 18 represents the host configuration with different host connectivity settings for PowerStore-A. For uniform host connectivity, host esx-c is local to PowerStore-A. The host connectivity for esx-c, and esx-d is swapped on PowerStore-B
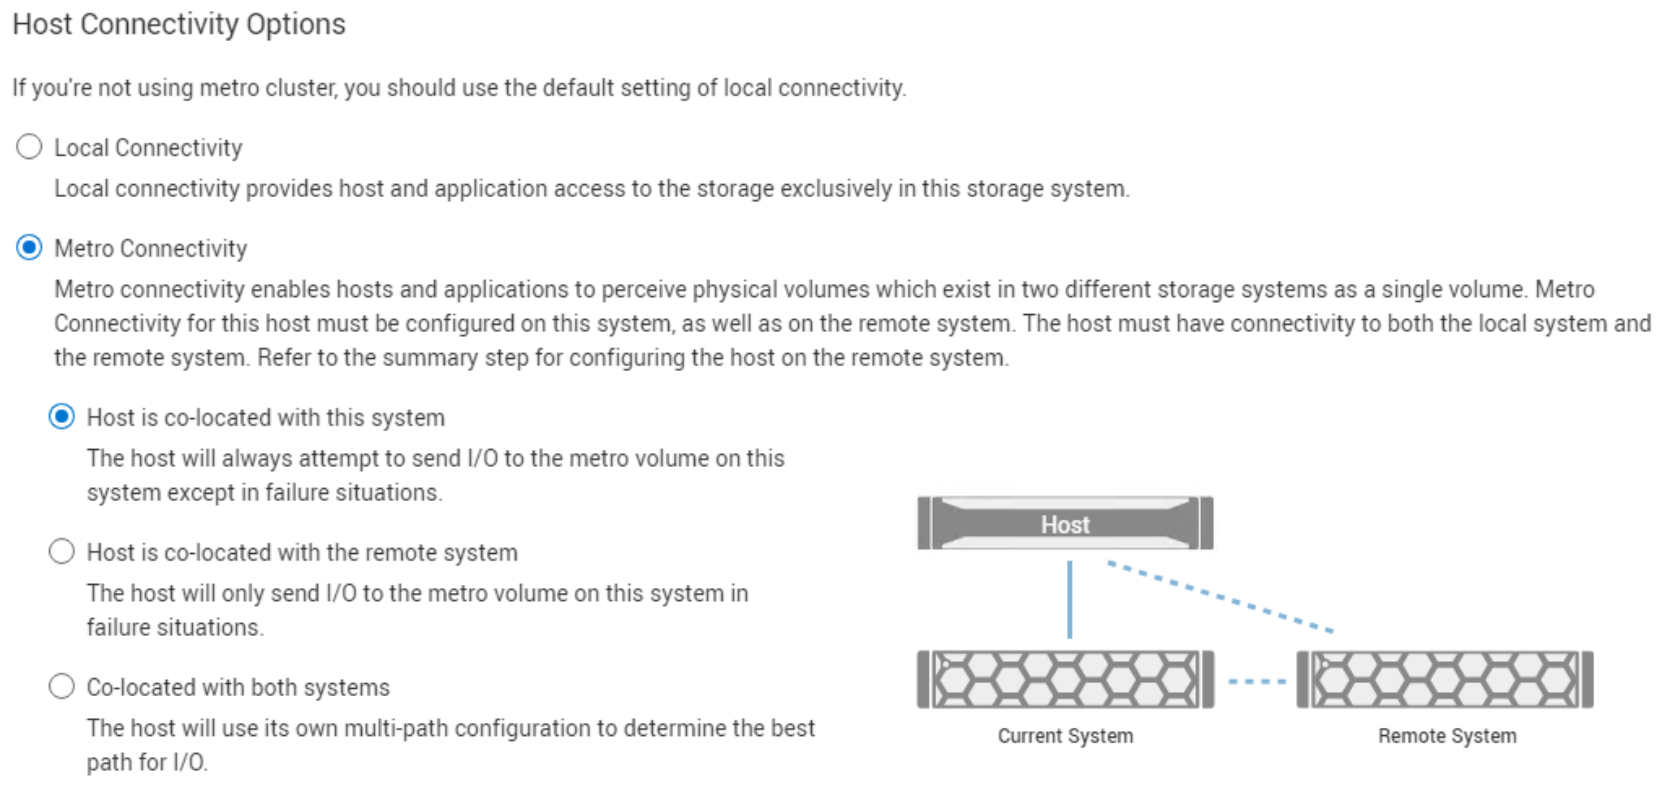
Figure 17. Host connectivity setting

Figure 18. PowerStore-A > Metro host overview
Create a Metro Volume replication
In the PowerStore Manager UI, you can create a Metro Volume in the Storage > Volumes overview page after selecting the appropriate Volume in drop-down menu Protect. Alternately, you can create it in the Volume details view under the Protection > Metro volume subtab with a link to configure Metro Volume.
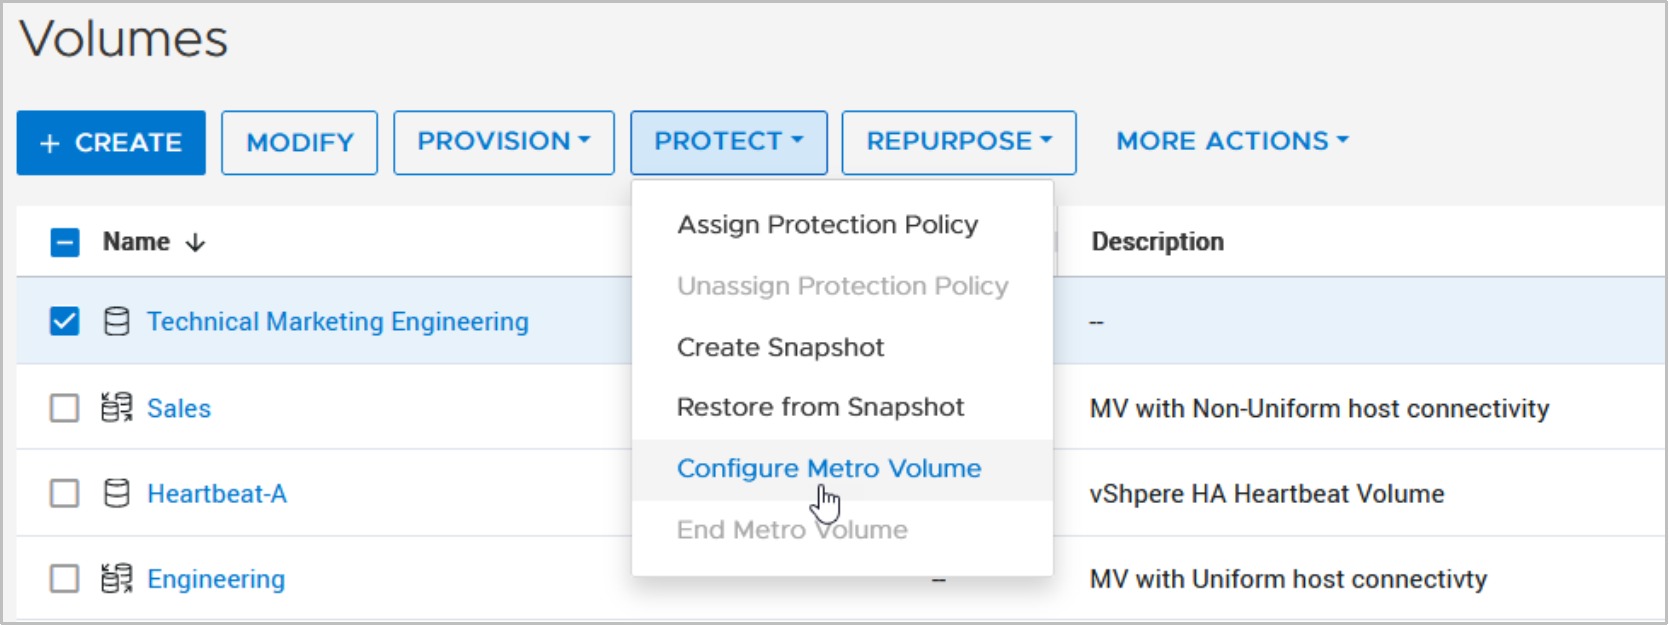
Figure 19. Configure Metro Volume in Volumes overview
The wizard prompts for the Remote System. When no remote system is set up, a link leads to the new remote systems wizard.
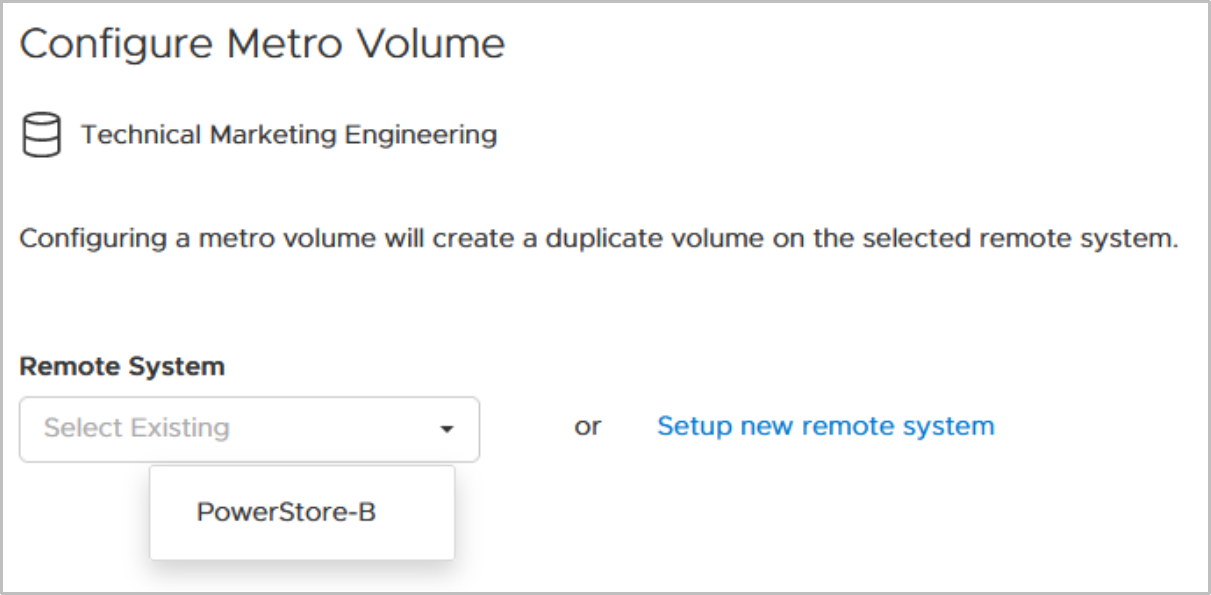
Figure 20. Configure Metro Volume wizard, single-appliance remote system
When the Remote System is a multi-appliance cluster, an extra drop-down menu allows you to select the appliance. With the Auto option, PowerStore Manager selects the best applicable appliance on remote PowerStore cluster for the volume.
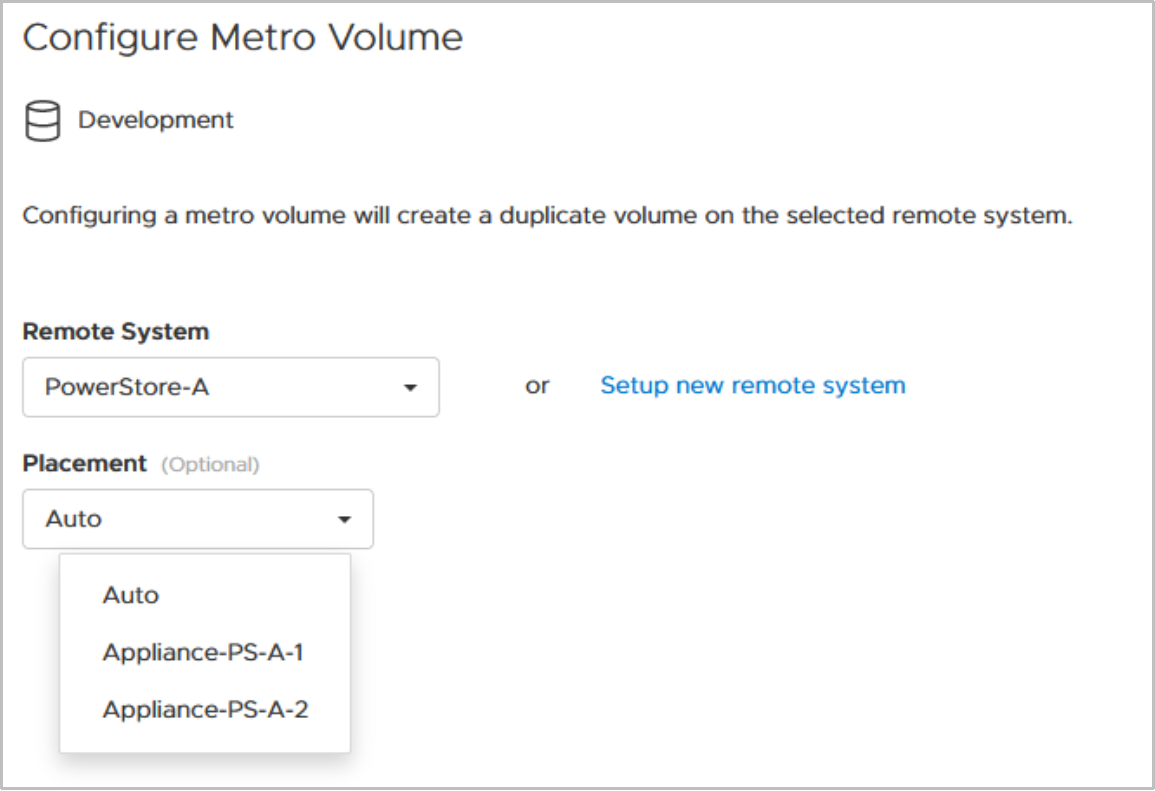
Figure 21. Configure Metro Volume wizard, multi-appliance remote system
Once a Metro Volume is set up, the icon in volume overview changes to indicate it is a Metro Volume. Also, the Metro Volume appears in Metro overview screen Protection > Metro. Depending on the current state, operations for the selected Volume are enabled.
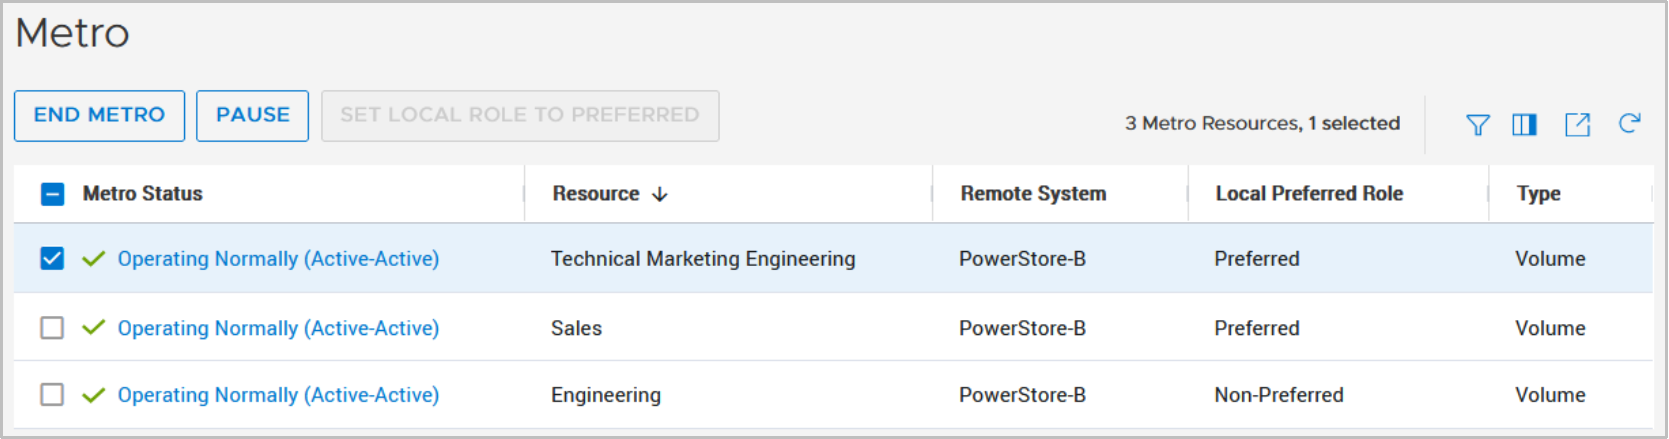
Figure 22. Protection > Metro overview
To view more details about the Metro Volume replication session, click the Metro Status for an individual Metro Volume:
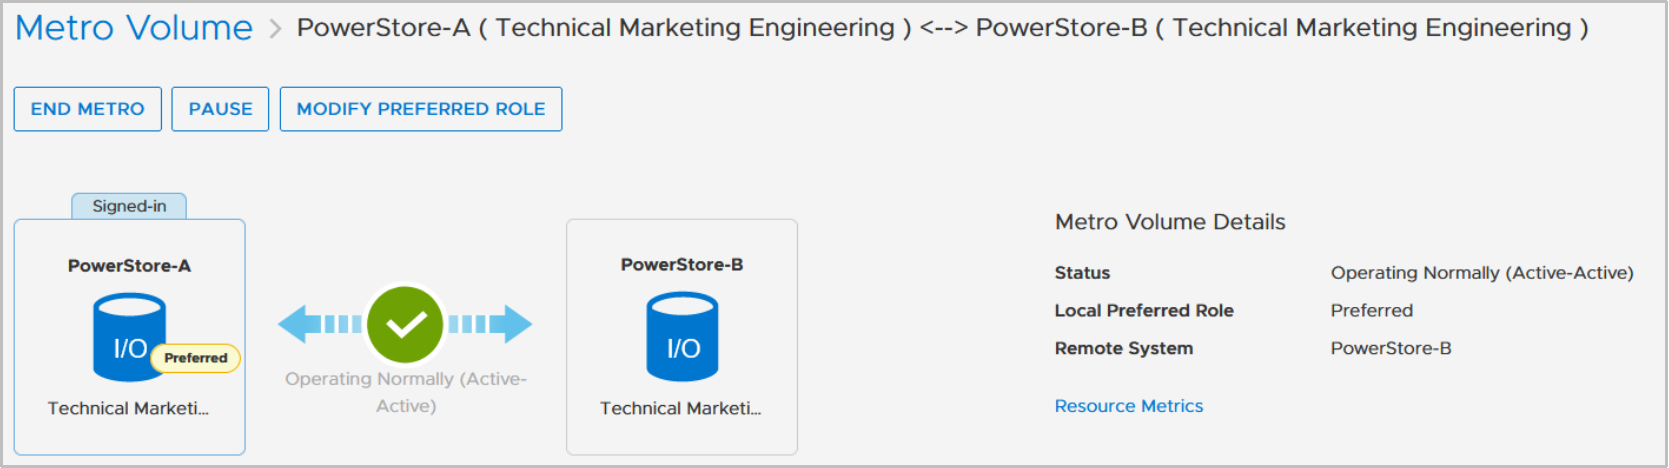
Figure 23. Metro Volume in Active-Active status
Pause and Resume
A Metro Volume pause operation pauses the replication traffic to the peer, and this operation is possible in almost all situations. A dialog box details the status after the Metro Volume is in paused state. While the Metro Volume is in paused state, the non-preferred volume appears offline to mapped hosts and no replication traffic is allowed.
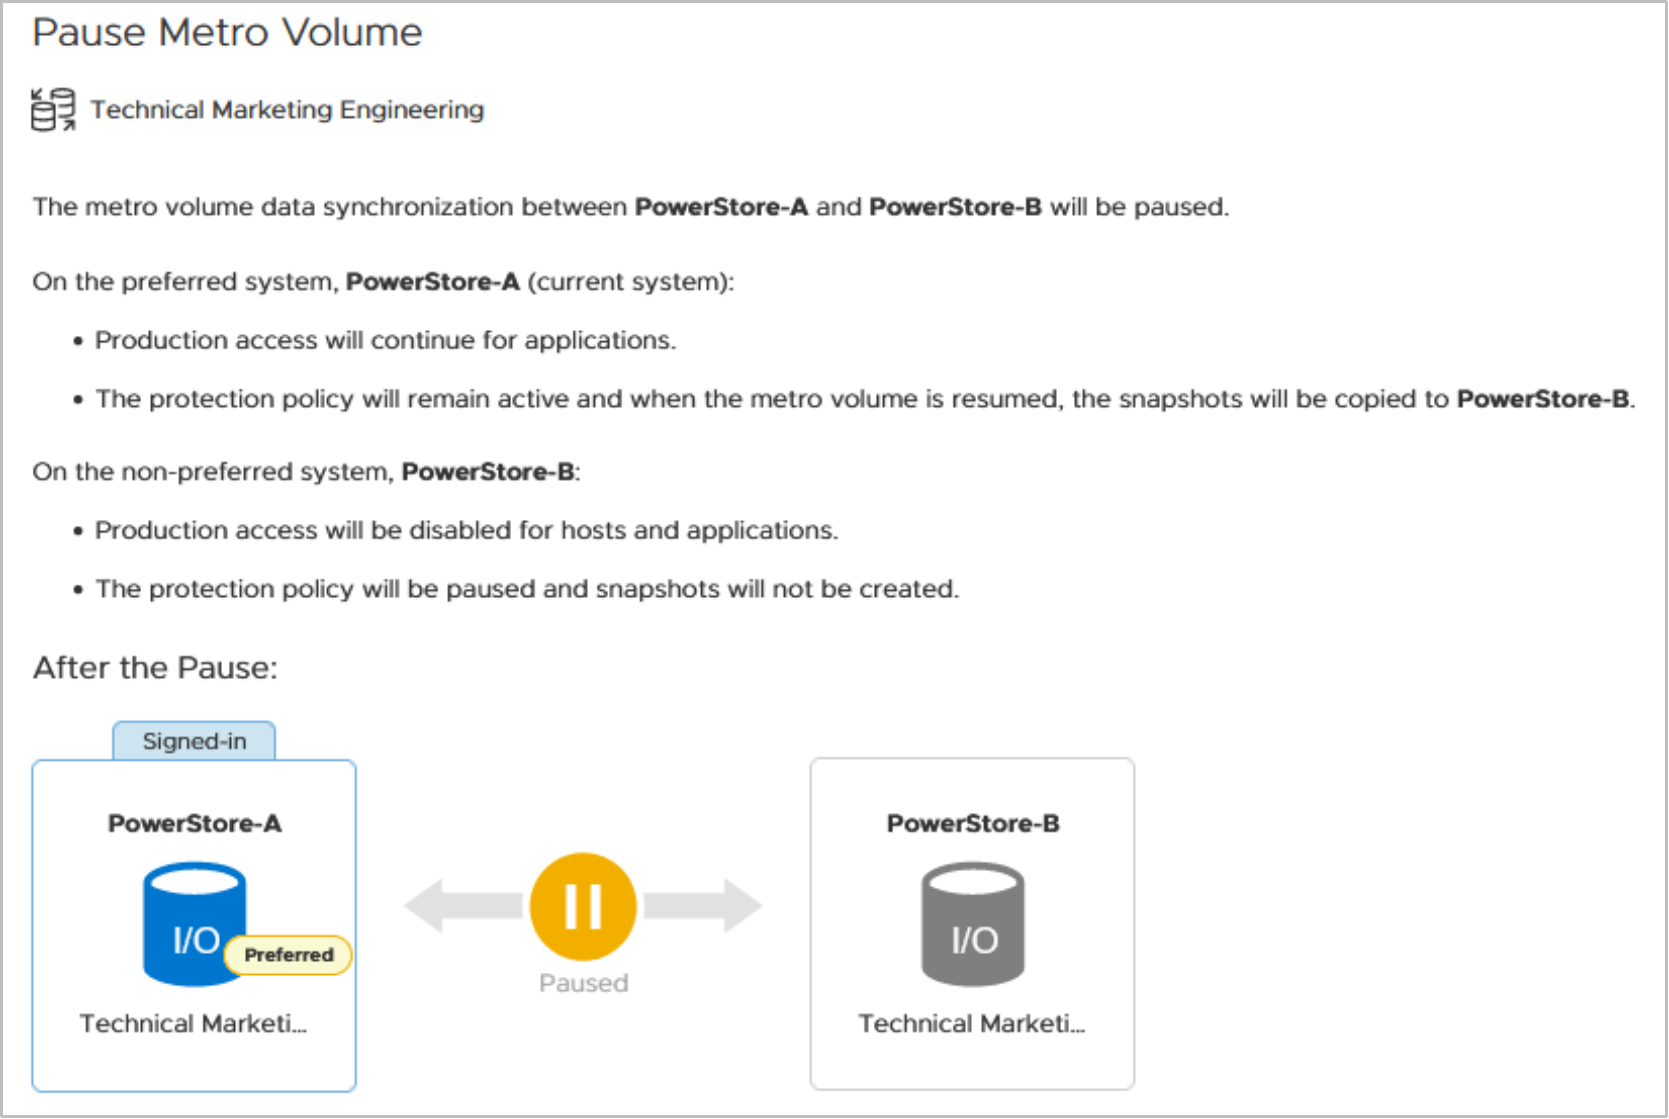
Figure 24. Pause Metro Volume
When the Metro Volume is in the paused state, the Metro Volume session details show the status and allows the demote and resume operations.
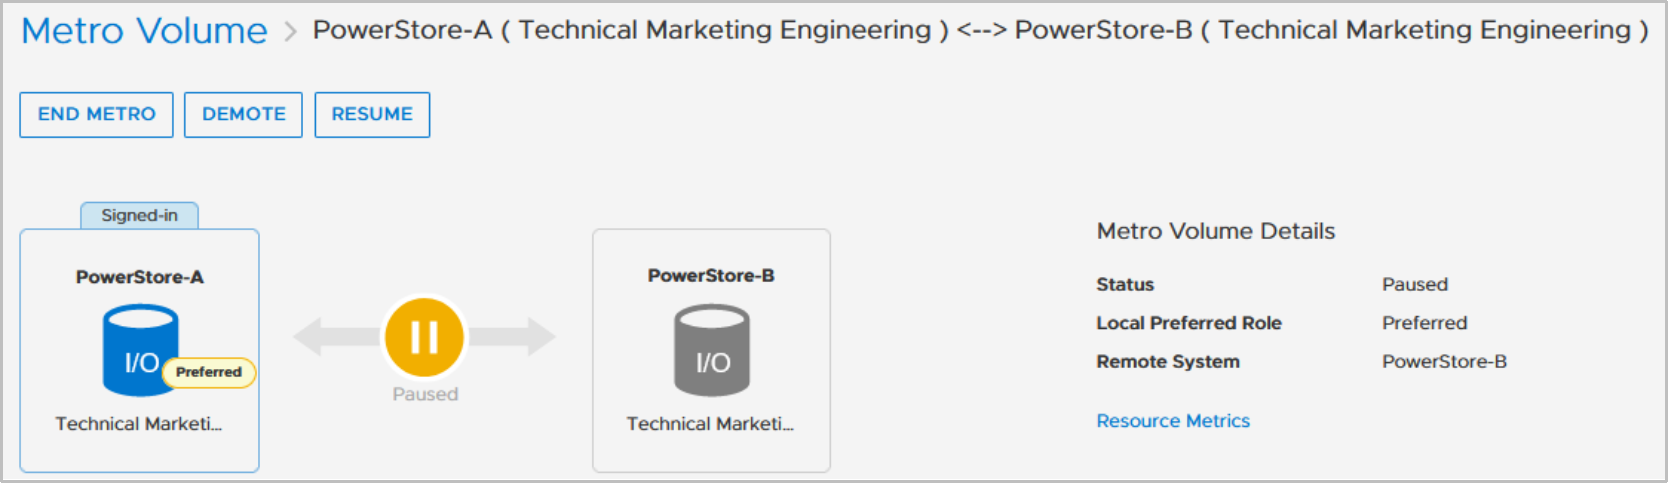
Figure 25. Metro Volume in Paused state
After you perform the Resume operation, the Metro Volume starts synchronization of the Metro Volume and enables host access after switching to active-active.
Modify preferred role
After a new Metro Volume configuration, the preferred side for the volume is the same as the original volume. In this example, the preferred side is PowerStore-A. The Metro Volume details page highlights the current system where the browser session is logged in and indicates the preferred side of the Metro Volume. The operation Modify Preferred Role is only possible in active-active state.
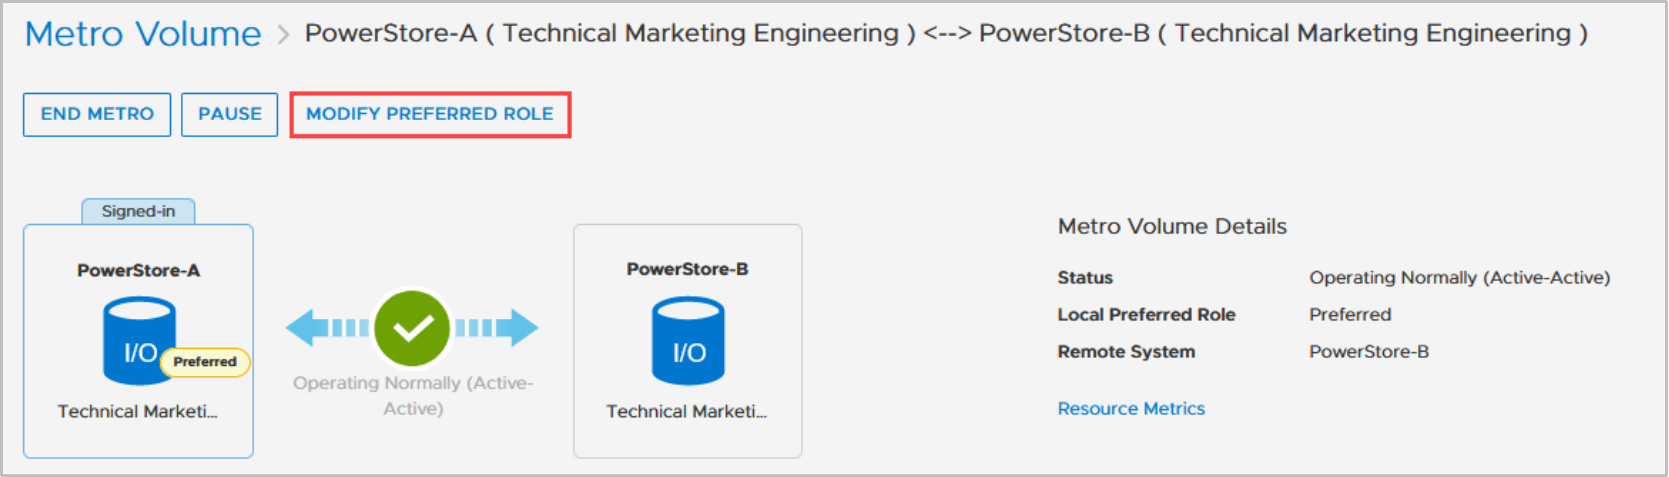
Figure 26. Metro Volume detail view
After you select Modify Preferred Role, a dialog box shows the new target configuration after the modification is finished. Modifying the preferred role does not have any influence on the host path ALUA setting.
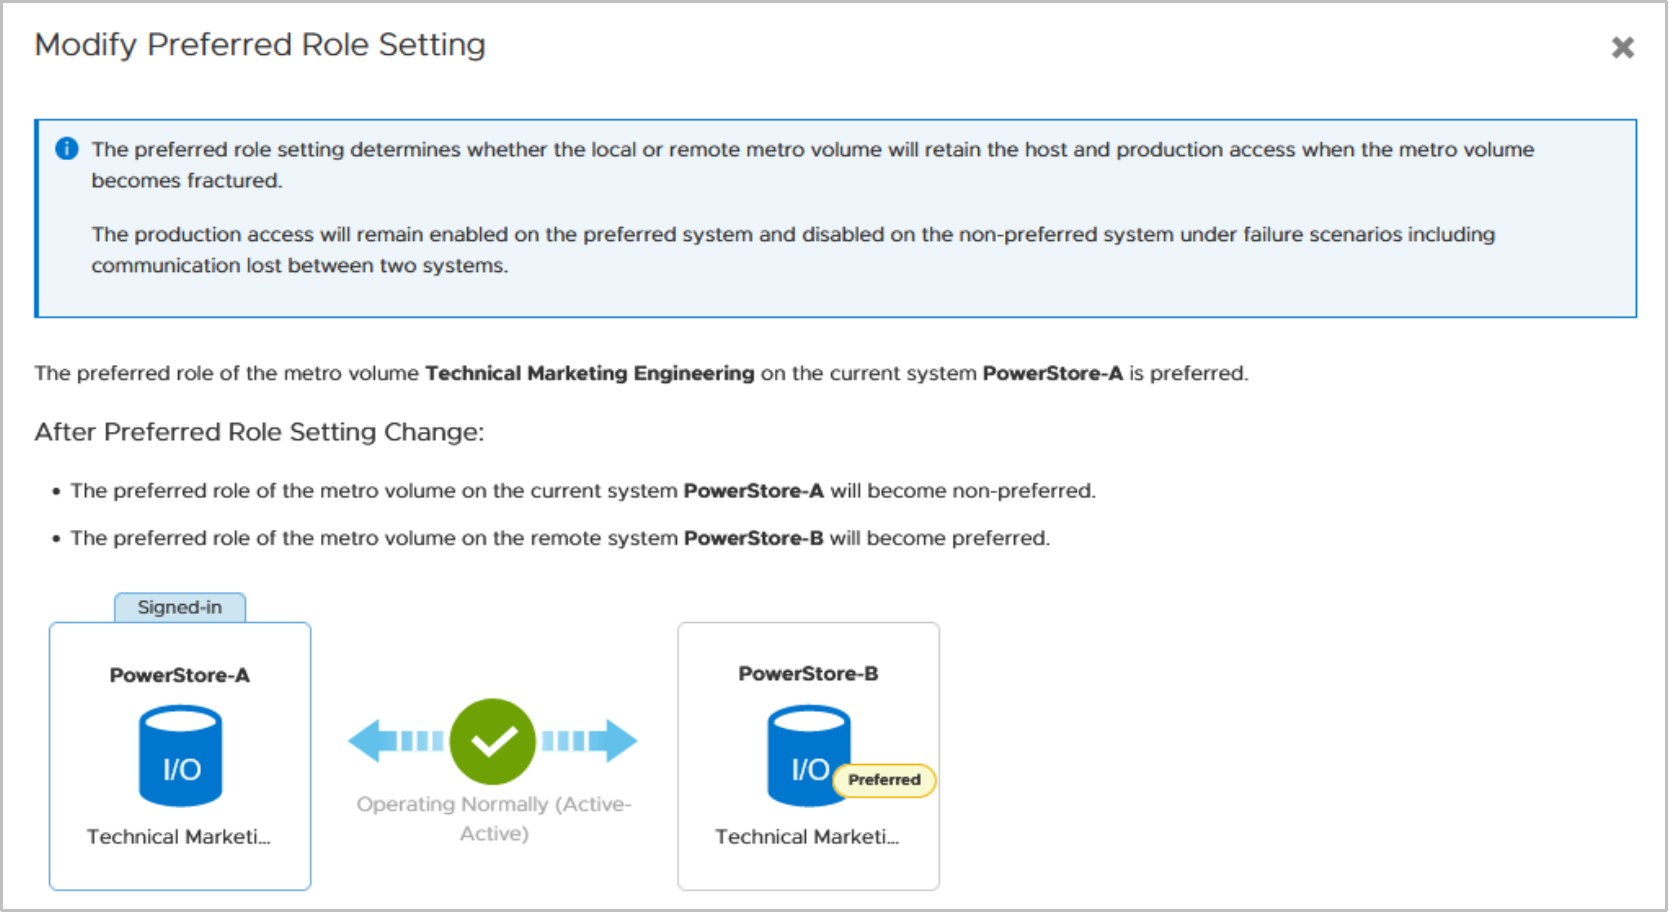
Figure 27. Modify Preferred Role Setting
Metro Volume in vSphere vCenter
When the Metro Volume sync session is set up, the volume is available on the peer PowerStore to be mapped to the hosts. After mapping and rescanning storage in vCenter, the paths appear in hosts under Storage Devices view. The shown path depends on the chosen host connectivity setup. The following figure shows a Metro Volume in a uniform connectivity after the initial sync when the volume reached active-active state. In this example, PowerStore-A is set up as co-located to the ESXi host, and PowerStore-B is the remote array. Active (I/O) indicates the active working path.
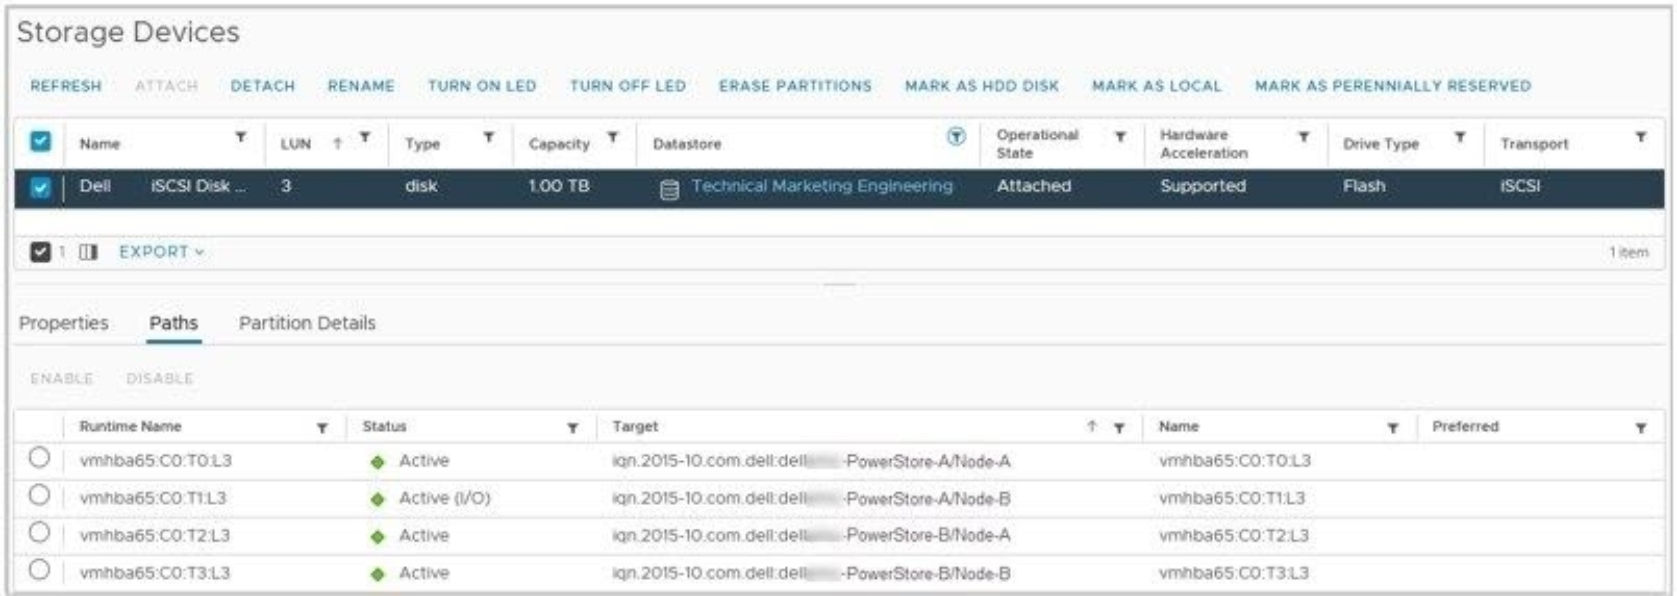
Figure 28. Uniform Metro Volume in vCenter
If you are pausing the Metro sync session or if there is a failure scenario that affects the replication, the path to the non-preferred side of the Metro Volume will show the status of dead. After a previous Modify Preferred Role operation, the Metro Volume would be offline on PowerStore-A and show the dead paths while the active-optimized path switched over to PowerStore-B/Node-B with volume node affinity. The status Active (I/O) in vCenter shows the changed working path which is the new ALUA active optimized path presented by PowerStore-B.
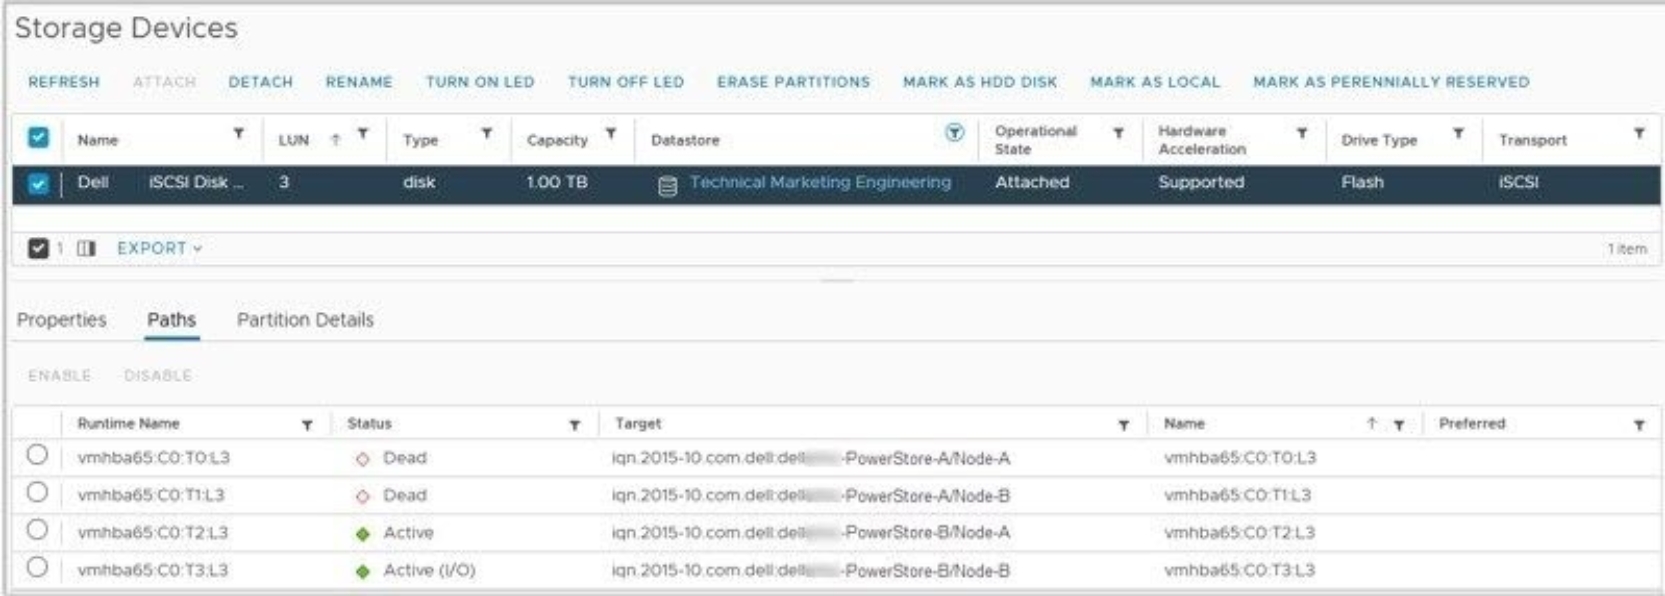
Figure 29. Uniform Metro Volume in vCenter after pause or during failure scenario
In any case, after Metro Volume resumes from a paused state or a failure scenario is solved, PowerStore starts the self-healing process of Metro Volume. After the Metro Volume is switched back into active-active, ESXi hosts can reestablish the paths.
Promote or demote after a failure situation
In a non-uniform host configuration when using the non-preferred volume, affected hosts lose all active paths to the Metro Volume. In this case, vSphere HA or vSphere FT must switch production to a host with paths to the preferred side of the Metro Volume. Path information for a Uniform connected Volume is identical for all ESXi hosts. In the example, host esx-a has a non-uniform Metro Volume configured and shows only the path to the local PowerStore cluster PowerStore-A.
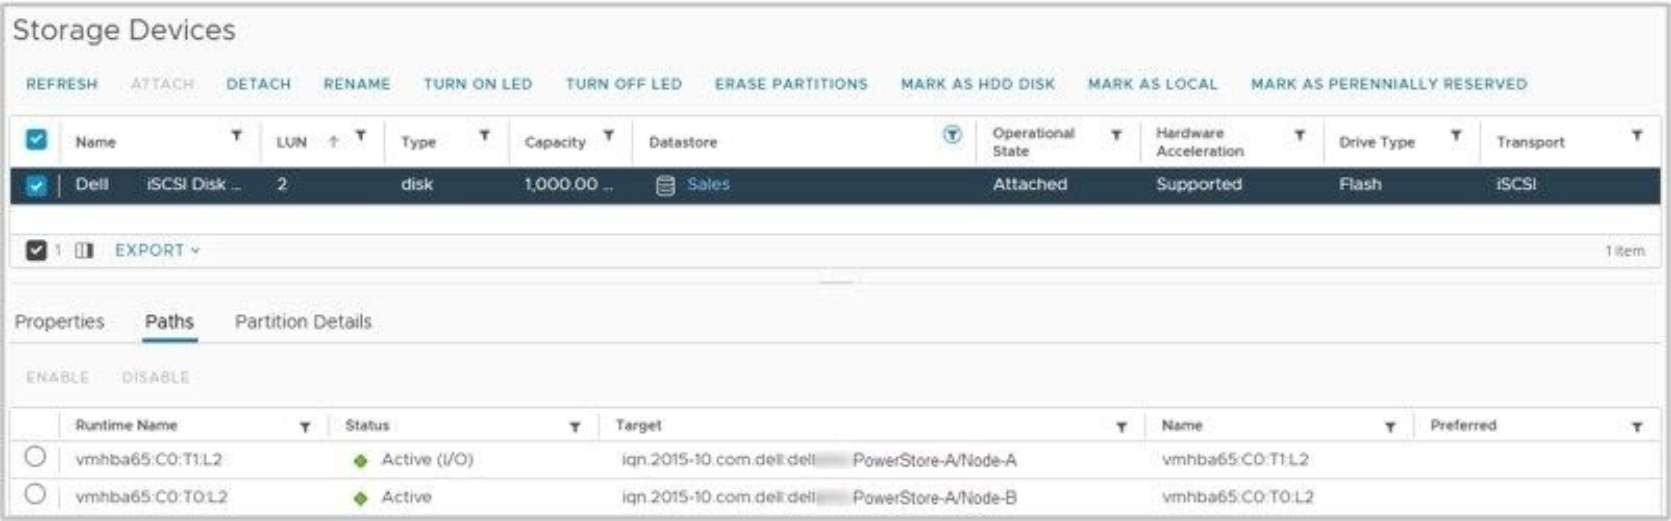
Figure 30. Non-uniform Metro Volume in vCenter
For instance, during a power outage of the site with the preferred volume, the hosts with connectivity to the non-preferred volume will lose all paths to the volume. To enable production on the surviving array, it is possible to promote the non-preferred volume to enable host access to resume operations. The following figure shows the non-preferred Volume on PowerStore-B after a failure.
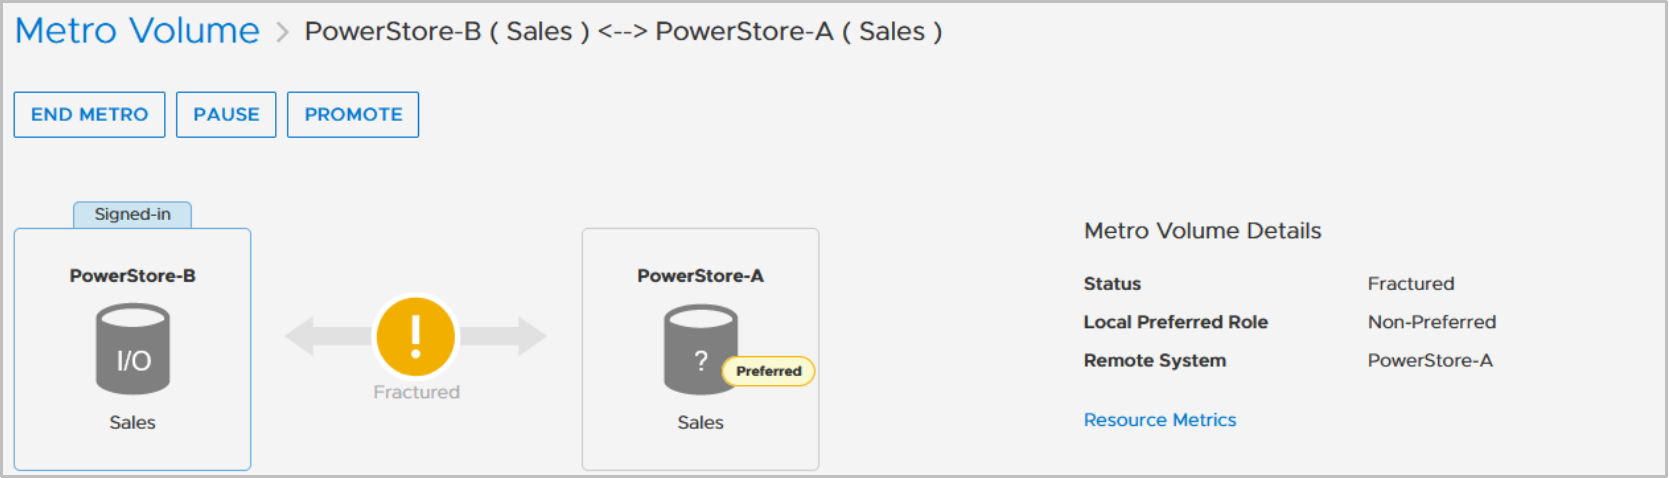
Figure 31. Fractured state on Non-Preferred
With the promote operation, it is possible to manually enable production host I/O for this volume even if it is non-preferred. To mitigate a possible split-brain situation when both sides are online for the hosts, a promote action is only possible when the peer array is offline, or the volume is demoted on the preferred side. A dialog box shows the situation after Promote is performed (see below).
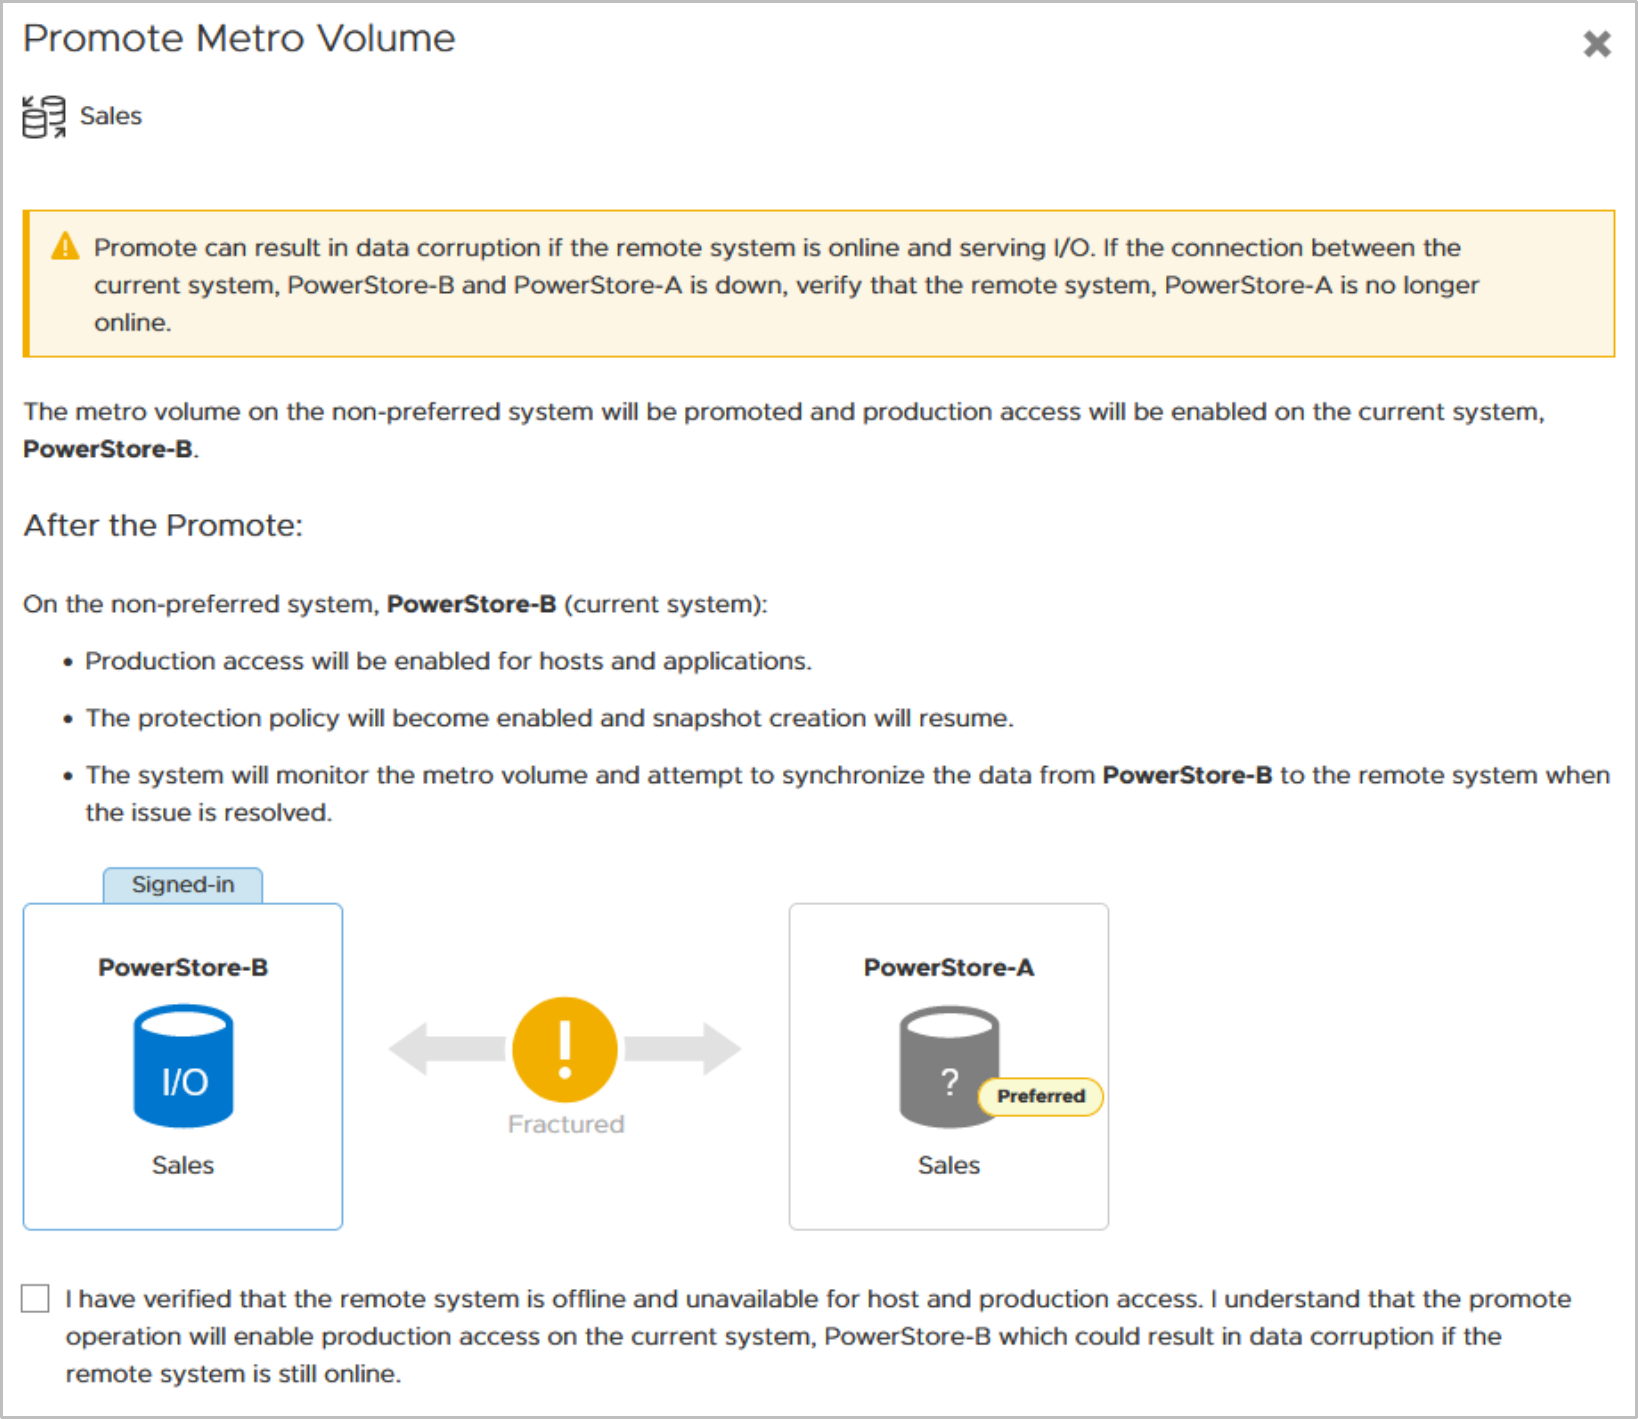
Figure 32. Promote Metro Volume
When the promote operation finishes, the paths to the non-preferred volume on ESXi hosts change to active for production I/O. Once the problem causing the fracture is solved, PowerStore starts the self-healing process and synchronizes the I/O from the promoted side to the peer.
A demote operation allows disabling the production host I/O on the preferred volume. This action might be required when a promote is planned, but the PowerStore with the preferred volume is still available. After you click the demote operation, the dialog box shows the Metro Volume after the operation is finished (see below).
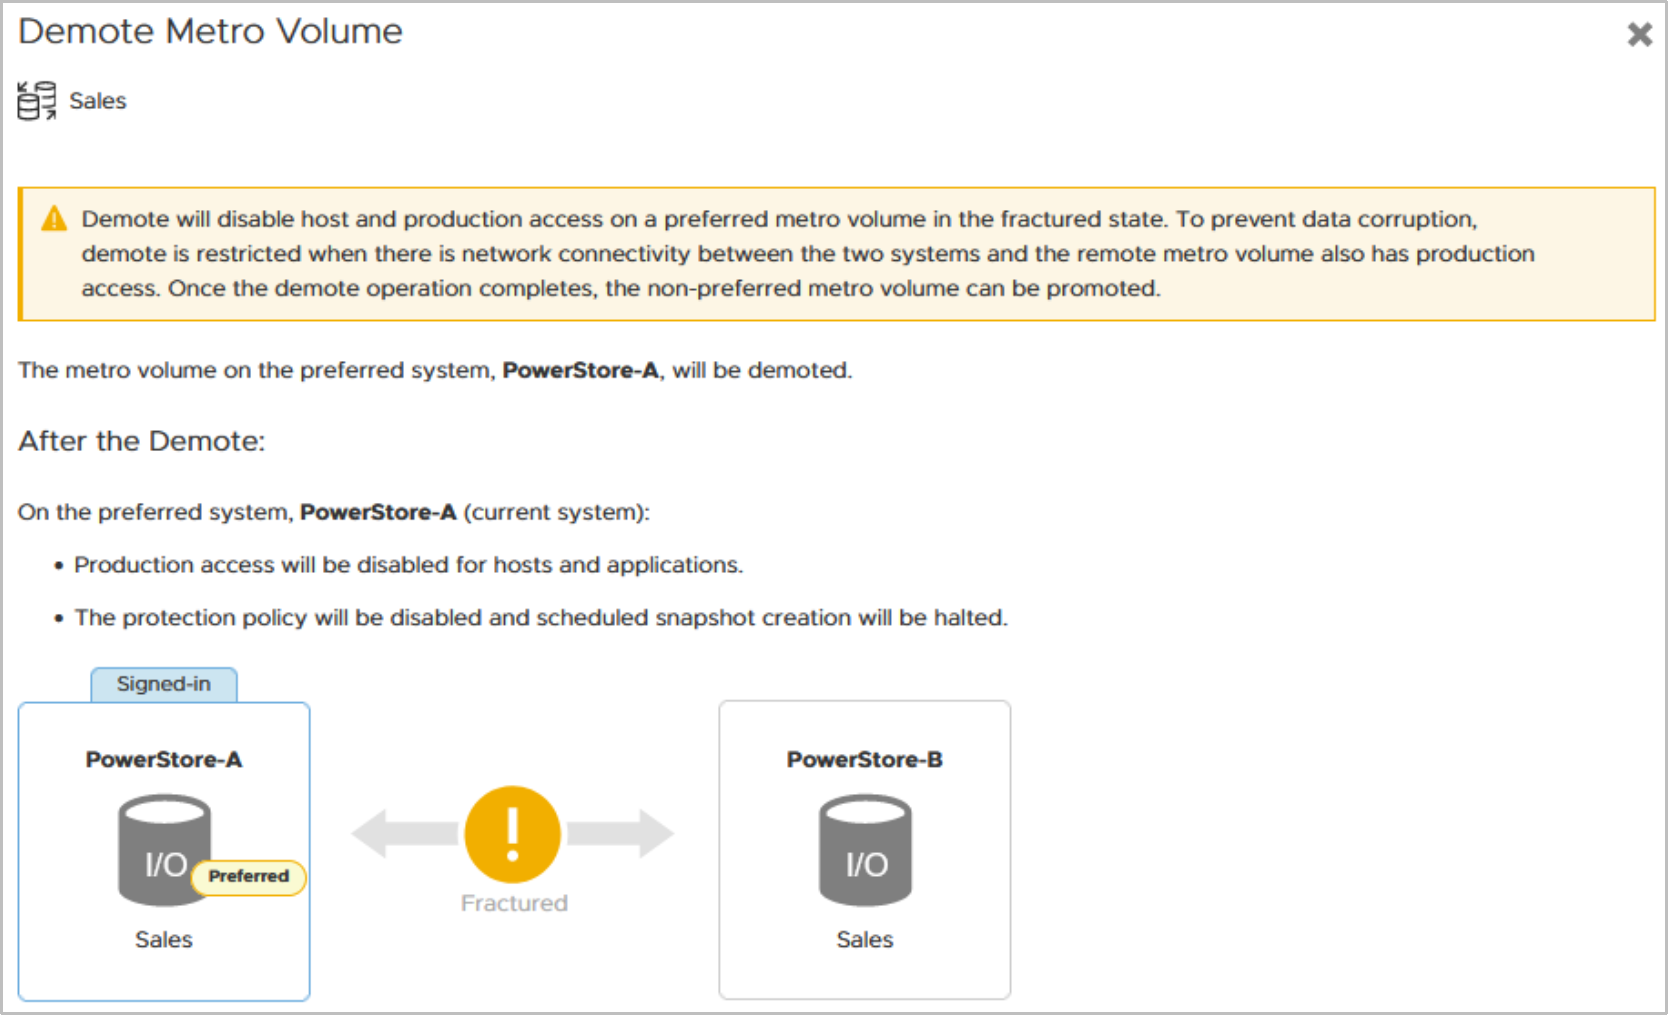
Figure 33. Demote Metro Volume