
None
None
-
This section describes the CloudPools configuration on a PowerScale cluster, which includes the following:
- Verify licensing
- Cloud storage account creation
- CloudPool creation
- File pool policy creation
- Run SmartPools job for CloudPools
- SyncIQ policy creation
Verify licensing
This section describes how to verify licensing on the PowerScale system.
- Log in to the OneFS WebUI and go to Cluster Management > Licensing as shown in Figure 19.
- Verify that the CloudPools and SmartPools license status is Activated.
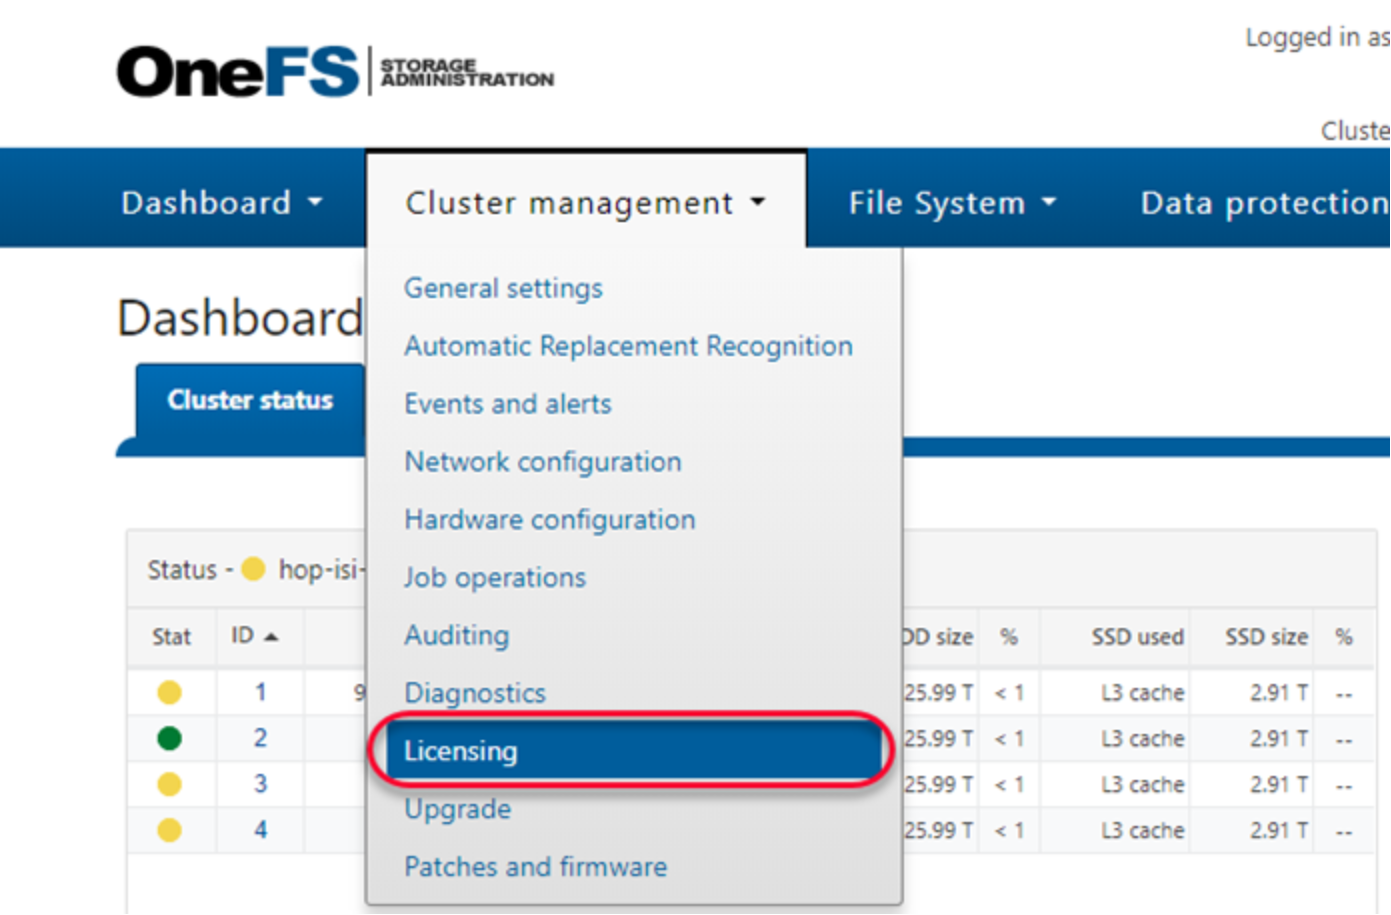
Figure 19. Verifying licenses
Cloud storage account for S3
This section describes how to create a cloud storage account for S3 on a PowerScale cluster.
- Log in to the OneFS WebUI and go to File System > Storage Pools. Click CloudPools as shown in Figure 20.
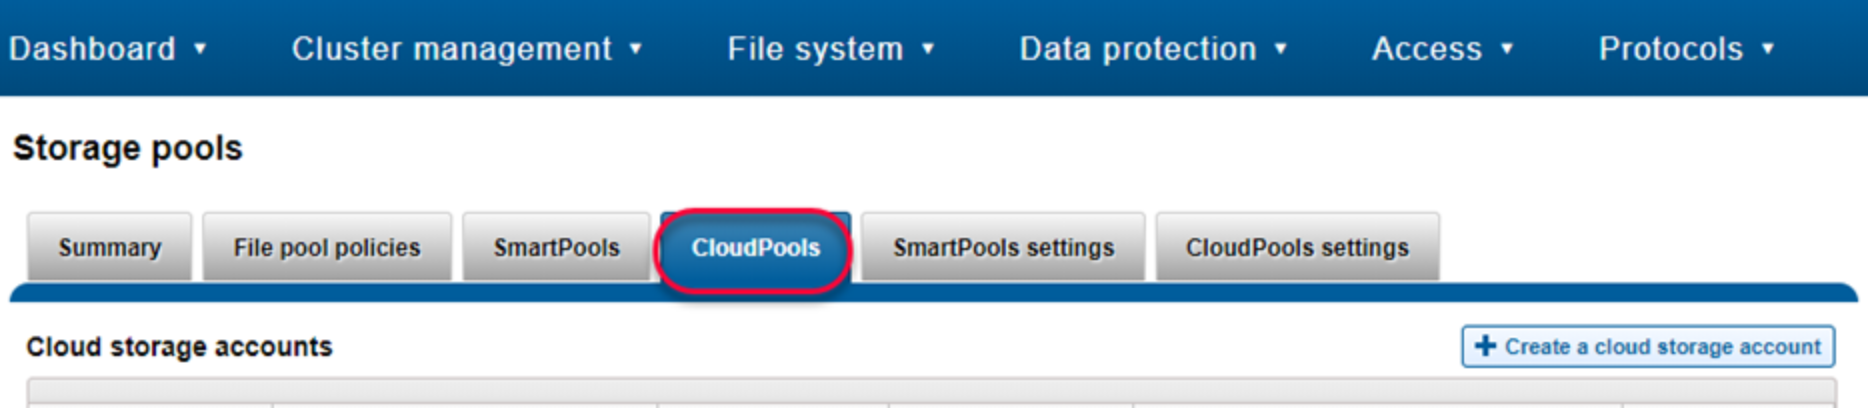
Figure 20. CloudPools
- Click the + Create a Cloud Storage Account button from the Create a Cloud Storage Account page as shown in Figure 21. The minimum information for CloudPools and Amazon S3 is as follows:
- Name or alias: Type a name to identify the cloud storage account.
- Type: Select Amazon S3.
- URI: Type the URI to connect AWS. For example, URI is https://s3.us-west-1.amazonaws.com.
- User name (key): Type the Access key ID of the specific IAM user for CloudPools.
- Key (secret key): Type the secret access key of the specific IAM user for CloudPools.
- Account ID: Type the Account ID gathered on the AWS console.
- Telemetry reporting bucket: Type the bucket name created on the AWS console.
- Storage region: Select the mapping region for the URI.
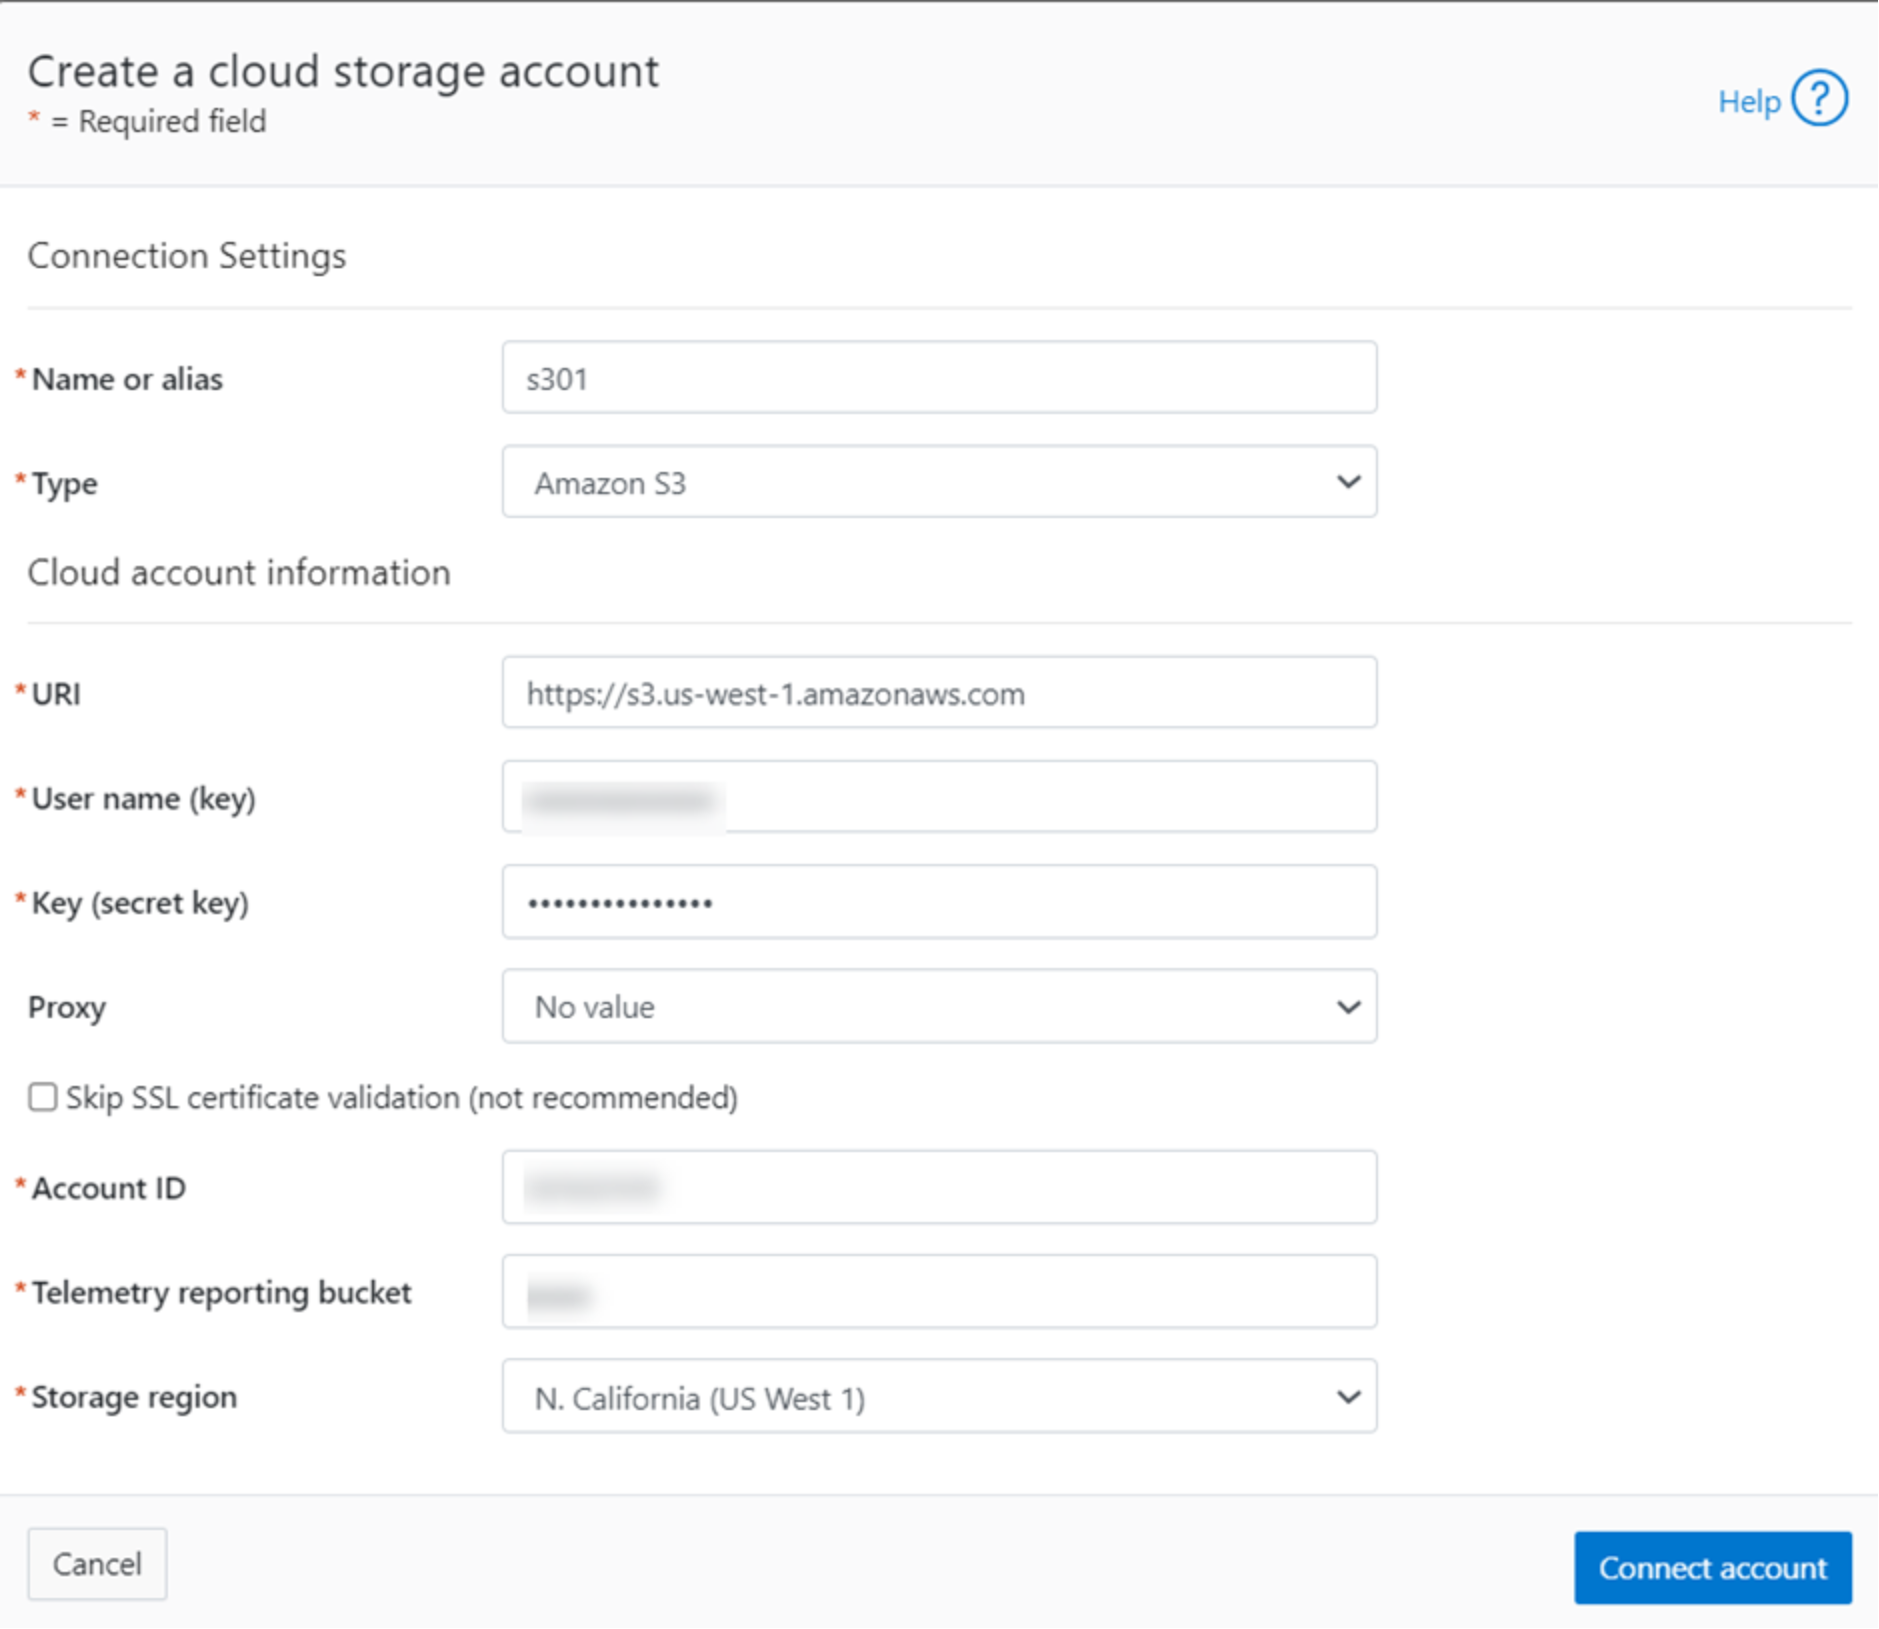
Figure 21. Create a cloud storage account
- Click Connect account to create a cloud storage account. This operation results in two buckets being created in Amazon S3. One bucket will start with a d as a container to store the CDOs, and the other will start with an m as a container to store the associated metadata.
Cloud storage account for C2S S3
This section describes how to create a cloud storage account for C2S S3 on a PowerScale cluster.
- Log in to the OneFS WebUI and go to File System > Storage Pools. Click CloudPools as shown in Figure 20.
- Click the + Create a Cloud Storage Account button from the Create a Cloud Storage Account page as shown in Figure 22. The minimum information for CloudPools and Amazon C2S S3 is as follows:
- Name or alias: Type a name to identify the cloud storage account.
- Type: Select Amazon C2S S3.
- Cloud account information – URI: Type the URI to connect AWS. For example, URI is https://s3.amazonaws.com.
- Storage region: Select the mapping region for the URI.
- Credential server information – URI: Type the credential provider URI used in C2S.
- Agency: Type the credential provider agency used in C2S.
- Mission: Type the credential provider mission used in C2S.
- Role: Type the credential provider role used in C2S.
- Certificate: Type the credential provider certificate used in C2S.
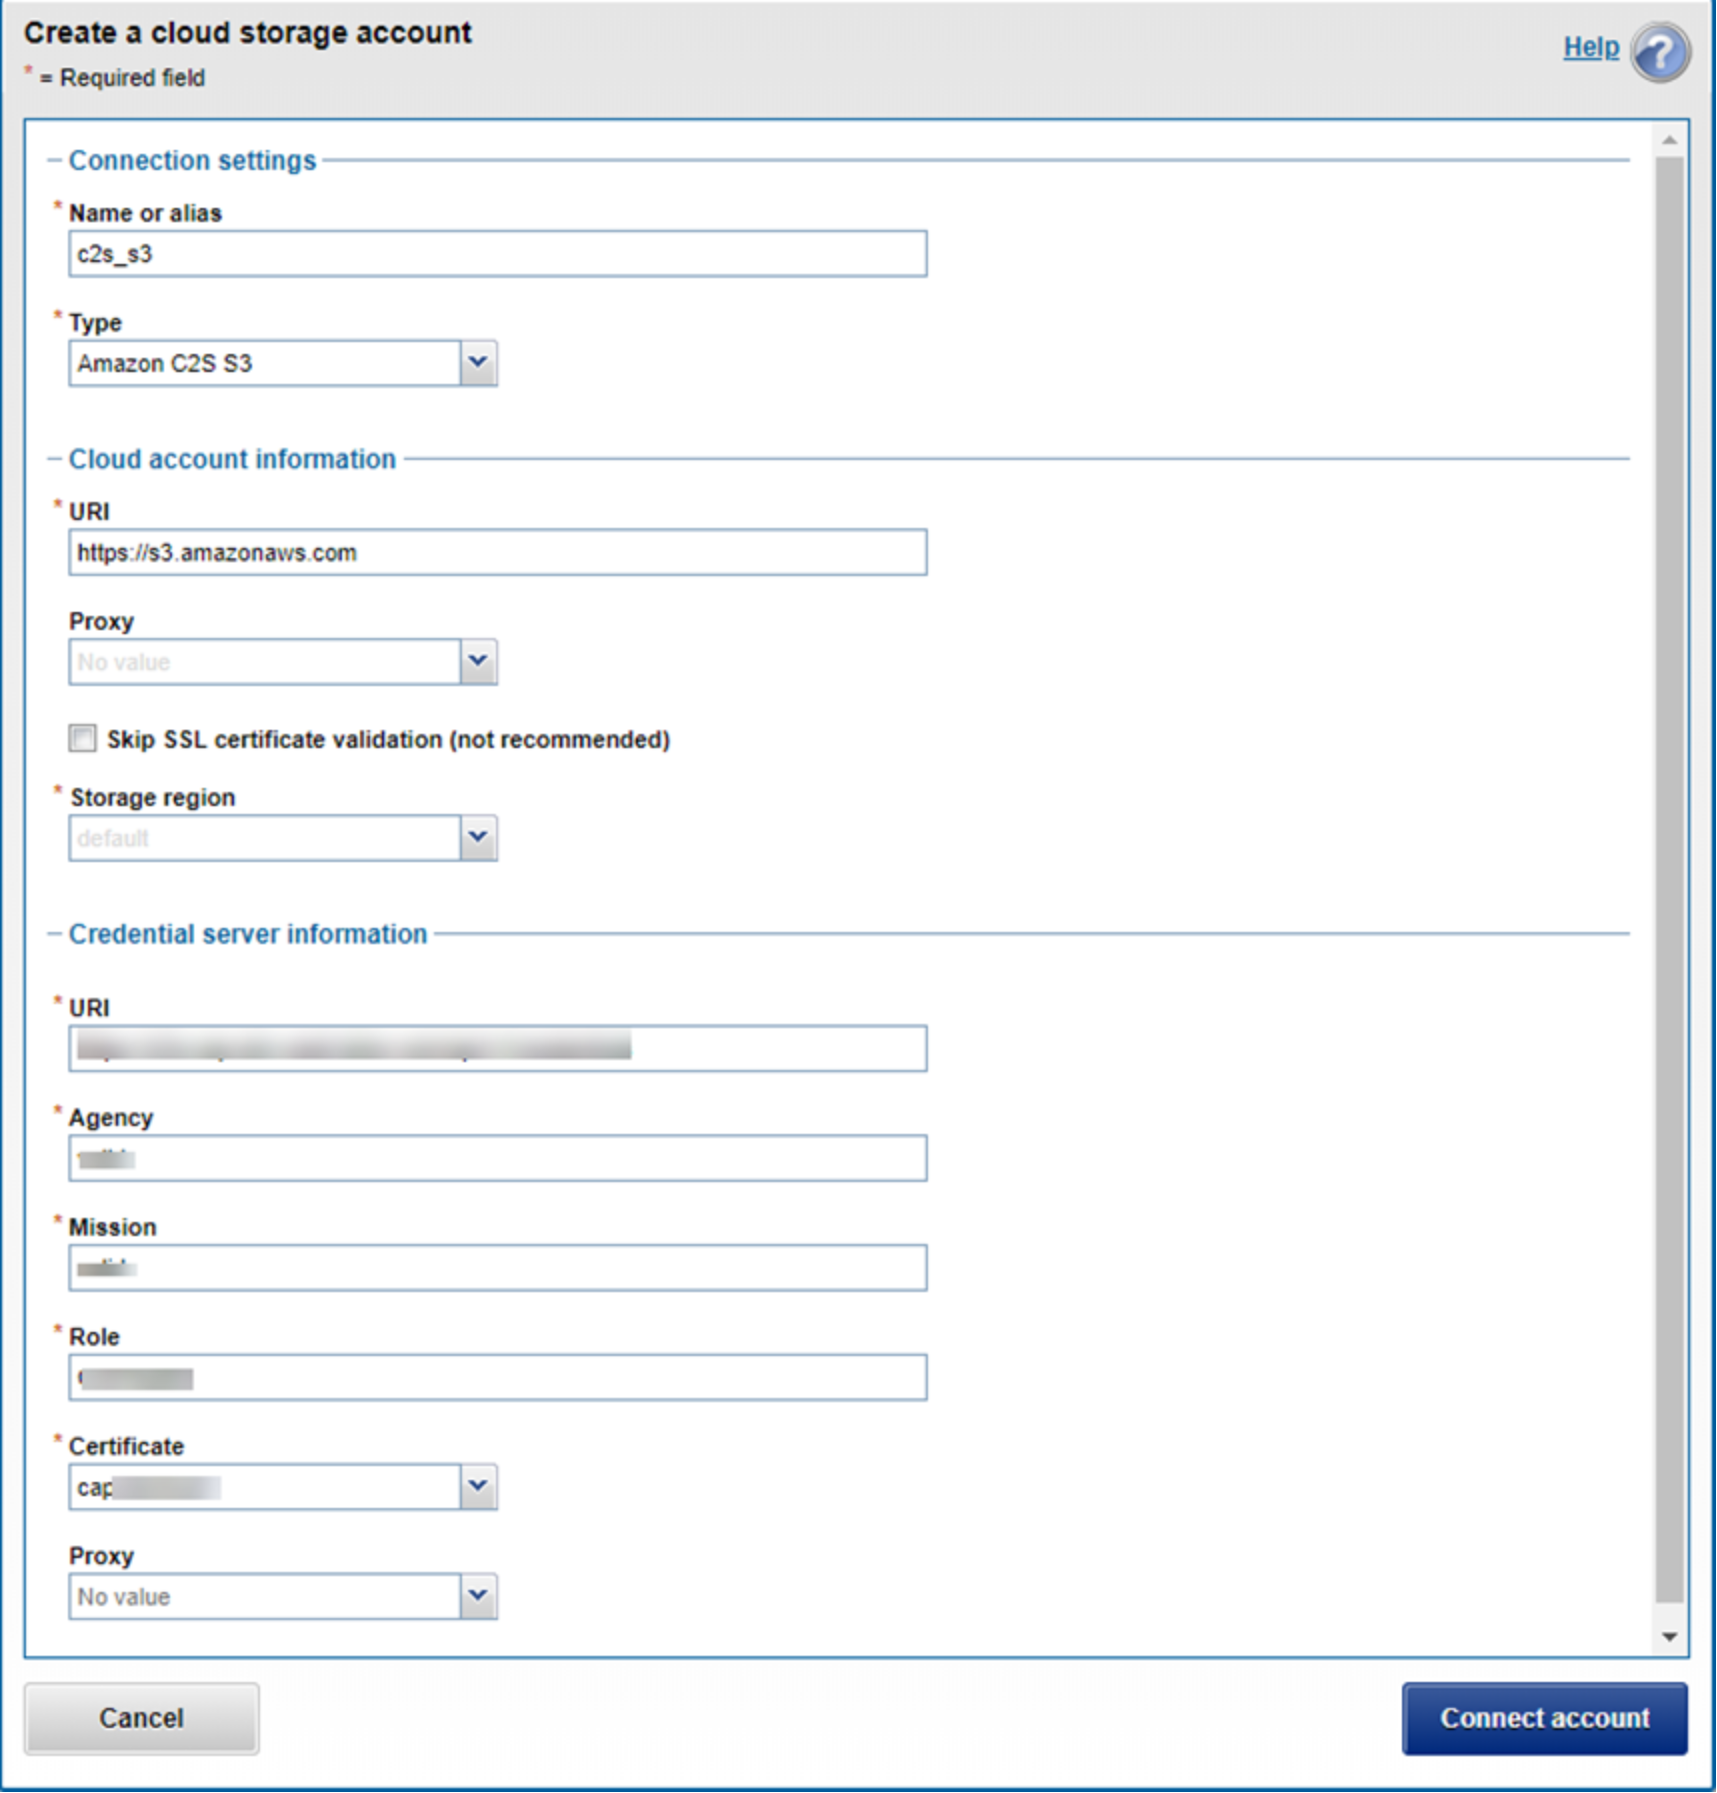
Figure 22. Create a cloud storage account
- Click Connect account to create a cloud storage account. This operation results in two buckets being created in Amazon C2S S3. One bucket will start with a “d” as a container to store the CDOs, and the other will start with an “m” as a container to store the associated metadata.
CloudPool for S3
This section describes how to create a CloudPool for S3 on a PowerScale cluster.
- Log in to the OneFS WebUI and go to File System > Storage Pools. Click CloudPools as shown in Figure 20.
- Click the + Create a CloudPool button from the Create a CloudPool page as shown in Figure 23. The minimum information is as follows:
- Name: Type a name to identify the CloudPool.
- Type: Select Amazon S3.
- Account in CloudPool: Select the cloud storage account.
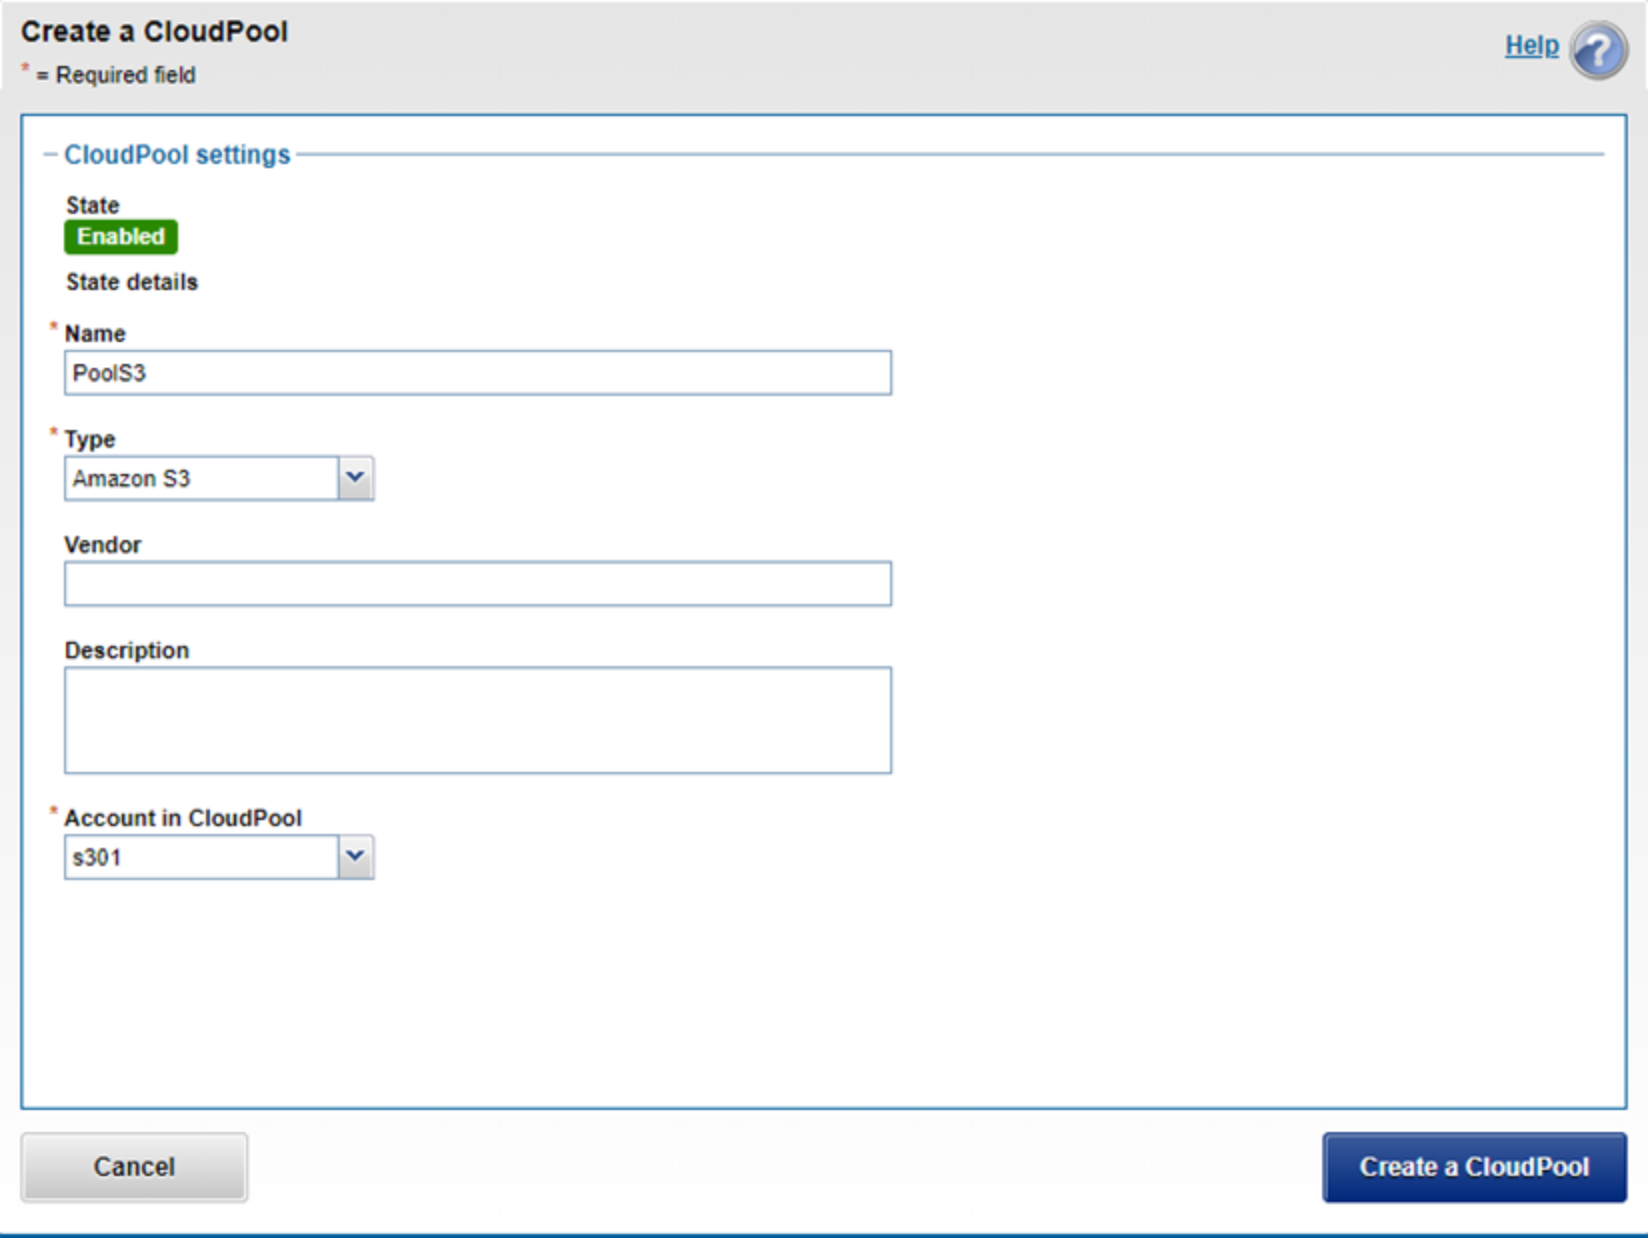
Figure 23. Create a CloudPool
- Click Create a CloudPool to create a CloudPool.
CloudPool for C2S S3
This section describes how to create a CloudPool for Amazon C2S S3 on a PowerScale cluster.
- Log in to the OneFS WebUI and go to File System > Storage Pools. Click CloudPools as shown in Figure 20.
- Click the + Create a CloudPool button from the Create a CloudPool page as shown in Figure 24. The minimum information is as follows:
- Name: Type a name to identify the CloudPool.
- Type: Select Amazon C2S S3.
- Account in CloudPool: Select the cloud storage account.
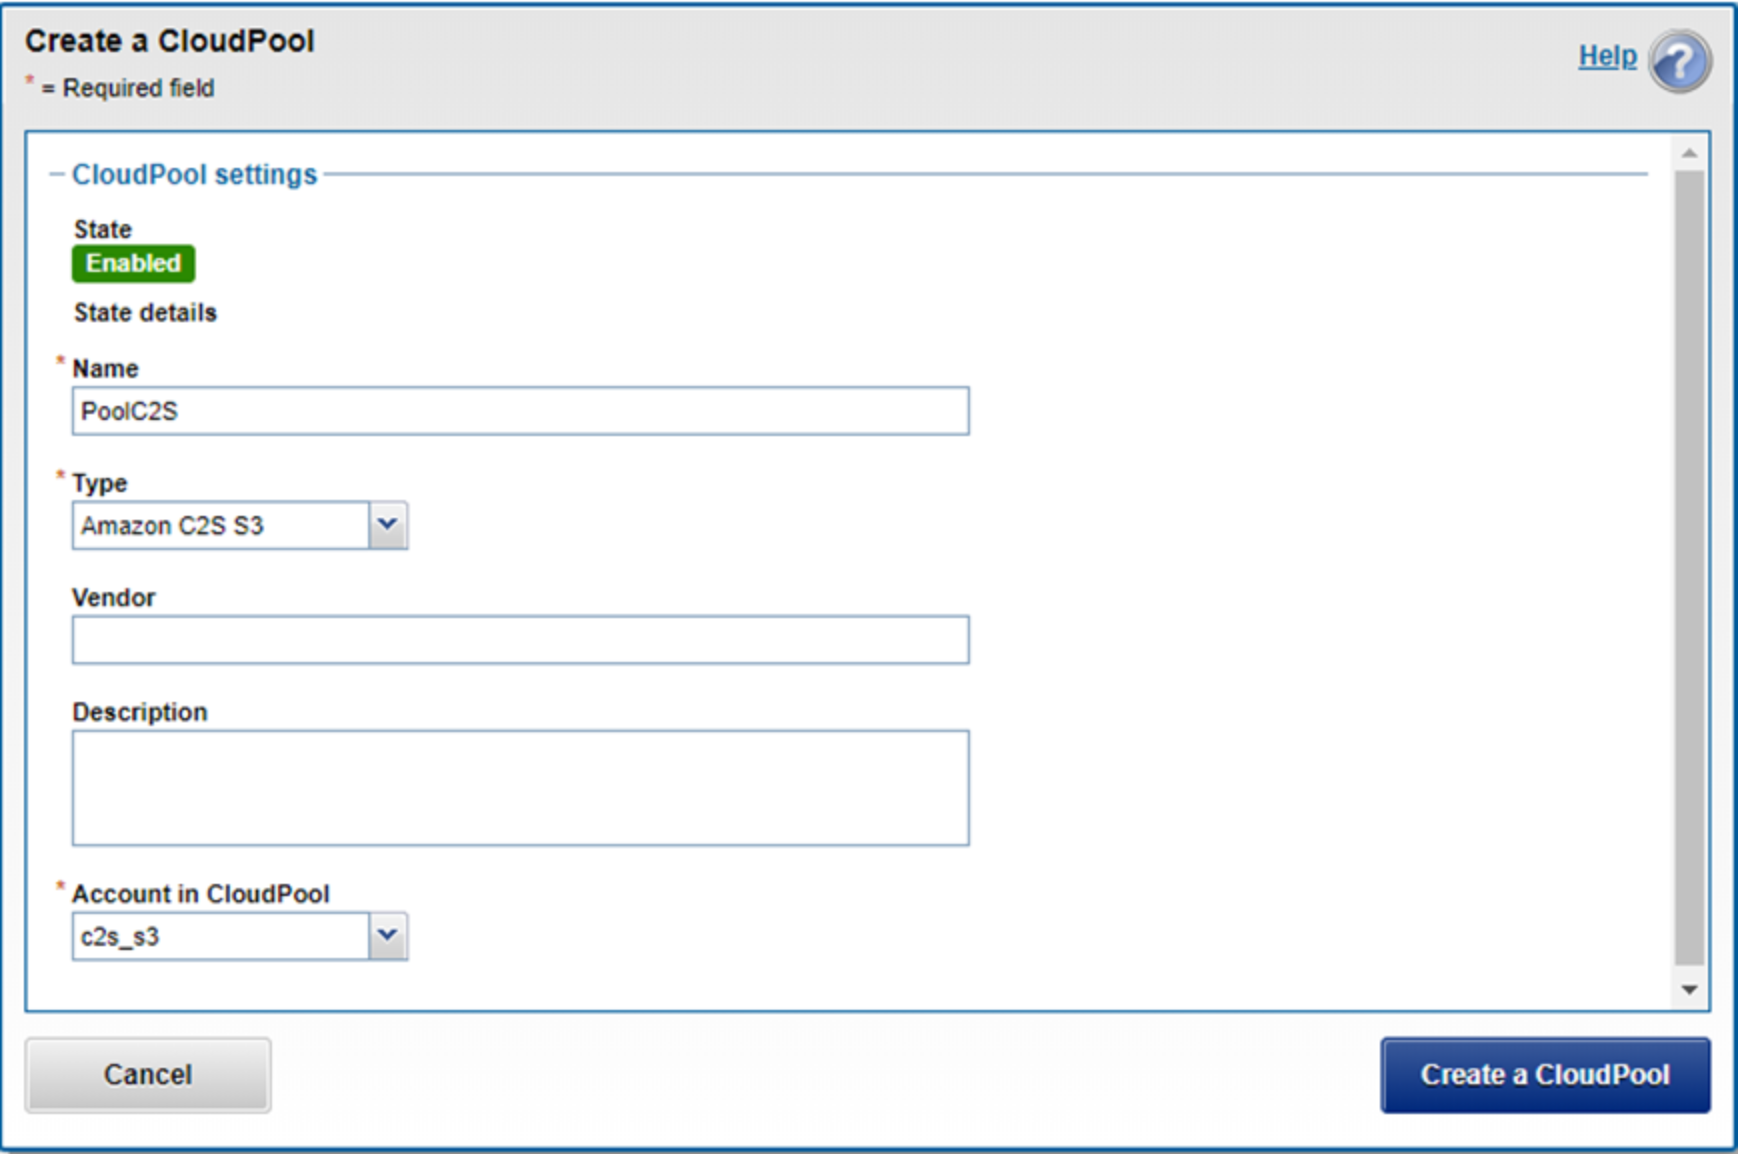
Figure 24. Create a CloudPool
- Click Create a CloudPool to create a CloudPool.
File pool policy
This section describes how to create a file pool policy on a PowerScale cluster.
- Log in to the OneFS WebUI and go to File System > Storage Pools. Click File Pool Policies as shown in Figure 25.

Figure 25. Create a file pool policy
- Click + Create a File Pool Policy from the Create a file pool policy page as shown in Figure 26 and Figure 27. The minimum information is as follows:
- Policy Name: Type a name to identify the file pool policy.
- File Matching Criteria: Define a logical group of files for CloudPools. See the section File-matching criteria
File-matching criteria. - Move to cloud storage: Select the specific CloudPool as the CloudPool storage target.
- Data retention settings: Set the data retention as your own. See the section Data retention
Data retention.
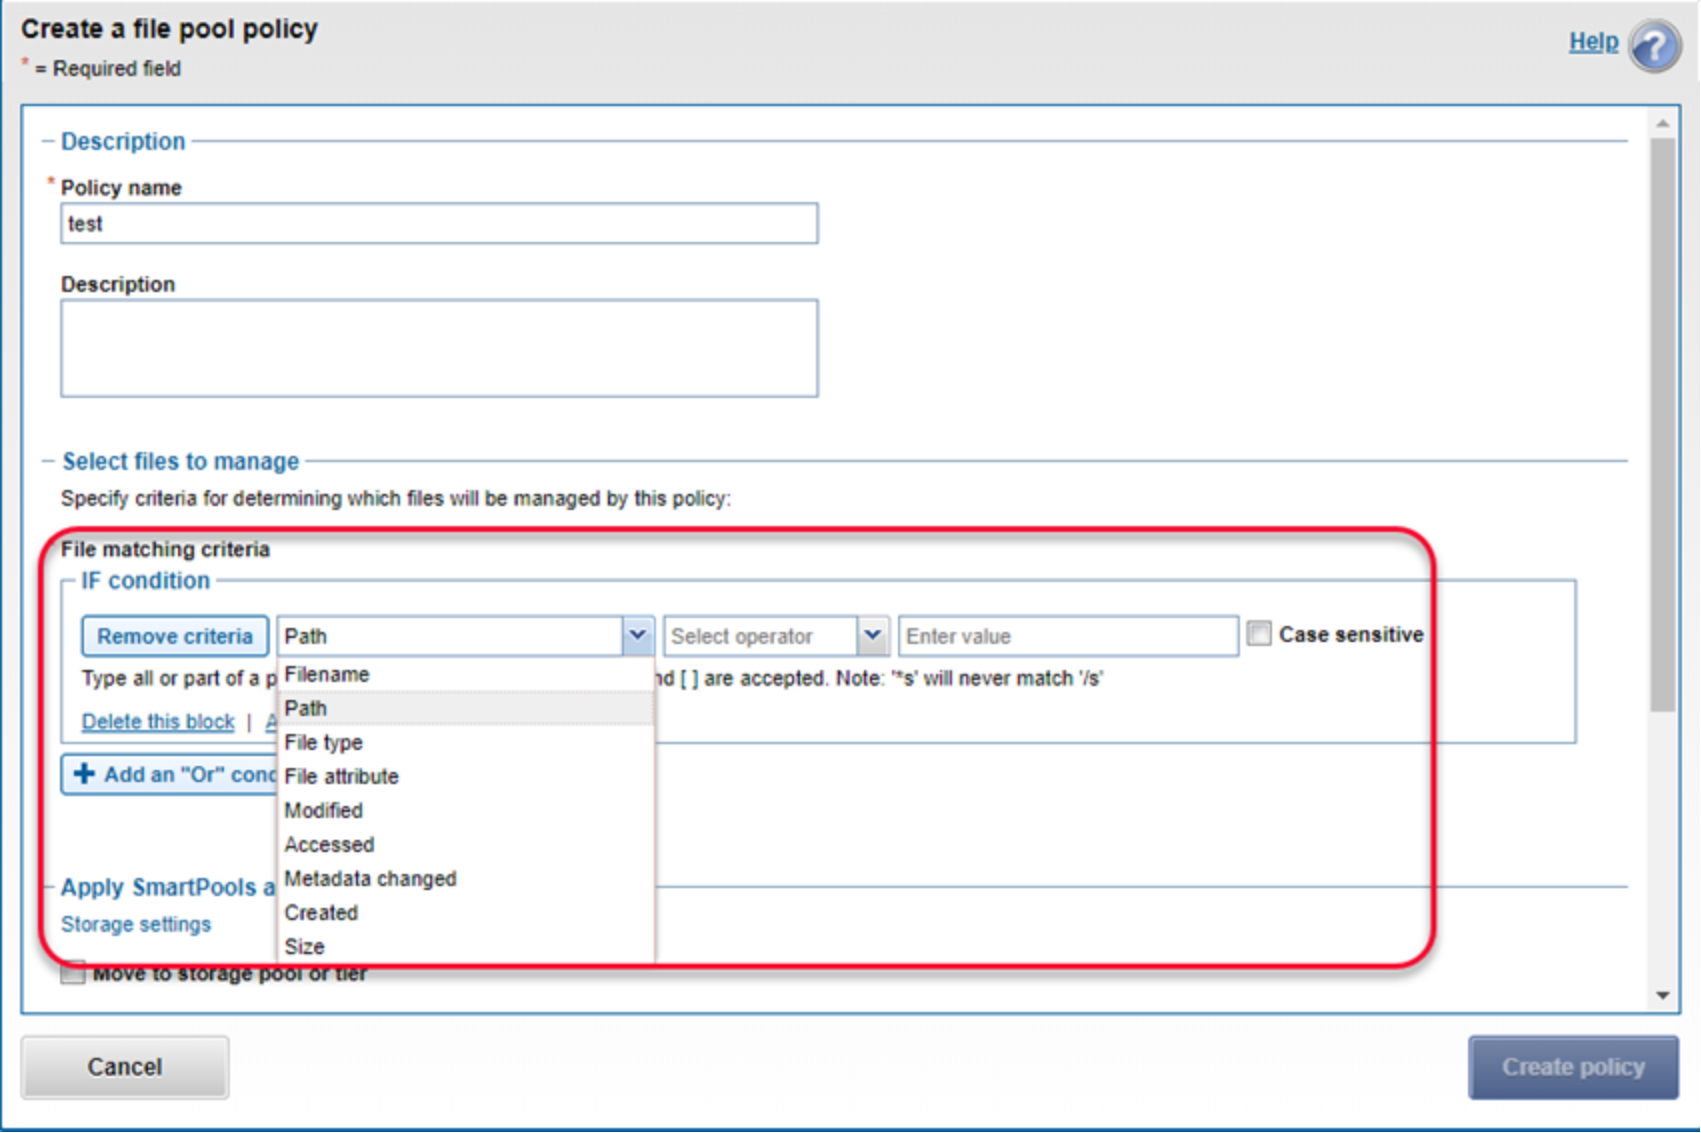
Figure 26. Create a file pool policy
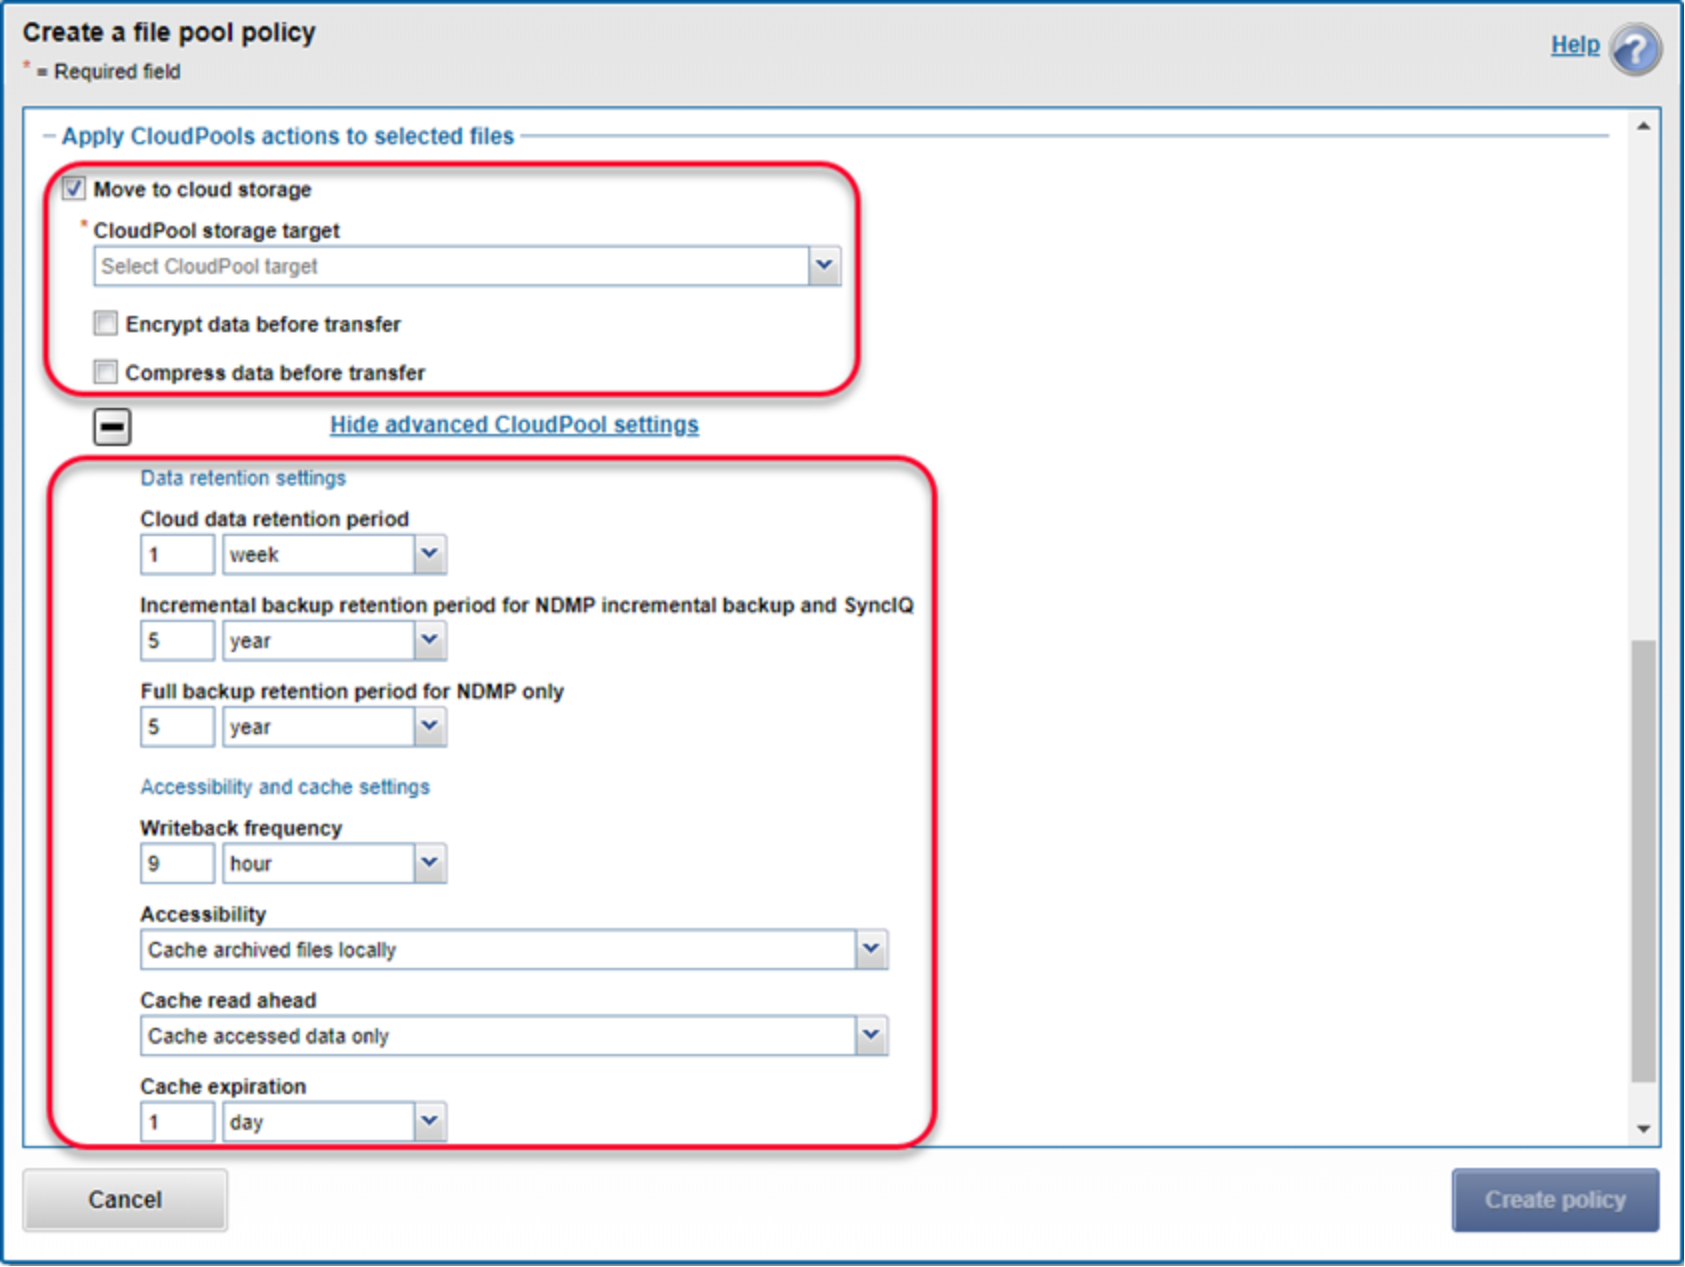
Figure 27. Create a file pool policy (continued)
- Click Create policy to create a file pool policy.
Run SmartPools job for CloudPools
This section describes how to run the SmartPools job for CloudPools on a PowerScale cluster.
- Log in to the OneFS WebUI and go to Cluster management > Job operations. Click Job types as shown in Figure 28.
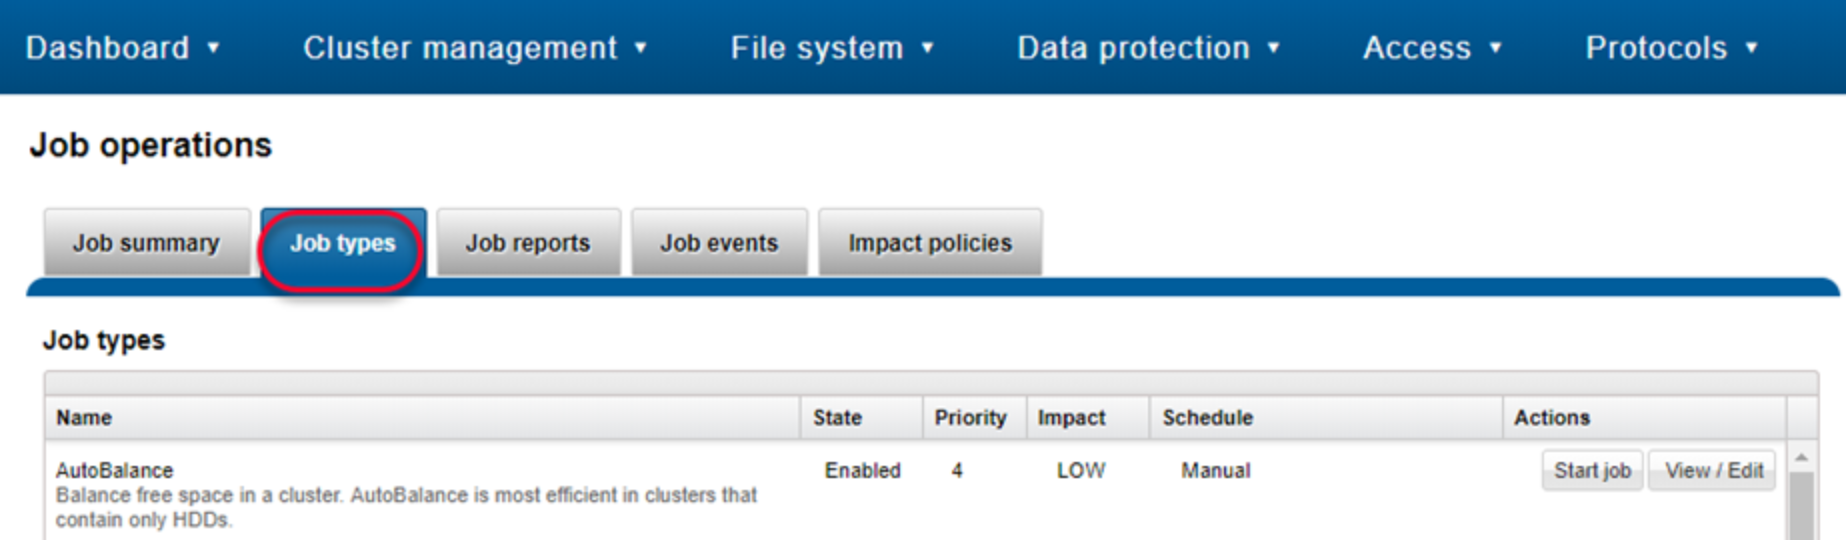
Figure 28. Job types
- Select the SmartPools item and click Edit as shown in Figure 29.

Figure 29. SmartPools job
- From the Edit job type details page as shown in Figure 30, you can do the following:
- Enable or disable the job
- Set the priority of the job
- Set the impact policy
- Set the job schedule as manual or scheduled as your own
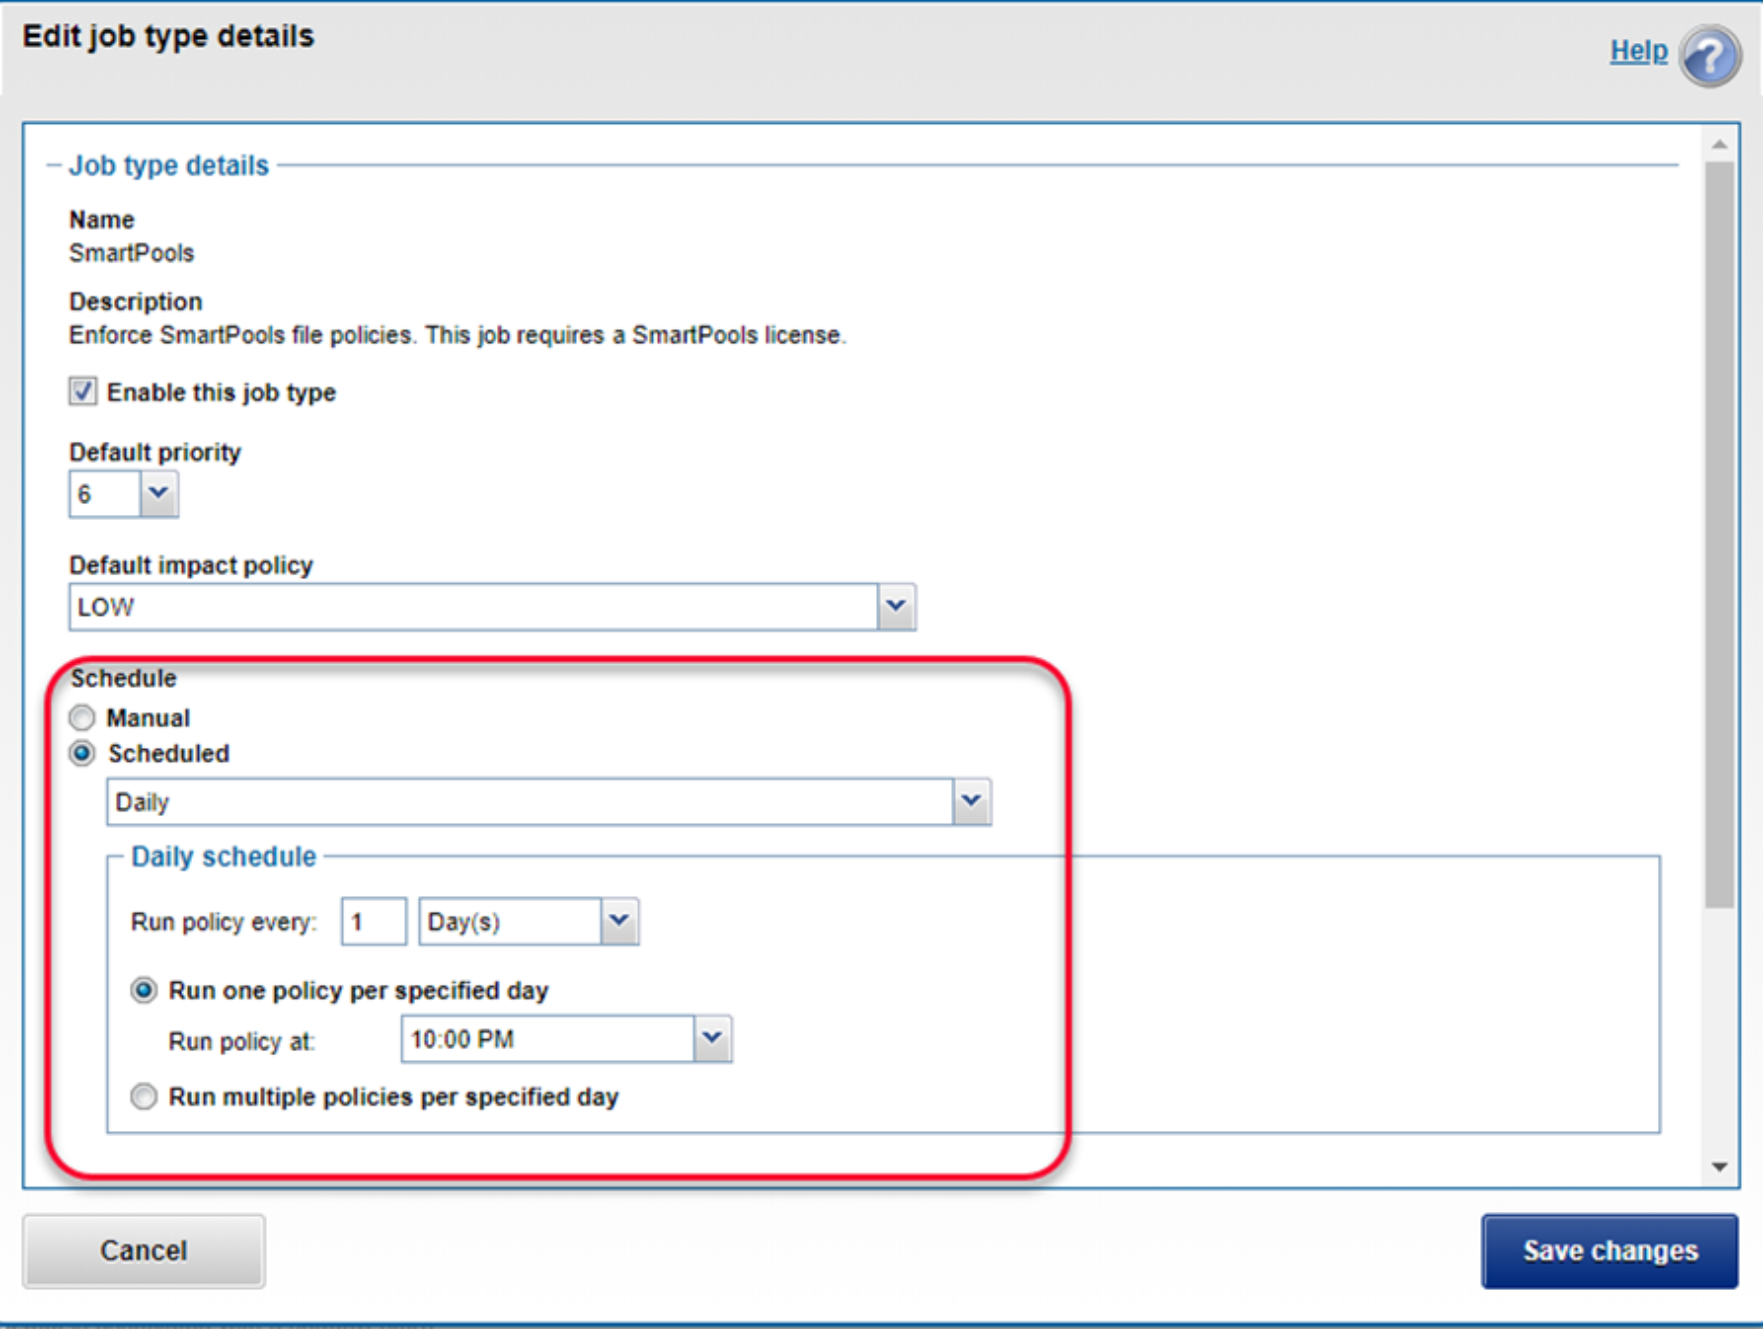
Figure 30. Edit job type details
- Click Start job as shown in Figure 29 to run the file pool policy to archive files from the PowerScale cluster to AWS. If you want to start a specific file pool policy job manually, refer to the section Commands and troubleshooting
Commands and troubleshooting.
SyncIQ policy
This section describes how to create a SyncIQ policy on a PowerScale cluster.
- Log in to the OneFS WebUI and go to Cluster Management > Licensing as shown in Figure 19. Verify that the CloudPools, SmartPools, and SyncIQ license status are Activated.
- Go to Data Protection > SyncIQ > Policies and click the + Create a SyncIQ policy button as shown in Figure 31 and Figure 32. The minimum information is as follows.
- Policy name: Type a name to identify the policy name.
- Source root directory: Type the directory name from the source PowerScale cluster you want to replicate to the target PowerScale cluster.
- Target host: Type the IP or name of the target PowerScale cluster.
- Target directory: Type the directory name from the target PowerScale cluster you want to store the data replicated from the source PowerScale cluster.
- Deep copy for CloudPools: Select the type you want to use.
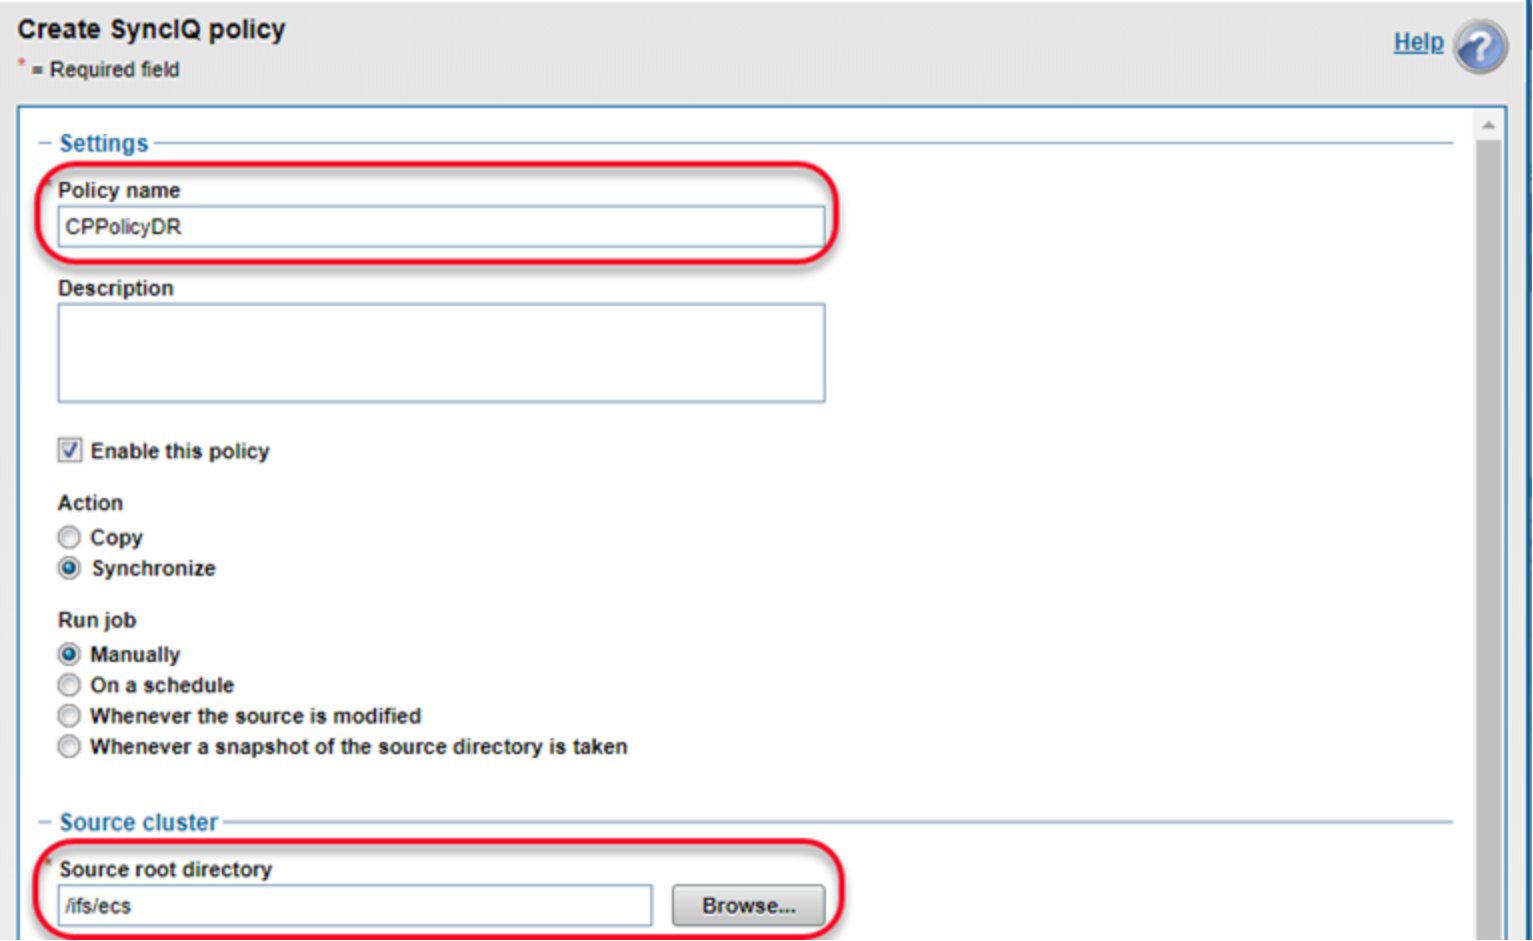
Figure 31. Create SyncIQ policy
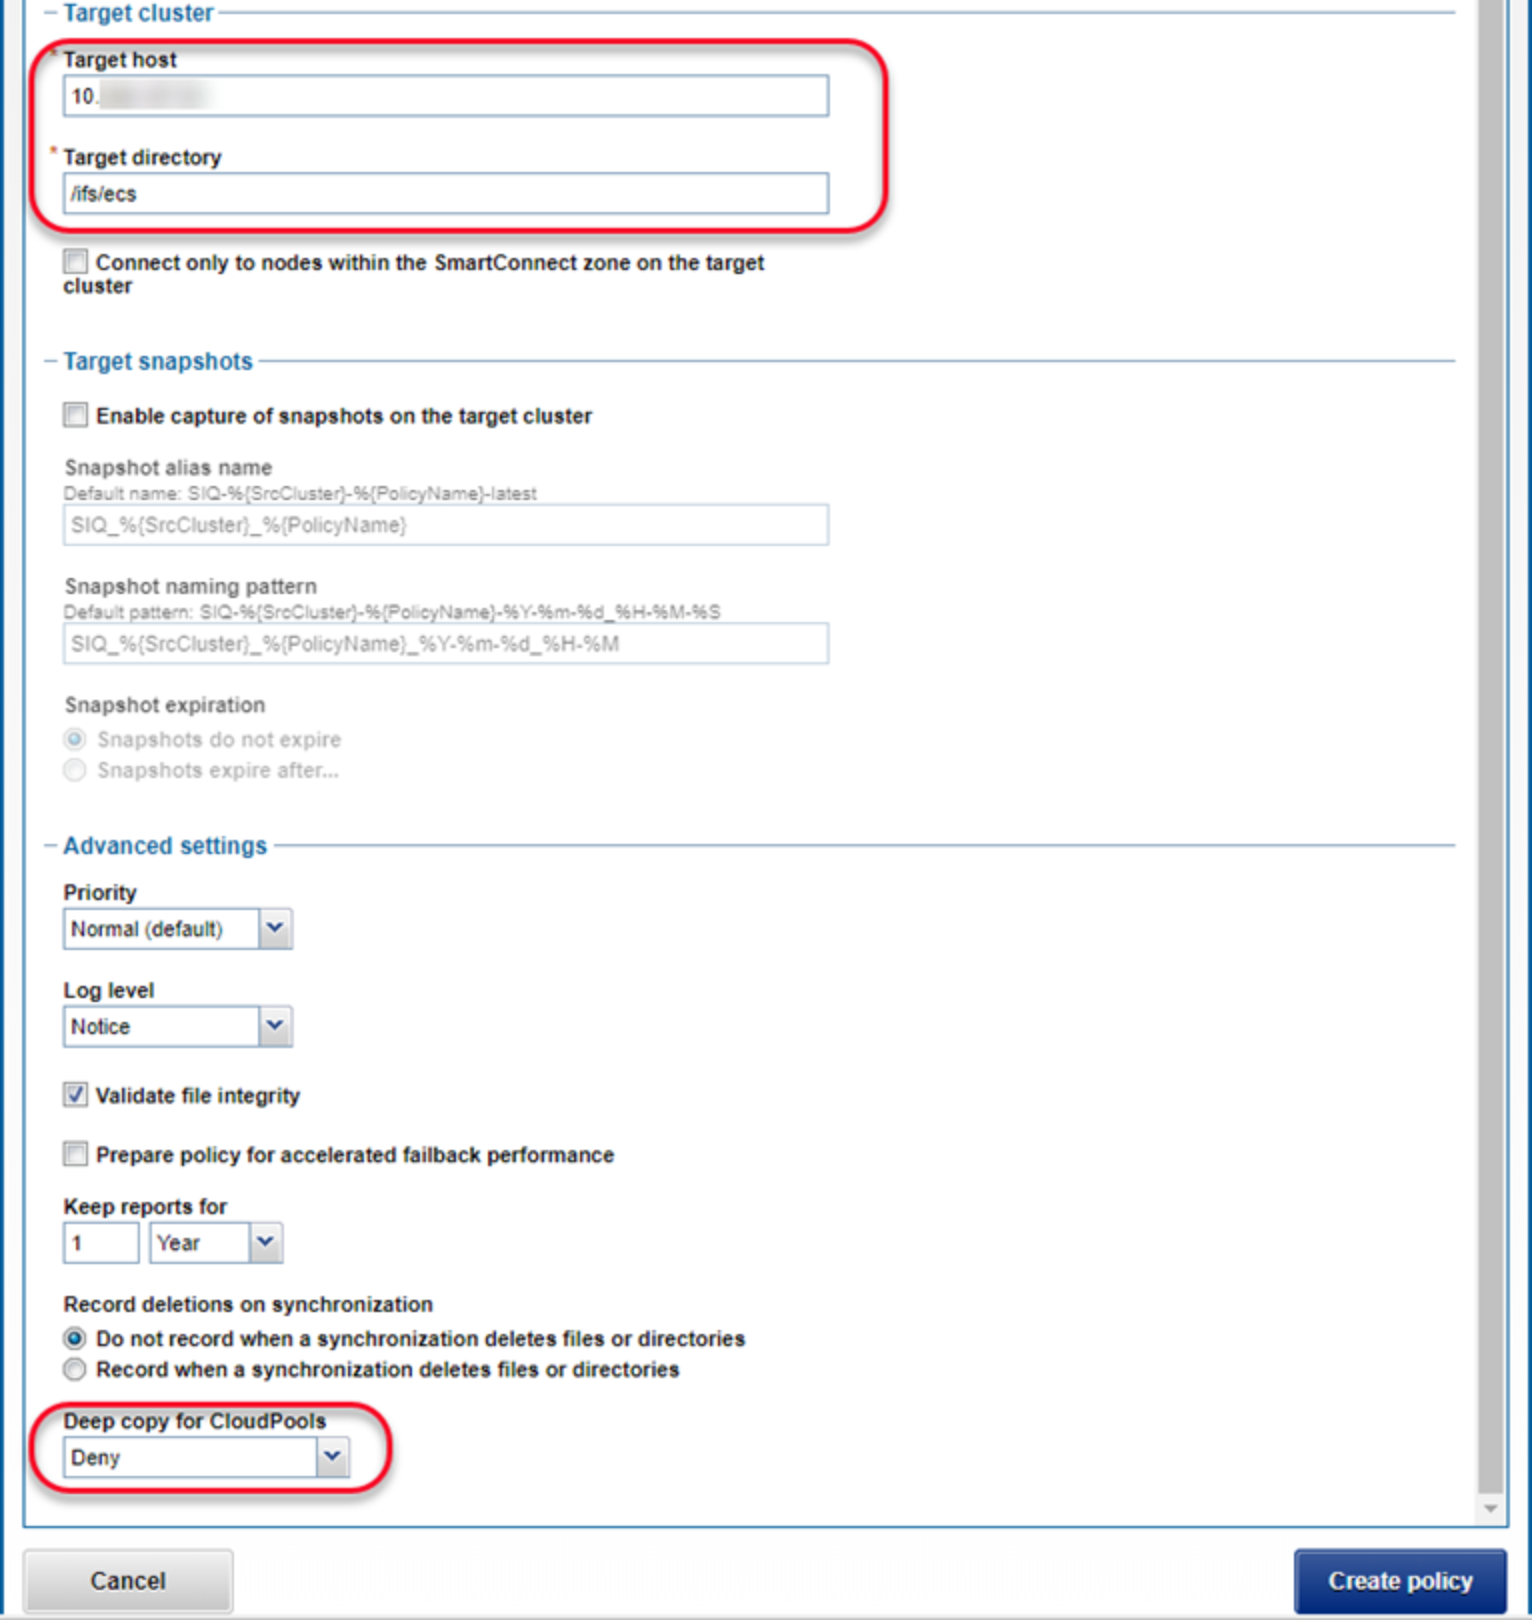
Figure 32. Create SyncIQ policy (continued)
- Click Create policy to create a SyncIQ policy.