
NDM Update walkthrough guide (source running 5977 or 5978 code)
NDM Update walkthrough guide (source running 5977 or 5978 code)
-
Adding the migration environment: NDM or NDM Update environment setup
Once all the pre-requisites are met, use Unisphere for PowerMax to set up the NDM environment.
The environment setup configures the migration environment that will be required to setup the groups used to migrate all applications from the source array to the target array. It confirms that both the source and target arrays can support the NDM operations. This includes ensuring that a usable replication pathway for data migration is available between source and target arrays.
This setup only needs to be run once and will be used for all NDM migrations between the selected source and target arrays. Should we need a second target array from the same source, then a second environment will need to be configured. Should RDF group 250 not be in use, the NDM environment will set up and use this group. If it is in use, the next available RDF group descending from 250 will be used. This applies to both arrays.
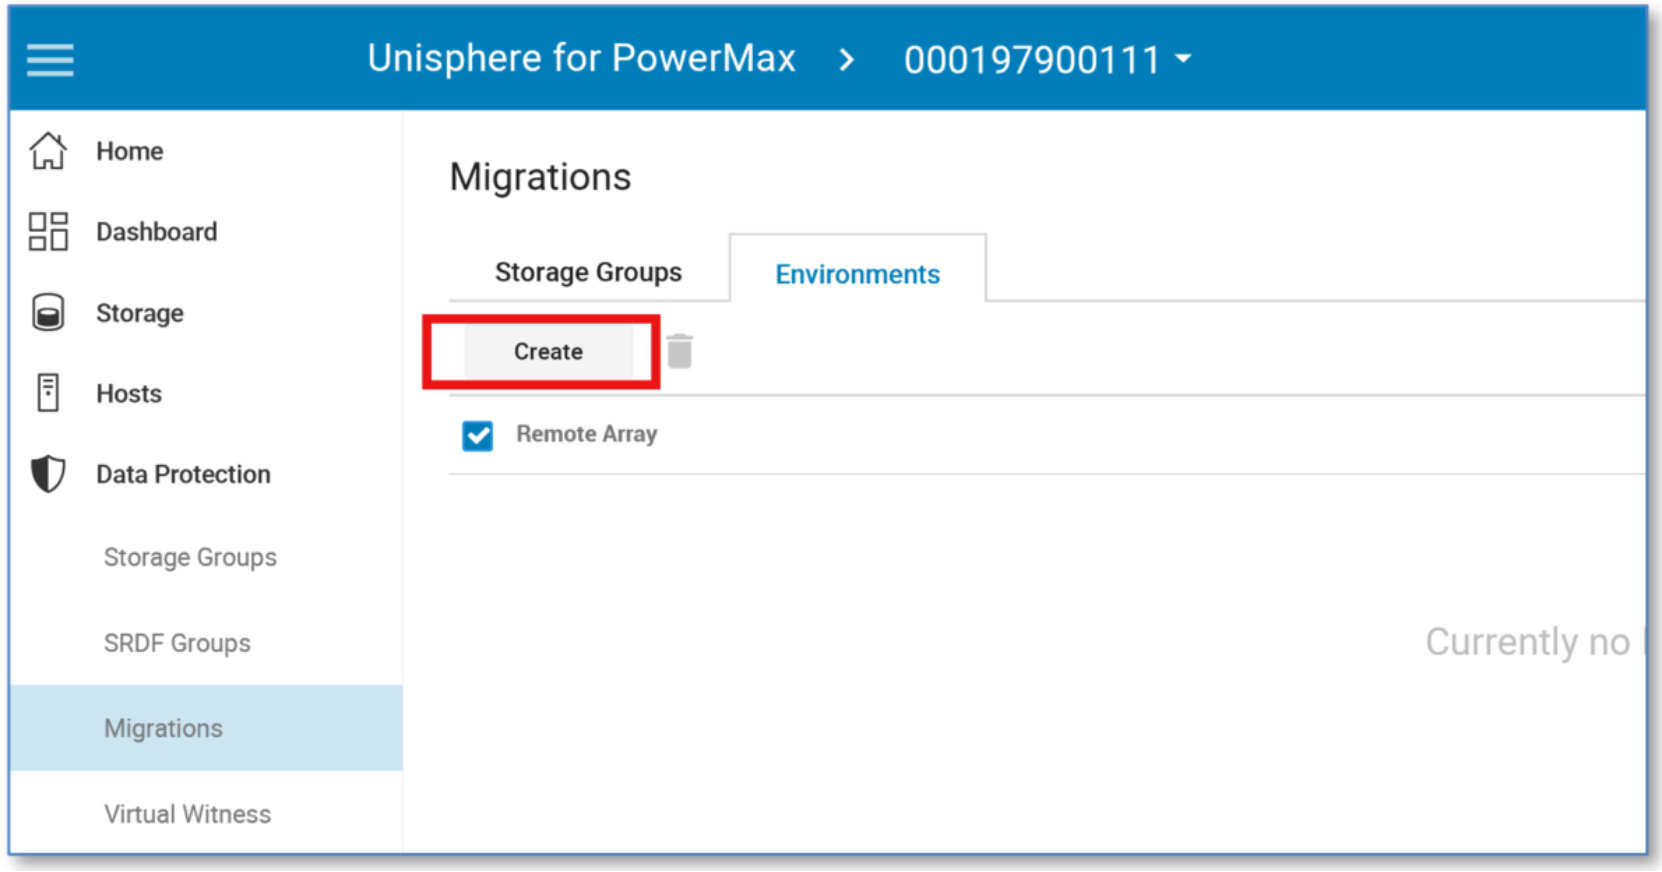
From the Data Protection menu, select Migrations. Select the Environment tab, and this will display any existing environments already set up.
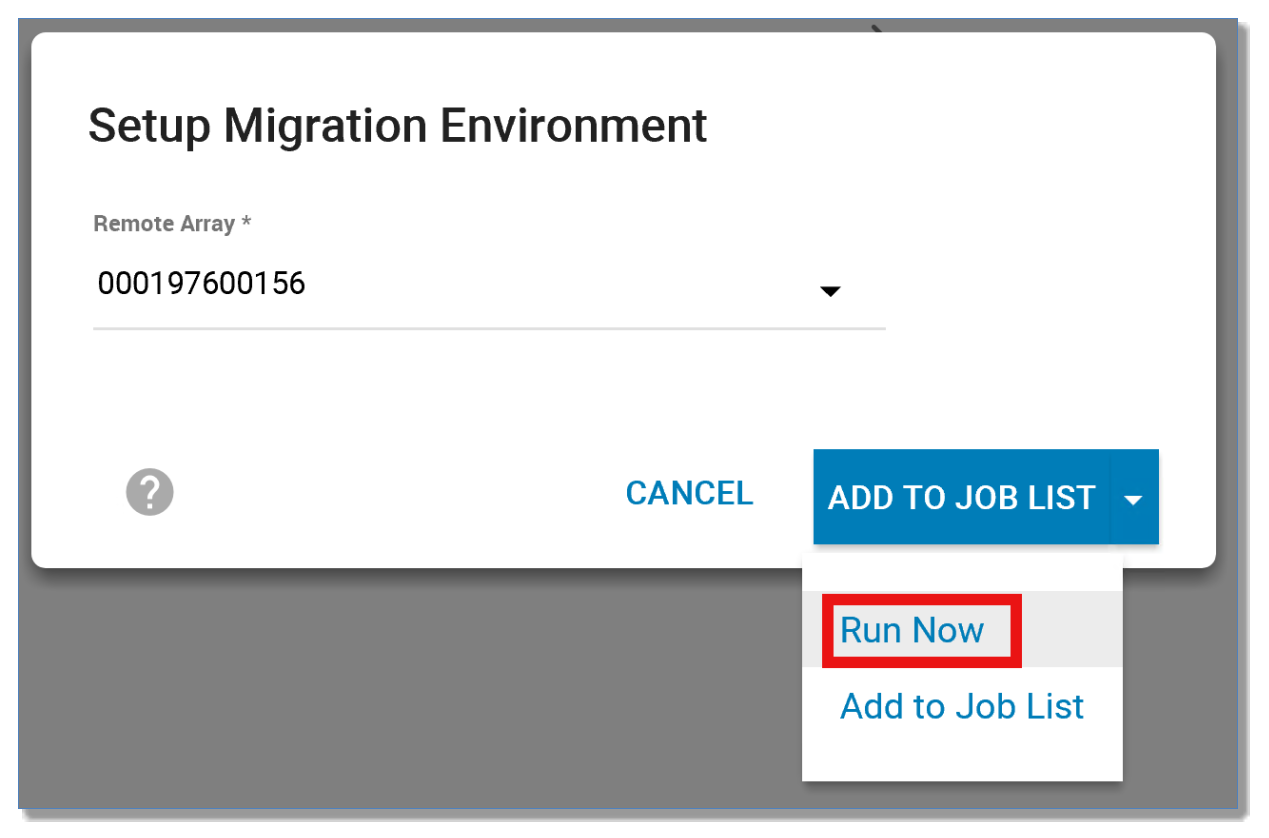
To create an environment, select Create, choose the target array, and select Run Now.
Using the CLI, run the following command:
symdm -src_sid 111 -tgt_sid 156 environment -setup
Examining further from the Replication dashboard, we can see the healthy migration environment between source array 130 and target 191.

Using the CLI, run the following commands:
symdm -sid 111 -environment list
symdm -src_sid 111 -tgt_sid 156 environment -validate
Using Unisphere (no_precopy, no move_identity)
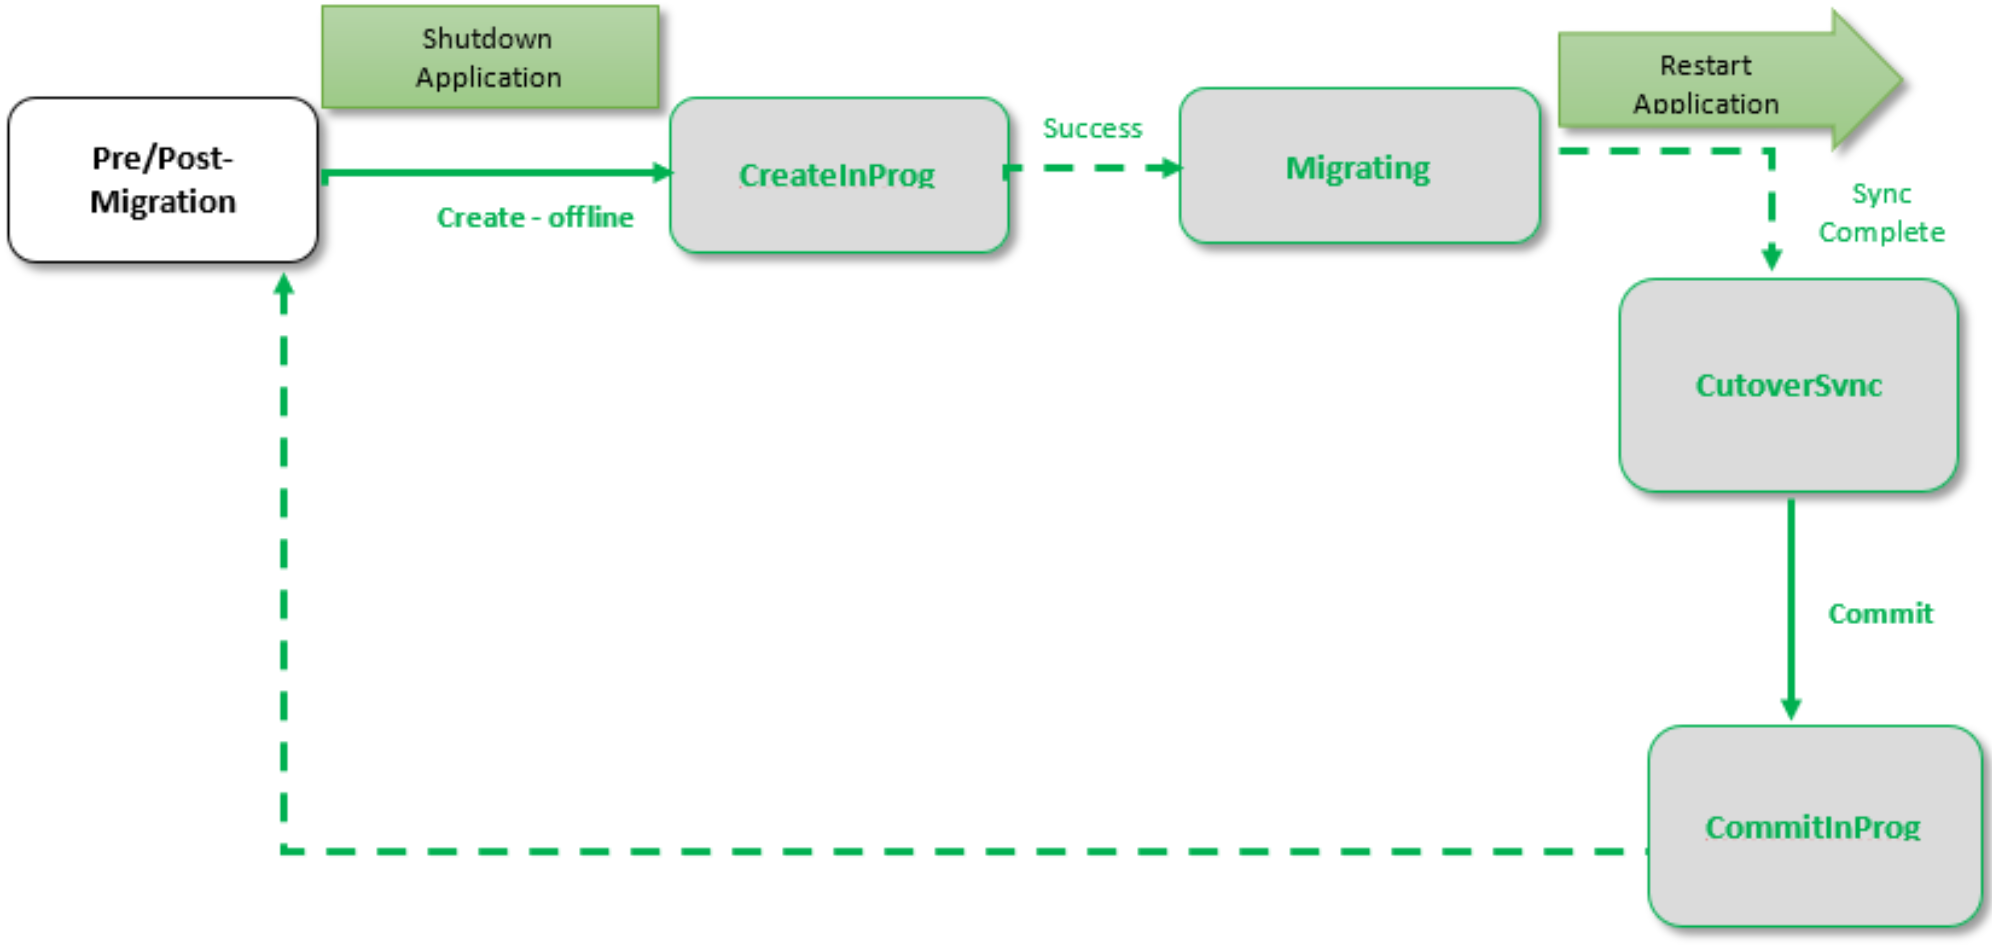
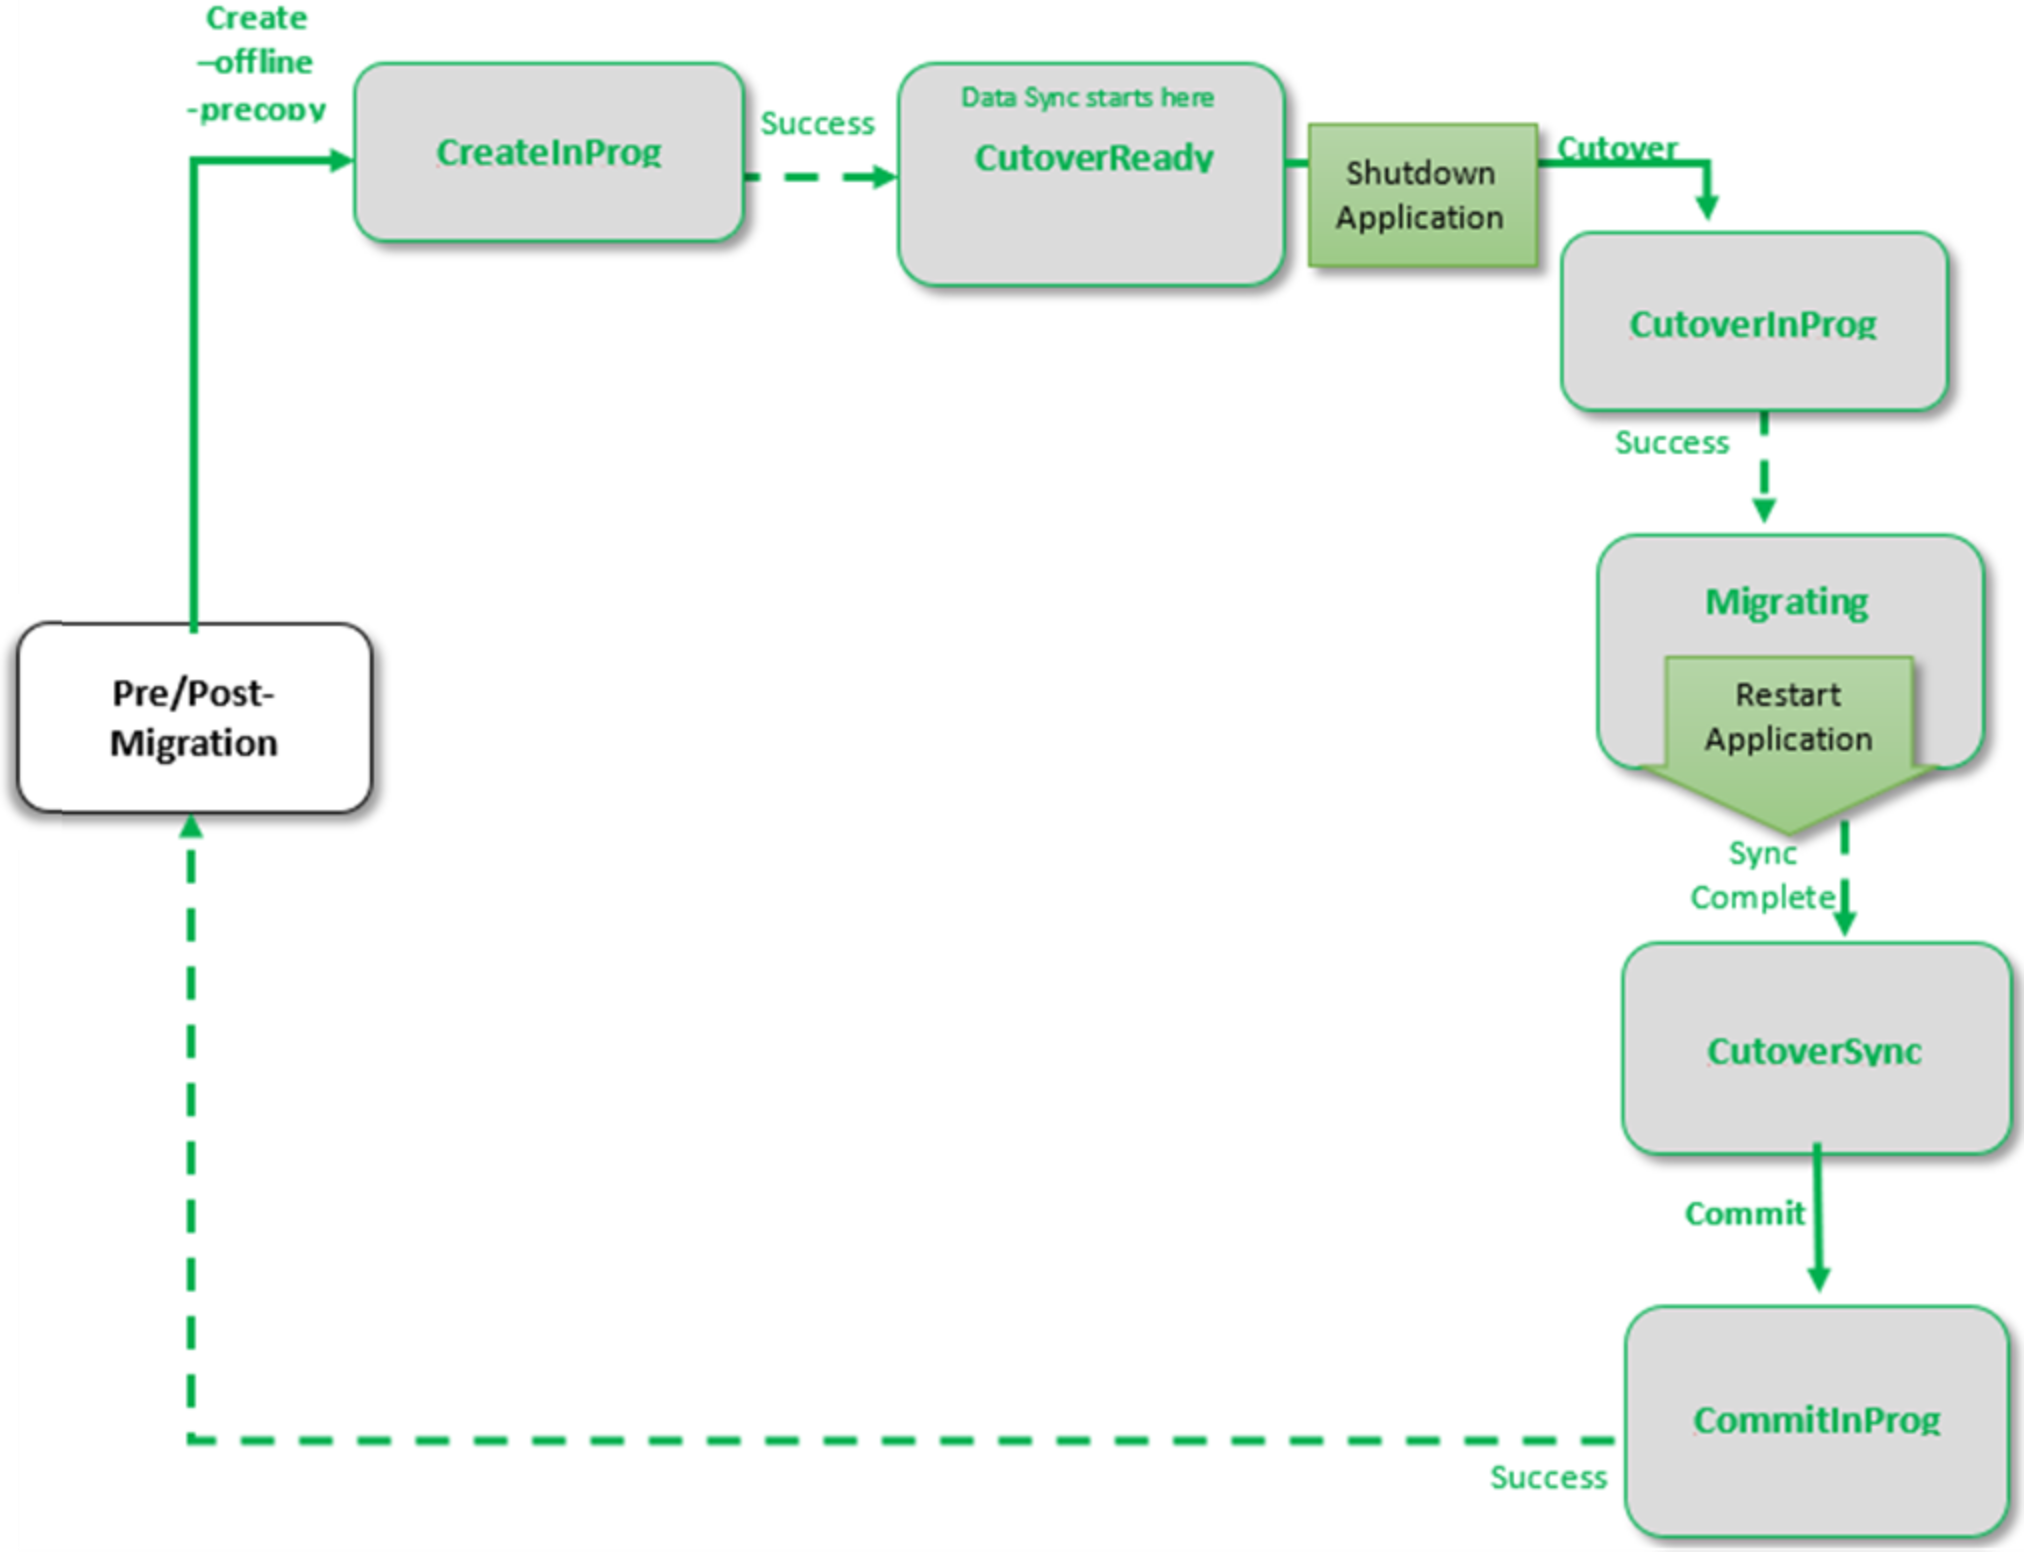
This process completes in the following sequence:
- Shut down application
- Create offline
- Rescan/discover paths
- Restart application
- Complete synchronization
- Commit
This use case involves migrating a storage group using NDM Update. Two reasons for choosing NDM Update for migration include the following:
- The host operating system and multipathing combination is not supported (see the support matrix).
- The user’s application is capable at this time of taking an outage, and the user would prefer not to spoof devices WWNs on the new array.
Note: If migrating Solaris Cluster environments using NDM Update, review Appendix G: NDM Update with Solaris cluster.
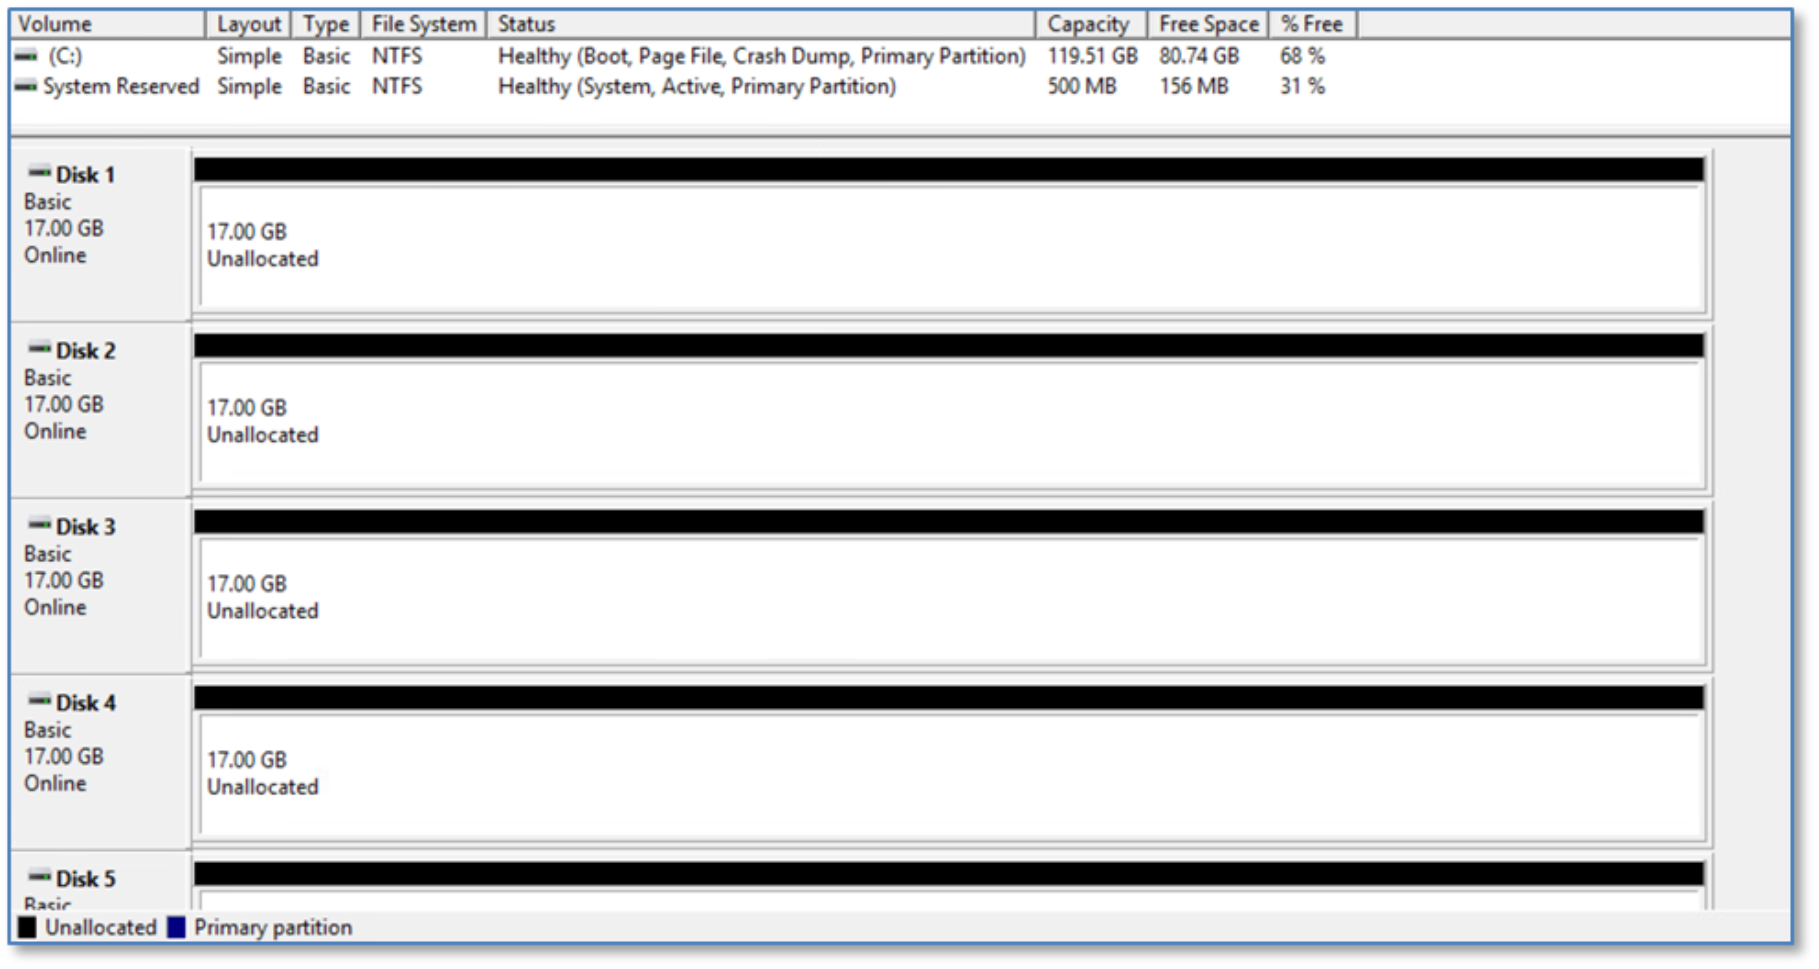
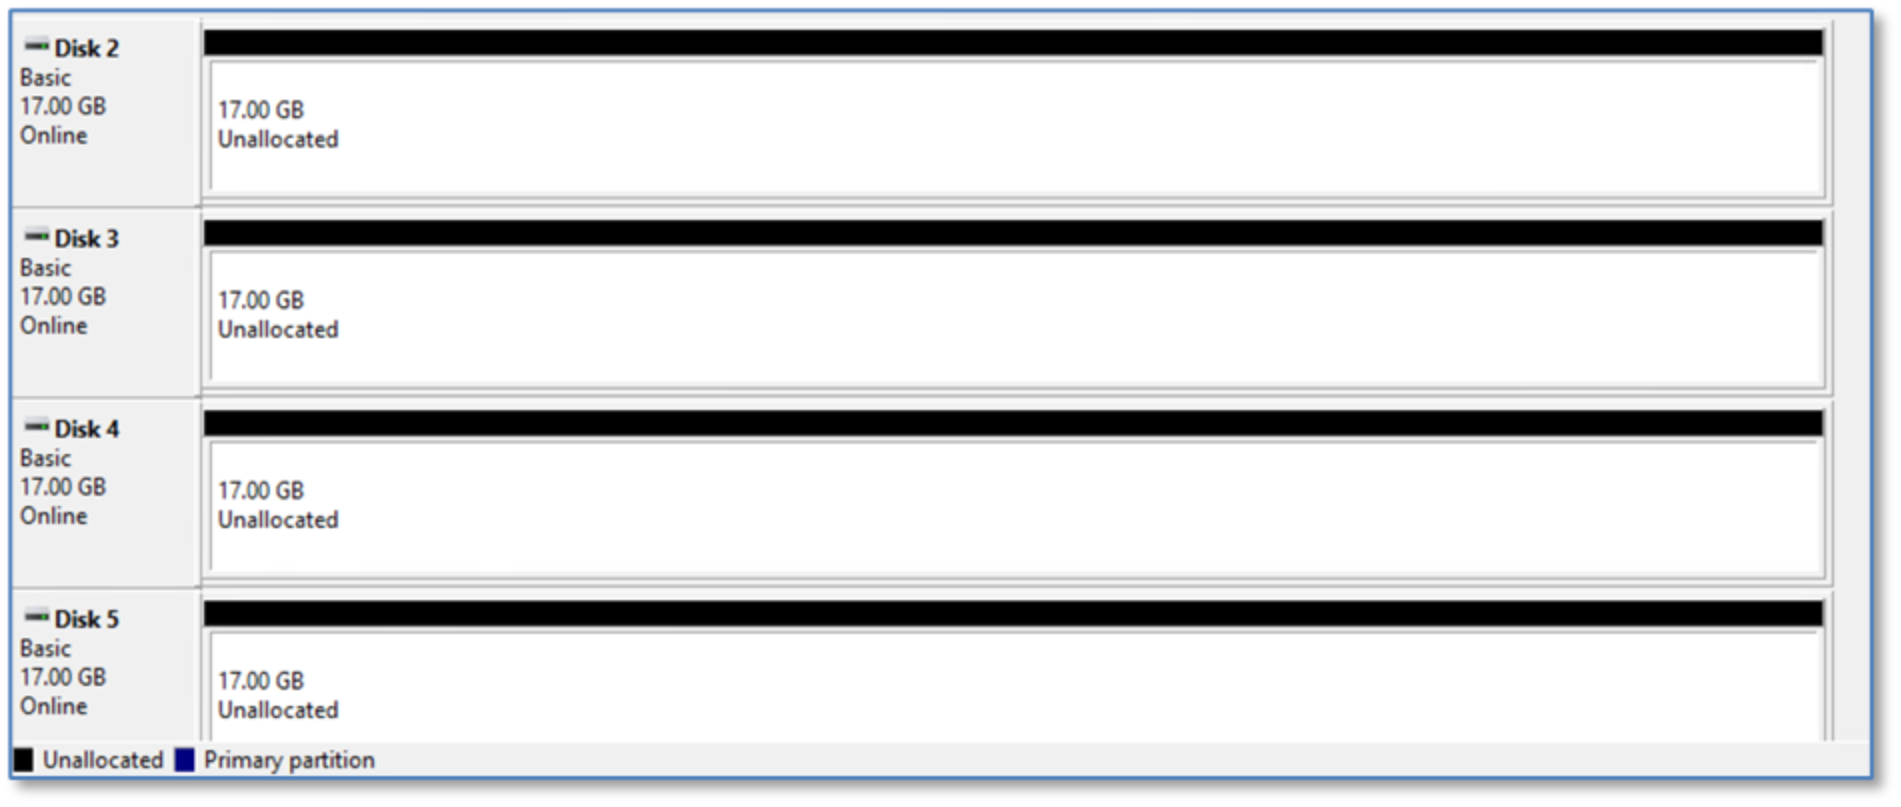
Examining the five devices in this migration from the host operating system disk management (in this case, Windows Server 2016), they appear as Disk 2 through Disk 6. These were previously added as RDMs to the VMs using VMware vSphere.
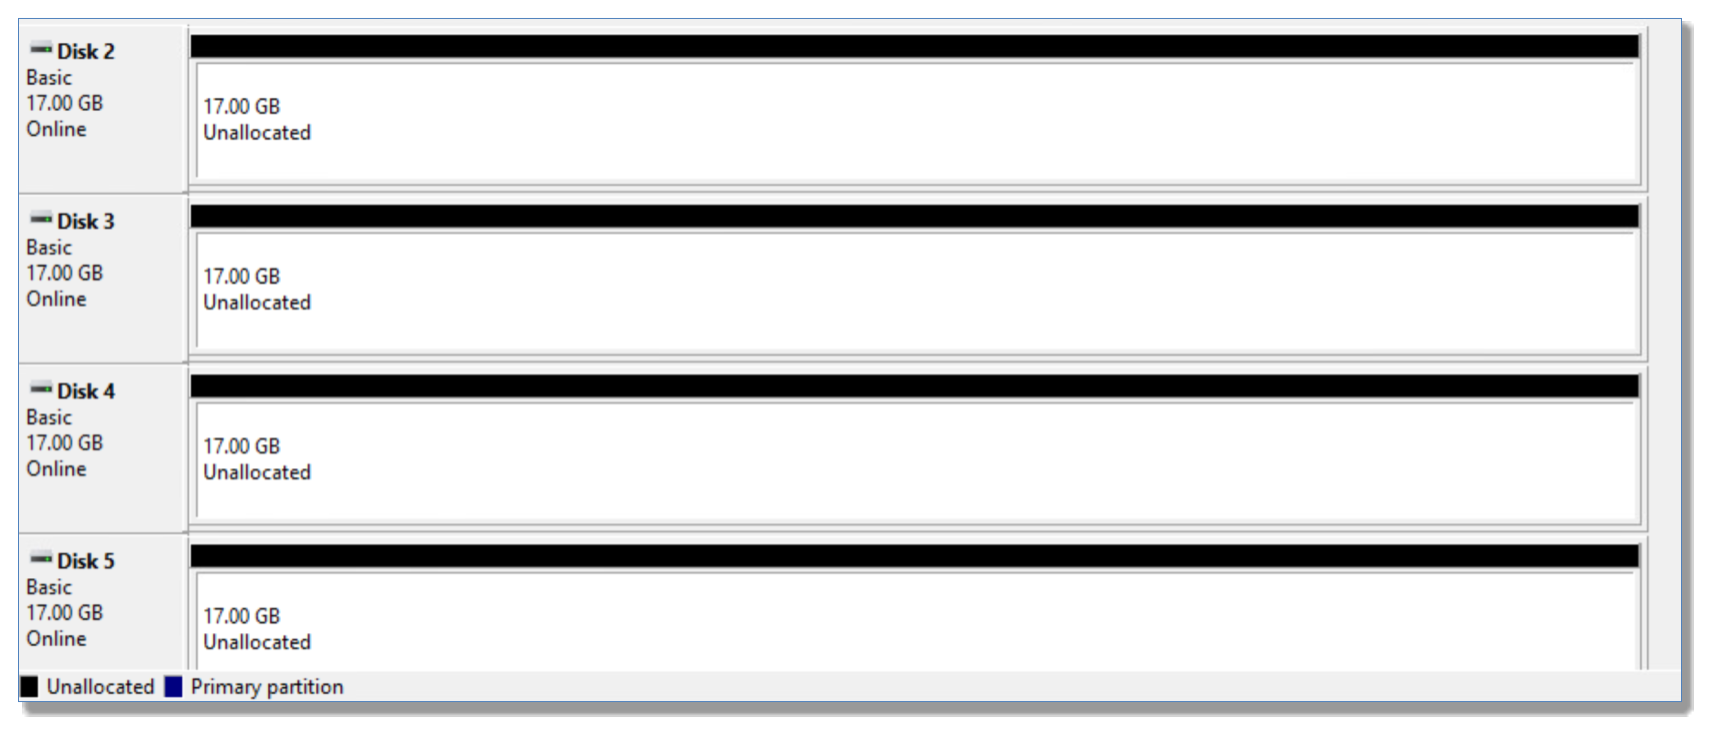
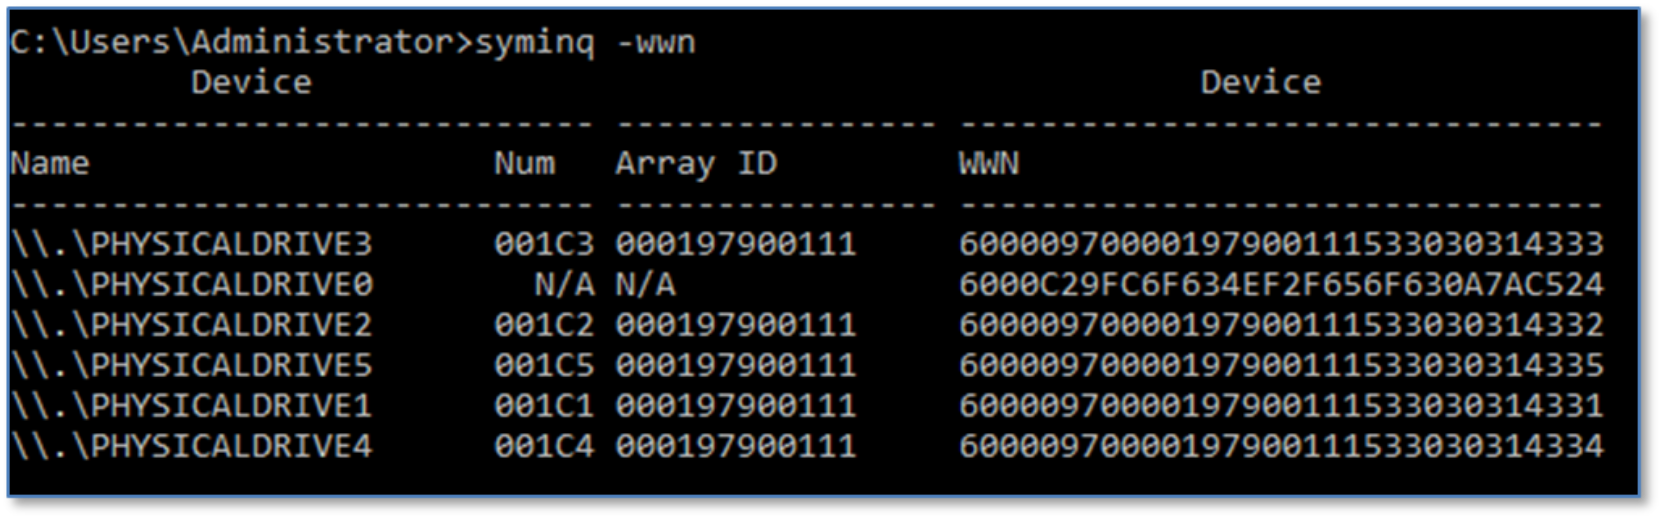
The volumes are contained within the storage group Minimally_Disrupt_Sg:

NDM Update create with no_Precopy and No Move_Identity
This section migrates the storage group Minimally_Disrupt_Sg with the offline option. The offline parameter signifies this migration will require an application outage to complete successfully.
Before migrating with the offline parameter, the host application needs to be shut down. Once a successful create offline is run, a host rescan or reboot is required.
The move identity parameter is not used for this migration, which means that the device identity is propagated from the source to the target. When the create operation is complete, the host needs to be reconfigured for the new devices.
The create command performs the following:
- Creates a storage group on the target array (name must not already exist in the target array) with the same name as the source storage group
- Creates duplicate devices on the target array to match those on the storage group
- Creates an initiator group using initiators with entries in the login history table
- Creates a port group (if one does not already exist or has not been selected by the user)
- Invalidates the tracks on the RDF mirror to prepare for the copy
- Starts the copy process in synchronous mode
- Creates a masking view to the host from the target array.
At this point, you must shut down your application.
Note: There are measures in place to check for host I/O. However, this check is for a 15-second window and does not guarantee an application has been shut down, it is up to the user to verify manually that an application has been shut down successfully before progressing.
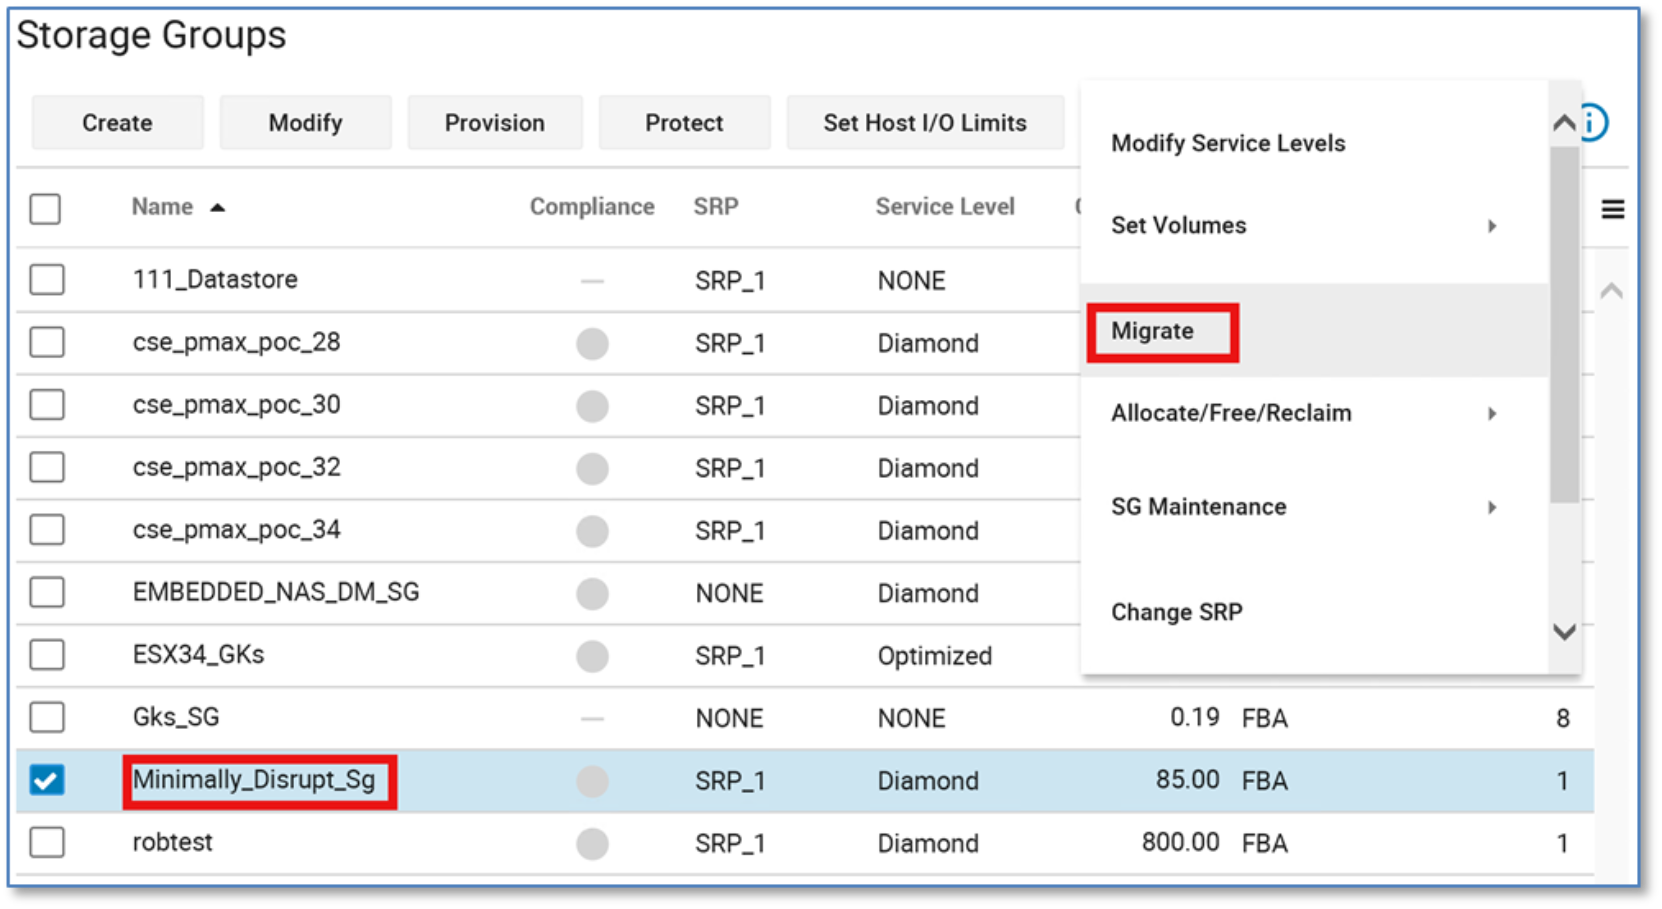
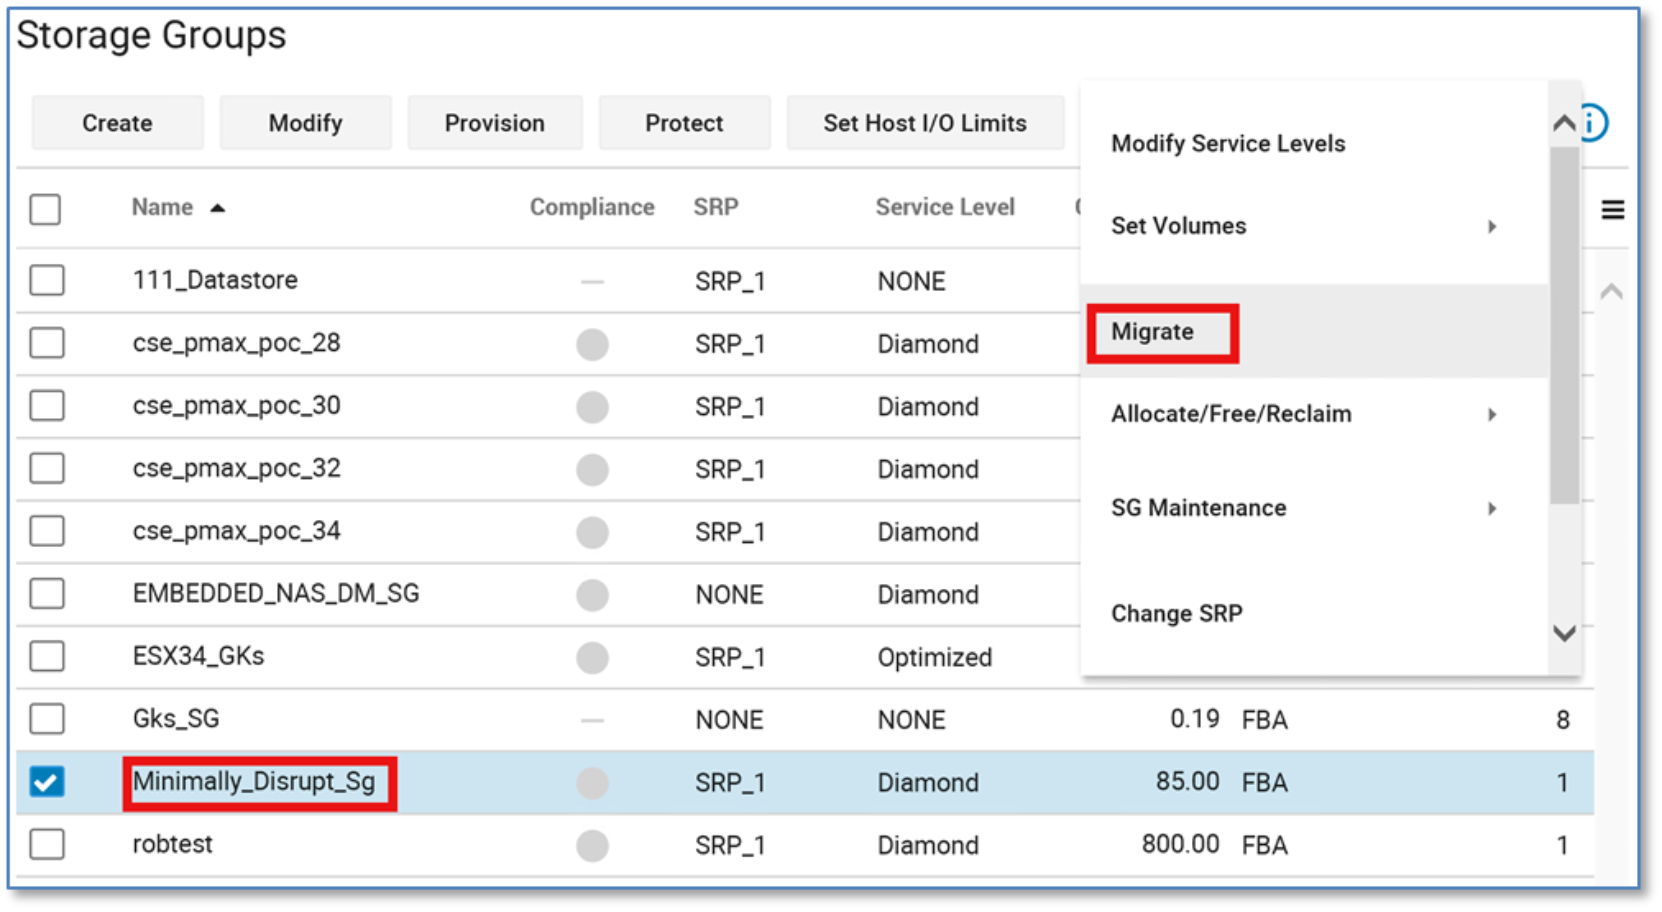
From the More Actions menu, click Migrate.
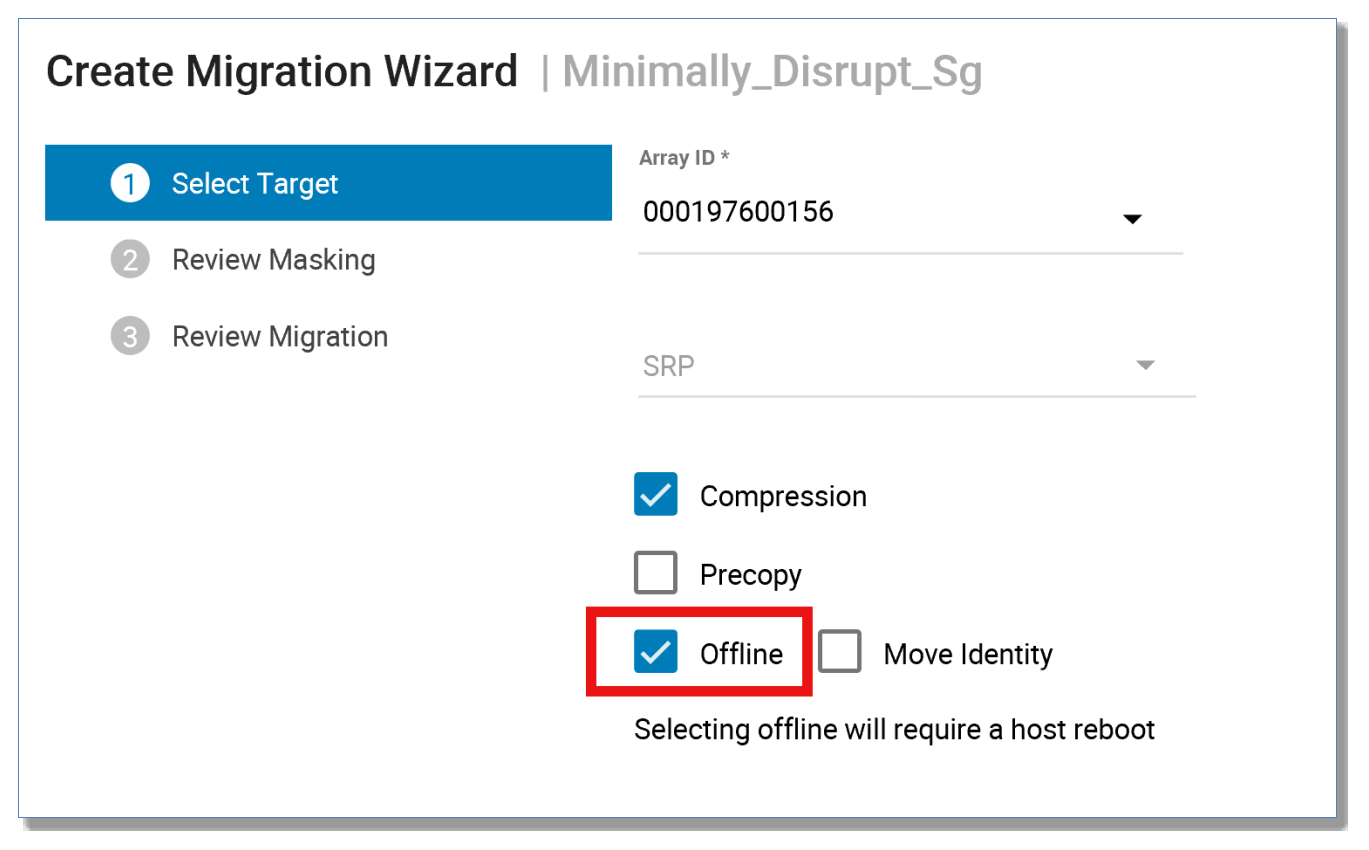
From the resulting menu, select Offline. This alerts Unisphere for PowerMax that NDM Update is being used to migrate this storage group. This will then highlight the need for a host reboot.
From the next screen, there is the option to select a pre-existing port group from the target array, or with 9.1 and later, create a new port group as part of the create command. Click Next.
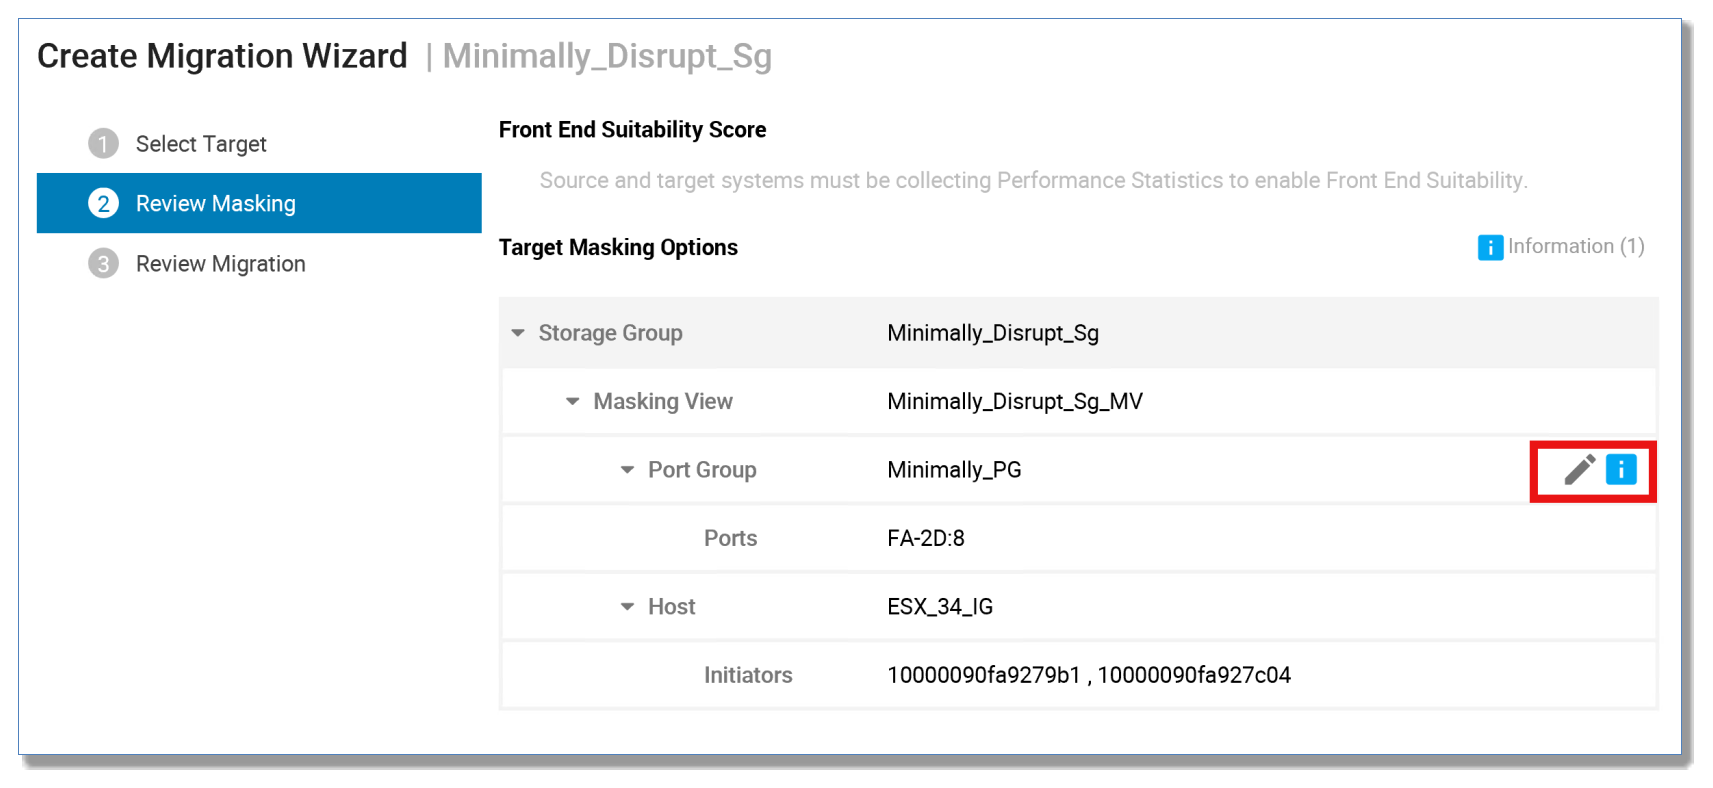
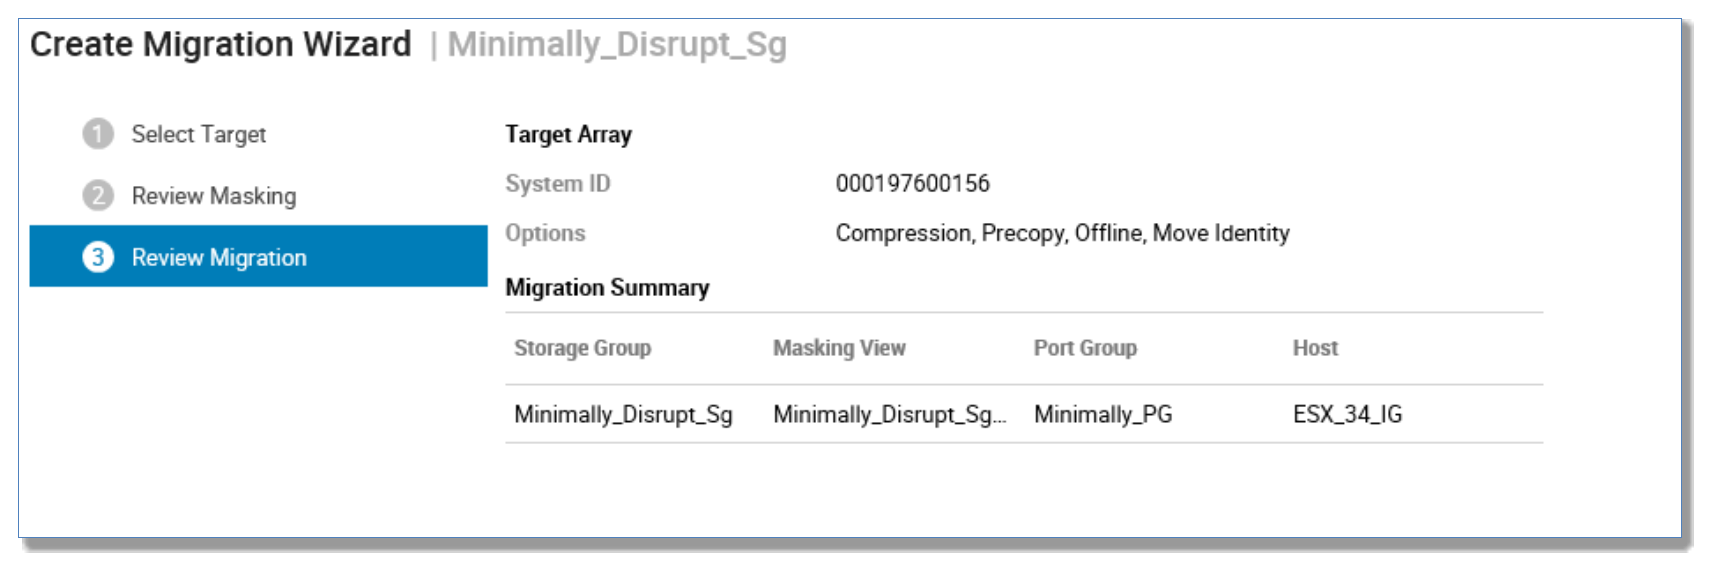
A breakdown of the planned migration session is displayed showing the masking elements and options selected for final approval. Click Run Now.
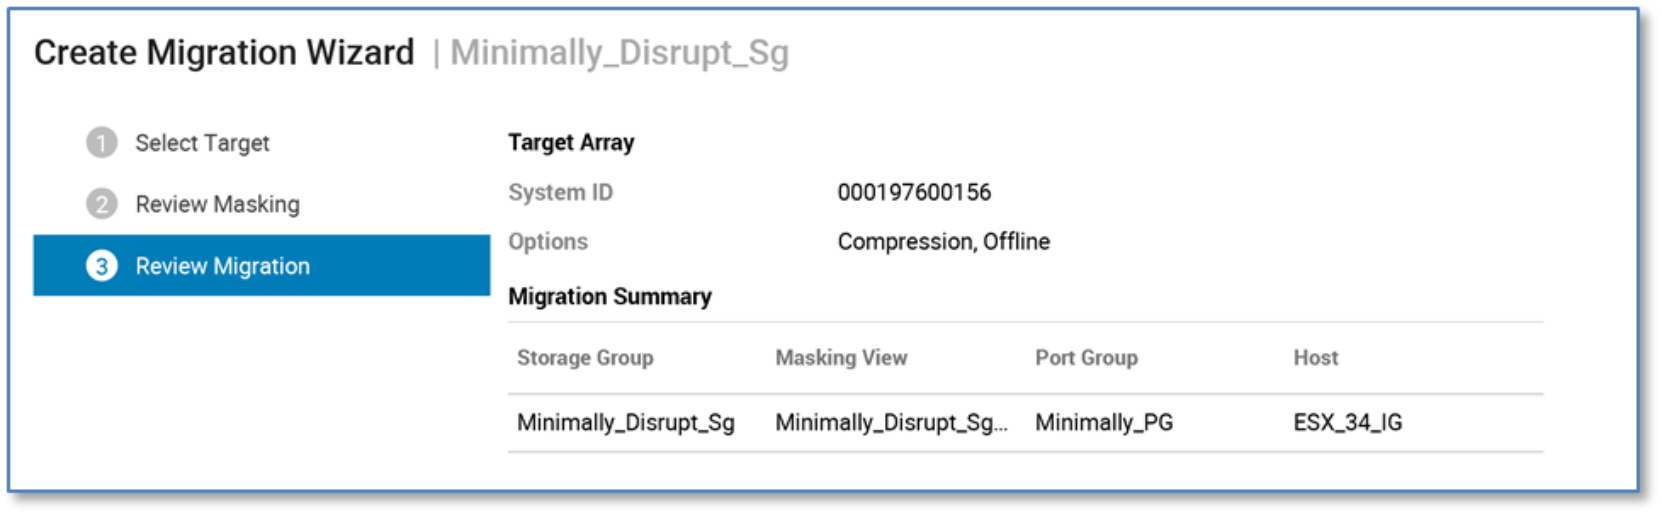
To validate and create the session using the CLI, run the following commands:
symdm -src_sid 111 -tgt_sid 156 -sg Minimally_Disrupt_Sg create -offline -validate
symdm -src_sid 111 -tgt_sid 156 sg Minimally_Disrupt_Sg create -offline
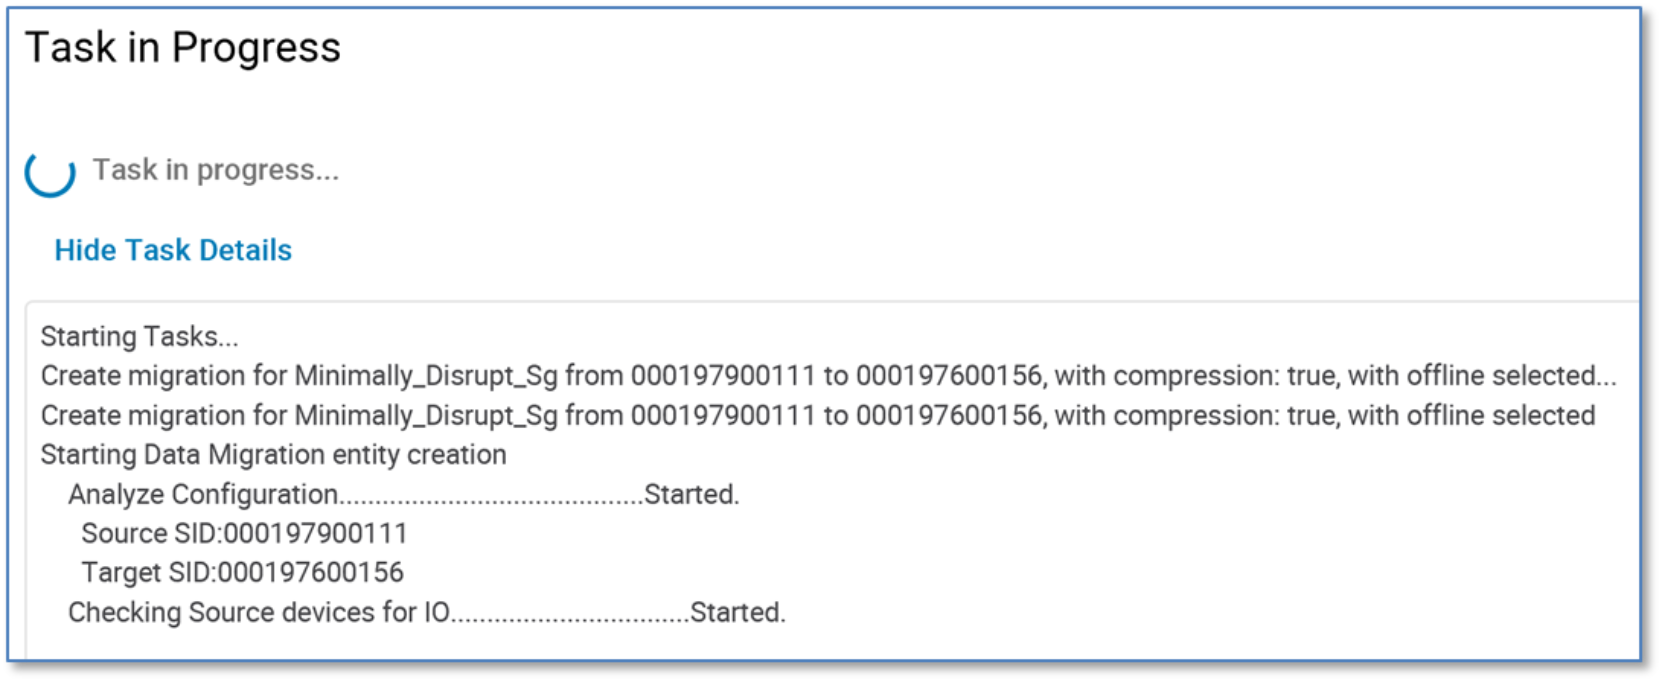
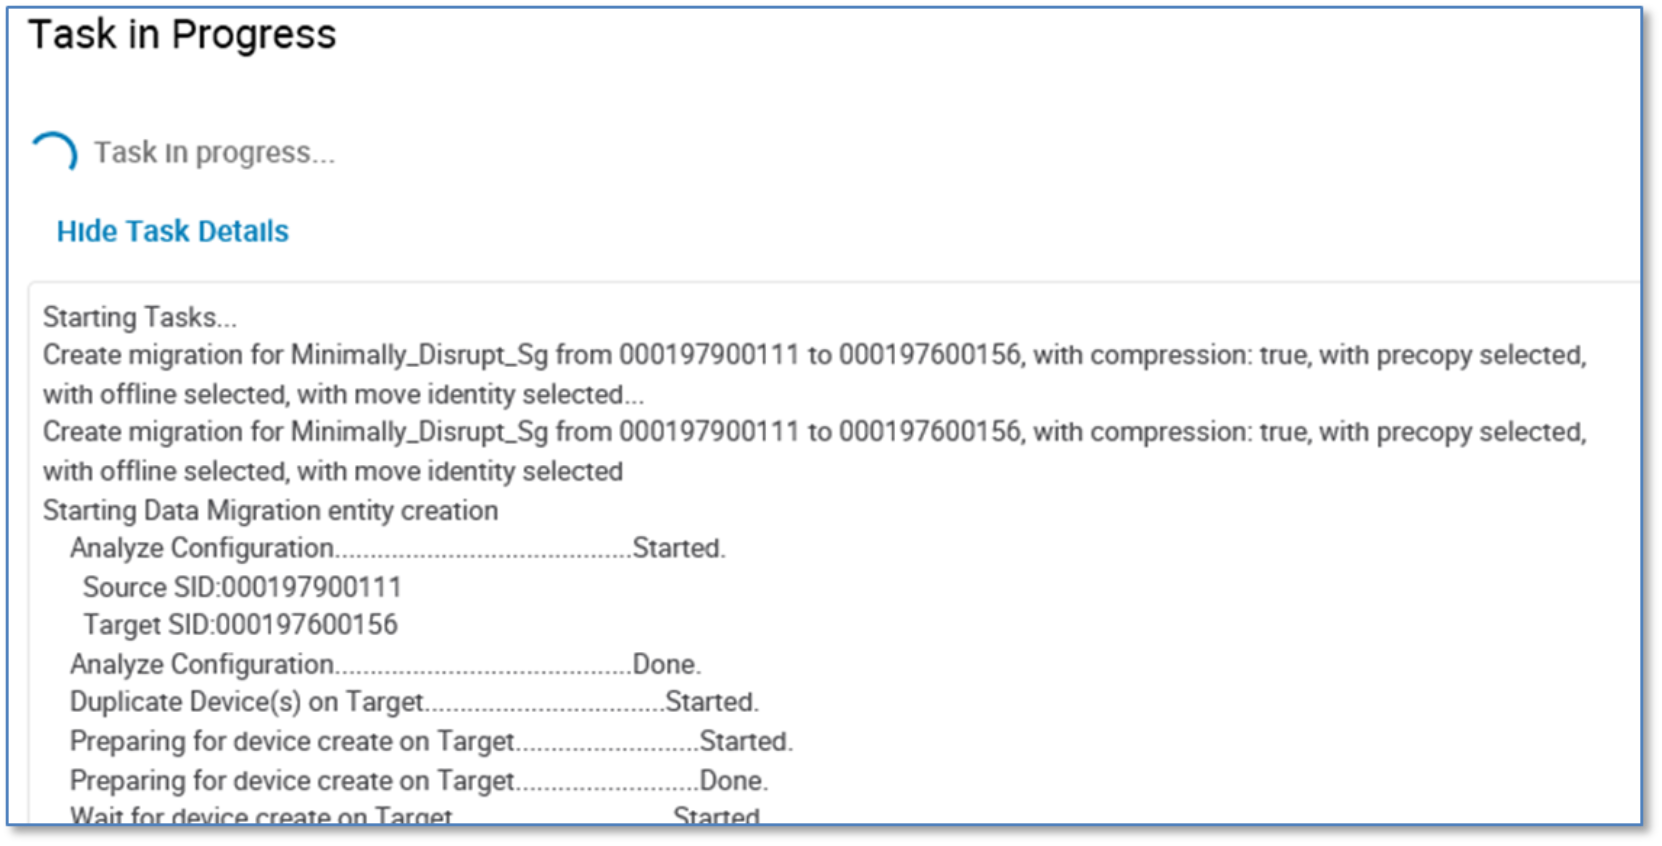
Once the create step has completed, click OK.
Note: Run a host rescan at this point to discover the paths to the new devices on the target array.
Examine the created NDM Update session
To examine the migration session, click Data Protection > Migrations. The current state of the migration setting is Migrating.
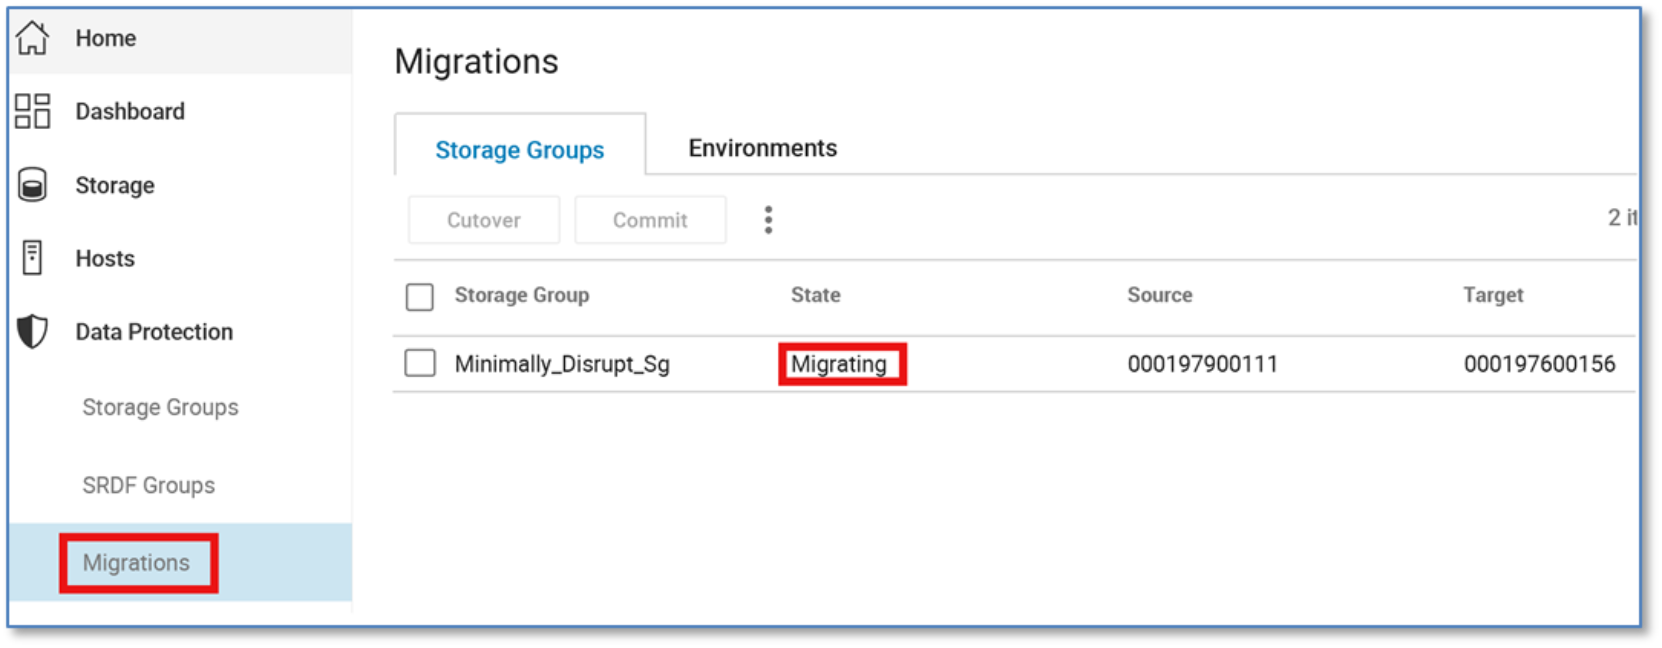
To view migration sessions using the CLI, run the following command:
symdm -sid 156 list
Reconfigure host and commit migration
During the create, paths to the source array will become host inactive. Since move identity was not used, the host will need to be reconfigured reflect the new devices. In this case, the new devices were added as RDMs to the VM using vSphere, also removing the old RDMs.
From the host operating system disk management, we can see the newly added devices.
Once the devices have been reconfigured to the host and the data is migrated from the source to the target array, we can commit the migration.
Click Data Protection > Migrations. The migration state will show CutoverSync.
Since this migration did not include precopy, a cutover is not necessary.
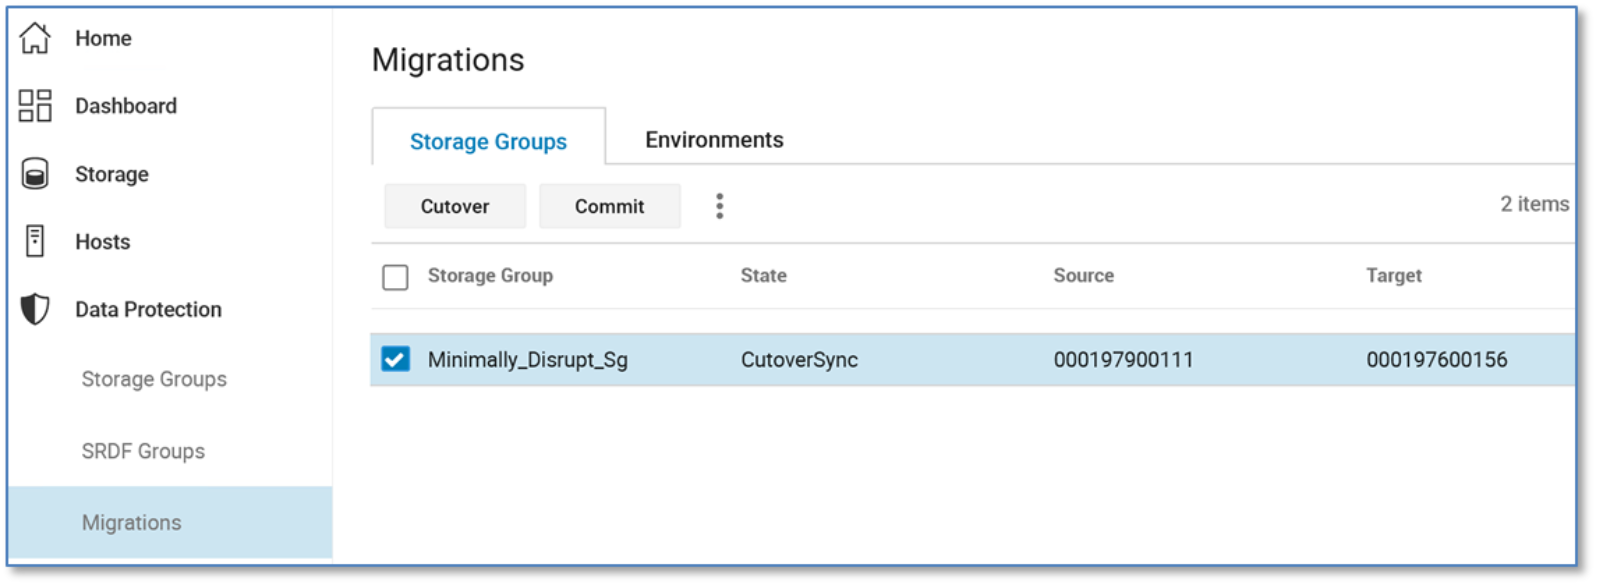
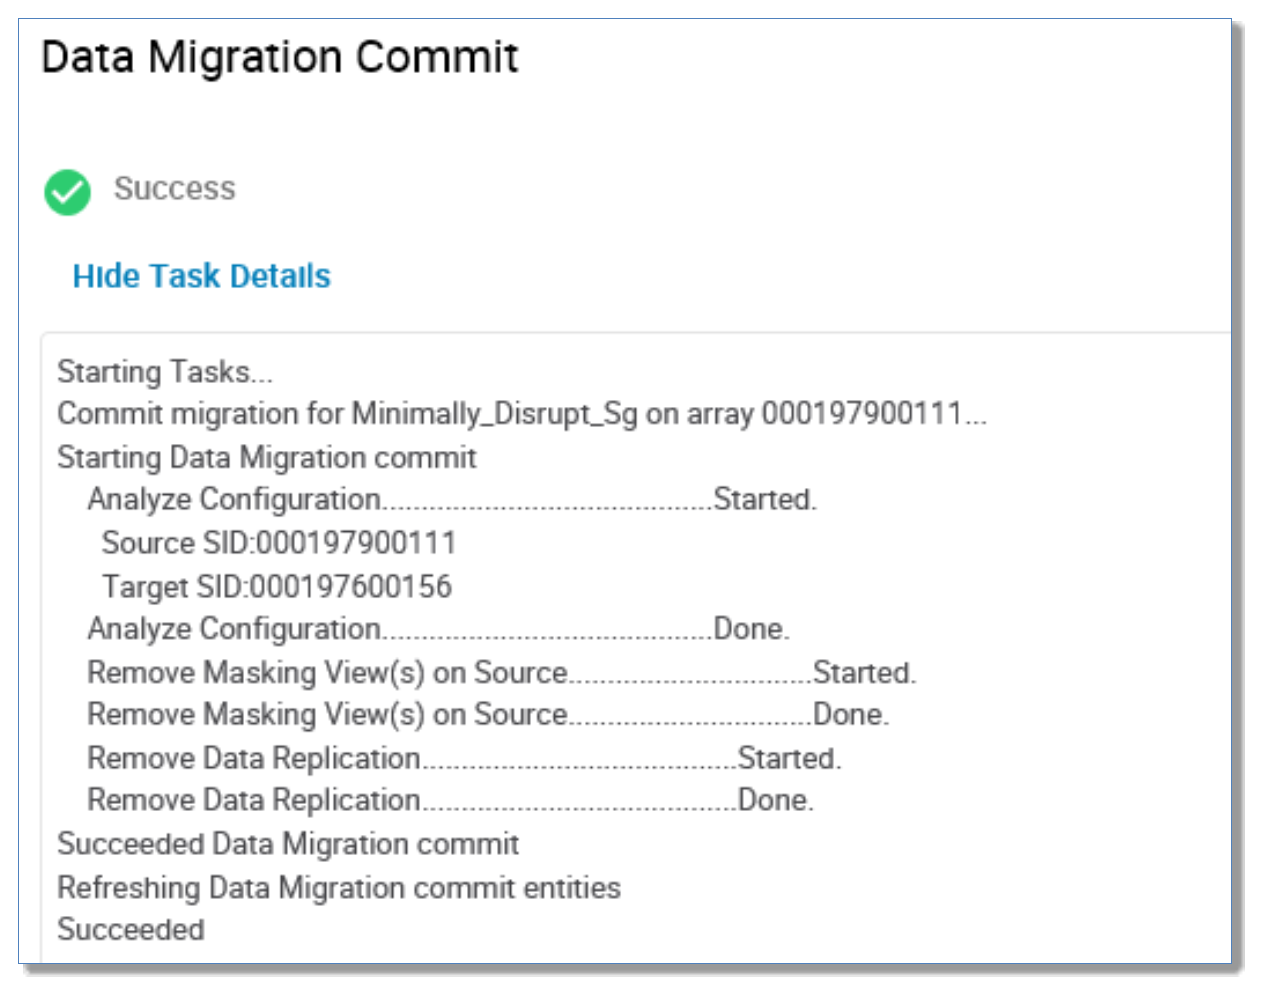
From here, select the Minimally_Disrupt_Sg storage group and click Commit. Click Run Now.
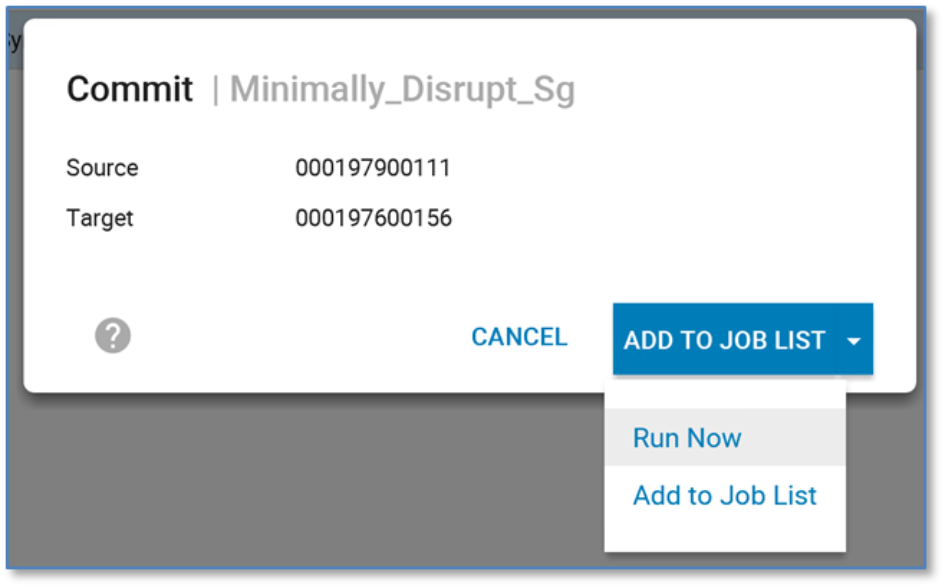
Upon successful completion of a commit operation, the replication between source-side and target-side devices is removed and the application migration is complete.
To commit the session using the CLI, run the following command:
symdm -src_sid 156 -sg Minimally_Disrupt_Sg commit
Note: Run a host rescan at this point to remove any potential old paths to unmasked devices.
Canceling a migration
The cancel operation cancels a migration that has not yet been committed. If the application was reconfigured or running I/O against the target array, the administrator must shut down the application before issuing the cancel command. Upon successful completion of a cancel operation, if the -move_identity option was not given as part of the create operation, the application configuration needs to be changed to use the original source LUNs.
The administrator must perform a host rescan with the option to remove dead paths to clean up the paths that were created for the target-side LUNs. The administrator must identify the source or the target array as well as the application whose migration is to be canceled.
Upon completion of a cancel operation, the application storage will be as it was prior to the start of the migration:
- Connections between source-side and target-side devices that were used to migrate data through the DM replication pathway are severed.
- Any target-side resources configured for the application that are not used by other applications on the target array are removed. This includes pre-existing IGs or PGs used by the migrated view on the target array if these are not used in other masking views or groups.
To cancel a migration using the CLI, perform the following command:
symdm -sid 156 -sg Minimally_Disrupt_sg cancel
Note: If the administrator has configured local or remote replication of the target-side devices, a cancel will be blocked. The administrator needs to remove the replication sessions before the cancel can run.
Recovering a failed migration
A recover operation is needed after a migration step completes with a failed state, and it is not normally required as a part of a migration. Failed states, depending on the reason for the failure, can include the following:
- CreateFailed
- CutoverFailed
- MigrateFailed
- CancelFailed
- CommitFailed
After the condition that caused a migration operation (create, cutover, commit, or cancel) to fail has been corrected, a recover operation can be invoked to continue with the migration by completing the following:
- Determining which migration operation failed
- Putting the migration session resources (connections, devices) into the appropriate state to allow the failed operation to complete
- Repeating or resuming (depending on the cause of the failure) the failed action
To recover a failed migration using the CLI (once the reason for failure has been resolved), run the following command:
symdm -sid 156 -sg Minimally_Disrupt_sg recover
Note: The administrator must identify either the source or the target array as well as the application storage from which the data migration is to be recovered.
Using Unisphere (with precopy, move_identity)
This process completes in the following sequence:
- Create offline with precopy
- Monitor copy progress
- Shut down application
- Cutover
- Rescan/discover paths
- Restart application
- Complete synchronization
- Commit
This use case involves migrating a storage group using NDM Update. Two reasons for choosing NDM Update for migration include the following:
- The host operating system and multipathing combination is not supported (see the support matrix).
- The user’s application is capable at this time of taking an outage and the user would prefer not to spoof device WWNs on restart
Examining the five devices in this migration from the host operating system disk management (in this case, Windows Server 2016), they show as Disk 2 through Disk 6. These were previously added as RDMs to the VMs using VMware vSphere.
The volumes are contained within a storage group called Minimally_Disrupt_Sg:
Note: If migrating Solaris Cluster environments using NDM Update, review Appendix G: NDM Update with Solaris cluster.
NDM Update create using precopy and choosing to move identity
This walkthrough migrates the storage group Minimally_Disrupt_Sg with the offline option. The offline parameter signifies this is a migration that requires minimal disruption.

This walkthrough will also precopy the data to the target array and choose to move identity or spoof WWNs on the target.
The precopy option allows applications to continue running on the source during the create while data is being migrated. Once the data migration is complete, a cutover runs which requires the application to be shut down. The cutover also makes the target devices visible to the host and the source devices inactive.
The move identity parameter is also used, which propagates the source device identities to the target. Using the move identity does not require the host configuration to be changed to reflect new devices.
After successful completion of a create -precopy operation, the administrator can monitor the progress of the data copy and then perform a cutover operation when enough of the data copy is completed. The cutover operation switches the application to run on the target devices.
The create with precopy command completes the following:
- Creates a storage group on the target array (name must not already exist in the target array) with the same name as the source storage group
- Creates duplicate devices on the target array to match those on the storage group
- Creates an initiator group using initiators with entries in the login history table
- Creates a port group (if one does not already exist or has not been selected by the user)
- Invalidates the tracks on the RDF mirror to prepare for the copy
- Starts the copy process in adaptive copy mode
From the More Actions menu, click Migrate.
From the resulting menu, select Offline. This alerts Unisphere for PowerMax that we intend on using NDM Update to migrate this storage group. This will then highlight the need for a host reboot.
Also, for this example, choose the Precopy and Move Identity parameters.

On the next screen, there is the option to select a pre-existing port group from the target array, or with 9.1 and later, create a new port group as part of the create command. Click Next.
A breakdown of the planned migration session is displayed showing the masking elements and options selected for final approval. Click Run Now.
To validate and create the session using the CLI, run the following commands:
symdm -src_sid 111 -tgt_sid 156 -sg Minimally_Disrupt_Sg create -offline -validate
symdm -src_sid 111 -tgt_sid 156 -sg Minimally_Disrupt_Sg create -offline -precopy -move_identity
Once the create step has completed, click OK.
Examine the created NDM Update session
To examine the migration session, click Data Protection > Migrations. The current state of the migration setting is Migrating.
To view migration sessions using the CLI, run the following command:
symdm -sid 156 list
Examine the created NDM Update session
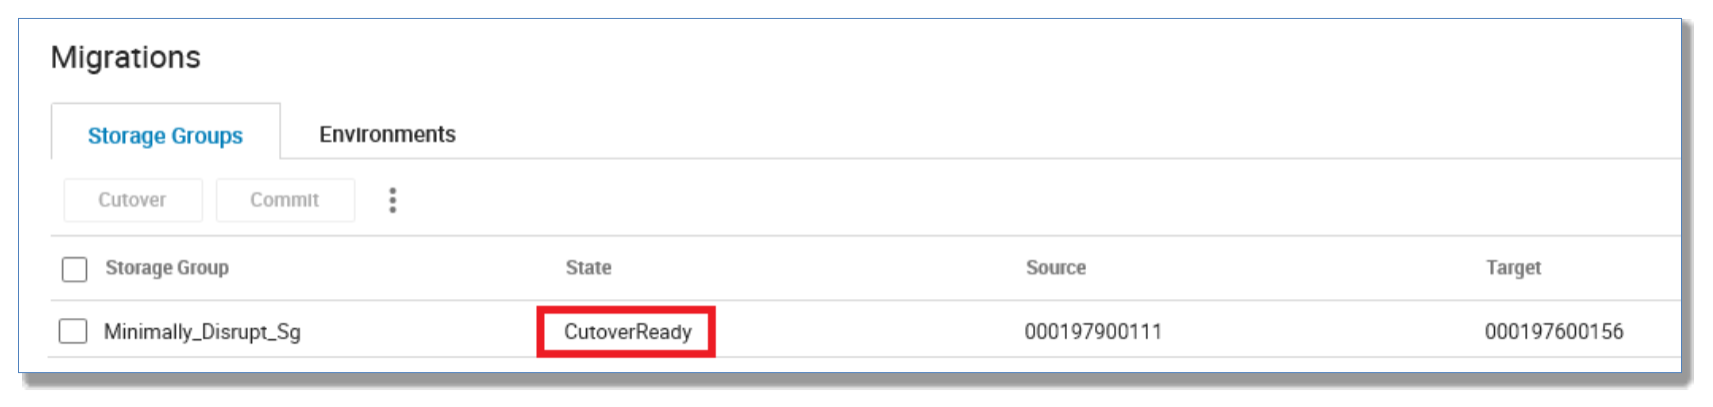
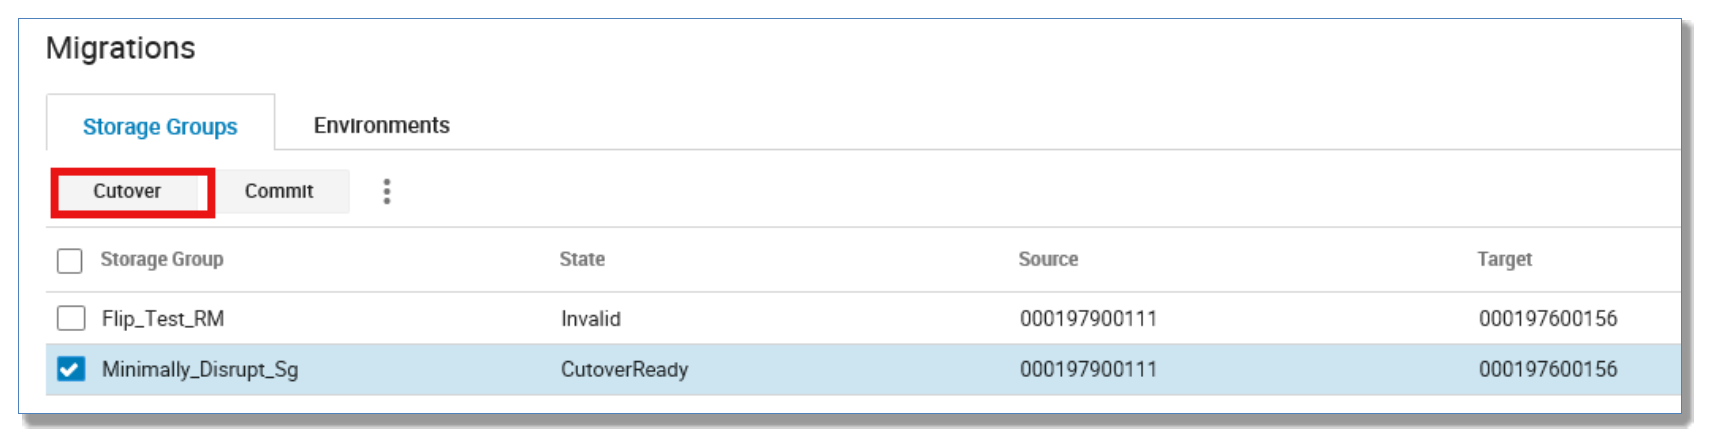
Refreshing the migration list view or solutions enabler command, the migration session has completed the precopy process and has now entered a CutoverReady state, meaning all data has copied and a cutting-over control to the target array is now possible.
At this point, shut down your application (this example powered down the VM).
Note: There are checks in place to check for host I/O. However, this check is for a 15-second window and does not guarantee an application has been shut down. It is up to the user to verify manually that an application has been shut down successfully before progressing.
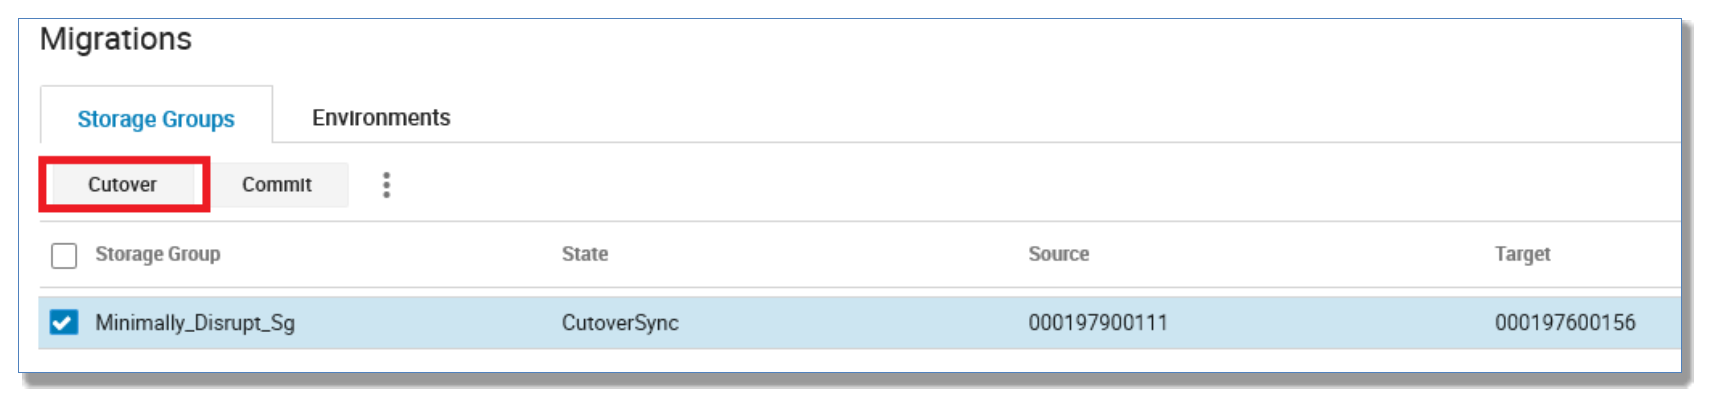
Cutover the migration
This operation is only used if the -precopy option was used with the create operation.
The cutover command makes the target devices visible to the host and the source devices inactive to the host. Any updates made to data on the target array are replicated back to the source array through the RDF link.
Before issuing the command, the administrator must first shut down the application. Upon successful completion of a cutover operation, the administrator must perform a host reboot and verify that new paths or new LUNs have been discovered prior to restarting the application.
Note: Since the move_identity parameter was selected for this example, a manual removal of old RDMs and the addition of new RDMs are not required. The host, upon reboot, will successfully discover the new LUNs assuming they are the original LUNs. However, before restarting an application, a visual verification of the paths should be undertaken.
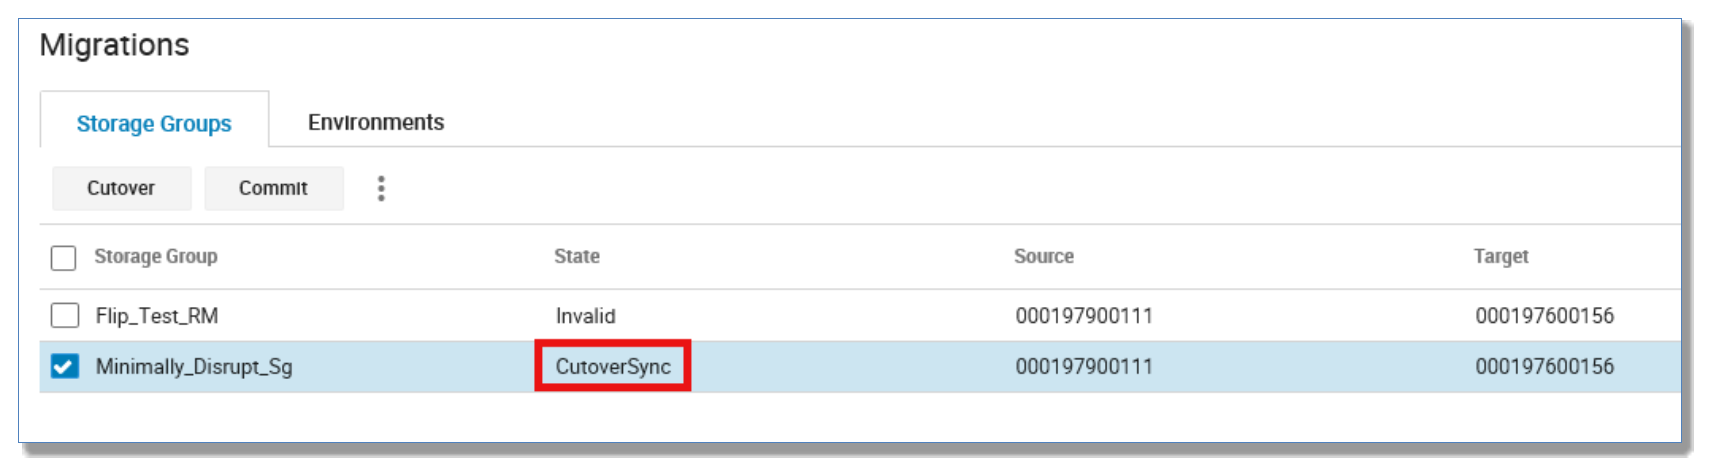
Upon a successful cutover, the migration session state will switch to CutoverSync.
To cutover the migration session using the CLI, run the following command:
symdm -sid 156 -sg Minimally_Disrupt_Sg cutover
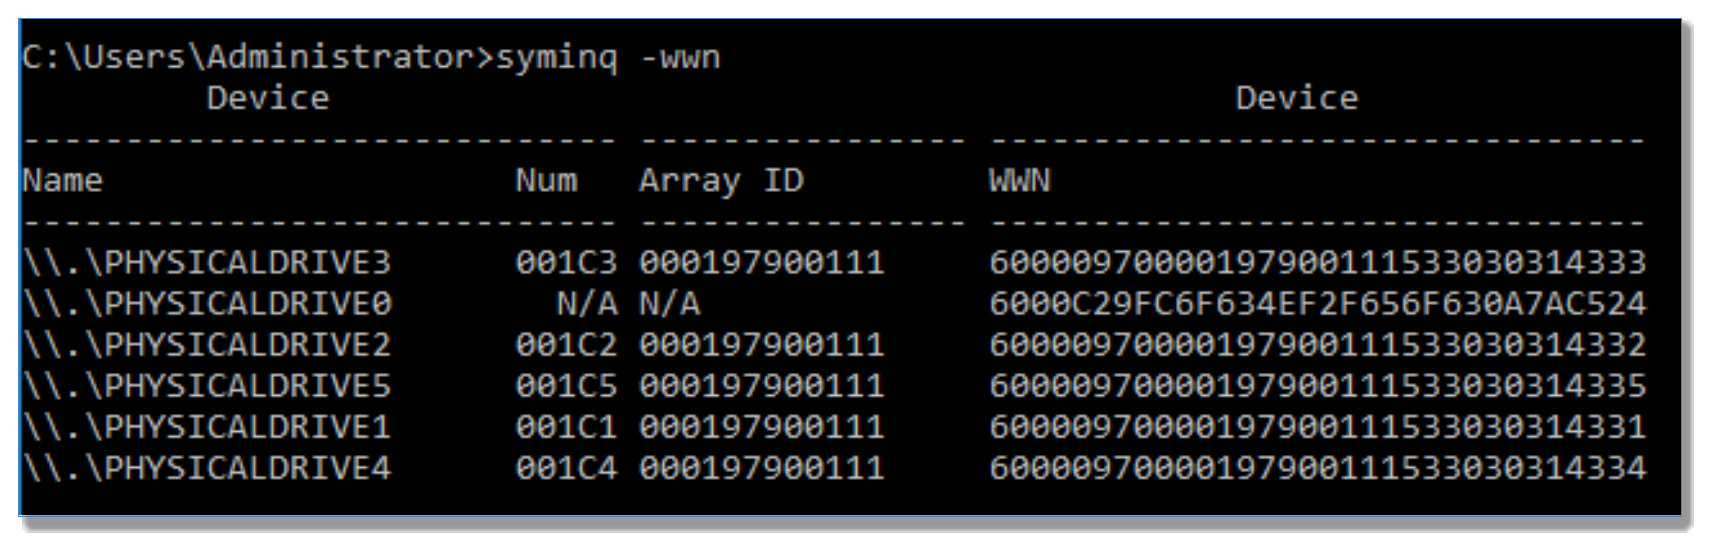
Since the move identity parameter was used, the device attributes were propagated from the source volumes to the target volumes. This can be seen below where the external identity differs from the native WWN. We have taken on the WWN of the paired source device and spoofed the target volume so it appears to the host as the same device.

At this point, reboot the host and restart the application (this example used a VM, requiring a rescan of the storage and restart of the VM).
Post-reboot, the device IDs remain the same to the host even though we are running on the target array 156.
Commit the migration
Upon successful completion of a commit operation, the replication between source-side and target-side devices are severed. The source-side devices migrated become longer be visible to a host, and since we chose the -move_identity option, the source-side devices are assigned the IDs the target-side devices were created with. This ensures they are no longer used by the application that was moved to the target array during the migration.
After completing the commit operation, the application migration is complete. The application will be running only on the target array and is no longer using the devices on the source array.
To commit the migration sessions using the CLI, run the following command:
symdm -sid 156 -sg Minimally_Disrupt_Sg commit
Once the migration session is committed, the session is removed from the migrations list view.

Cancel a migration
The administrator must perform a host rescan with the option to remove dead paths to clean up the paths that were created for the target-side LUNs. The administrator must identify the source or the target array as well as the application whose migration is to be canceled.
Upon successful completion of a cancel operation, the application storage will be as it was prior to the start of the migration:
- Connections between source-side and target-side devices that were used to migrate data through the DM replication pathway are severed.
- Any target-side resources configured for the application that are not used by other applications on the target array are removed. This includes pre-existing IGs or PGs used by the migrated view on the target array if these are not used in other masking views or groups.
Recovering a failed migration
A recover operation is needed after a migration step completes with a failed state, and it is not normally required as a part of a migration. Failed states, depending on the reason for the failure can include the following:
- CreateFailed
- CutoverFailed
- MigrateFailed
- CancelFailed
- CommitFailed
After the condition that caused a migration operation (create, cutover, commit, or cancel) to fail has been corrected, a recover operation can be invoked to continue with the migration by completing the following:
- Determining which migration operation failed
- Putting the migration session resources (connections, devices) into the appropriate state to allow the failed operation to complete
- Repeating or resuming (depending on the cause of the failure) the failed action
To recover a failed migration using the CLI (once reason for failure has been resolved), run the following command:
symdm -sid 156 -sg Minimally_Disrupt_sg recover