
OpenResty configuration
OpenResty configuration
-
Configuration files are used to define how OpenResty load balances requests to a pool of servers. The NGINX configuration file, nginx.conf, is located in “/usr/local/openresty/nginx/conf” directory. The ngnix.conf file is structured in blocks of directives surrounded by braces {}. The examples in this white paper predominately define the following contexts or blocks:
- global or main – any directives that are defined outside of the braces {} and affects all contexts within the file.
- events – connection handler
- http – defines how HTTP or HTTPS requests are processed
- stream – defines how TCP or UDP requests are processed. Similar to http context, it contains global variables and nested server and upstream contexts.
This section describes each context and the embedded Lua scripts in step-wise fashion and can be culminated together to create an nginx.conf file. For reference, the nginx.conf file used in this example is also attached to this white paper. See Appendix A: Attachment – nginx-sample.zip.
Global and event context
The global context consists of the directives that apply to the entire web platform and to all contexts. It is defined outside of the braces {}. One of the primary directives in the global context is worker_processes. NGINX has a “master process” responsible for maintaining worker processes. The worker_processes directive in the configuration file defines how many worker processes the master spawns to handle requests. This number is usually based on the number of CPU cores on the host running NGINX. In this simple example, work_processes is set to 1. This value can be tuned and optimized based on your server and workload requirements.
The event context block specifies the directives related to the connection processing. It can include the following:
- worker_connections - number of clients that can be served per worker process
- epoll – an event notification mechanism to streamline I/O and improve scalability of NGINX for processing requests.
- multi-accept – if “on”, it accepts as many connections as possible
These values can also be tuned based on workload requirements. Figure 16 exemplifies these directives.
worker_processes 1;
events {
worker_connections 2048;
use epoll;multi_accept on;
}
Figure 16. Global and Event Context Directives
HTTP context
The http context includes all the directives and nested blocks or contexts (that is, the server, location, and so on) that define how OpenResty processes HTTP client requests. Inside this context are the following:
- general – definitions used within the http context such as error and access logs, proxy buffers, proxy buffering, error and access log files, paths, log format, and so on.
- server – handler for a specific type of HTTP client requests and contains listening ports, ssl certificates, and so on.
- upstream – defines a named pool of backend servers that requests are sent to and the load balancing algorithm
- *lua* – embedded Lua scripts to handle health checks and metric collection.
General directives
The definitions or directives defined within the http context that are not surrounded by braces, {}, apply to all the nested contexts or blocks within the http context. As a best practice, if there are directives that are applicable to one or more nested contexts, it should be defined in the higher context or outside of the nested context. In this example shown in Figure 17, directives declared outside of a nested context are related to logging, performance optimizations, and connection time out values. Lua and third party module directives can also be specified at this level if it is needed prior to defining a context or block.
The first set of directives defined in this example is the log format for the access log and error log. The logs are generally located relative to the install directory of OpenResty (that is, /usr/local/openresty/nginx/logs) or as specified in the access_log and error_log directives.
OpenResty by default reads and writes to internal buffers. These buffers contain data received and sent to and from clients, and data received and sent to and from proxy servers. If these buffers are set too low, then temporary files are used to store the data. The purpose of the buffering directives is to optimize performance. The values of the buffering directives can be tuned based on the workload. There are several optimizations that are used in this example. The buffers relating to client requests include the following:
- client_max_body_size – maximum size of the body of a client request. Set to 0 to disable checking of body size.
- client_body_buffer_size –the client buffer size (that is, a POST action)
- client_header_buffer_size – maximum header size for a client request.
Another set of the optimizations relates to internal buffering of requests and responses from proxied servers. In this example, proxy_request_buffering is disabled so that the request body is immediately sent to the proxied servers. As for responses, they are buffered and the proxy_buffers specify the number of allocated buffers and size for a request. Also, the proxy_buffer_size is defined to indicate the buffer size to store the first part of the response from a proxied server. This is a separate buffer and can be smaller than the buffers for the rest of the response.
Further optimizations can be implemented by using the tcp_nodelay, tcp_nopush, and sendfile directives. These directives work together to optimize how data is sent at the system (kernel) and TCP layer. The directive tcp_nodelay sends data in the socket buffer immediately without delay. If not enabled, there can be up to 0.2 seconds before data is sent. Historically the TCP stack set this delay to avoid network congestion and to handle very small amount of data that did not fill up the packet. However, today, the packet is usually full and enabling tcp_nodelay turns off this behavior. As for tcp_nopush, this ensures that packets are full or at a certain optimal level before they are sent. The sendfile directive reduces the internal overhead when transferring static files. It uses file descriptors and mmap to directly send data without extra context switching and copying of data. As for the keepalive_timeout value, it specifies how long a client connection is open on the server side.
http {
log_format main '$remote_addr - $remote_user [$time_local] "$request" '
'$status $bytes_sent $body_bytes_sent "$http_referer" '
'"$http_user_agent" ua=$upstream_addr us=$upstream_status ''rt=$request_time rl=$request_length
uct=$upstream_connect_time '
'uht=$upstream_header_time urt=$upstream_response_time';
access_log logs/access.log main buffer=32k flush=5s;
error_log logs/error.log warn;client_max_body_size 0;
client_body_buffer_size 8M;
client_header_buffer_size 32K;proxy_http_version 1.1;
proxy_request_buffering off;
proxy_buffering off;
proxy_buffer_size 2M;
proxy_buffers 100 2M;sendfile on;
tcp_nopush on;
tcp_nodelay on;
keepalive_timeout 60;
...
...
...
}
Figure 17. HTTP context General Directives
Upstream context
The upstream context declares the pool of backend servers or ECS nodes that OpenResty sends HTTP requests for handling. Based on the load balancing algorithm specified would determine how the requests are balanced across the servers. Supported load balancing algorithms include round –robin (default), least connected, and ip-hash. The upstream context is defined outside of the server context. The name of the upstream context is referenced within the server or location blocks. In Figure 18, the name of the upstream context is ecs_9020 and ecs_9024 and the IP addresses of each ECS node and protocol port are preceded by a server directive. For S3 object requests, port 9020 is specified and for Swift, port 9024 is specified. The other ECS protocols communicating over HTTP would be in their own named upstream block and have similar definitions but different port numbers. If there are a lot of upstream servers, it is recommended to create a separate file for the upstream directives for readability and better manageability. Then, within the http context, add an “include” directive with the name of the file in nginx.conf. If no load balancing algorithm is defined in the context, the default load balancing algorithm (round robin) is used. The keepalive directive indicates the number of idle keepalive connections to upstream server that remain open.
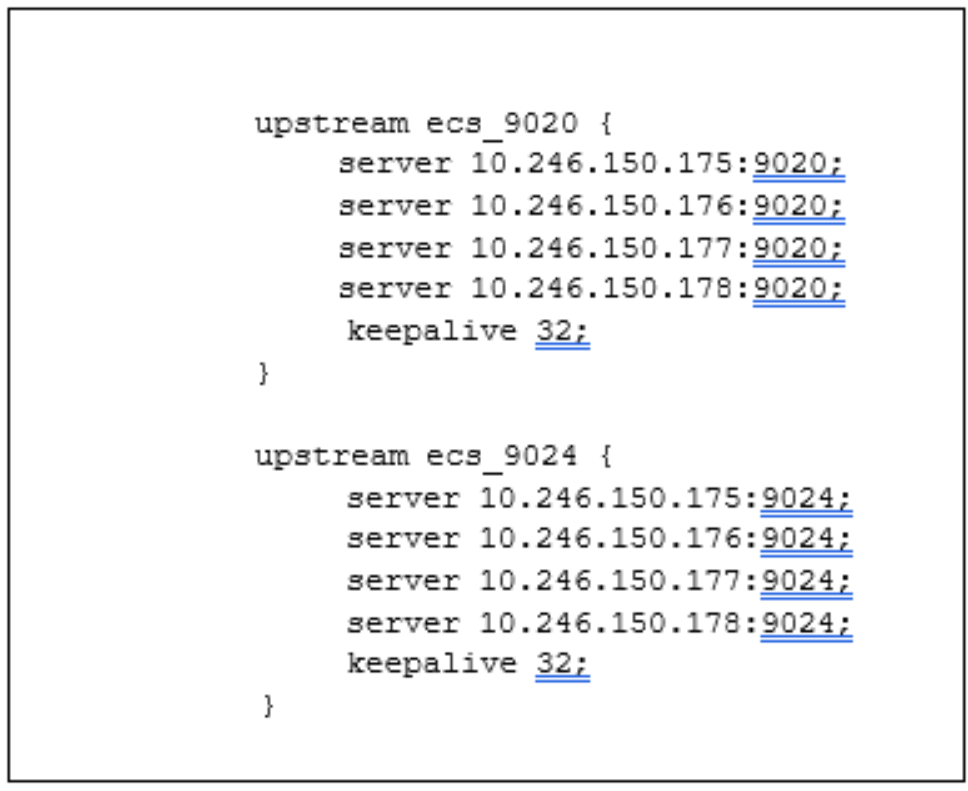
Figure 18. Upstream Context within HTTP context
Health check Lua script
The value of OpenResty is the inclusion of LuaJIT and other lua modules that allow developing of scripts to customize the web platform. The Dell DevOps team has developed several sample Lua scripts. One of the Lua scripts is the health checks of ECS nodes defined in the “init_worker_by_lua_block” context. In Figure 19, there are several http context directives defined prior to the Lua blocks which include:
- lua_code_cache – indicates whether Lua code is cached or not.
- lua_shared_dict – declares a named shared memory zone, healthcheck, of certain size, 1M, and is shared by all NGINX worker processes.
- lua_socket_log_errors – enables or disables error logging when a failure occurs for the TCP or UDP cosockets.
These directives are used by several of the Lua scripts and thus declared outside of the Lua block(s).
lua_package_path "${prefix}/lua/?.lua;;";
lua_code_cache on;
lua_shared_dict healthcheck 1m;
lua_socket_log_errors off;
Figure 19. General Directives for Lua Blocks
The “init_worker_by_lua_block” implements the health checks for the ECS nodes and uses the built-in lua-resty-upstream- check module. It runs on every NGINX worker process startup if master process is enabled or when the NGINX configuration file is loaded if master process is disabled. It sends an HTTP “ping” request to validate the ECS nodes and services are up and available to handle requests. The upstream context named ecs_9020 and ecs_9024 indicates the pool of ECS nodes. As shown in the comments in Figure 20, this runs a check every 5 seconds and considers a node down if the ping fails once. Errors in spawning this Lua script are logged in error.log file in the install directory of OpenResty (that is, /usr/local/openresty/nginx/logs).
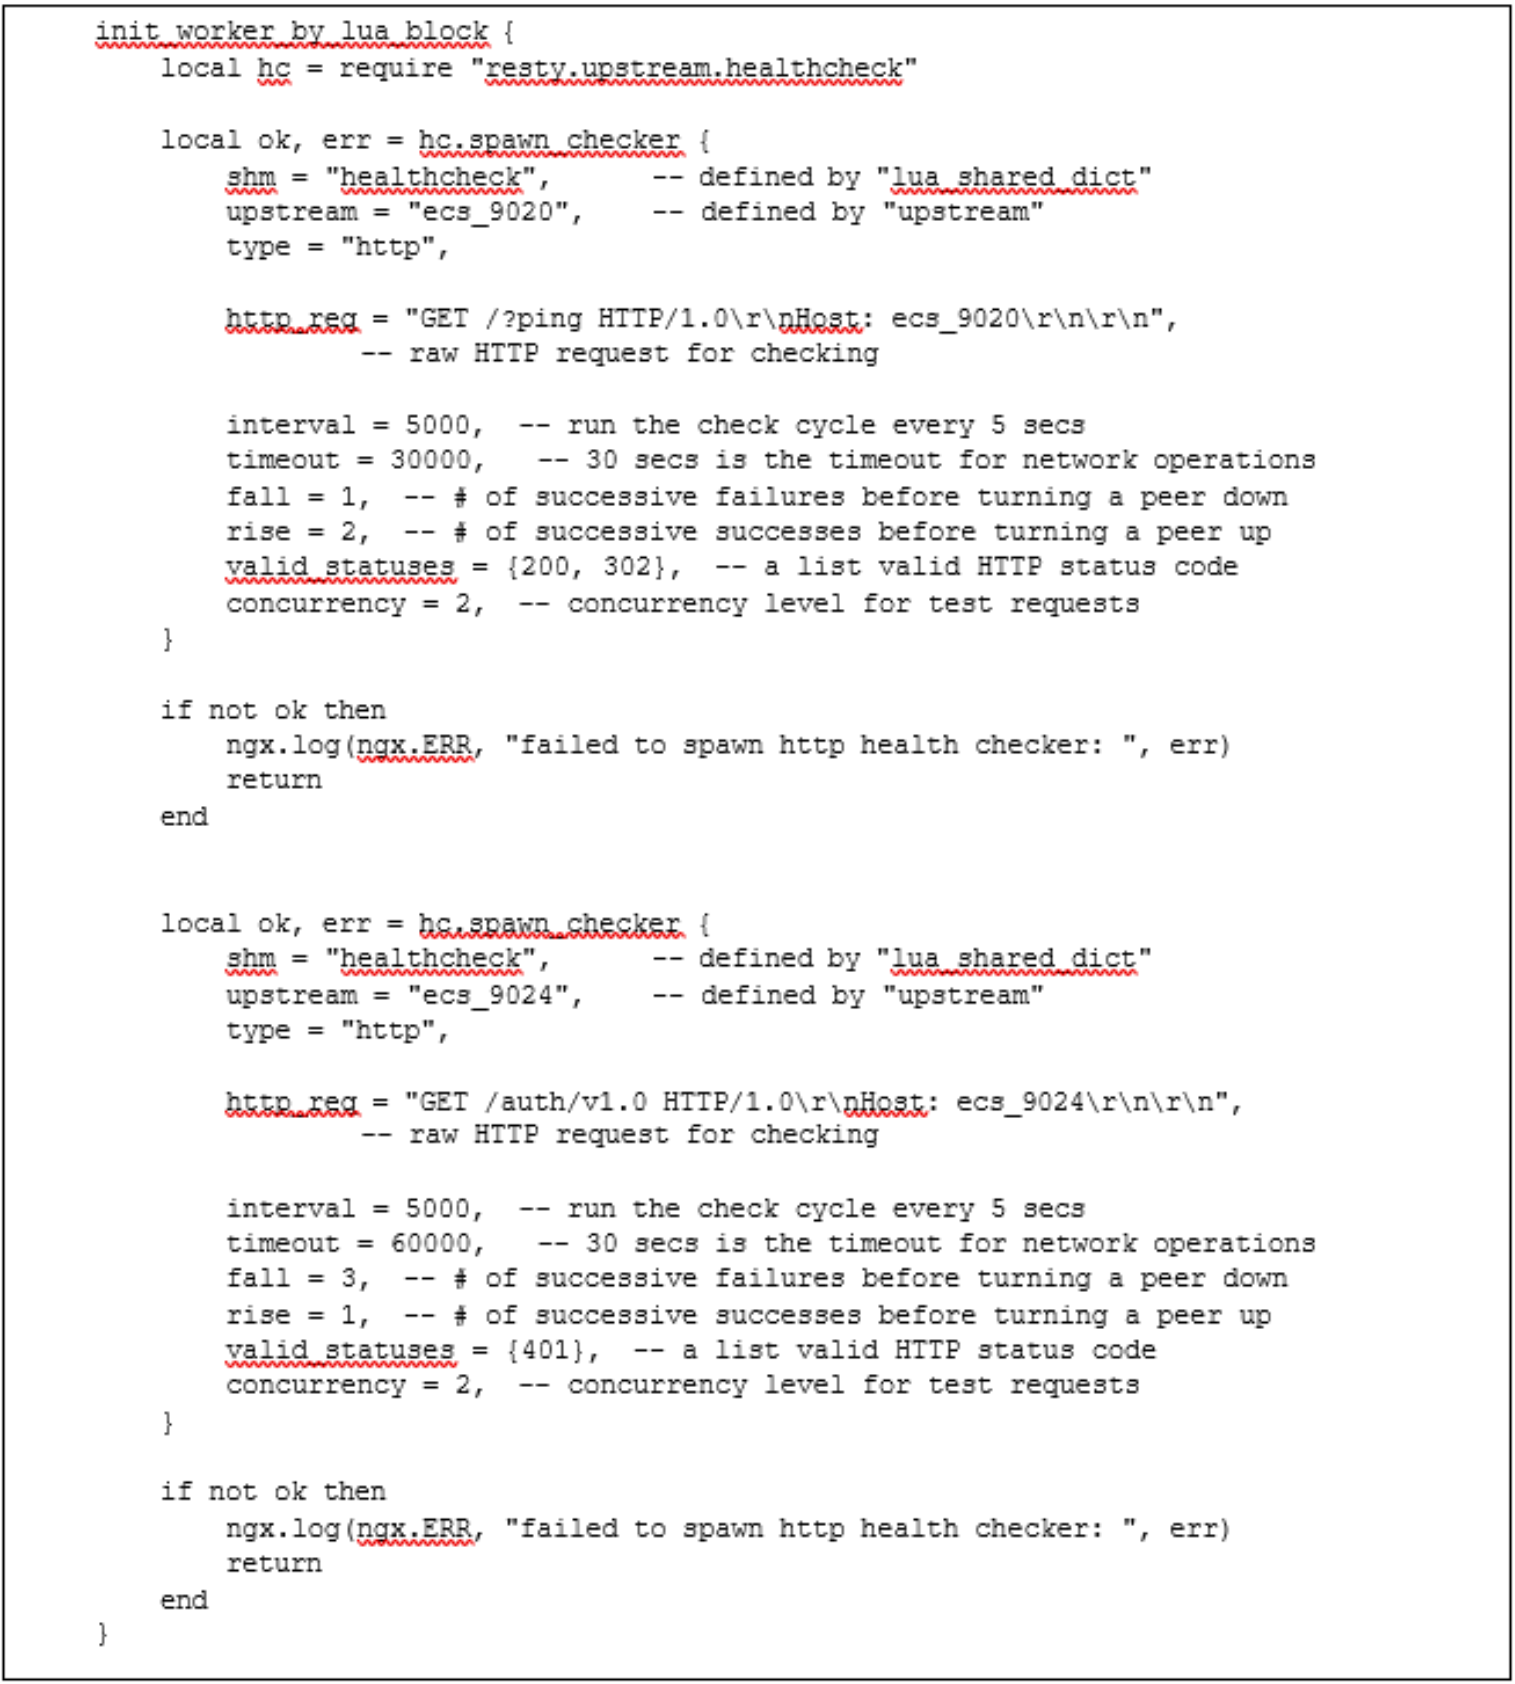
Figure 20. ECS Health Check Lua Script within HTTP Context
Server context
The server context is defined within the HTTP context and includes the following directives:
- listen – IP address and/or port combination that this context is listening to.
- location – defines how certain requests that match a specified criteria (that is, header) are processed. Multiple location contexts can be specified.
Figure 21 indicates that this server is listening on port 9020 and passes HTTP requests to the proxied servers (ECS nodes) of upstream context name, name ecs_9020 for handling of S3 requests. Similarly, a server context is defined for Swift on port 9024 and passes to the upstream context named ecs_9024. There can be multiple server contexts defined with different listening ports and a set of proxied servers. This allows for handling of different types of client requests. The proxy_set_header adjusts the headers for Swift connections. For some applications, for instance Cyberduck, the proxy_pass URL is being specified in the response header and by setting the proxy_set_header, it is corrected.
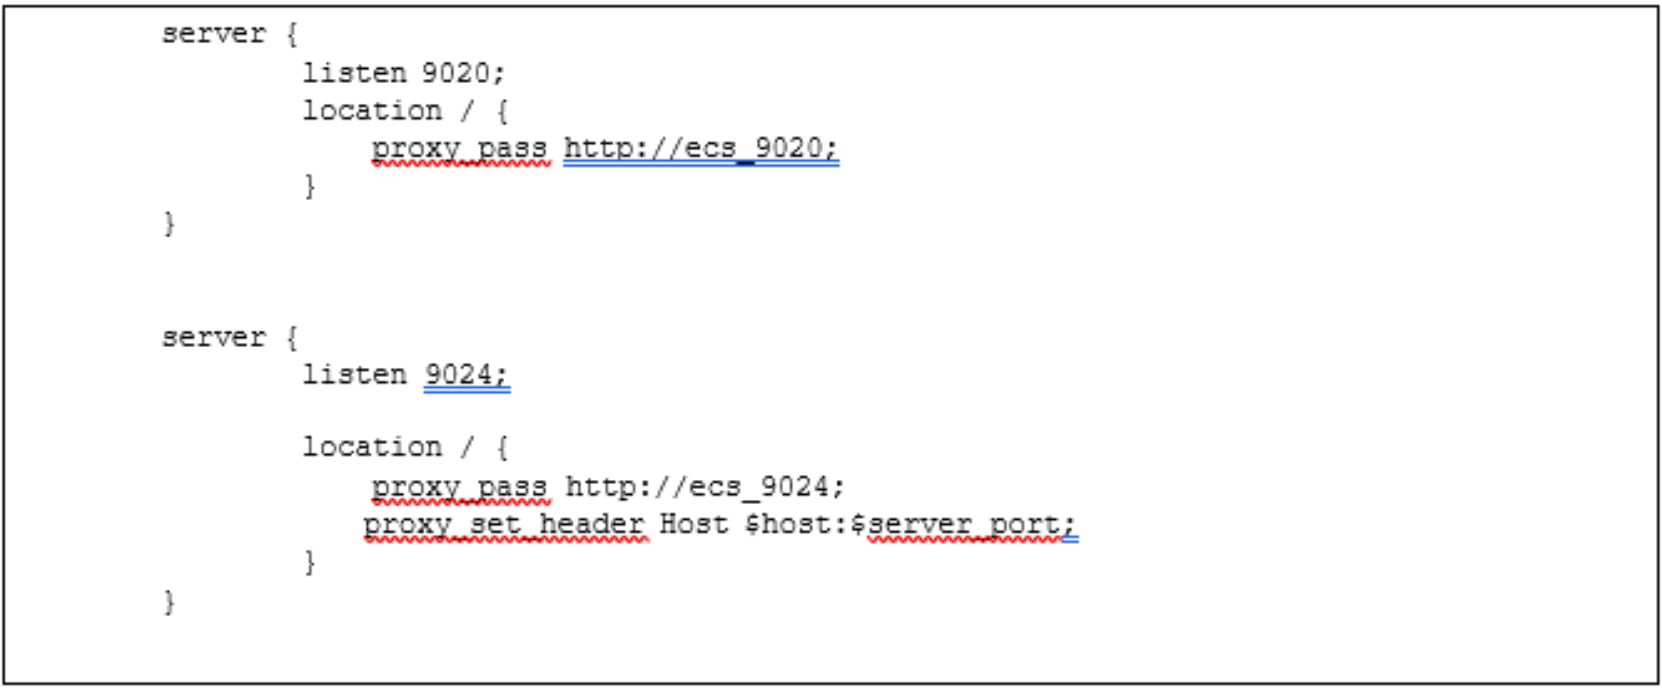
Figure 21. Server Context within HTTP Context
After the nginx.conf has been modified, check the validity of the configuration file. If the configuration file is valid, then start OpenResty service to put in effect the directives in nginx.conf. Figure 22 exhibits how to check and start OpenResty.

Figure 22. Example Command to Check nginx.conf and Start OpenResty
To validate the OpenResty configuration, install S3 Browser or curl and set the IP or name of the host running OpenResty. Figure 23 provides an example of the settings for S3 Browser. Since HTTP is being tested, verify that the S3 Browser has the “Use secure transfer (SSL/TLS)” box cleared. Also specify port 9020 on the REST endpoint because OpenResty is listening on this port for HTTP S3 requests.
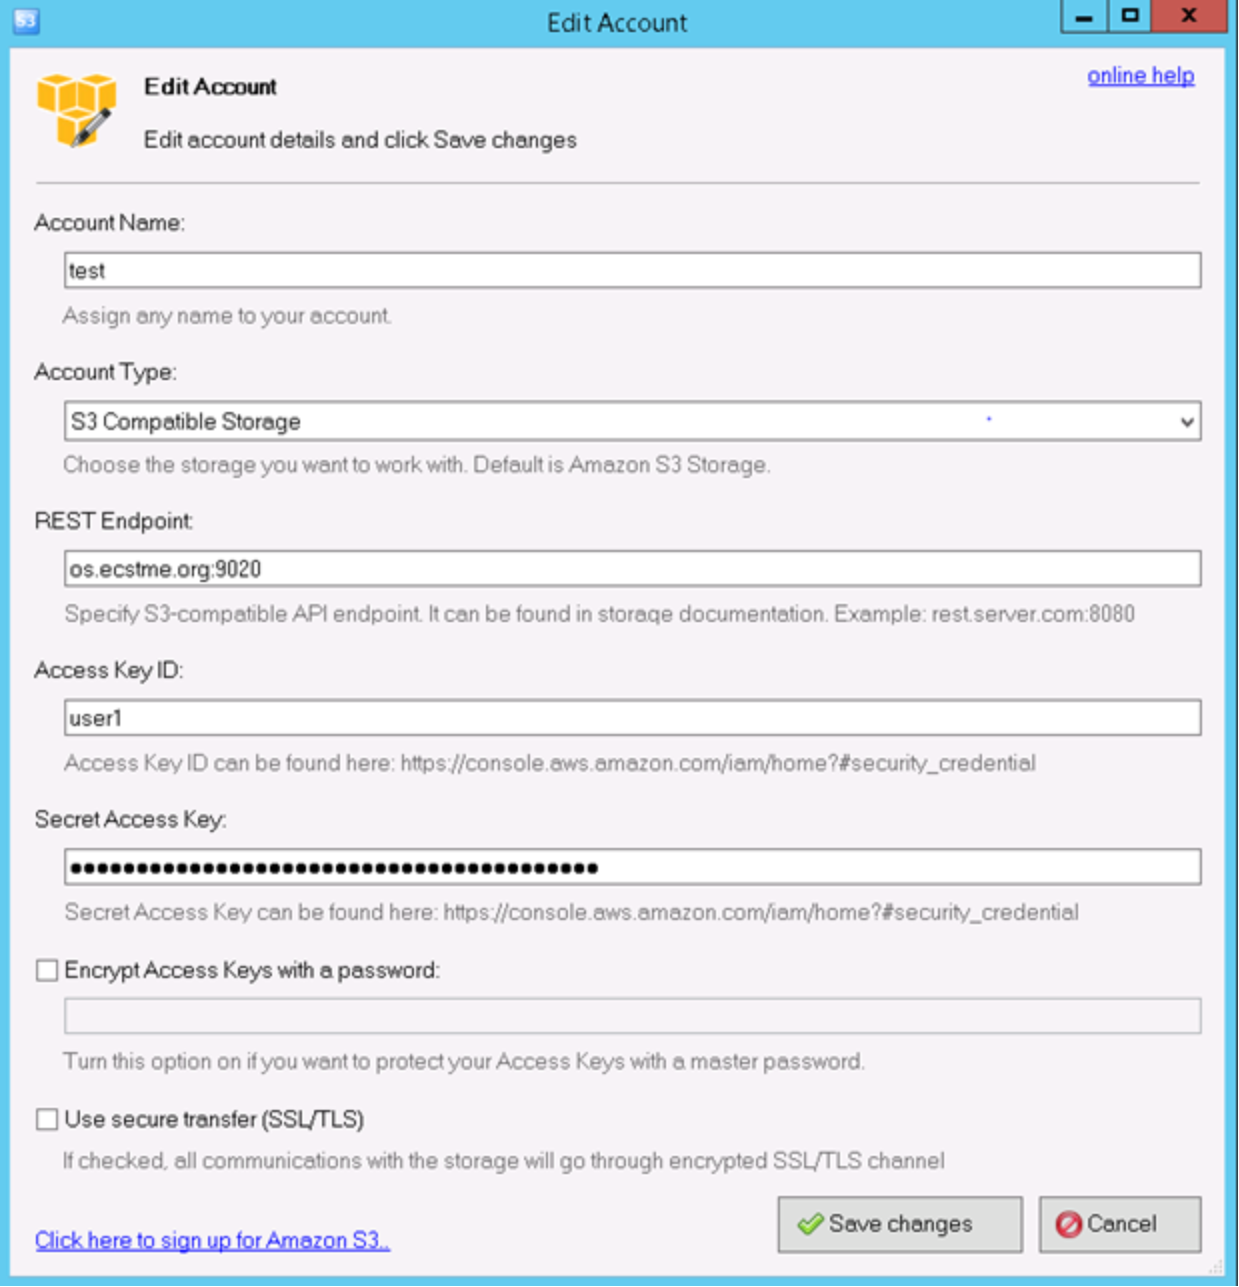
Figure 23. S3 Browser Settings Example Using OpenResty
The Linux curl command can also be used to test both S3 and Swift. In this example, a curl command is used to test Swift. The DNS alias, “swift.ecstme.org” and port 9024 for the server settings and the Swift credentials (such as user as suser1 and password for Swift user) as shown in Figure 24 are passed to the curl command. An HTTP response of 204 and an ECS token are returned to indicate that the command succeeded.
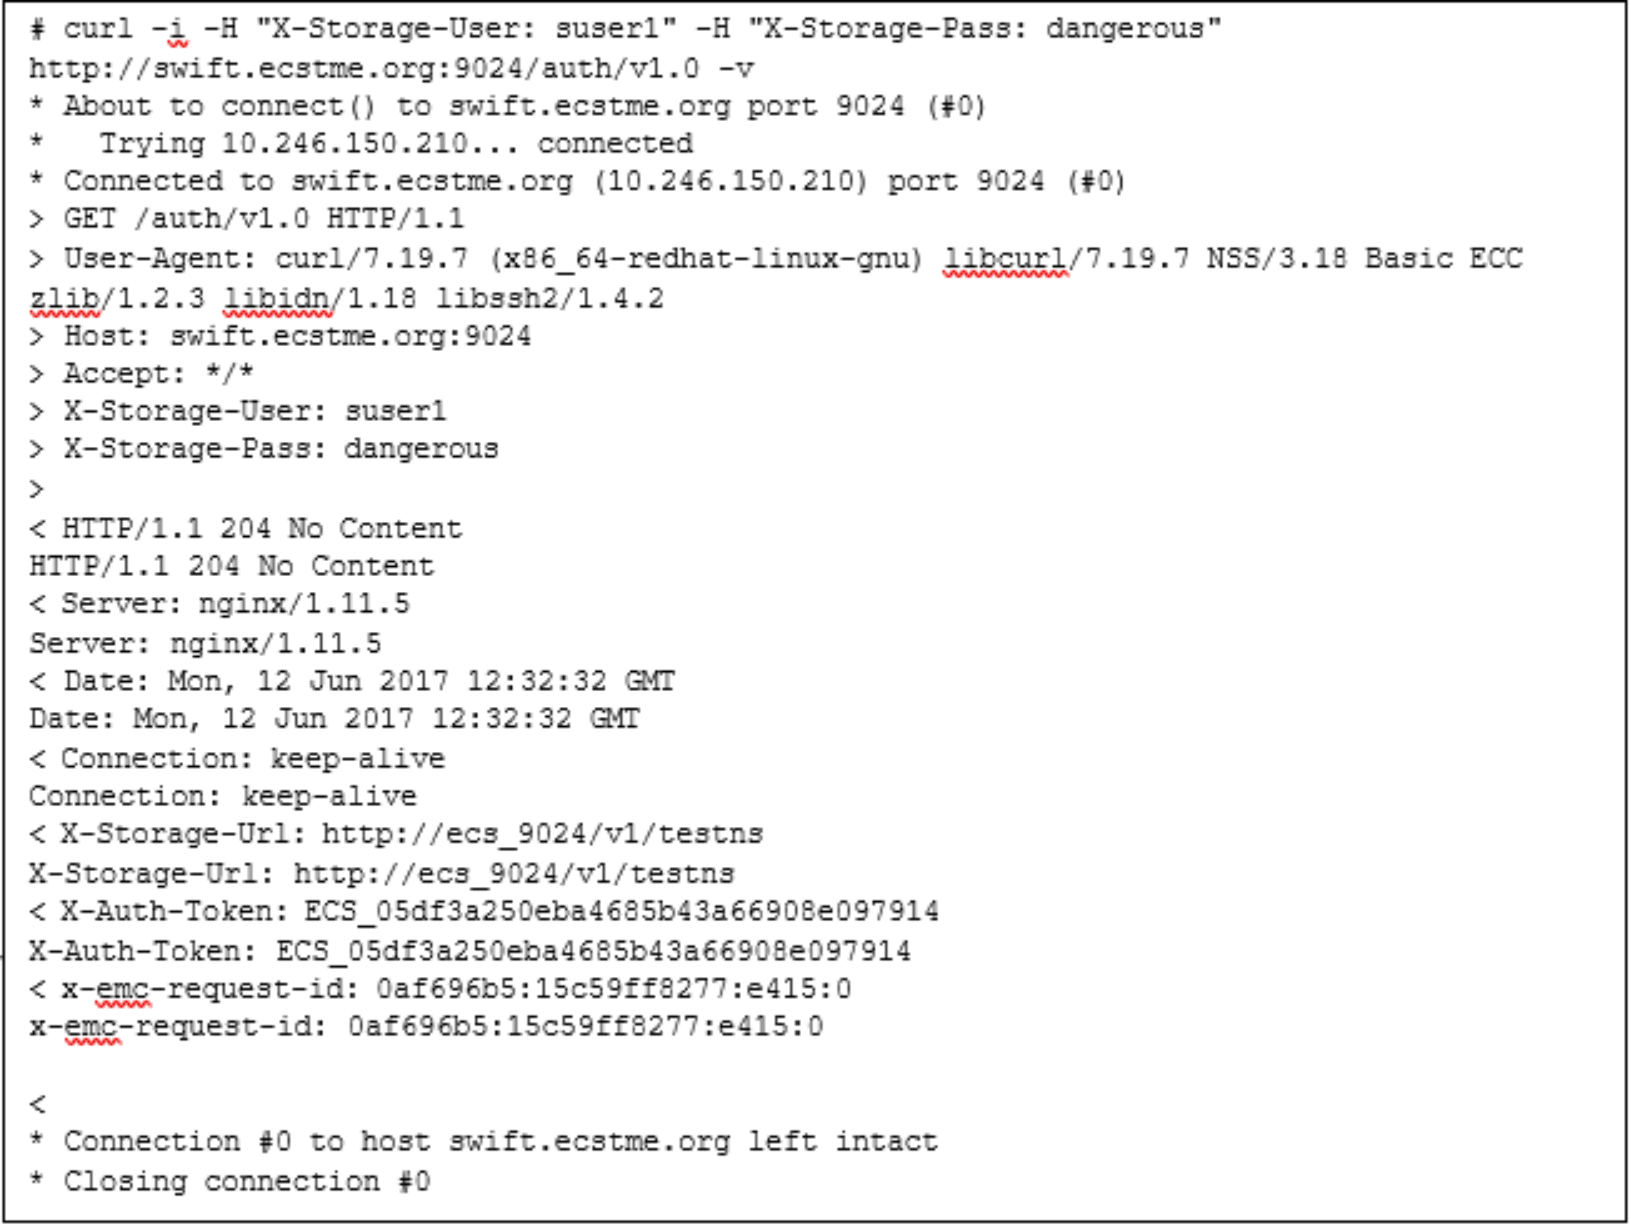
Figure 24. Curl Command with Swift Settings Example Using OpenResty
SSL certificates
Developing trust between two entities is established using Secure Socket Layer (SSL) and SSL certificates. The purpose of SSL and certificates is encryption and identification to ensure that communication exchange between two parties is secure and trustworthy. For identification of who to trust, a certificate would need to be generated and installed on OpenResty or ECS nodes. Certificates usually contain information about the owner of the certificate (such as company, organization, city, state, email address of owner), duration of validity, resource location (such as Fully Qualified Domain Name or common name), public key, and hash. The certificate generated can be signed by either:
- Certificate Authority (CA) – trusted organizations that can verify the identity and validity of the entity requesting the certificate.
- Self-signed - authenticated by the system where the certificate resides.
As a best practice, using a Certificate Authority to sign the certificate is preferred over issuing self-signed certificates. Almost all client systems come with a list of trusted root CA certificates that automatically validates your CA-signed certificate. If you opt to use a self-signed certificate, that certificate will need to be installed on all client systems as a “trusted” certificate. If your organization has an internal Certificate Authority, you can use that CA to sign your certificates. Make sure that any client systems have your CA’s root certificate installed. Also, using OpenResty to offload and terminate SSL is a best practice in order not to add extra load on ECS nodes to establish SSL sessions. Thus, the certificate generated in this example is to be installed on the host running OpenResty. Some organizations have security policies that specify that the connection to ECS must be encrypted all the way to ECS. In those cases, you need to terminate SSL on the ECS appliance itself. If SSL termination is required on ECS nodes, then use Layer 4 (tcp) load balancing mode to pass through the SSL traffic to ECS nodes for handling. In this scenario, the certificates would need to be installed on ECS. For information about how to generate certificates for ECS Nodes, refer to ECS System and Administration Guide.
Certificate Generation for OpenResty Example
OpenSSL is used in this example to generate the certificates. You do not need to generate the certificates on ECS; any system with suitable tools like OpenSSL can generate certificates. By default, OpenSSL is installed on most Linux releases. General steps to create a certificate for OpenResty using OpenSSL include:
- Generate a private key.
- Modify the configuration file to add Subject Alternative Names (SANs).
- Create a certificate request to submit to CA or generate a self-signed certificate.
- Combine the private key and certificate and place in the OpenResty directory.
When generating certificates, the hostname of where the certificate is used needs to be specified. For compatibility with the S3 protocol, the Common Name (CN) on the certificate should point to the wildcard DNS entry used by S3 because S3 uses virtually hosted-style URL buckets where the bucket name is in the hostname. There can only be one wildcard entry on an SSL certificate and it must be under the CN. If specifying IP addresses or other DNS entries for Atmos and Swift protocols, Subject Alternative Names (SANs) should be registered on the certificate. Some organizations do not allow the use of wildcard certificates. In this case, you need to make sure that all of your S3 applications use “path-style” access so they can use the base hostname of S3 (such as ecstme.org) instead of the default method of adding the bucket to the hostname (such as bucket.os.ecstme.org).
Step 1: Generate a Private Key
A private key is required for self-signed and CA requests certificates. This key is combined with the certificate generated. An example of how to generate the private key is shown in Figure 25. Permissions are also changed on the generated key to safeguard from accidental modification or deletion.
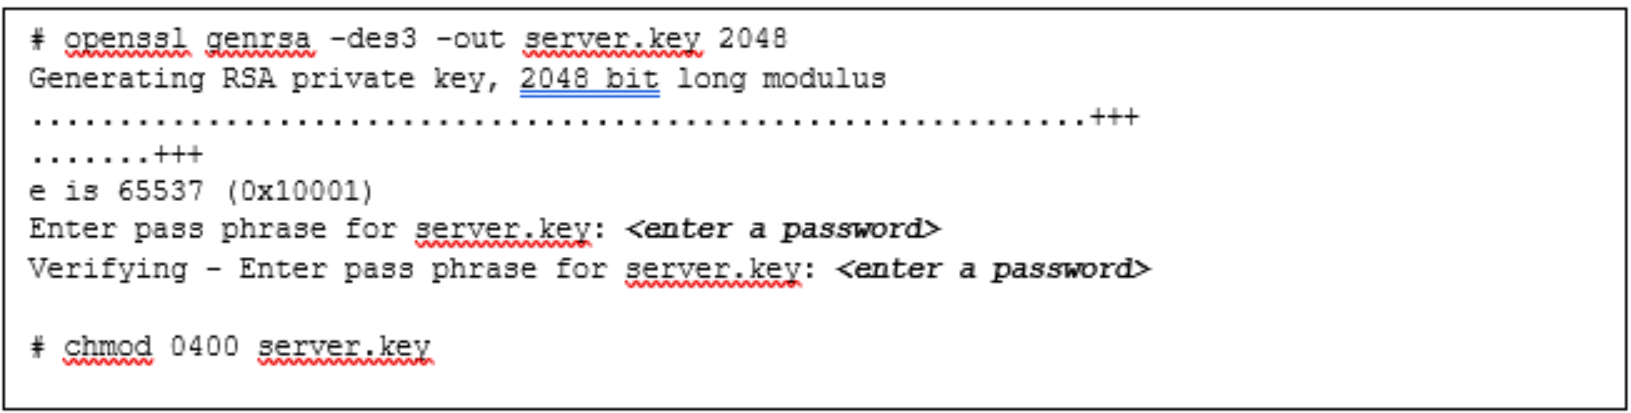
Figure 25. Example Command to Create Private Key Using OpenSSL
Step 2: Modify the Configuration File with SANs
OpenSSL does not allow passing of SANs through the command line so a configuration file is created to define them. A sample configuration file for openssl can be used as a reference and is located in /usr/lib/ssl/openssl.cnf. Copy the openssl.cnf file to a temporary directory where certificates are generated and placed as pictured in Figure 26.
# cp /usr/lib/ssl/openssl.cnf request.conf
Figure 26. Copying of Openssl Configuration File
Edit the request.conf file to include the SAN by adding the IP addresses or DNS entries mapping of the OpenResty web-platform. Figure 27 is an example of the SAN setting for both DNS entries and IP addresses.
[ alternate_names ]
DNS.1 = os.ecstme.org
DNS.2 = swift.ecstme.org
IP.1 = 10.246.150.210
Figure 27. SANs Setting in Configuration File
In the [ req ] section, add the following lines if not present in the configuration file as shown in Figure 28.
x509_extensions = v3_ca # The extentions to add to the self-signed cert
req_extensions = v3_ca # For cert signing req
Figure 28. Indicate Parameter(s) for Extensions
In the [ v3_ca ] section, add the following lines as shown in Figure 29. This indicates that there are alternate names provided.
[ v3_ca ]
subjectAltName = @alternate_names
basicConstraints = CA:FALSE
keyUsage = nonRepudiation, digitalSignature, keyEncipherment
extendedKeyUsage = serverAuth
Figure 29. Specify [ v3_ca ] Parameters for SAN
Also in [ v3_ca ] section, if creating a certificate signing request, comment out “authorityKeyIdentifier” as illustrated in Figure 30. There is no need to comment this out for self-signed certificates.
#authorityKeyIdentifier=keyid:always,issuer
Figure 30. Comment out authorityKeyIdentifier paramteter in [ v3_ca ] Section
Finally in section [ CA_default ], uncomment or add the copy_extension line as pictured in Figure 31.
copy_extension=copy
Figure 31. Parameter to Add at [ CA_default ] Section
Step 3a: Creation of a Certificate Signing Request for CA Submission
Figure 32 provides an example openssl command of how to create a certificate signing request. The command requires the private key, “server.key” created in Step 1, and the modified configuration file, request.conf containing the subject alternate names as described in Step 2. Several user inputs are expected such as location and organization information, email address, and Common Name. As previously mentioned, the Common Name should be set to the wildcard DNS entry used by S3 which is “*.os.ecstme.org” in this example.
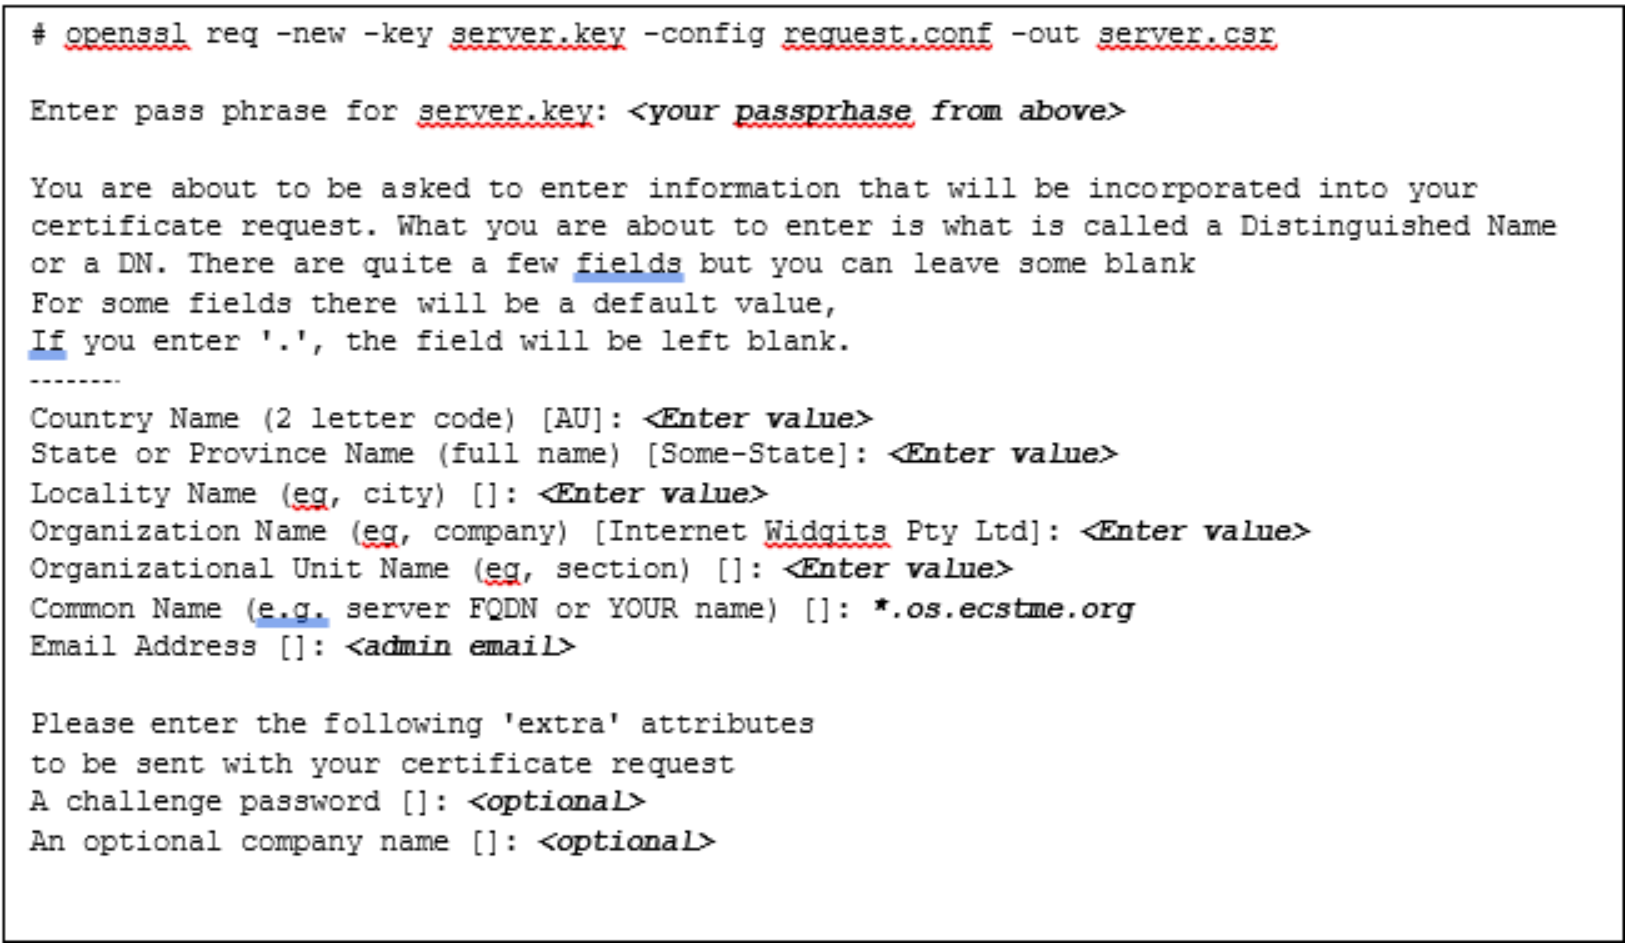
Figure 32. Example Command to Generate a Certificate Signing Request
Step 3b: Creation of a Self-Signed Certificate
The command to create self-signed certificates is similar to certificate request except for the addition of “- x509” option. Figure 33 provides an example command to generate the self-signed certificate. Also, the Common Name is set to “*.os.ecstme.org” for the S3 wildcard DNS entry. The validity of this certificate by default is one month, if more days are desired, specify the command with “-days <# of days> (that is” –days 366”).

Figure 33. Example Command for Creation of Self-Signed Certificate
In either certificate generation, user inputs and the Subject Alternate Names provided are included in the certificate. An openssl command to output certificate in text format is highlighted in Figure 34 and Figure 35 for each type of certificates.
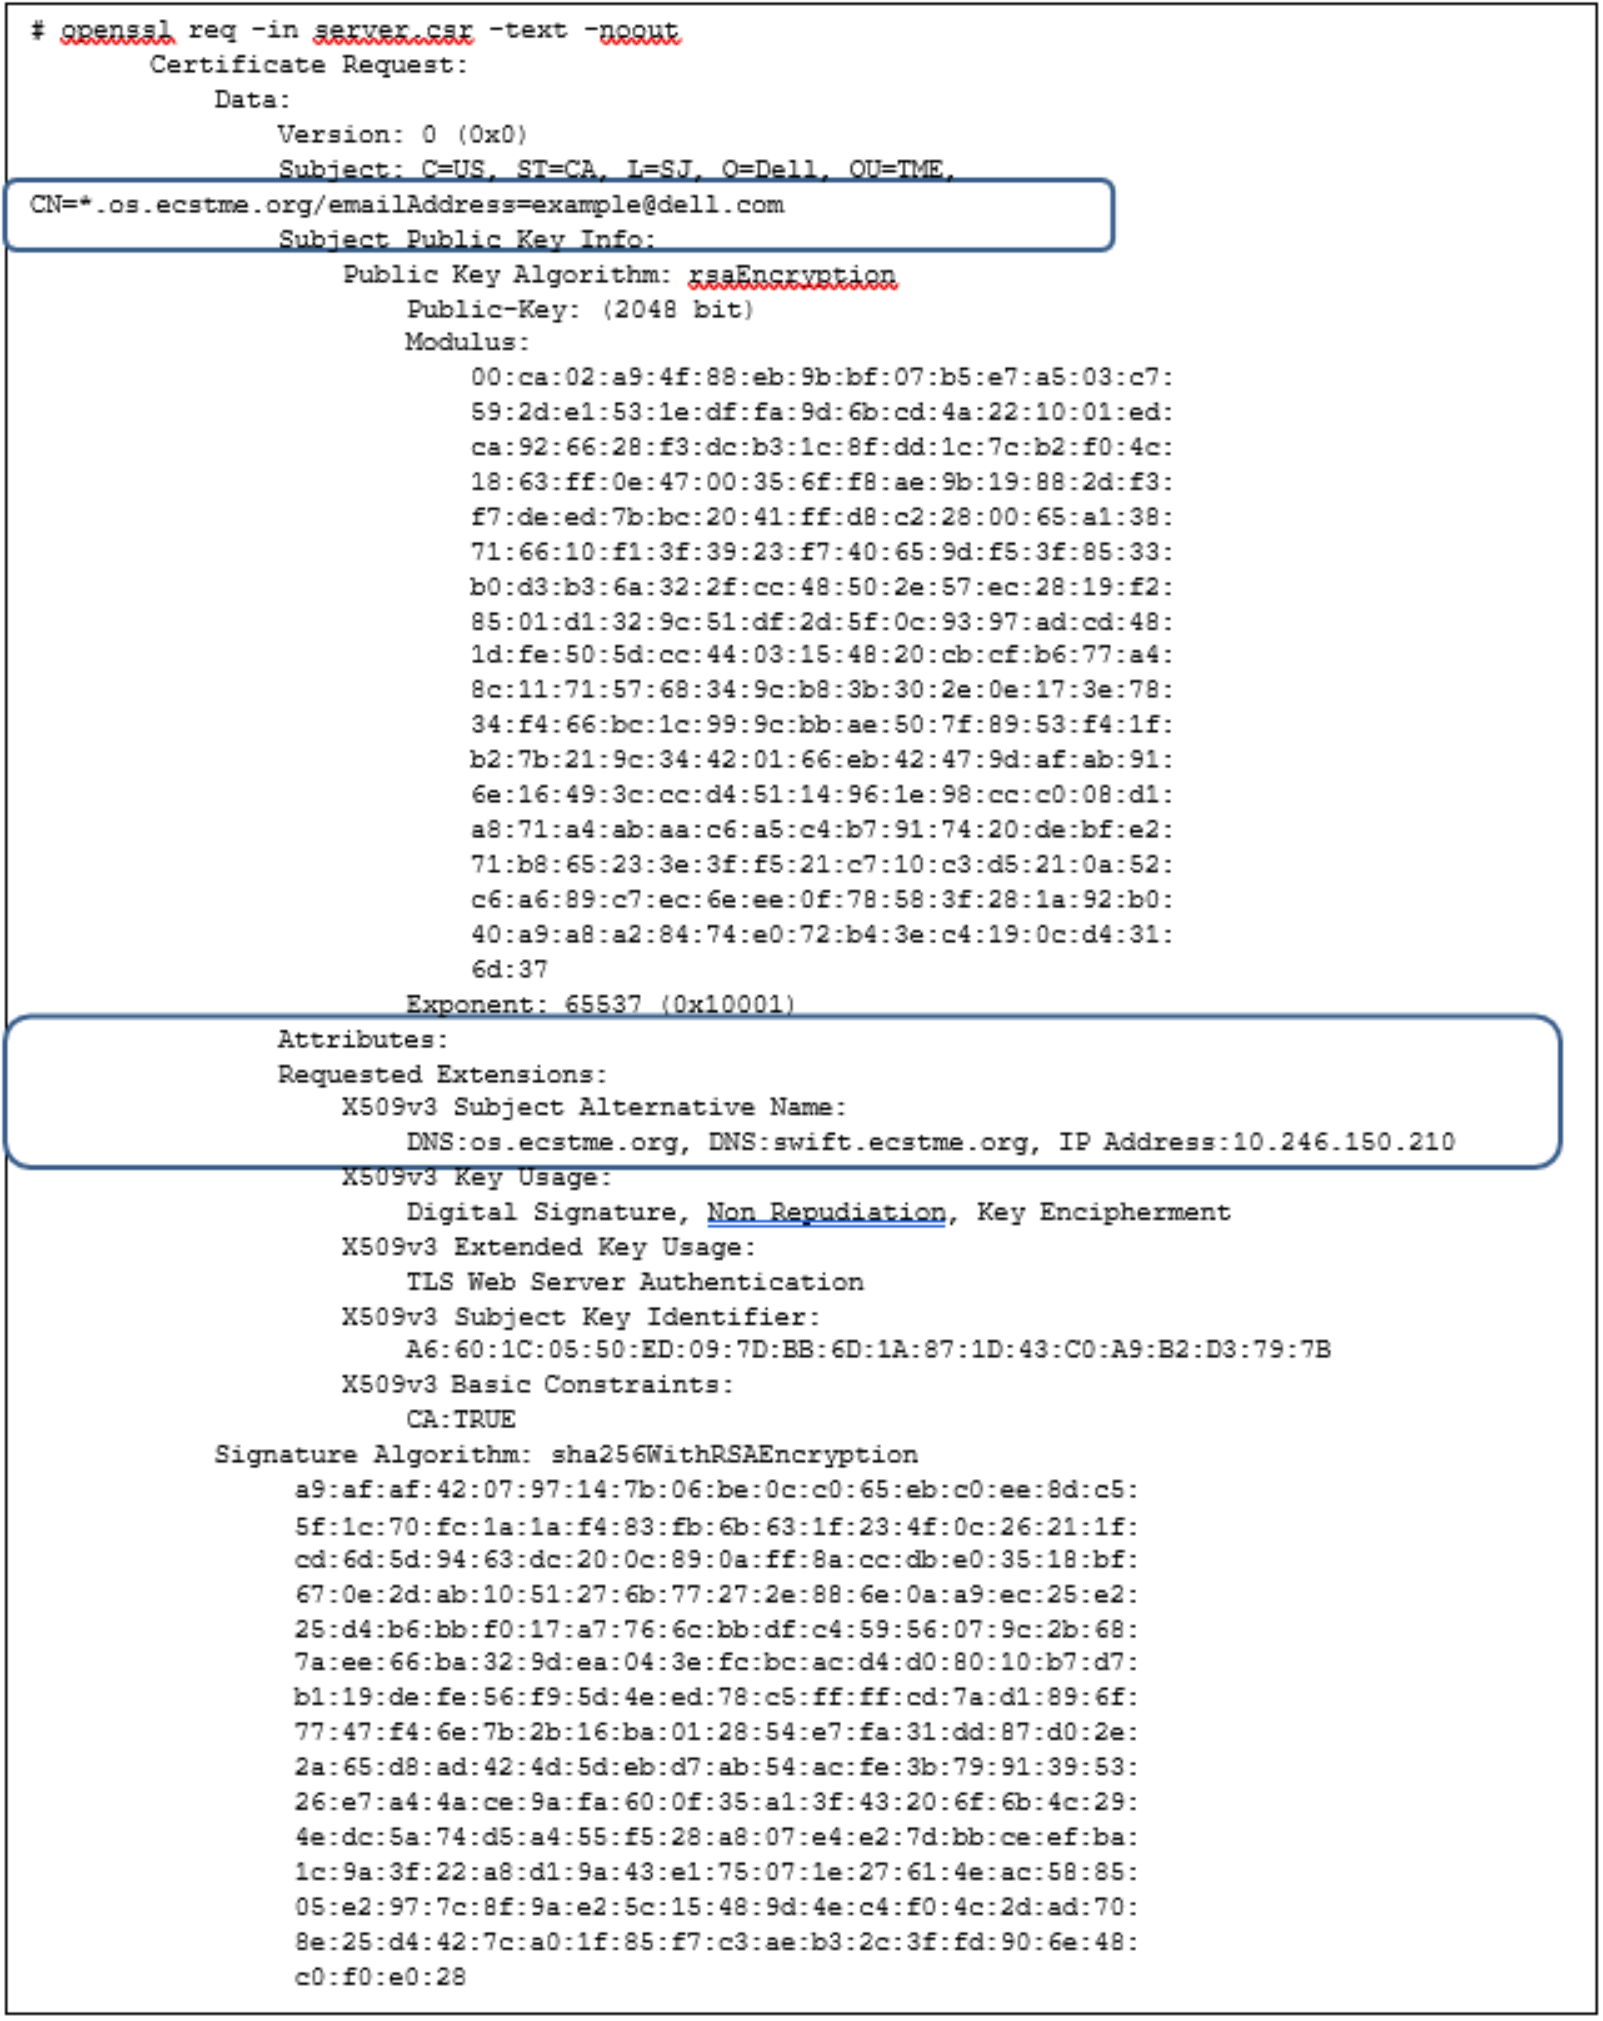
Figure 34. Example Text Output of Certificate Request
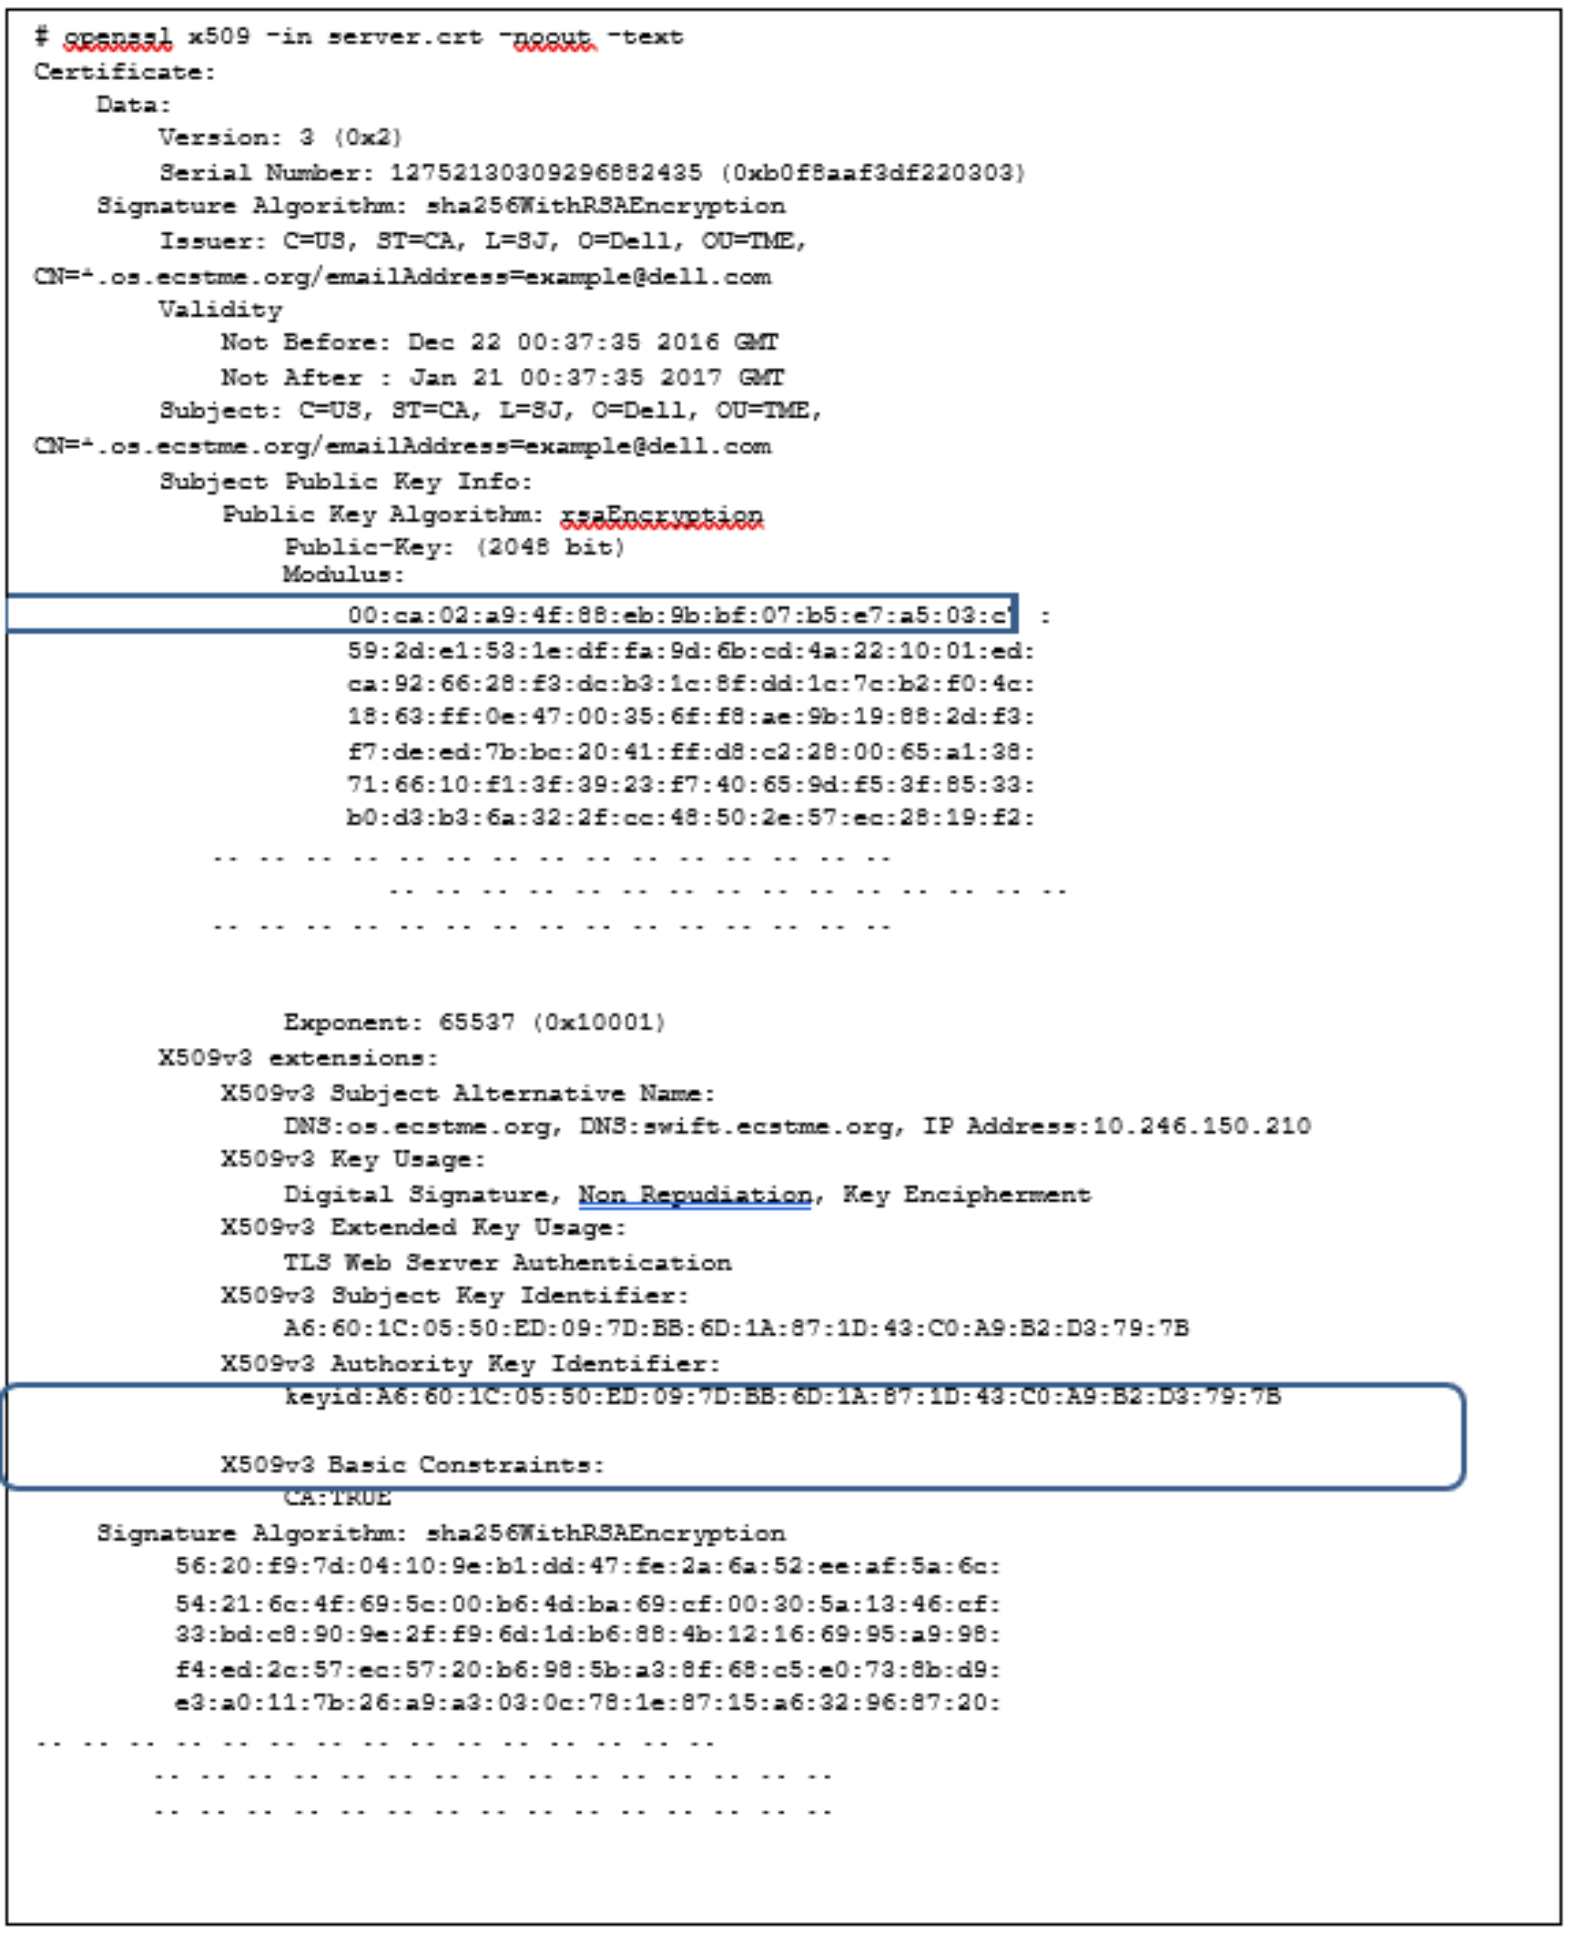
Figure 35. Sample Self-Signed Certificate Output after Generation
Step 4: Combining the Private Key with Certificate File
After the certificate files have been created, OpenResty requires the private key to be combined with the certificate file. If your certificate was signed by a CA, the intermediate CA files and certificate chain file would need to also be appended to the certificate signing request prior to combining it with the private key. Figure 36 illustrates how to extract the private key by removing the password, concatentating it with a self-signed certificate file to generate a combined file and then placing the combined file in OpenResty directory (that is /usr/local/openresty/nginx/ssl)
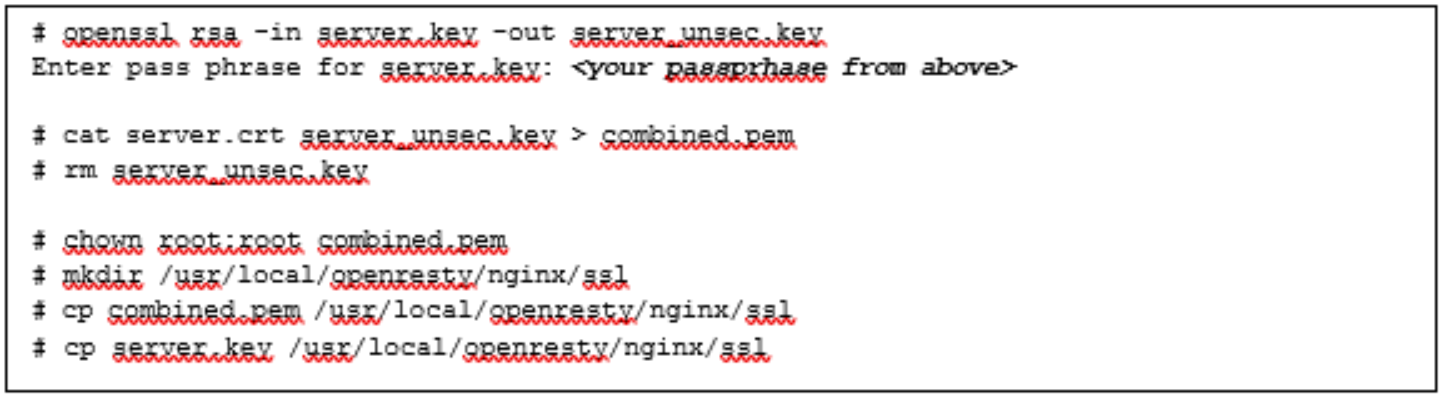
Figure 36. Example Commands for Combining the Private Key with Certificate
Once the certificate generation has been completed, the server context in the OpenResty configuration file, “nginx.conf”, is modified with the listening port for S3 HTTPS incoming requests and location of the certificates, combined.pem, and server.key. ECS S3 HTTPS port is 9021. Figure 37 provides an example of server context for handling HTTPS requests. In this example, the SSL is terminated at the load balancer and thus certificates are not needed on the ECS nodes. The same backend using the non-SSL ports of the ECS nodes are used as previously defined for upstream context, ecs_9020. Similar definitions are specified for the Swift protocol using port 9025; and the proxy_set_header with port 9024 has been defined such that the response returned from ECS is set appropriately.
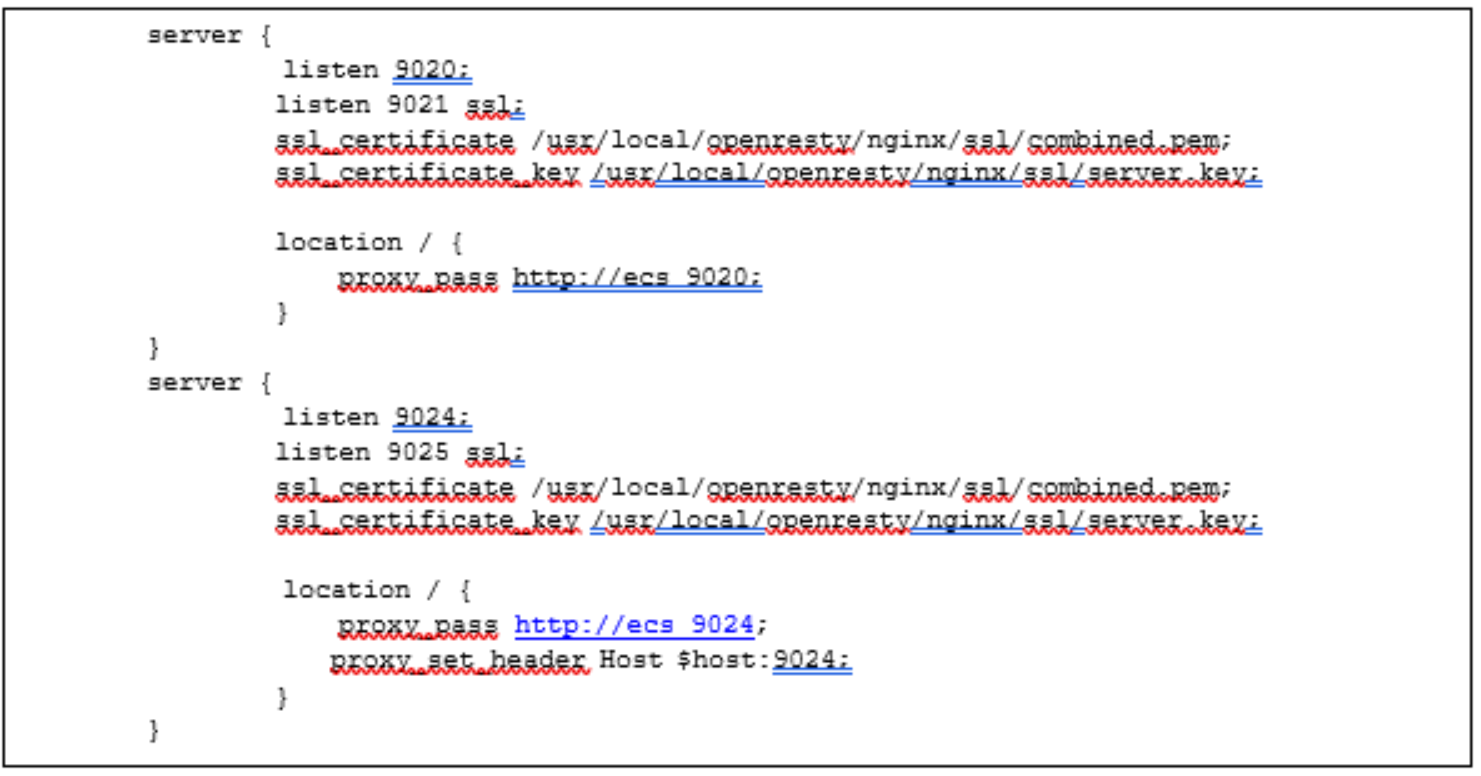
Figure 37. Add Listening Port and SSL Certificates Directives
After the nginx.conf has been modified, check the validity of the configuration file. If the configuration file is valid, then stop and restart the OpenResty service to put the directives in nginx.conf into effect as shown in Figure 38.
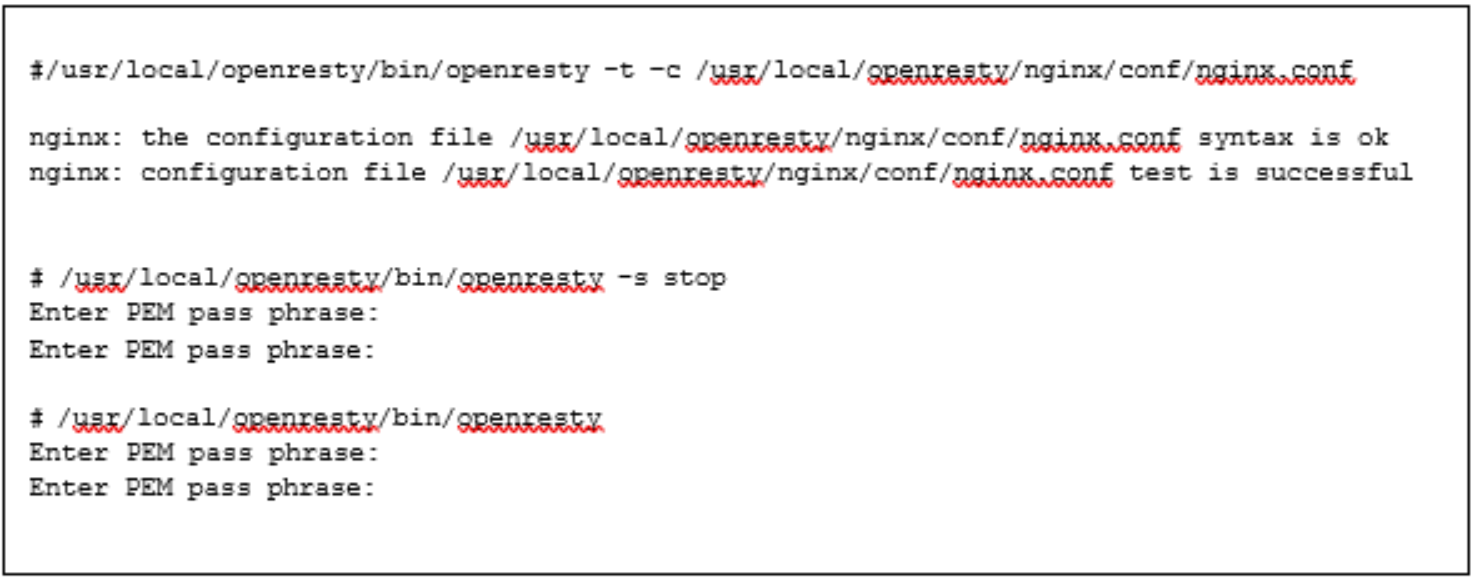
Figure 38. Sample Commands to Validate nginx.conf and Restart OpenResty
When restarting OpenResty, use the pass phrase of server.key (from Figure 32) when prompted for a password.
S3Browser can be used to validate that “https” traffic and SSL certificates are going through OpenResty. For S3 Browser, edit the account and place a checkmark in “Use secure transfer (SSL/TLS) box as pictured in Figure 39. Also specify port 9021 in the REST endpoint since OpenResty is listening to S3 HTTPS request from this port. If using curl to test, use the “-k” option in the command and the appropriate port, that is, “curl -k -i -H "X- Storage-User: suser1" -H "X-Storage-Pass: dangerous" https://swift.ecstme.org:9025/auth/v1.0 -v”.
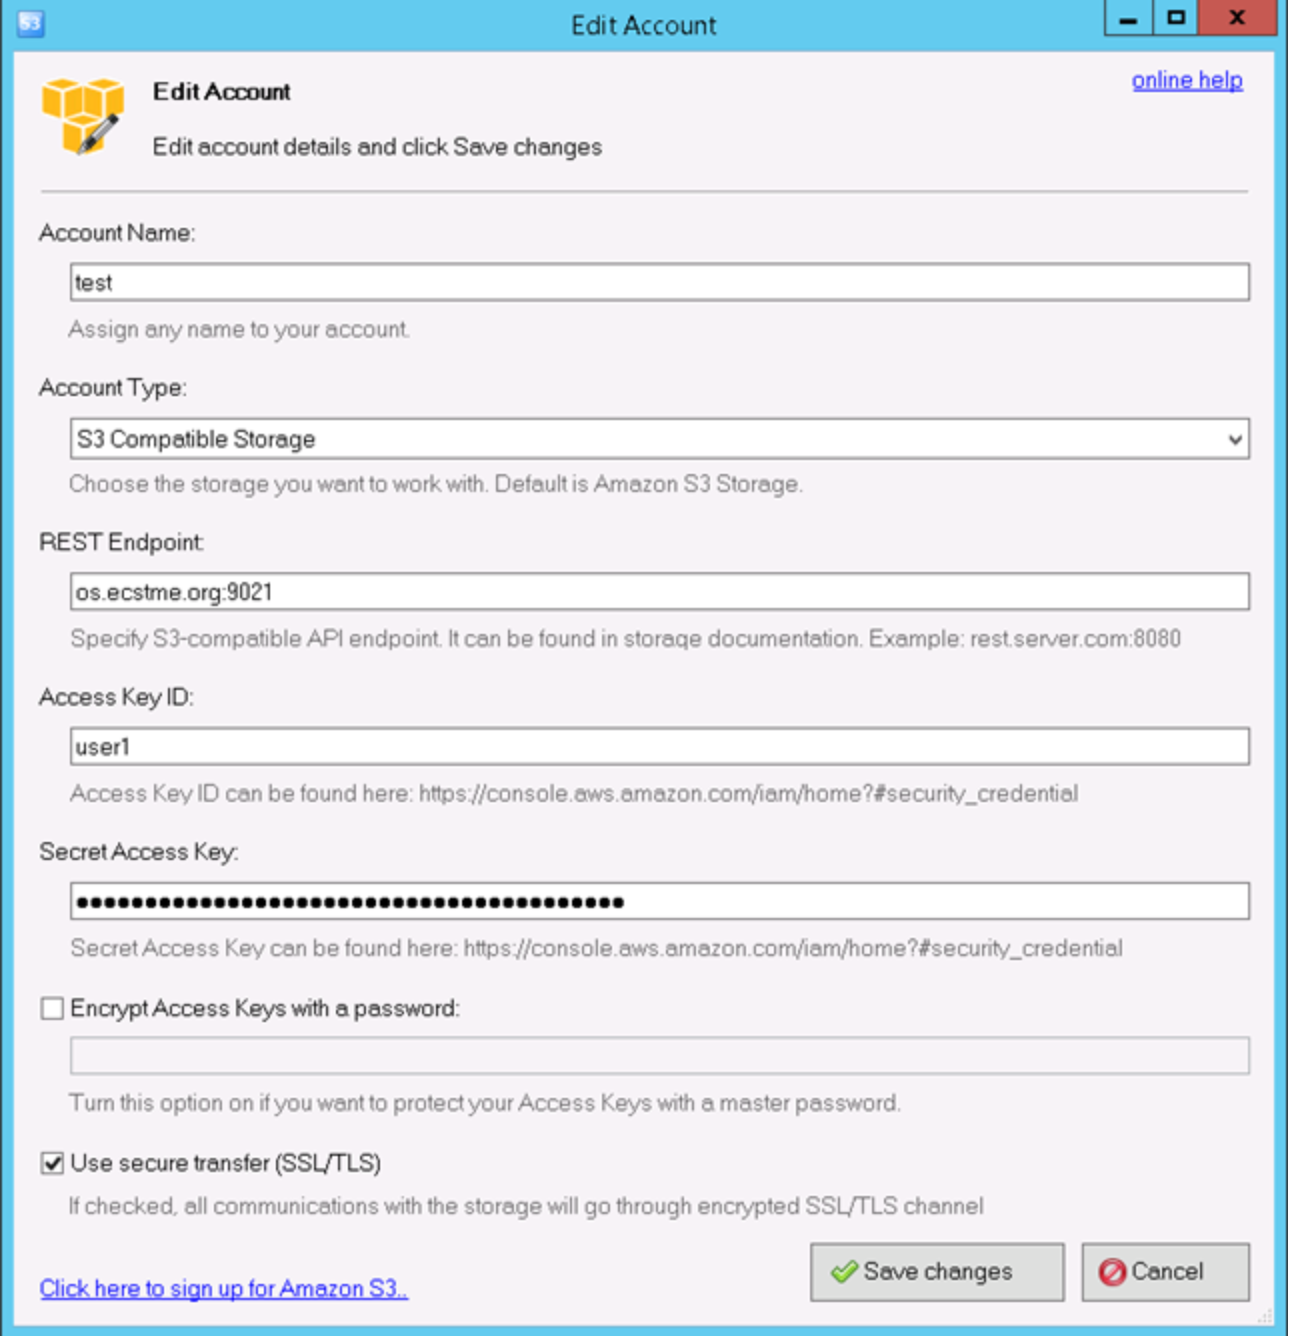
Figure 39. S3 Browser Options to Enable HTTPS
Stream context
ECS NFS implementation uses server-side metadata caching and the cache exists locally on each node. Thus, it is important that NFS requests are handled by the same backend ECS node and a load balancer is used predominately for high availability purposes for NFS. If one of the ECS nodes currently serving NFS requests fails, then OpenResty redirects requests to another ECS node.
The Linux server that is hosting OpenResty should not be running “rpcbind” otherwise there will be a conflict when setting up OpenResty to forward NFS requests to ECS. If “rpcbind” is installed by default in the operating system, disable or remove. In the OpenResty configuration file, a stream context is defined and requests are directly passed through to the ECS Nodes for handling. The server context listens for requests on ports 2049, 111, and 10000 where NFS daemons such as nfsd, mountd, nlockmgr and portmapper are listening to on the ECS nodes. As shown in the example directives in Figure 40, there is a stream context and within it multiple upstream contexts. The upstream contexts specify the list of ECS nodes with protocol ports and the load balance algorithm “hash”. The “hash algorithm” selects servers based on a hash of the source IP such as the user IP address to ensure request goes to the same server until something changes in the hash (that is, one backend server goes down). A third-party module, ngx_stream_check_module, is used to provide health checks of the stream context using the “check” directive. And server context listens to the NFS protocol ports and proxies it to the named backend. Logging can also be defined in this section as well as tcp and buffer optimizations such as tcp_nodelay and proxy_buffer size.
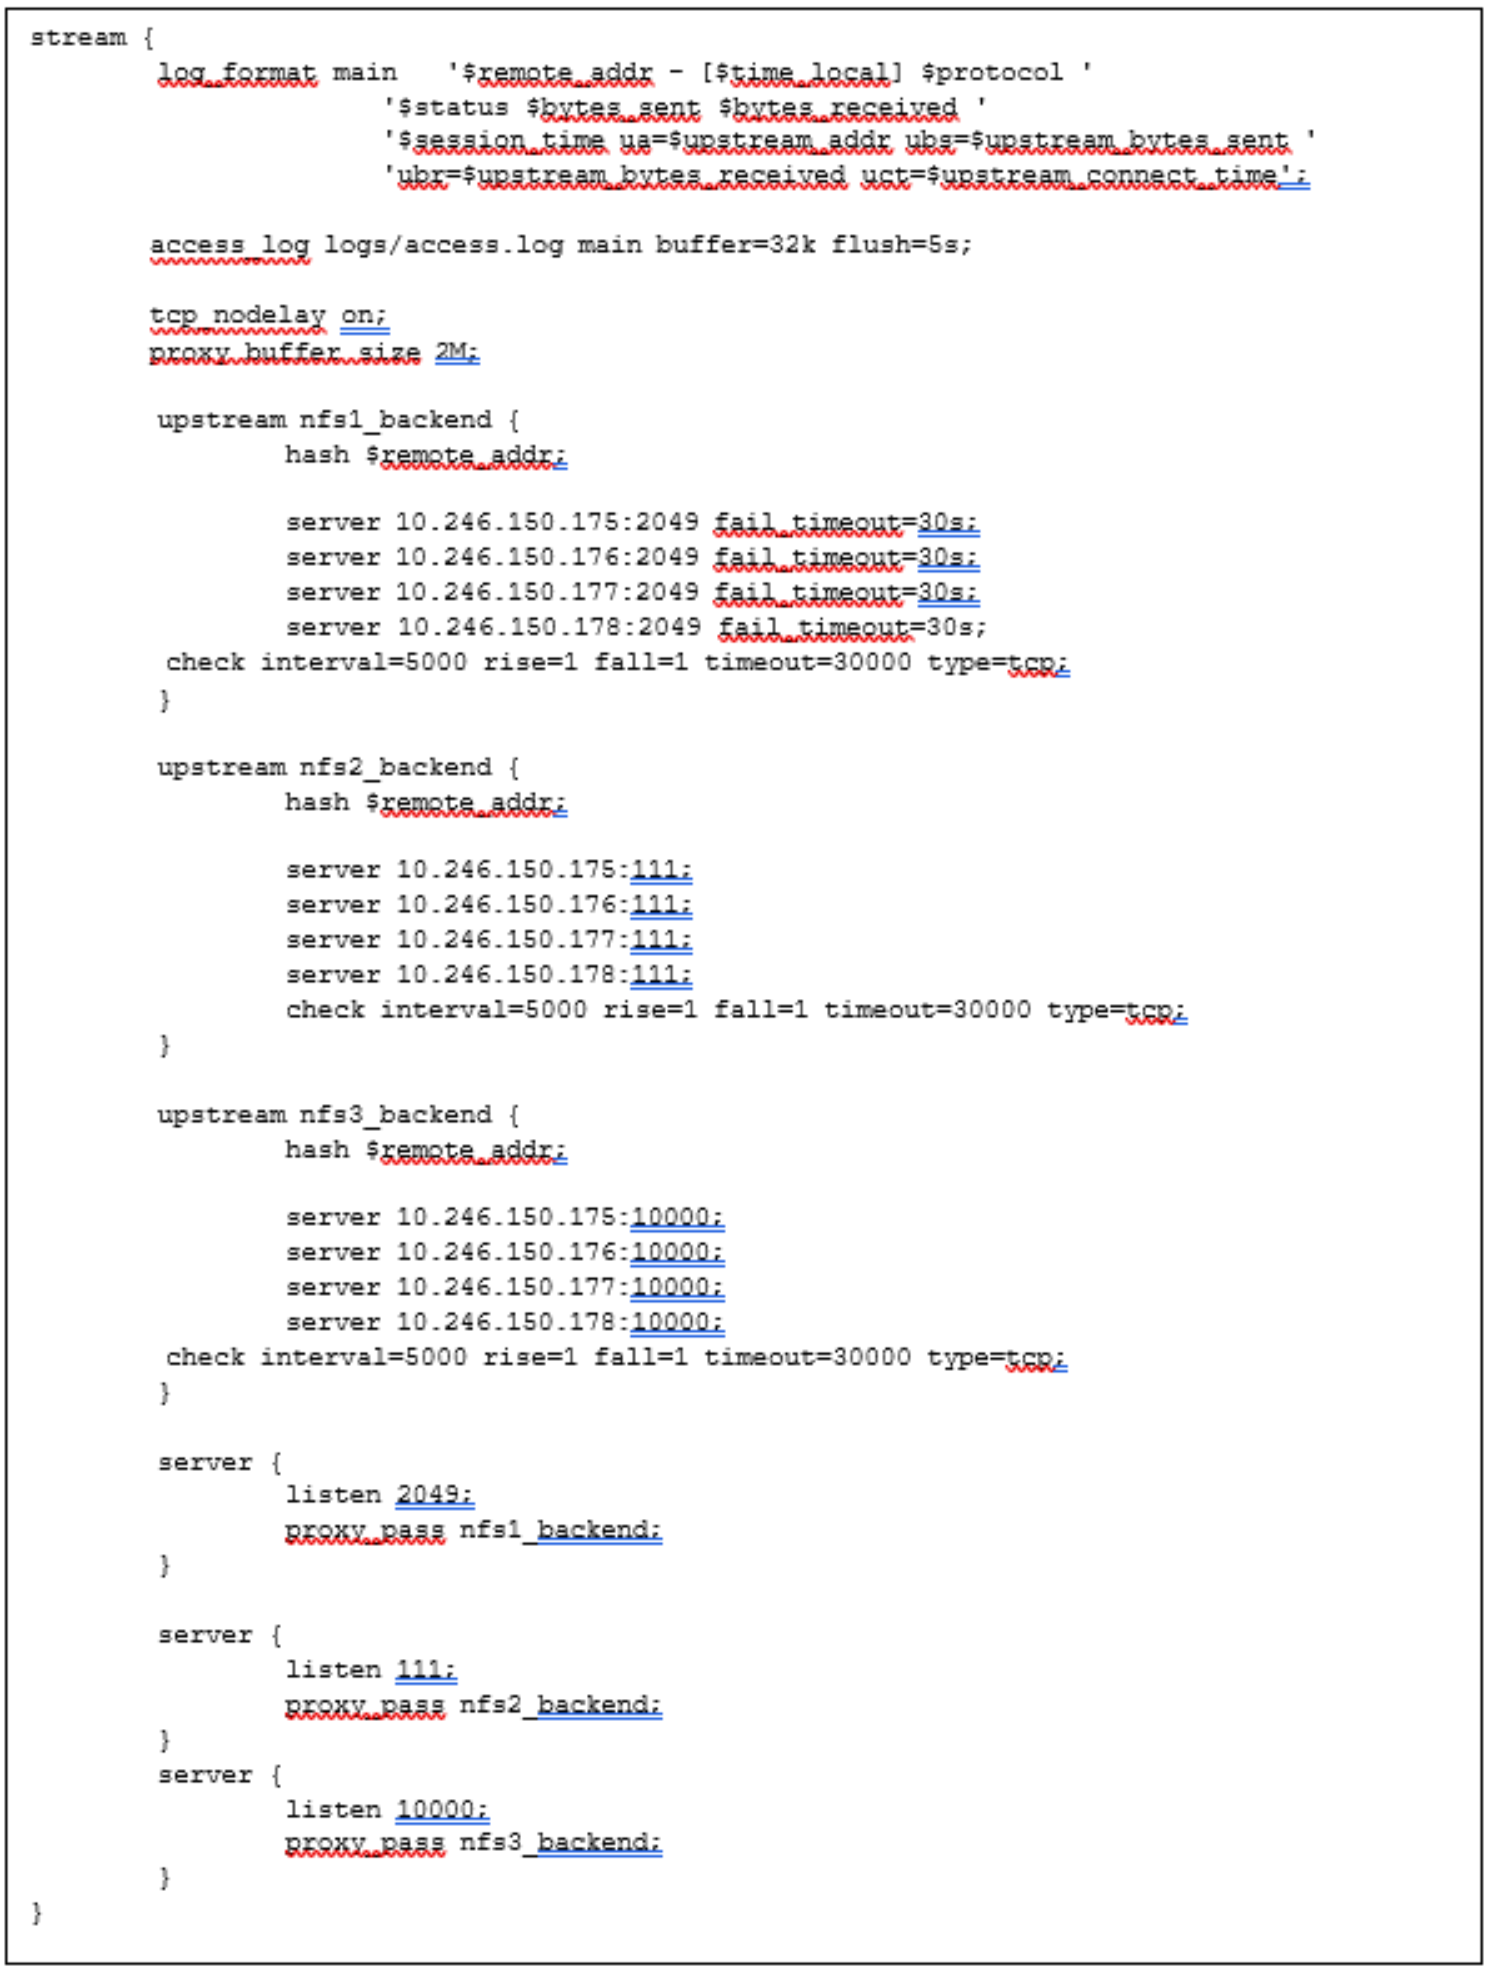
Figure 40. Example Frontend and Backend Definitions for NFS
It is assumed that ECS has been configured to support file and the exports and user and group mappings have been configured appropriately for NFS. The host IP or name running OpenResty should be added to the exports host options in ECS as shown in Figure 41. The user mappings are configured prior to mount as pictured in Figure 42.
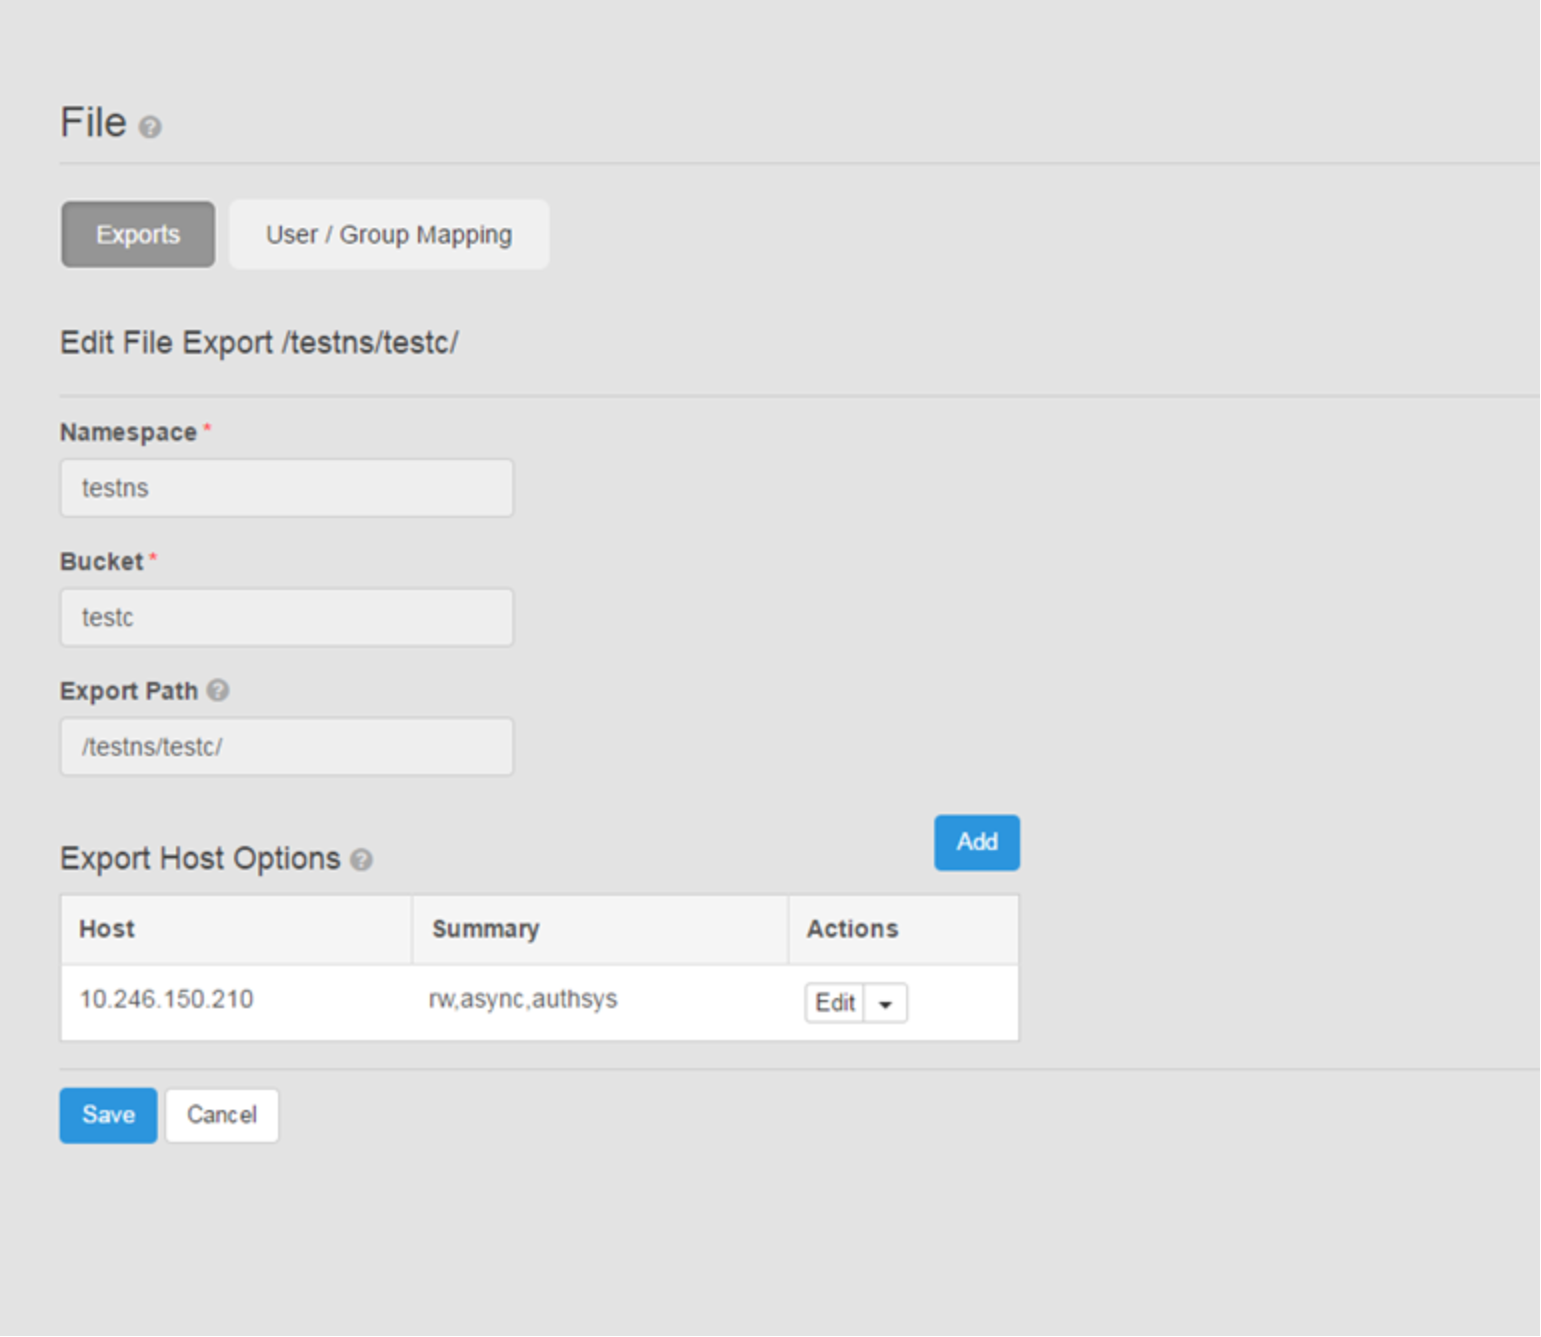
Figure 41. Example of File Export Settings in ECS
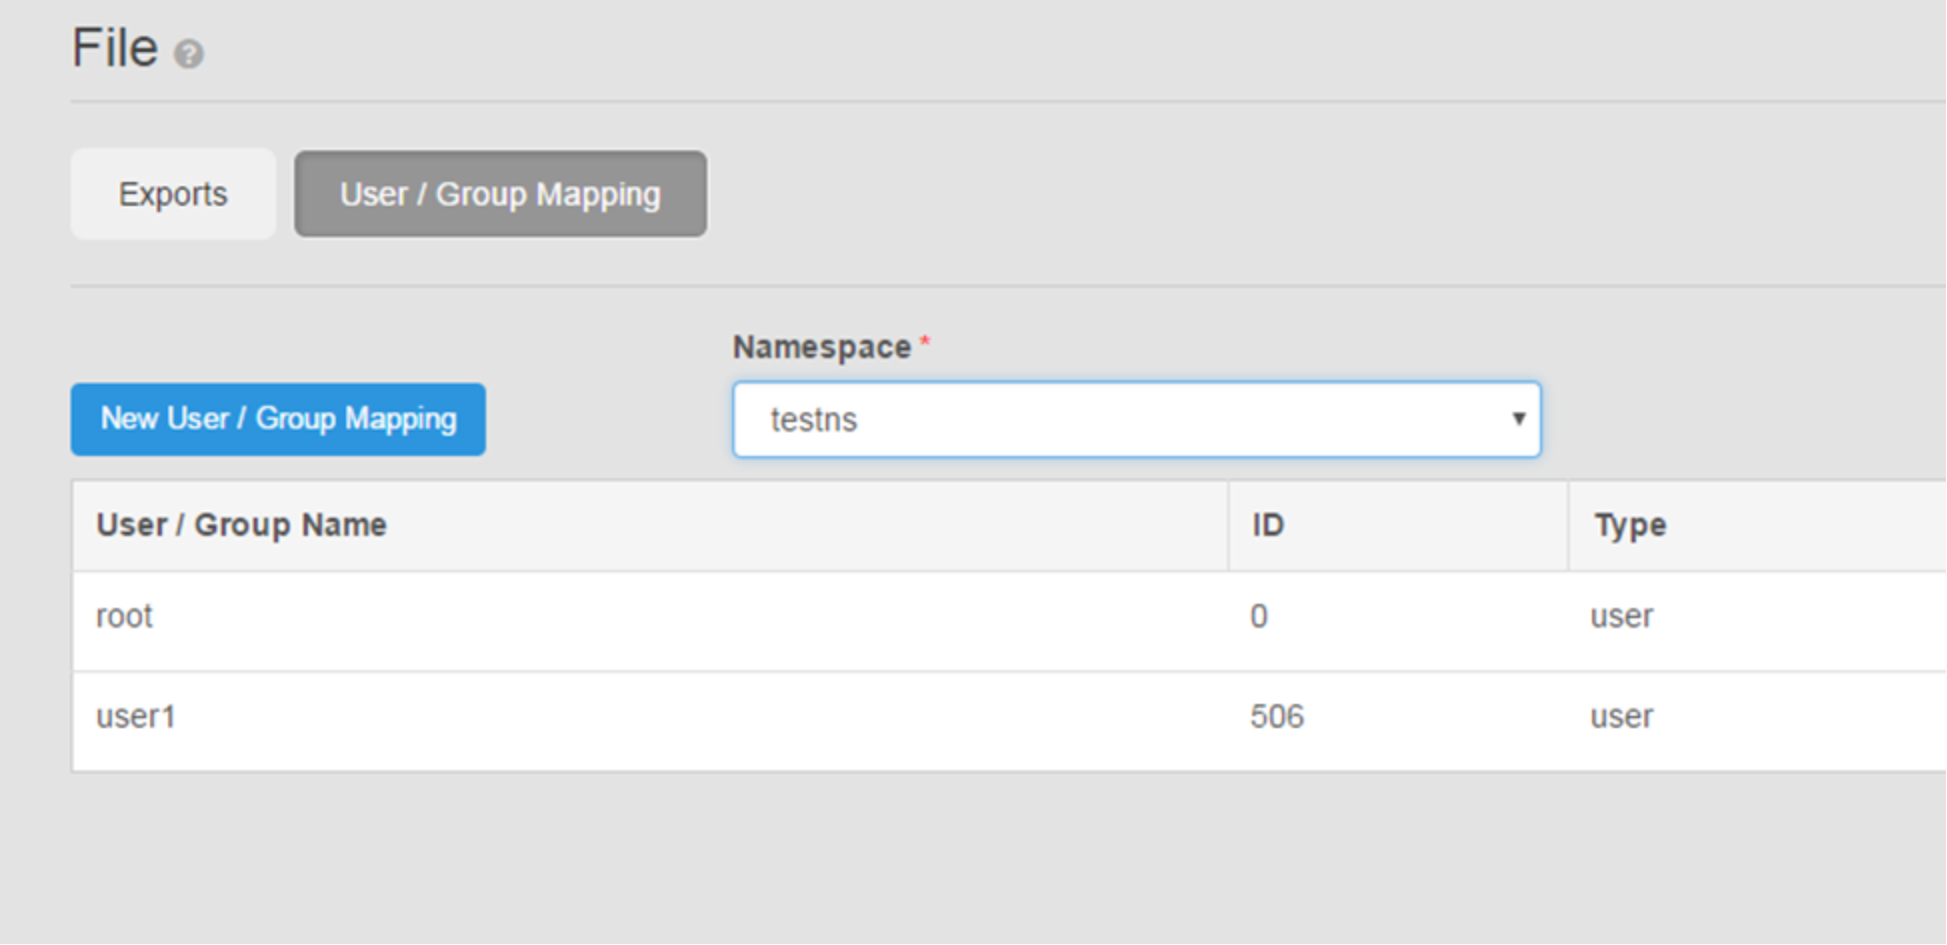
Figure 42. Example of User Mapping Settings in ECS
After adding the stream context directives, validate the nginx.conf file and restart OpenResty to pick up the changes to nginx.conf, as shown in Figure 43.
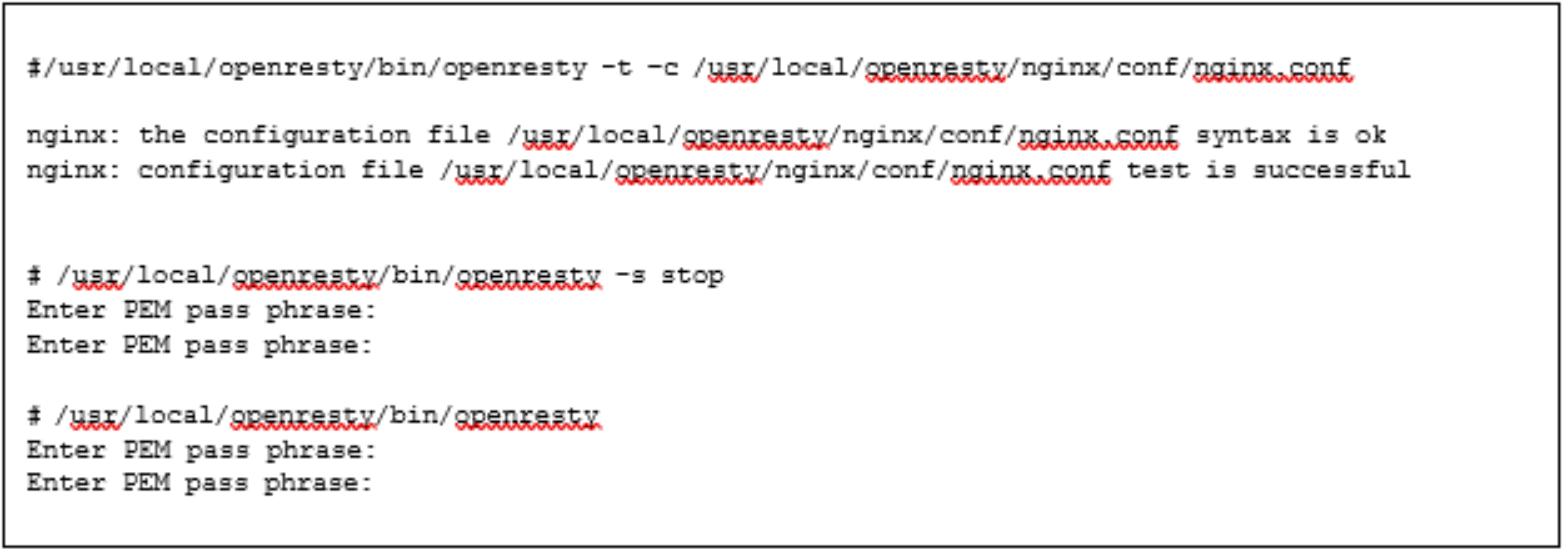
Figure 43. Validate nginx.conf File and Restart OpenResty
Then from an NFS client, another server different from the OpenResty server, issue a mount command specifying the IP or name of OpenResty, port 2049 and NFS version 3. Figure 44 shows the example “mount” command and output of “df” command to illustrate the success of the mount. There should be an equivalent user in the Linux client with the same userid (506, in this example) specified as in ECS to access data as shown in Figure 45.
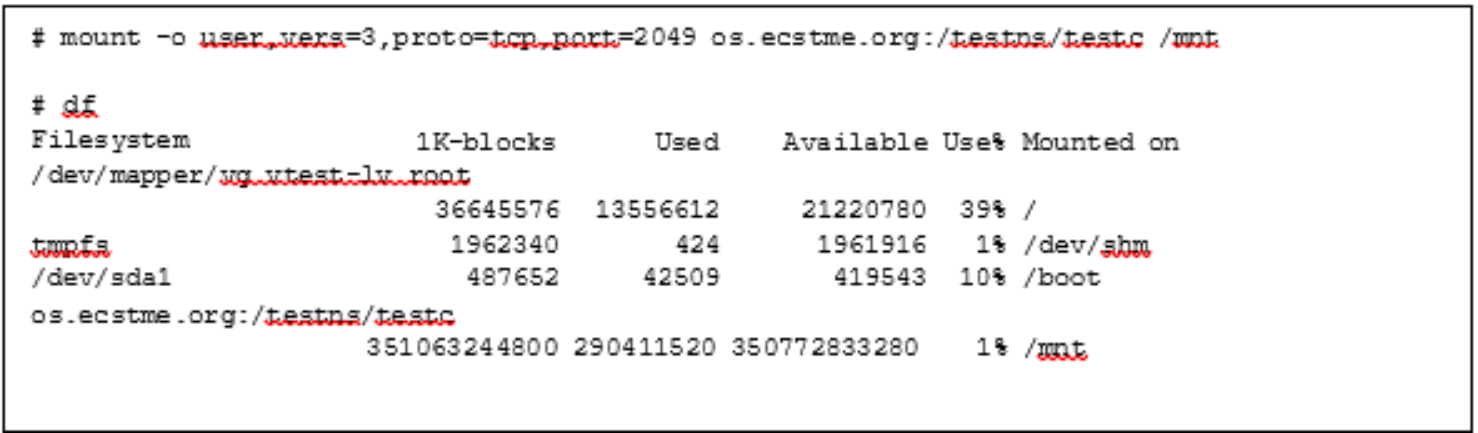
Figure 44. Example "mount" and "df" Command

Figure 45. Example Output of User ID on Linux Client and "ls"
Monitoring
Standard NGINX has limited monitoring capabilities; however, when integrated with OpenResty, Lua scripts, and additional add-on modules, monitoring is enhanced. The Dell DevOps team has developed Lua scripts for monitoring of HTTP requests and connections, HTTP metrics, and the health status of the upstream servers. The scripts and modules are categorized as follows:
- HTTP Metrics - tracks the number and size of HTTP requests, connections, and latency
- init_by_lua_block – initializes and registers the metrics
- log_by_lua_block – logs the requests, bytes, and latency
- prometheus.lua – modified by the Dell DevOps team and defines the code for the metrics: counter, gauge, and histogram implementation specific to HTTP requests, connections, and latency.
- HTTP and Stream Monitoring by Web Page
- nginx-module-sts-master and nginx-module-stream-sts-master – provides stream server traffic status information such as requests per second, responses, and total traffic received and sent. If no stream context is defined, no information will be shown.
- nginx-module-vts-master – provides HTTP server traffic status information.
In this example, the “init_by_lua_block” and “log_by_lua_block” are responsible for keeping track of the HTTP connections, requests, and latency by host. It uses the Prometheus metric library to keep track of the metrics and viewable using a separate web page. As shown in Figure 46, this module is initialized by an “*.init” call and returns a Prometheus object to register different metrics. The code related to the object return is defined in the prometheus.lua file. The prometheus.lua file is attached to this white paper; comments within the Lua file are self-explanatory. The reader is encouraged to review the file for more details on the script. The metrics registered and implemented in the prometheus.lua file include gauge, counter, and histogram to collect the total number of HTTP requests by host, the HTTP request latency by host, total size of incoming requests in bytes and number of HTTP connections. The init_by_lua_block runs when the NGINX configuration file is loaded (initialization phase) and the log_by_lua at the log request processing phase. The following directives are defined prior to the Lua calls:
- lua_package_path – path to where Lua scripts are located. In this example, it is in a created directory within the OpenResty directory, /usr/local/openresty/nginx/lua.
- lua_shared_dict – declares a named shared memory zone, healthcheck, of certain size, 10M, and is shared by all NGINX worker processes.
These metrics are made viewable by adding a location context labeled “/metrics” within the server context. Since the server context is listening on port 9020, access to the web page requires the port in the URL (that is http://os.ecstme.org:9020/metric) as shown in Figure 47.
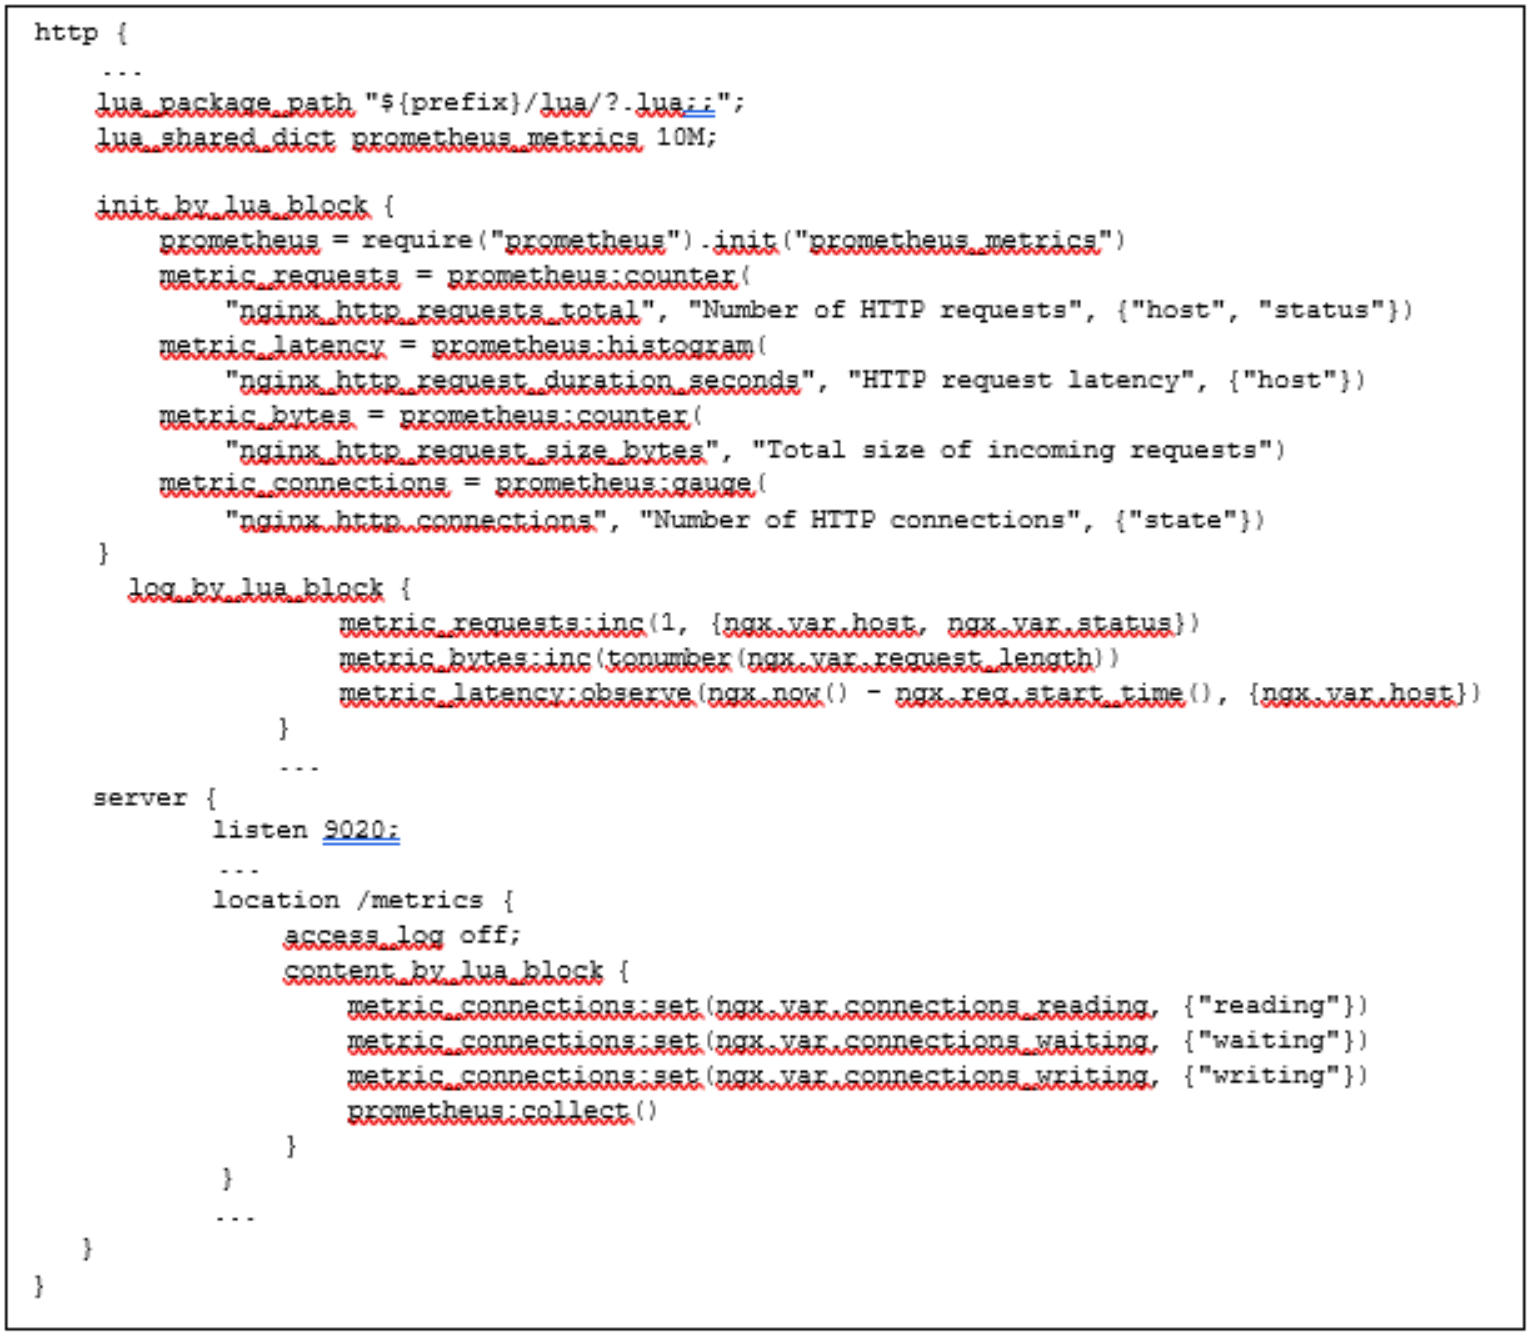
Figure 46. HTTP Metrics Directives
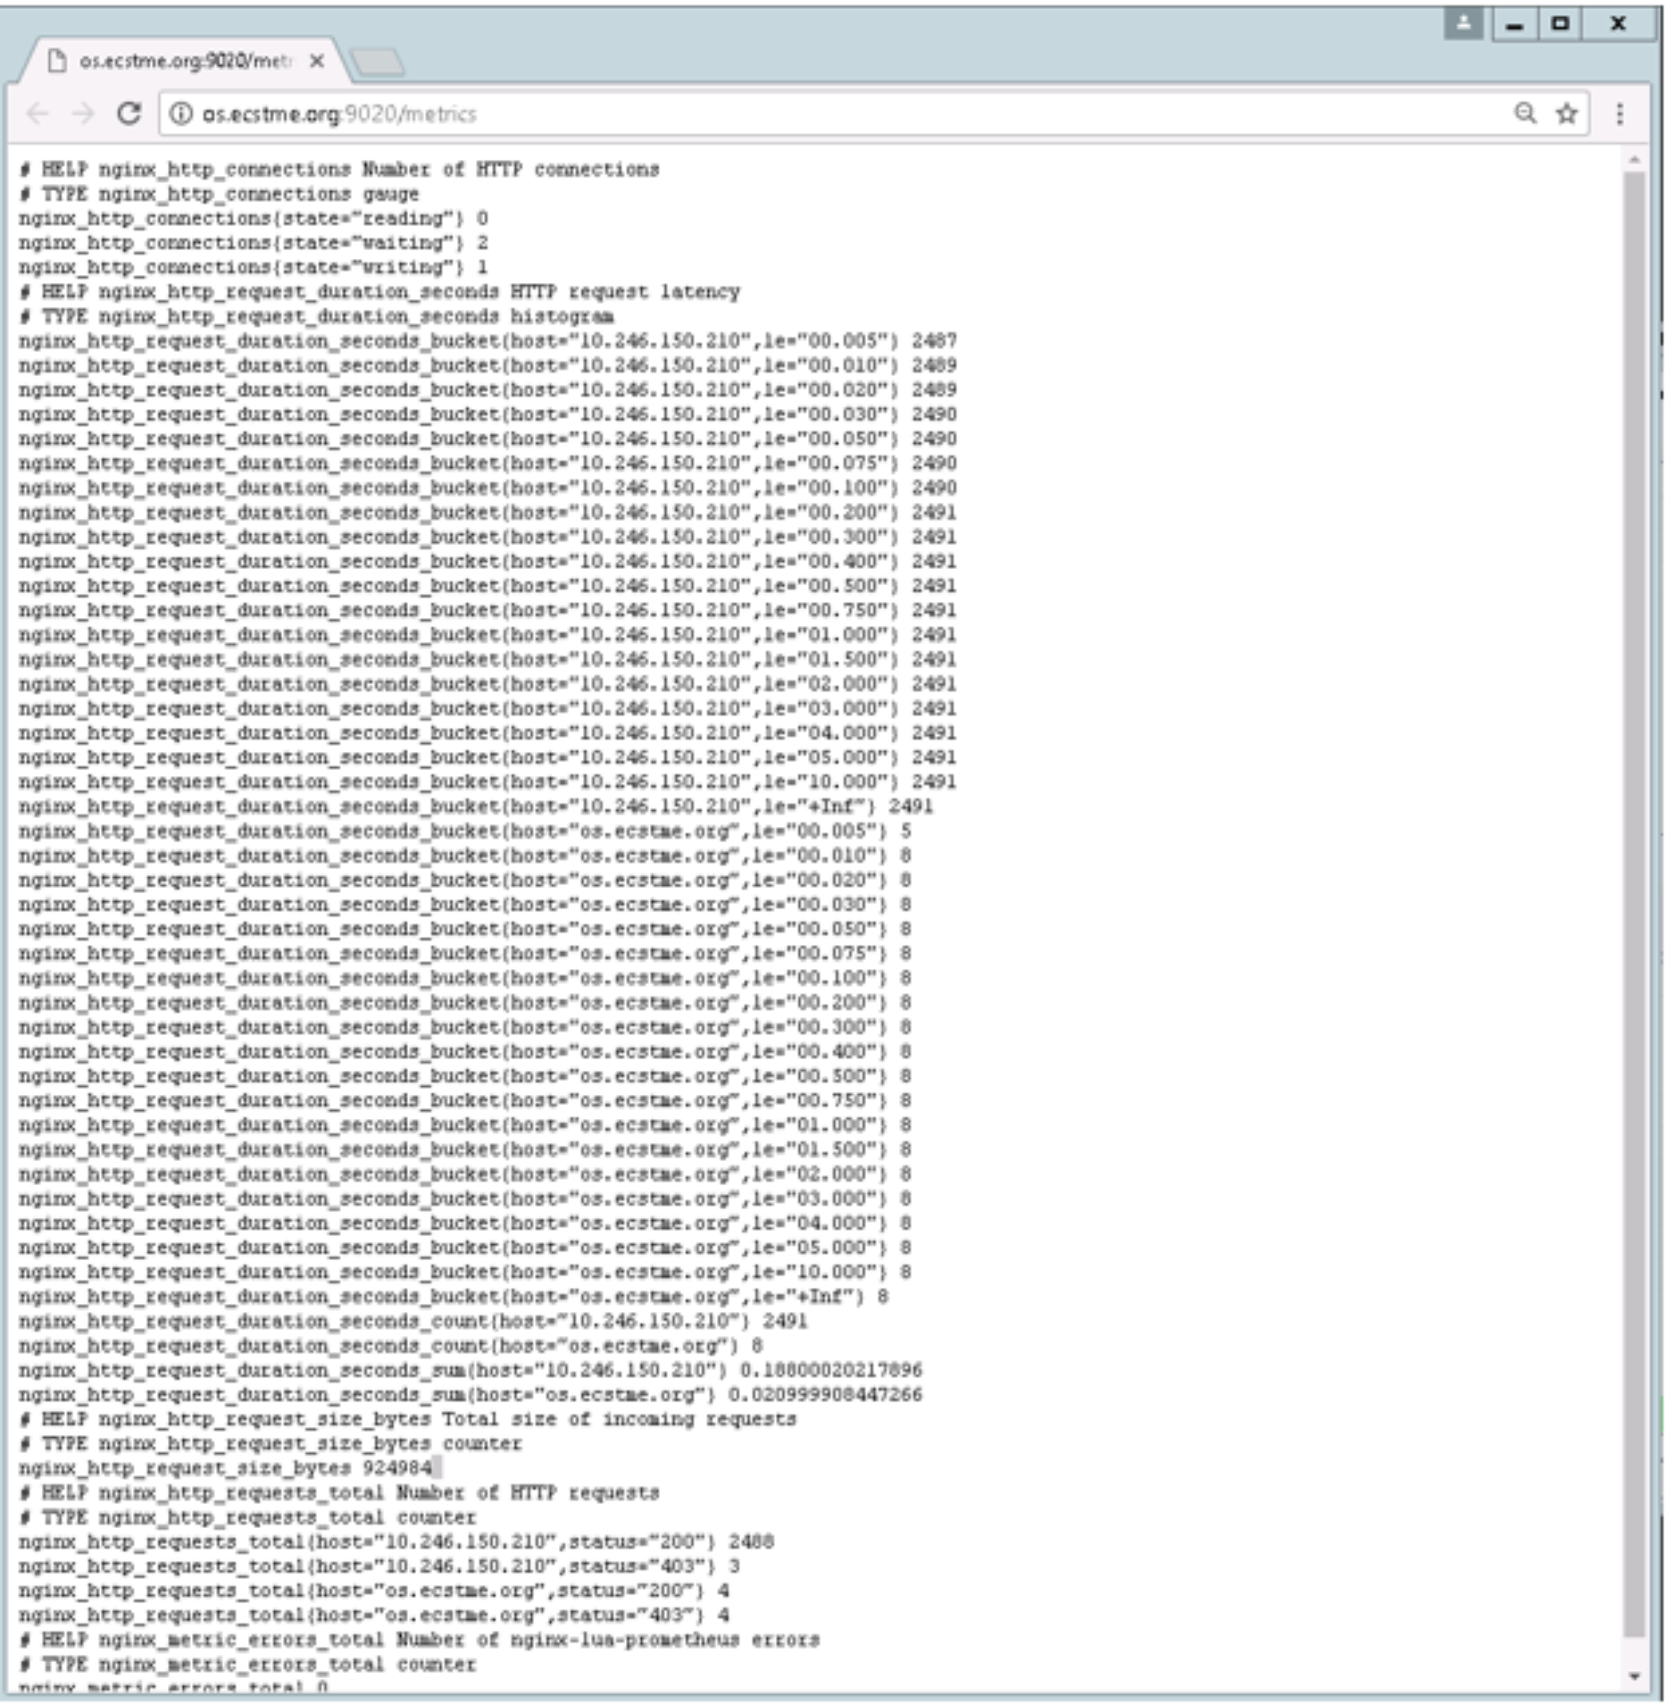
Figure 47. Example View of HTTP Metric Output
For HTTP traffic monitoring, the nginx-module-vts is used and vhost_traffic_status_zone is declared in the http context. This module is referenced within the location context within the server context as vts_status. Similarly for stream status, nginx-module-sts and nginx-module-stream-sts are used. The stream_server_traffic_status_zone is defined within the http context and server_traffic_status_zone is defined within the stream context as illustrated in Figure 48.
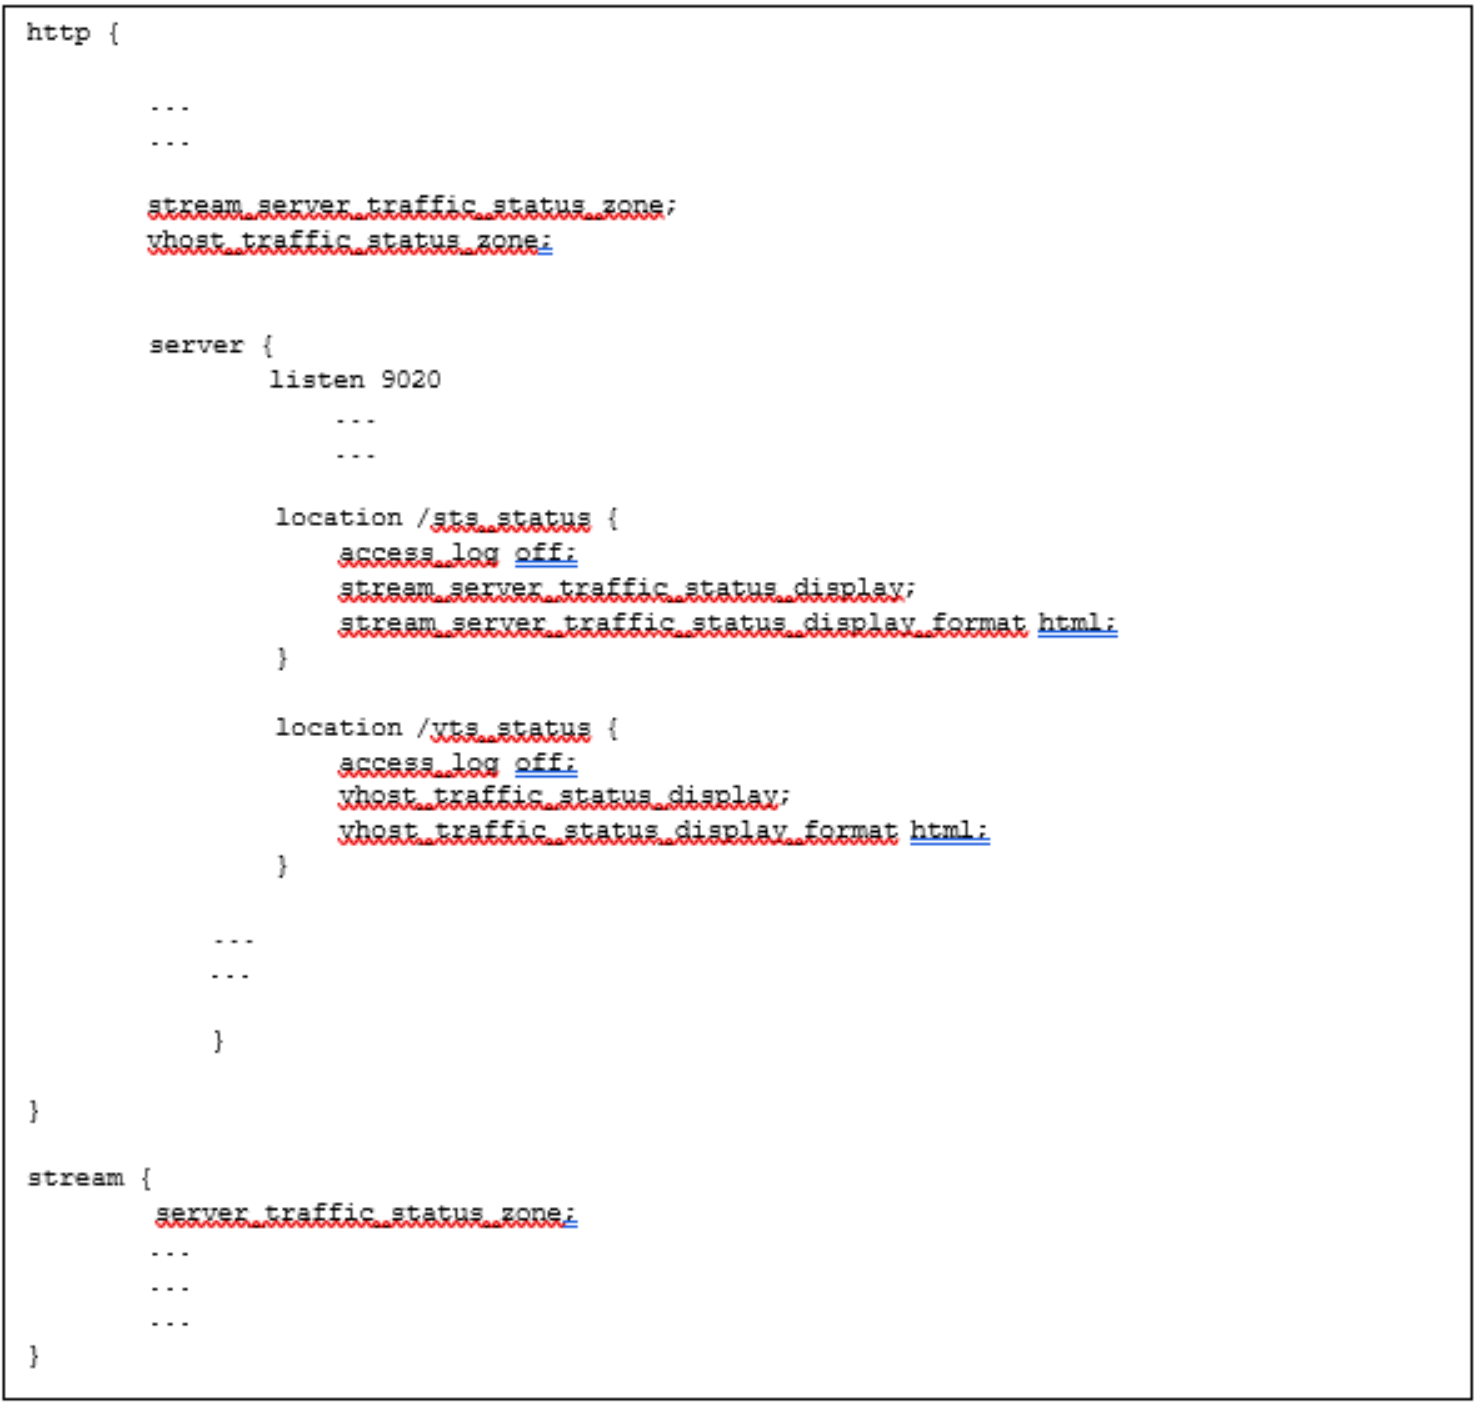
Figure 48. HTTP and Stream Monitoring Directives
Figure 49 provides a sample view of the web page output for HTTP. As can be seen from the webpage, the number of connections and requests coming into the OpenResty web platform and the amount of shared memory being used. It also highlights the state, response time, number and sizes of HTTP requests, and the response being sent to each of the proxied servers (ECS Nodes). Figure 50 shows a sample view of stream (TCP) traffic, going to backend servers (ECS Nodes). Similar traffic information is provided for the TCP traffic. In this example, the stream traffic is NFS traffic.
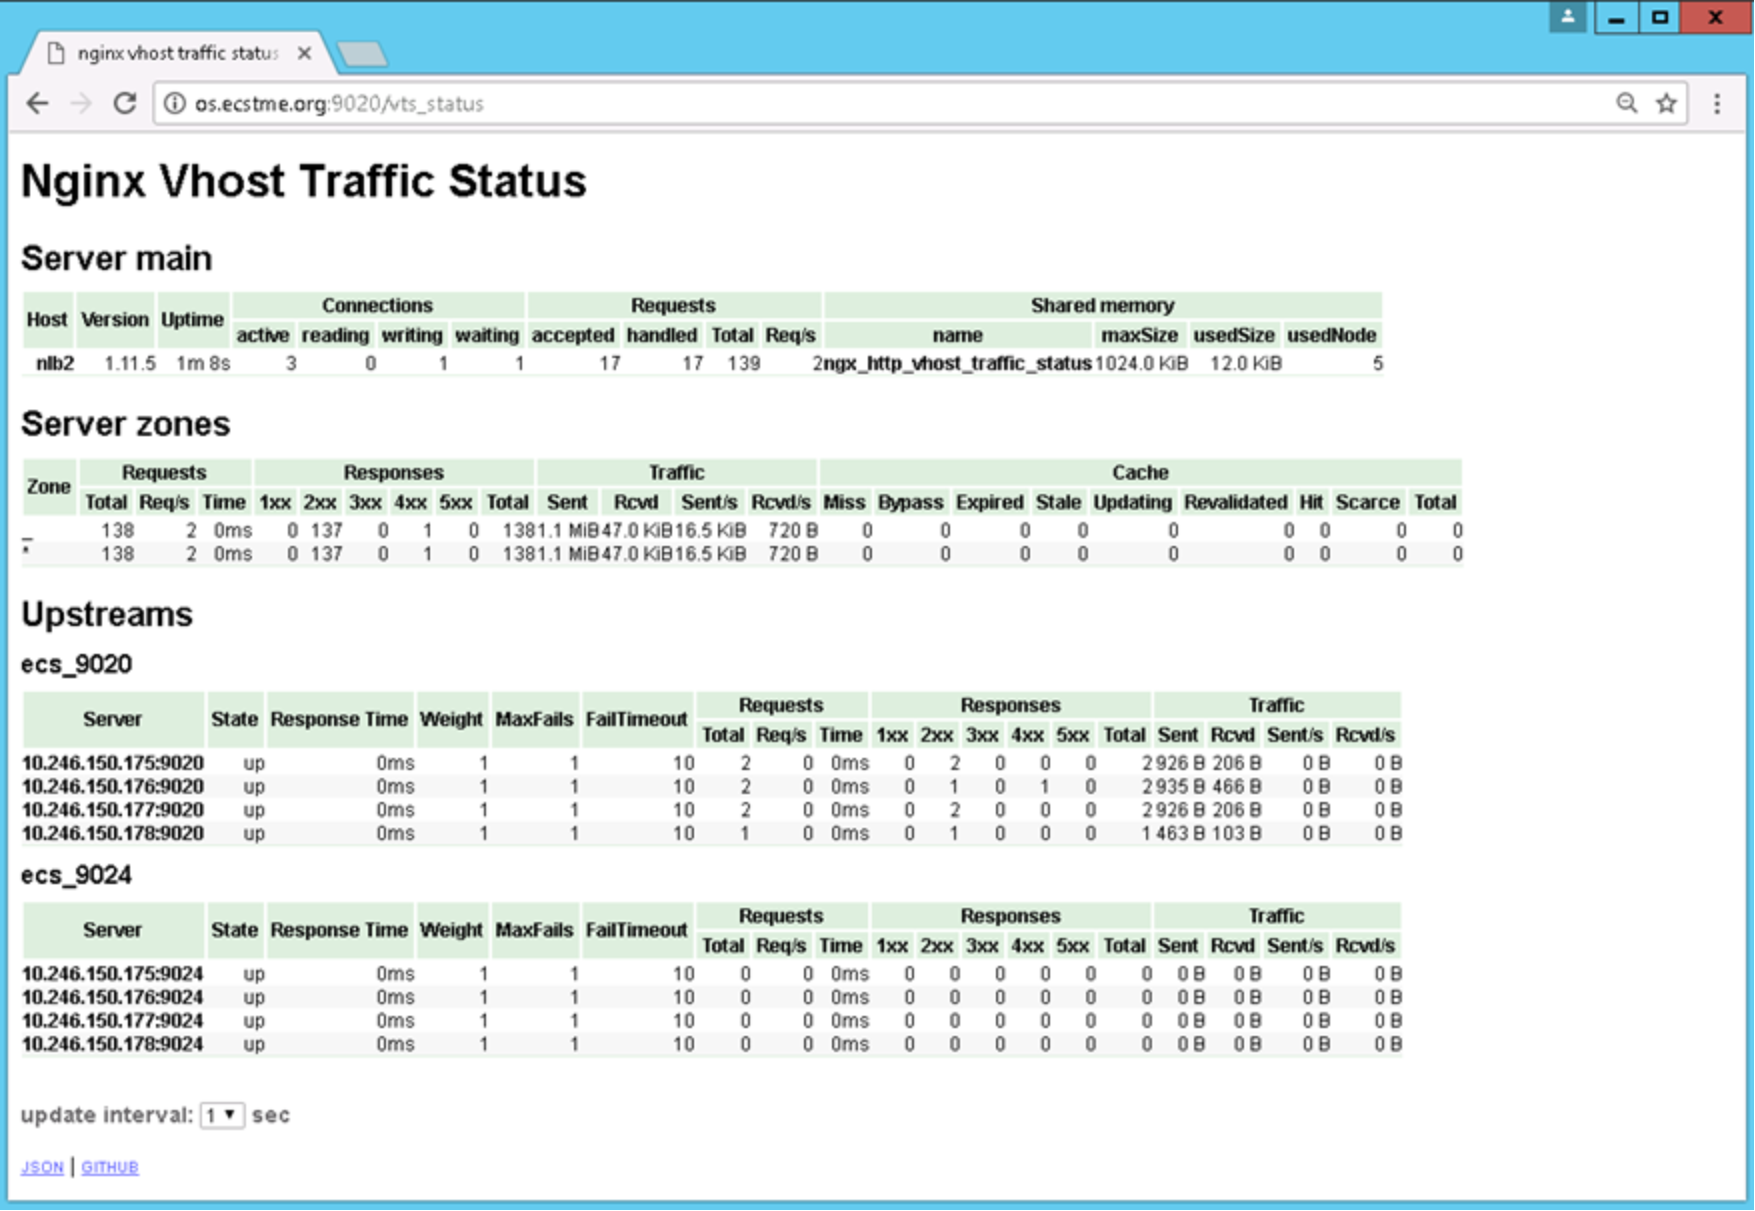
Figure 49. Example View of HTTP Traffic Web Page
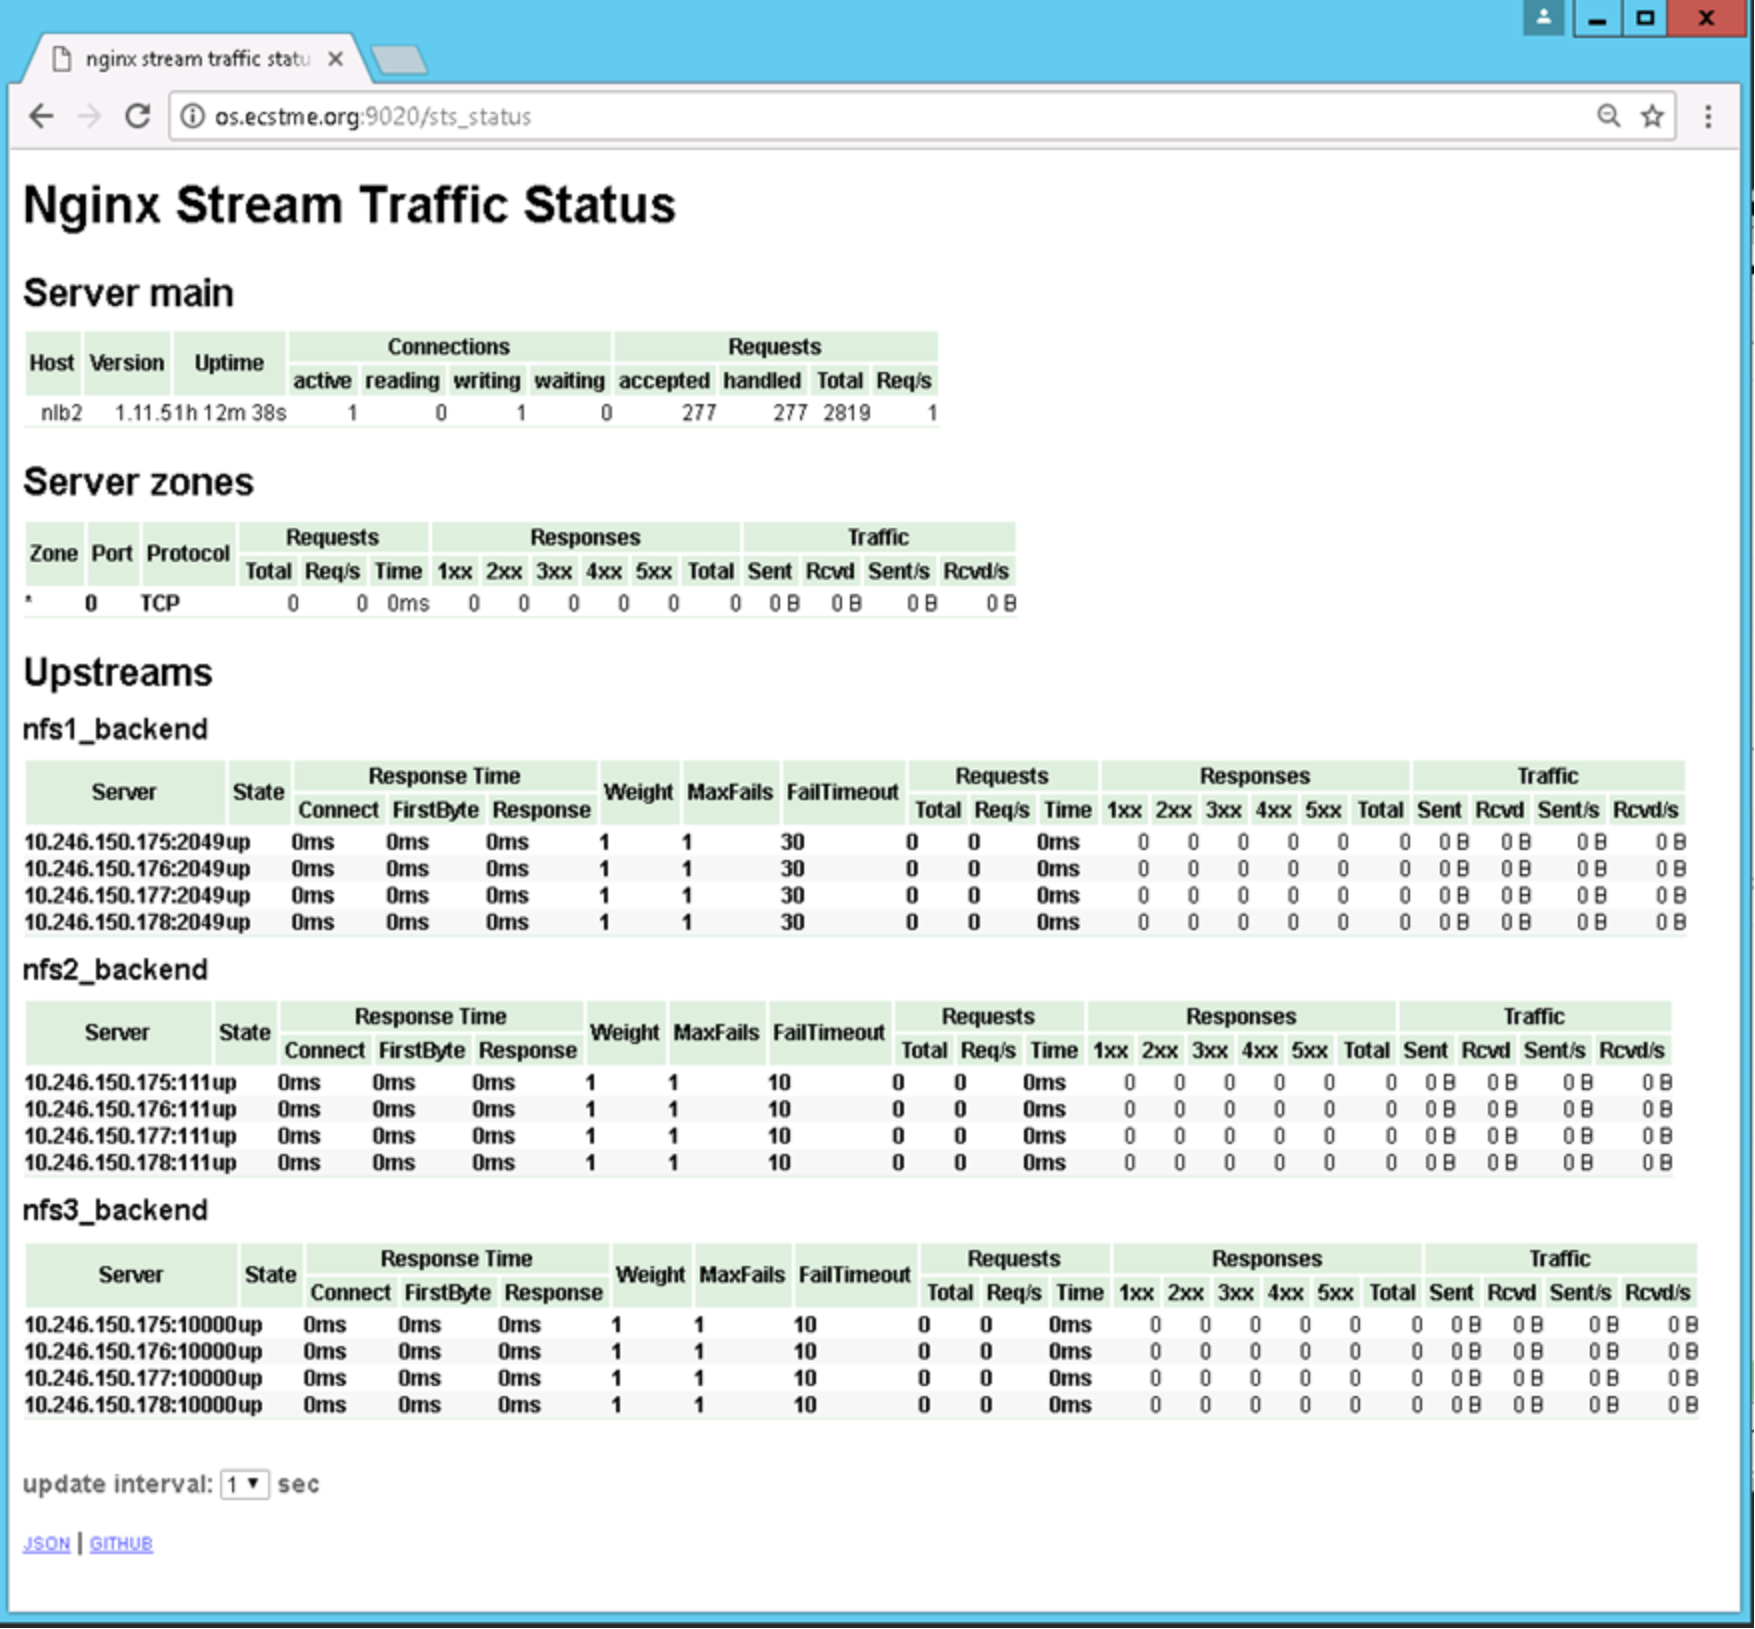
Figure 50. Example View of Stream Traffic Web Page
Also available are directives for exhibiting the status of the upstream servers (that is ECS Nodes), stream (TCP) health check status page, and NGINX. Figure 51 shows these directives which are also defined within the server context listening on port 9020.
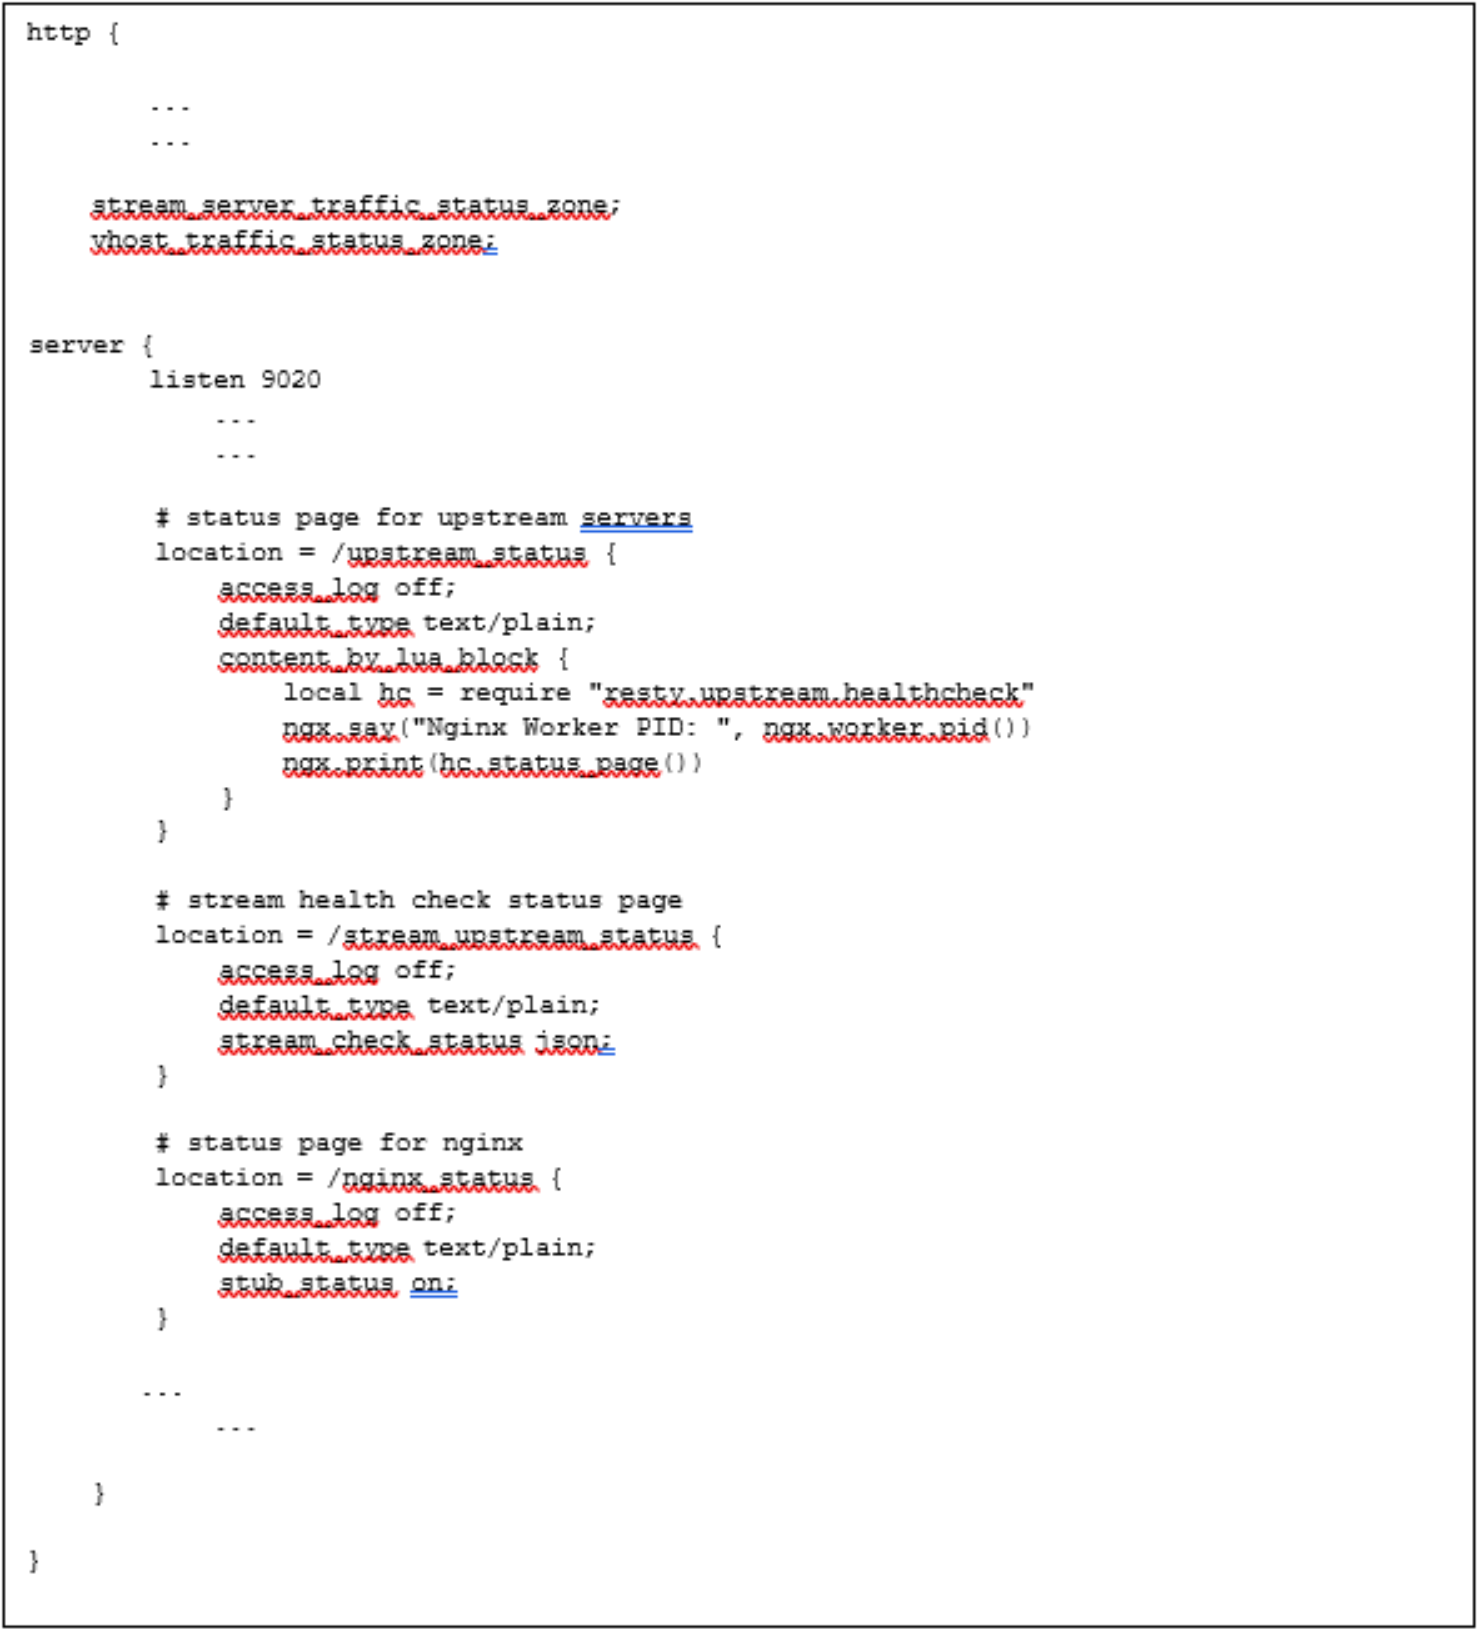
Figure 51. Health Status Directives for ECS Nodes, Stream, and NGINX process
Figure 52, Figure 53, and Figure 54 provide example views of each of the web page output showing the ECS Nodes, stream, and NGINX status. Again, the status information is accessible over port 9020 and the “match” criteria specified in the location context, is specified on the URL for instance, http://os.ecstme.org:9020/upstream_status.
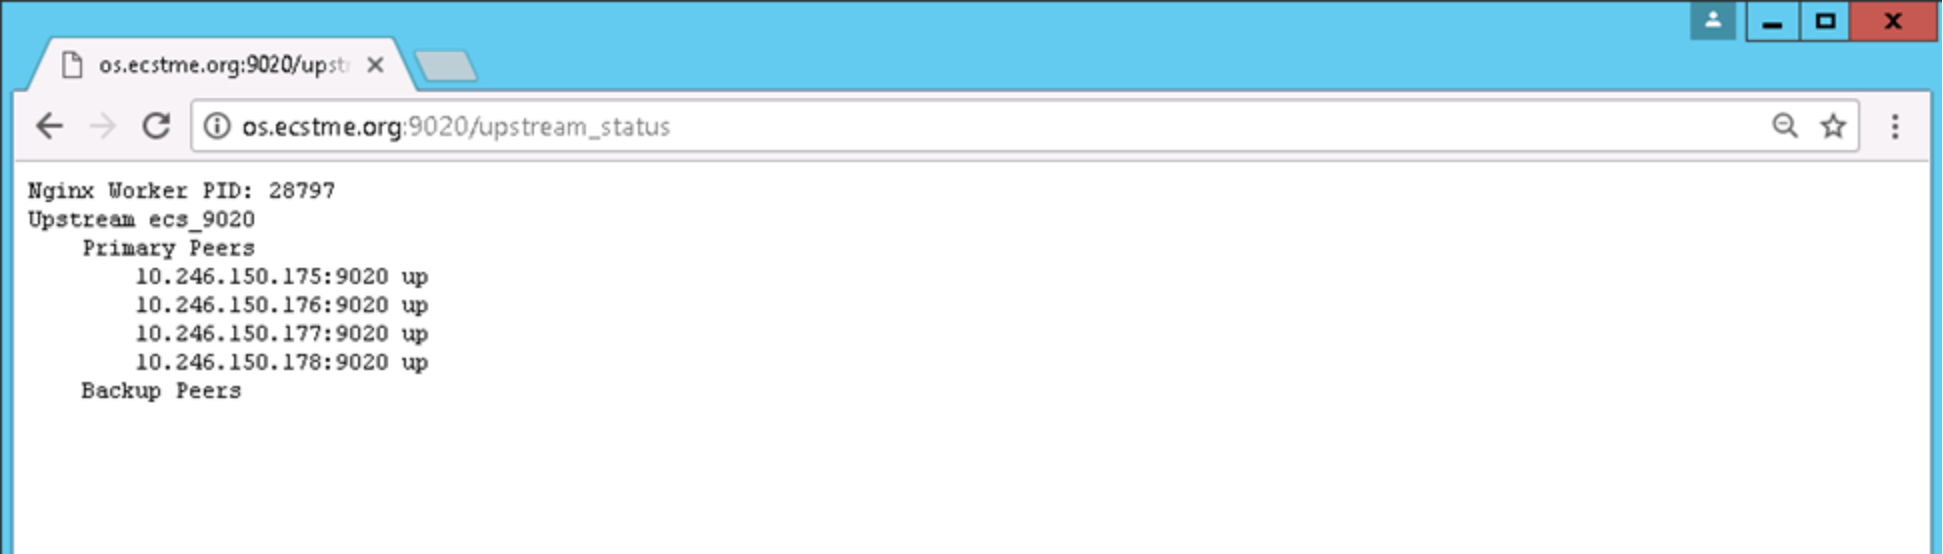
Figure 52. Upstream Servers (ECS Nodes) Status
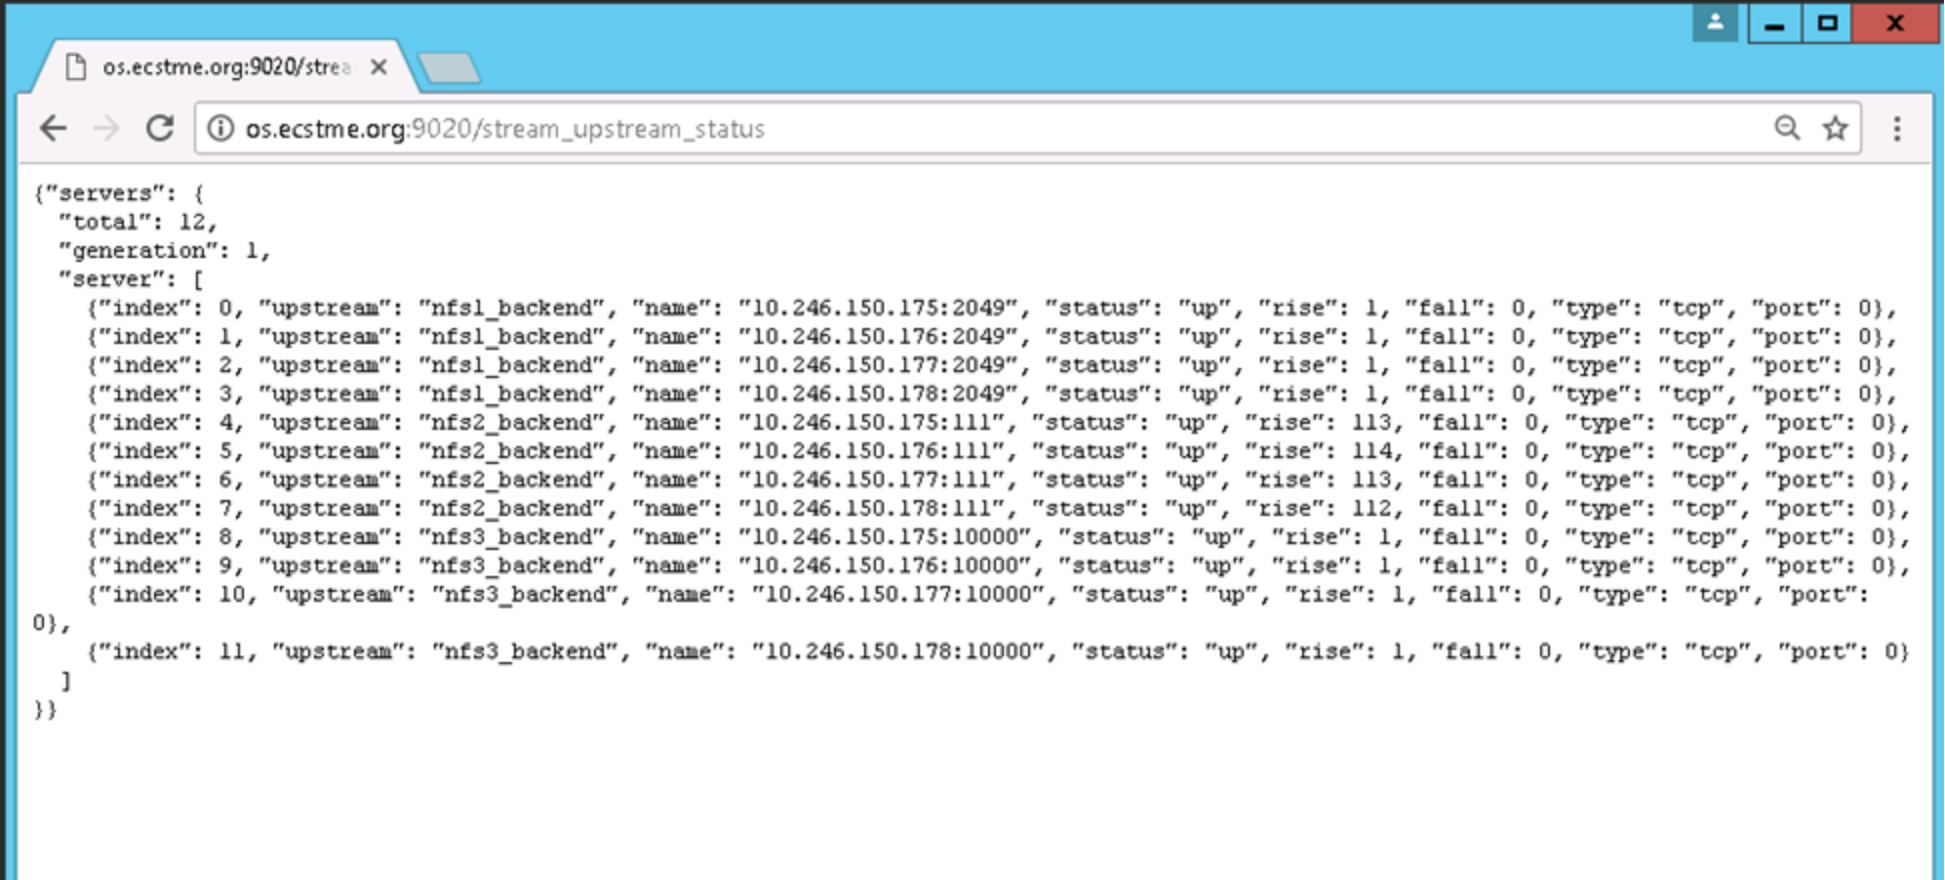
Figure 53. Stream Status (In this Example, NFS)

Figure 54. NGINX status