
Replace a volume for a cluster node
Replace a volume for a cluster node
-
This section shows how to replace a data volume as needed for an existing cluster node.
Prior to replacing the EBS volume, we need to ensure that the volume is in the correct state. We need the node-lnn (node logical number) where the drive to be replaced is located and the bay that the drive resides in. Note that only volumes in the state of REPLACE are ready to be removed and replaced.
Table 11 lists the different drive states you can expect to see.
Table 11. Node drive state
Drive State
Description
HEALTHY
The drive is functioning correctly.
SMARTFAIL
The drive is in the process of being removed safely either because of an I/O error or by user request.
REPLACE
The drive was SmartFailed successfully and is ready to be removed.
PREPARING
The drive is undergoing a format operation. The drive state changes to HEALTHY when the format is successful.
JOURNAL
The drive is a journal drive and cannot be SmartFailed.
NEW
The drive is new and blank. This is the state that a drive is in when you run the isi dev command with the -a add option.
EMPTY
No drive assigned to that Bay.
Note: it may take quite some time (on the order of days) for a drive to finish SmartFailing. And note that only drives in the REPLACE state are ready to be replaced, and only drives in the HEALTHY state can be manually SmartFailed.
Before you make any changes on AWS resources, you should identify the drive information and state of the drive that is to be replaced with the following instructions.
- Log in to the node where the drive to be replaced exists, and then run the following command to list the drives of the cluster.
# isi devices drive list
Example output:
vonefs-cfv-1# isi devices drive list --node-lnn=all
Lnn Location Device Lnum State Serial
-----------------------------------------------------------
1 Bay 0 /dev/nvd8 N/A JOURNAL AWS33E14FDDB06375F68
1 Bay 1 /dev/nvd7 N/A NEW AWS229D6FB6CDDB4A3D6
1 Bay 2 /dev/nvd6 1 HEALTHY vol04da47796b537ebcc
1 Bay 3 /dev/nvd5 2 HEALTHY vol0684d4b04d700f913
1 Bay 4 /dev/nvd4 3 HEALTHY vol05f7251de4928ac0c
1 Bay 5 /dev/nvd3 4 HEALTHY vol00caced3a6000567f
1 Bay 6 /dev/nvd2 5 HEALTHY vol05b52418a379fca65
1 Bay 7 /dev/nvd1 0 HEALTHY vol08197cfc7d89ad317
2 Bay 0 /dev/nvd8 N/A JOURNAL AWS2345F9AD5A8194936
2 Bay 1 /dev/nvd7 N/A NEW AWS31120833E6FC7289C
2 Bay 2 /dev/nvd6 1 HEALTHY vol0c2af15523723c455
2 Bay 3 /dev/nvd5 2 HEALTHY vol0152b5109b83c53e0
2 Bay 4 /dev/nvd4 3 HEALTHY vol09ca884a23d551daf
2 Bay 5 /dev/nvd3 4 HEALTHY vol0cd5c0b312be88f8d
2 Bay 6 /dev/nvd2 5 HEALTHY vol02065cff1707a4b53
2 Bay 7 /dev/nvd1 0 HEALTHY vol017b4aba1d8305bb7
Write down the following information:
- Lnn: logical node number that drive to be replaced in resides. For the example above this is 1, which indicates that this is the first node of the cluster.
- Location: the location of a drive. For the example above, this is Bay 3.
- Serial: Serial of the drive to be replaced, for the example above vol0684d4b04d700f913.
- SmartFailing a HEALTHY drive. Typically drives that are to be replaced have failed and have already automatically been SmartFailed. Therefore, this step is not necessary other than for procedural testing purposes. Run the following command to SmartFail the drive highlighted in the previous step.
# isi devices drive smartfail --node-lnn 1 --bay 3
- Before proceeding, wait for the drive to be in the REPLACE status
Next, we remove the drive from the node using either the AWS CLI or AWS Management Console
AWS CLI instructions
- Find the cluster node instance ID, which you will use to perform the volume replacement. The instance ID i-0b7c9dbe87cf06955 is used as an example.
- The new drive must have an identical configuration as the SmartFailed drive. Therefore, before removing the drive from the node, collect the underlying EBS volume information of the node, including:
- volume type
- volume size
- volume device name
- volume availability zone
- Delete on termination
- Iops (for gp3 only)
- Throughput (for gp3 only)
To obtain the above EBS volume information, the volume ID will be necessary to query the volume. The volume ID can be obtained by inserting the "-" character after “vol” into the Serial obtained from the previous step. As an example, the drive Serial vol0684d4b04d700f913 represents the EBS volume ID vol-0684d4b04d700f913.
Now you can run the following AWS CLI to collect the EBS volumes.
# aws ec2 describe-volumes --volume-ids vol-0684d4b04d700f913 --output json --region us-east-1
Example output:
{
"Volumes": [
{
"Attachments": [
{
"AttachTime": "2023-01-31T09:24:39+00:00",
"Device": "xvdd",
"InstanceId": "i-0b7c9dbe87cf06955",
"State": "attached",
"VolumeId": "vol-0684d4b04d700f913",
"DeleteOnTermination": true
}
],
"AvailabilityZone": "us-east-1b",
"CreateTime": "2023-01-31T09:24:39.948000+00:00",
"Encrypted": false,
"Size": 1024,
"SnapshotId": "",
"State": "in-use",
"VolumeId": "vol-0684d4b04d700f913",
"Iops": 3000,
"VolumeType": "gp3",
"MultiAttachEnabled": false,
"Throughput": 125
}
]
}
Write down the EBS volume information based on the previous output.
Table 12. Volume information
Volume options
Examples for this guide
Volume type
gp3
Volume size in GiB
1024
Volume device name
xvdd
Volume availability zone
us-east-1b
Delete on termination
True
Iops (for gp3 only)
3000
Throughput in MiB/s (for gp3 only)
125
- Now you can detach the EBS volume from the cluster node by running the following AWS CLI.
# aws ec2 detach-volume --volume-id vol-0684d4b04d700f913 --instance-id i-0b7c9dbe87cf06955 --region us-east-1
Example output:
{
"AttachTime": "2023-01-31T09:24:39+00:00",
"Device": "xvdd",
"InstanceId": "i-0b7c9dbe87cf06955",
"State": "detaching",
"VolumeId": "vol-0684d4b04d700f913"
}
- Log in to the cluster node, and verify the drive on the cluster is no longer present by running the following OneFS CLI:
# isi devices drive list
Below is the example for this guide.
vonefs-cfv-1# isi devices drive list --node-lnn=1
Lnn Location Device Lnum State Serial
-----------------------------------------------------------
1 Bay 0 /dev/nvd8 N/A JOURNAL AWS33E14FDDB06375F68
1 Bay 1 /dev/nvd7 N/A NEW AWS229D6FB6CDDB4A3D6
1 Bay 2 /dev/nvd6 1 HEALTHY vol04da47796b537ebcc
1 Bay 3 - N/A REPLACE
1 Bay 4 /dev/nvd4 3 HEALTHY vol05f7251de4928ac0c
1 Bay 5 /dev/nvd3 4 HEALTHY vol00caced3a6000567f
1 Bay 6 /dev/nvd2 5 HEALTHY vol05b52418a379fca65
1 Bay 7 /dev/nvd1 0 HEALTHY vol08197cfc7d89ad317
- Delete the unused and detached EBS volume by running the following AWS CLI.
# aws ec2 delete-volume --volume-id vol-0684d4b04d700f913 --region us-east-1
Query the volume to ensure it was deleted and no longer exists:
# aws ec2 describe-volumes --volume-ids vol-0123456789abcdef --output text --region us-east-1
Example output:
An error occurred (InvalidVolume.NotFound) when calling the DescribeVolumes operation: The volume 'vol-0684d4b04d700f913' does not exist.
- Using the volume information collected in step 2, create an EBS volume for replacement. Below is an example. For more information, see the AWS documentation about the create-volume command.
# aws ec2 create-volume --availability-zone us-east-1b --size 1024 --volume-type gp3 --iops 3000 --throughput 125 --region us-east-1
Example output, write down the new EBS volume ID vol-0765111ed49661be2.
{
"AvailabilityZone": "us-east-1b",
"CreateTime": "2023-03-29T08:31:02+00:00",
"Encrypted": false,
"Size": 1024,
"SnapshotId": "",
"State": "creating",
"VolumeId": "vol-0765111ed49661be2",
"Iops": 3000,
"Tags": [],
"VolumeType": "gp3",
"MultiAttachEnabled": false,
"Throughput": 125
}
- Attach the new EBS volume to the cluster node with device name collected in step 2.
# aws ec2 attach-volume --volume-id vol-0765111ed49661be2 --instance-id i-0b7c9dbe87cf06955 --device xvdd --region us-east-1
Highly recommended: Using the instance-id, and the DeviceName of the EBS volume, modify the EBS volume attribute DeleteOnTermination and set to true. This will indicate that the EBS volume will be deleted upon instance termination to avoid having leftover, unattached EBS volumes when the node (EC2 instance) is terminated.
# aws ec2 modify-instance-attribute --instance-id i-0b7c9dbe87cf06955 --block-device-mappings "[{\"DeviceName\": \"xvdd\",\"Ebs\":{\"DeleteOnTermination\":true}}]" --region us-east-1
Before proceeding, check that the EBS Volume has finished attaching from the AWS side by verifying that the State is in-use:
# aws ec2 describe-volumes --volume-ids vol-0765111ed49661be2 --region us-east-1
- Finally, log in to the cluster node, and verify the drive is present on the cluster node by running the following OneFS CLI:
# isi devices drive list
Below is an example for this guide.
vonefs-cfv-1# isi devices drive list --node-lnn=1
Lnn Location Device Lnum State Serial
-----------------------------------------------------------
1 Bay 0 /dev/nvd8 N/A JOURNAL AWS33E14FDDB06375F68
1 Bay 1 /dev/nvd7 N/A NEW AWS229D6FB6CDDB4A3D6
1 Bay 2 /dev/nvd6 1 HEALTHY vol04da47796b537ebcc
1 Bay 3 /dev/nvd5 2 HEALTHY vol0765111ed49661be2
1 Bay 4 /dev/nvd4 3 HEALTHY vol05f7251de4928ac0c
1 Bay 5 /dev/nvd3 4 HEALTHY vol00caced3a6000567f
1 Bay 6 /dev/nvd2 5 HEALTHY vol05b52418a379fca65
1 Bay 7 /dev/nvd1 0 HEALTHY vol08197cfc7d89ad317
AWS Management Console instructions
- Find the cluster node instance ID, which you will use to perform the volume replacement. The instance ID i-0b7c9dbe87cf06955 is used as an example.
- Sign in to the AWS Management Console and open the EC2 console at https://console.aws.amazon.com/ec2/.
- Choose Elastic Block Store, and then Volumes.
- The new drive must have an identical configuration with the SmartFailed drive. Therefore, before removing the drive from the node, collect the underlying EBS volume information of the node, including:
- volume type
- volume size
- volume device name
- volume availability zone
- Iops (for gp3 only)
- Throughput (for gp3 only)
To obtain the above EBS volume information, the volume ID will be necessary to query the volume. The volume ID can be obtained by inserting the "-" character after “vol” into the Serial obtained from the previous step. As an example, the drive Serial vol0684d4b04d700f913 represents the EBS volume ID vol-0684d4b04d700f913.
Use the filter “Volume ID = vol-0684d4b04d700f913” to obtain the volume details. Figure 36 is an example.

Figure 36. EBS volume information
Write down the EBS volume information based on the above output.
Table 13. Volume information
Volume options
Examples for this guide
Volume type
gp3
Volume size in GiB
1024
Volume device name
xvdd
Volume availability zone
us-east-1b
Iops (for gp3 only)
3000
Throughput in MiB/s (for gp3 only)
125
- Select the EBS volume in step 5, then choose Actions, and finally choose Detach volume.
- Log in to the cluster node, and verify the drive on the cluster is no longer present by running the following OneFS CLI:
# isi devices drive list
Below is an example.
vonefs-cfv-1# isi devices drive list --node-lnn=1
Lnn Location Device Lnum State Serial
-----------------------------------------------------------
1 Bay 0 /dev/nvd8 N/A JOURNAL AWS33E14FDDB06375F68
1 Bay 1 /dev/nvd7 N/A NEW AWS229D6FB6CDDB4A3D6
1 Bay 2 /dev/nvd6 1 HEALTHY vol04da47796b537ebcc
1 Bay 3 - N/A REPLACE
1 Bay 4 /dev/nvd4 3 HEALTHY vol05f7251de4928ac0c
1 Bay 5 /dev/nvd3 4 HEALTHY vol00caced3a6000567f
1 Bay 6 /dev/nvd2 5 HEALTHY vol05b52418a379fca65
1 Bay 7 /dev/nvd1 0 HEALTHY vol08197cfc7d89ad317
- Return to the EC2 volume console to delete the volume. Select the EBS volume in step 5, then choose Actions, and finally choose Delete volume.
- Next, using the volume information collected in step 4, create an EBS volume for replacement. Figure 37 is an example.
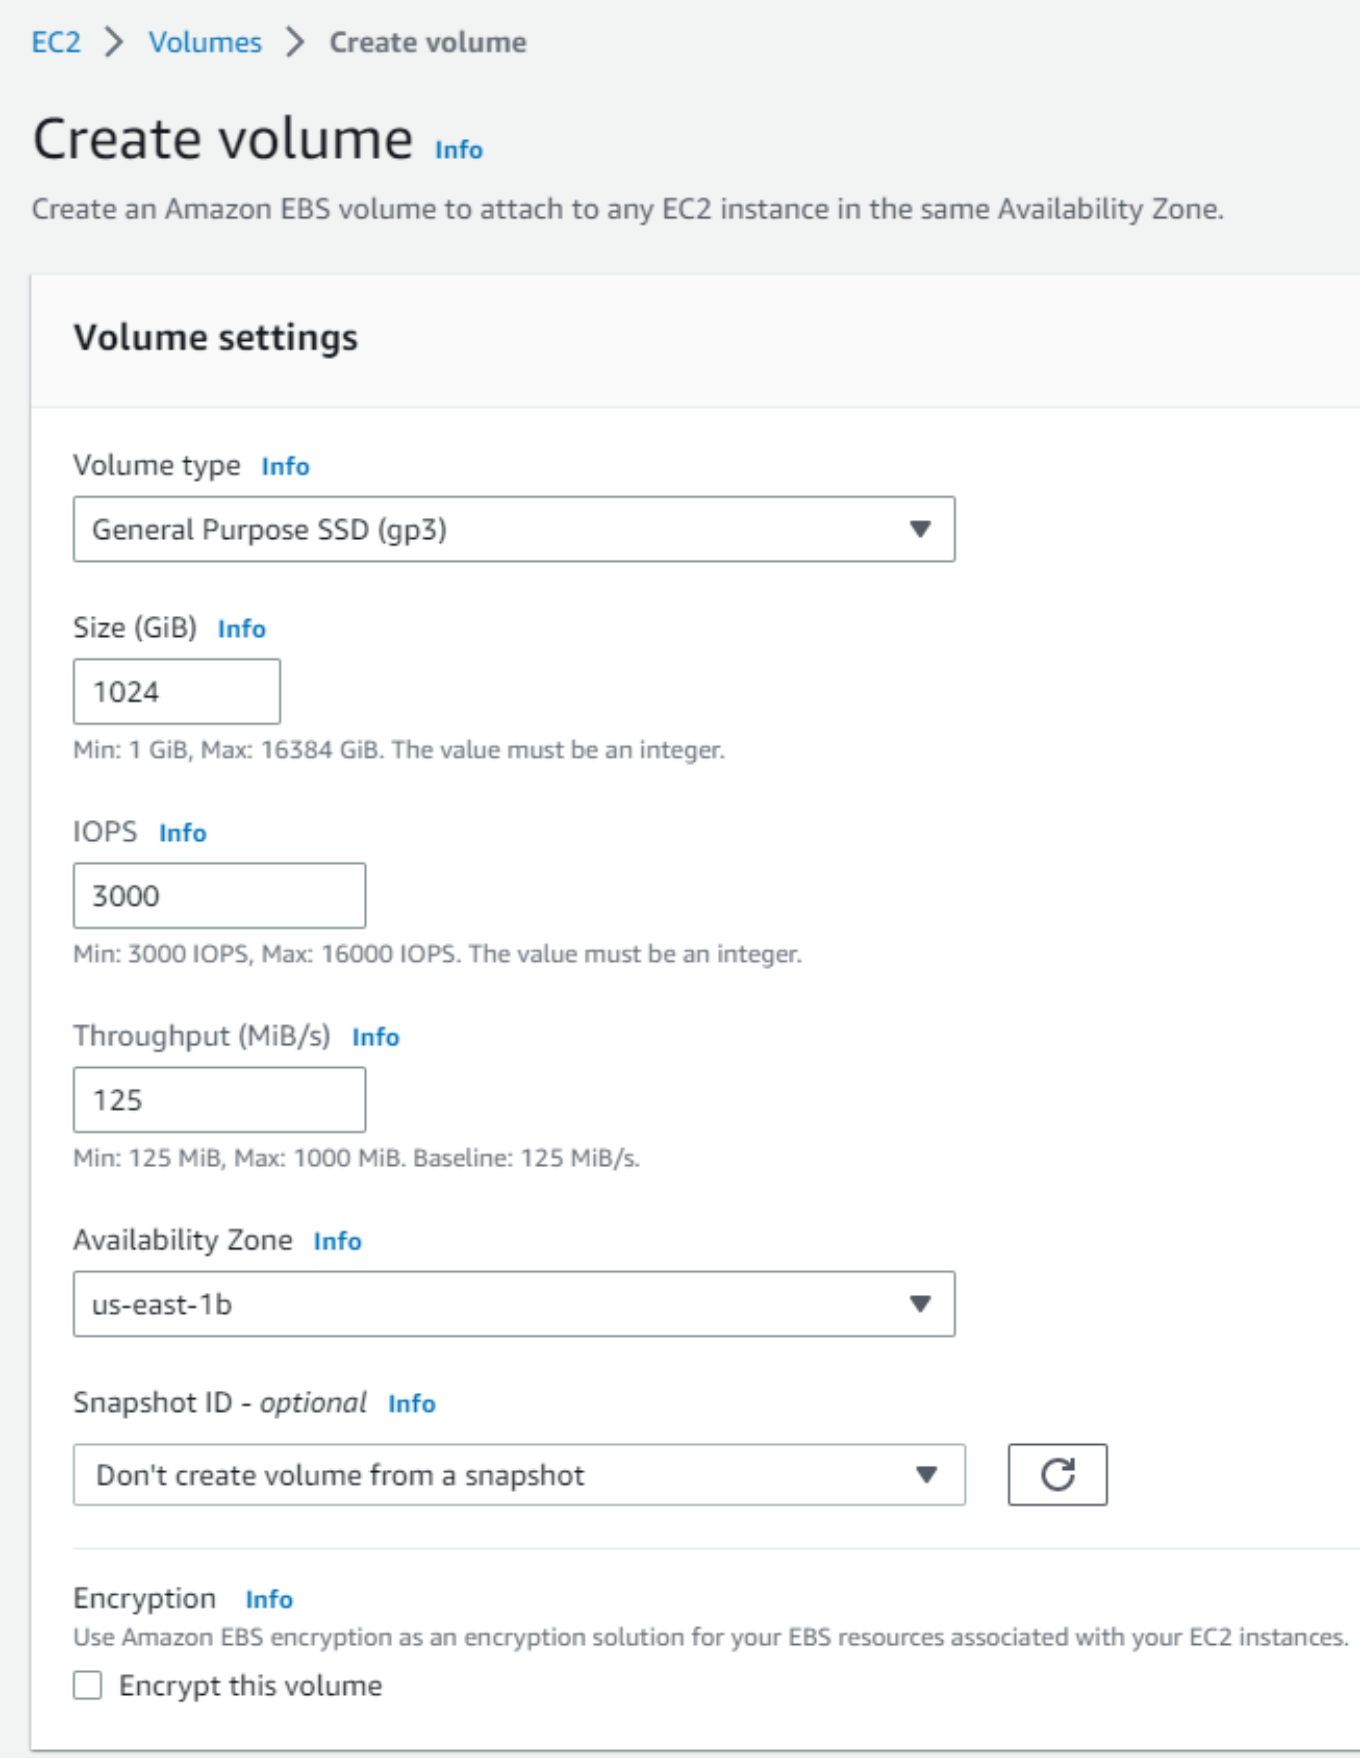
Figure 37. Create an EBS volume
- Attach the new EBS volume to the cluster node with the device name collected in step 4. Figure 38 is an example.
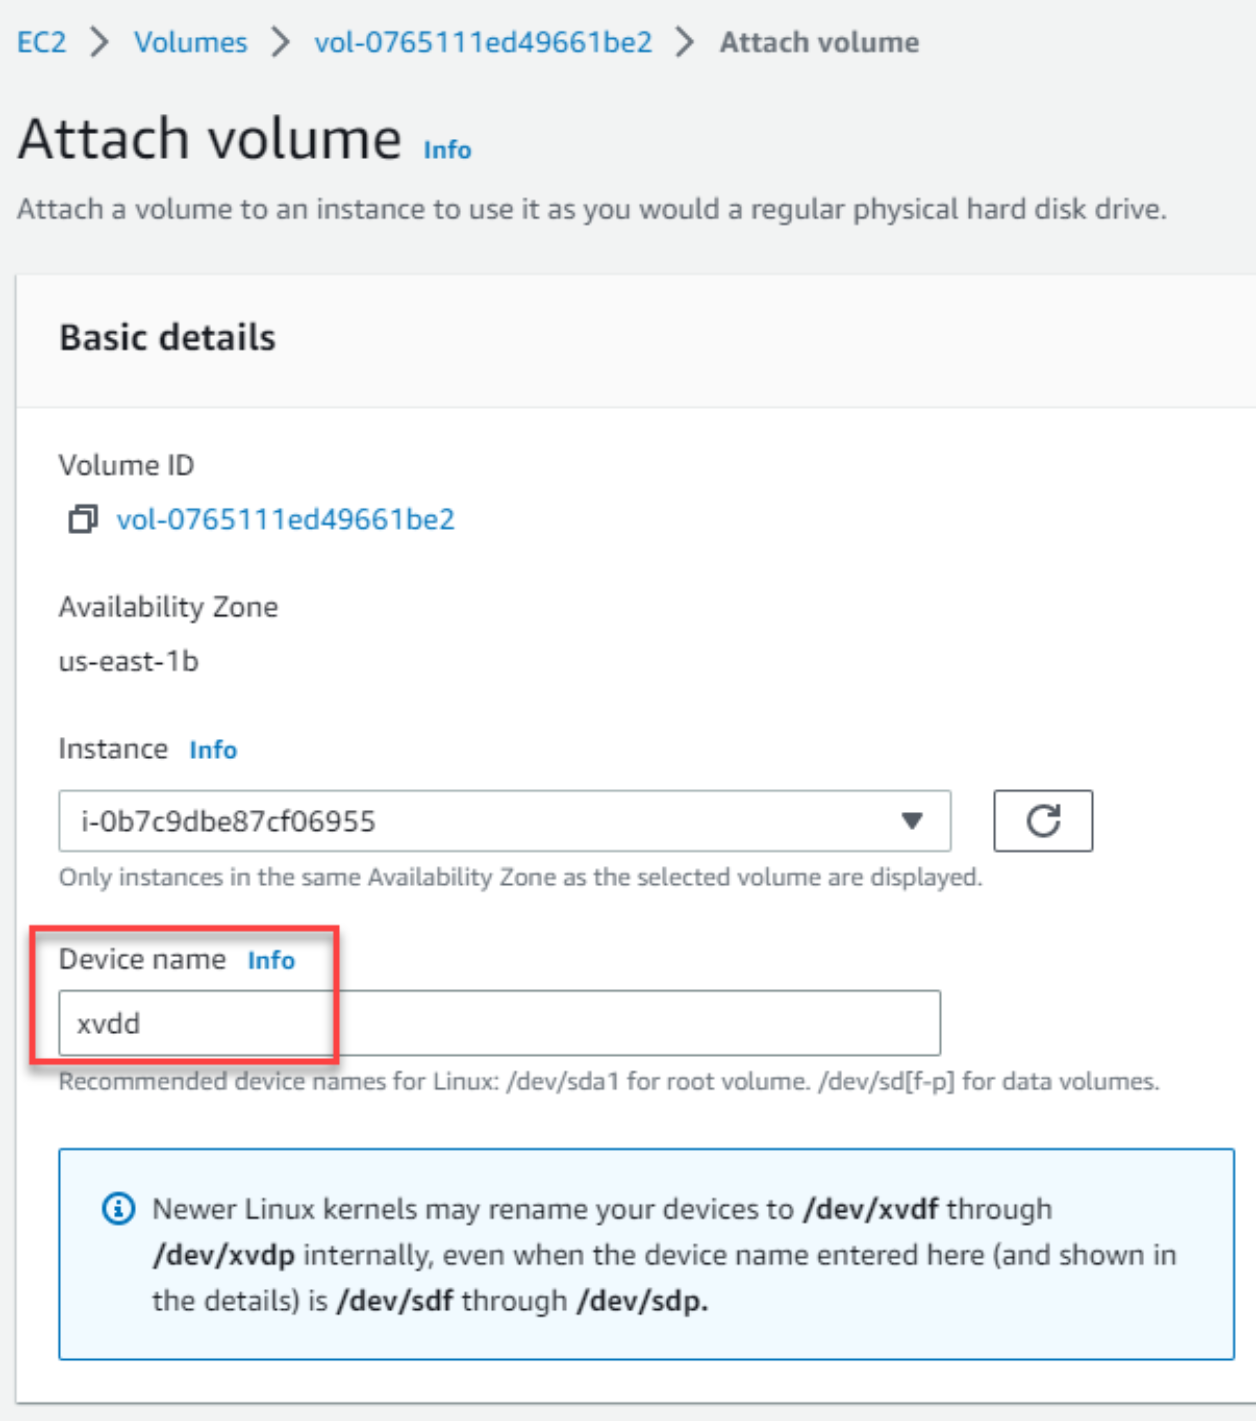
Figure 38. Attach the EBS volume
Highly recommended: Using the instance-id, and the DeviceName of the EBS volume, modify the EBS volume attribute DeleteOnTermination set to true. This will indicate that the EBS volume will be deleted upon instance termination to avoid having leftover, unattached EBS volumes when the node (EC2 instance) is terminated.
# aws ec2 modify-instance-attribute --instance-id i-0b7c9dbe87cf06955 --block-device-mappings "[{\"DeviceName\": \"xvdd\",\"Ebs\":{\"DeleteOnTermination\":true}}]" --region us-east-1
Note: There is no option available from the AWS Management Console to modify the EBS volume DeleteOnTermination attribute. We have to use above AWS CLI command for that.
Before proceeding, check that the EBS Volume has finished attaching from the AWS side by verifying that the State is In-use:
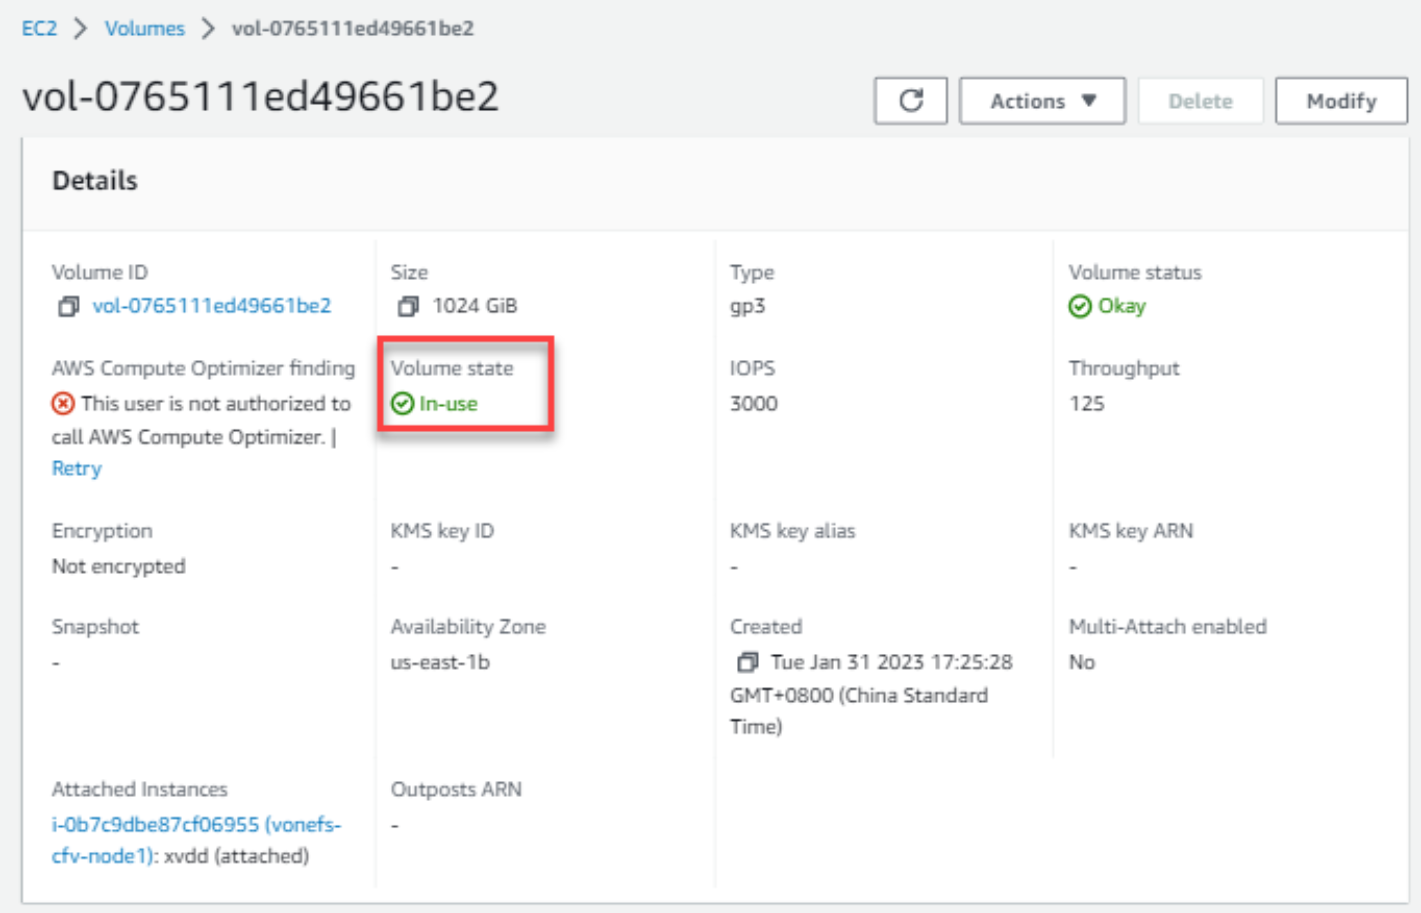
Figure 39. Verify volume state
- Finally, log in to the cluster node, and verify that the drive is present on the cluster node by running the following OneFS CLI:
# isi devices drive list
Below is an example.
vonefs-cfv-1# isi devices drive list --node-lnn=1
Lnn Location Device Lnum State Serial
-----------------------------------------------------------
1 Bay 0 /dev/nvd8 N/A JOURNAL AWS33E14FDDB06375F68
1 Bay 1 /dev/nvd7 N/A NEW AWS229D6FB6CDDB4A3D6
1 Bay 2 /dev/nvd6 1 HEALTHY vol04da47796b537ebcc
1 Bay 3 /dev/nvd5 2 HEALTHY vol0765111ed49661be2
1 Bay 4 /dev/nvd4 3 HEALTHY vol05f7251de4928ac0c
1 Bay 5 /dev/nvd3 4 HEALTHY vol00caced3a6000567f
1 Bay 6 /dev/nvd2 5 HEALTHY vol05b52418a379fca65
1 Bay 7 /dev/nvd1 0 HEALTHY vol08197cfc7d89ad317