
Create EC2 instances for the cluster
Create EC2 instances for the cluster
-
You have now completed most of the work required to deploy a cluster in AWS. This section demonstrates how you create cluster nodes based on the AWS resources in the previous sections.
Find the OneFS AMI ID
After you purchase APEX File Storage for AWS, you should be able to find the OneFS AMI image in the AWS Web Console by using the following steps:
- Open the AWS Management Console.
- Open the EC2 service portal and select the correct region.
- Click the AMI under the Images menu item.
- Change to Public images view.
- Find the AMI image as needed by searching “onefs”, and write down the AMI image ID. Please verify that the owner ID of OneFS AMI is 437769053180 which is the Dell Technologies official AWS account for sharing public OneFS AMI.
Figure 17 is an example of OneFS AMI.
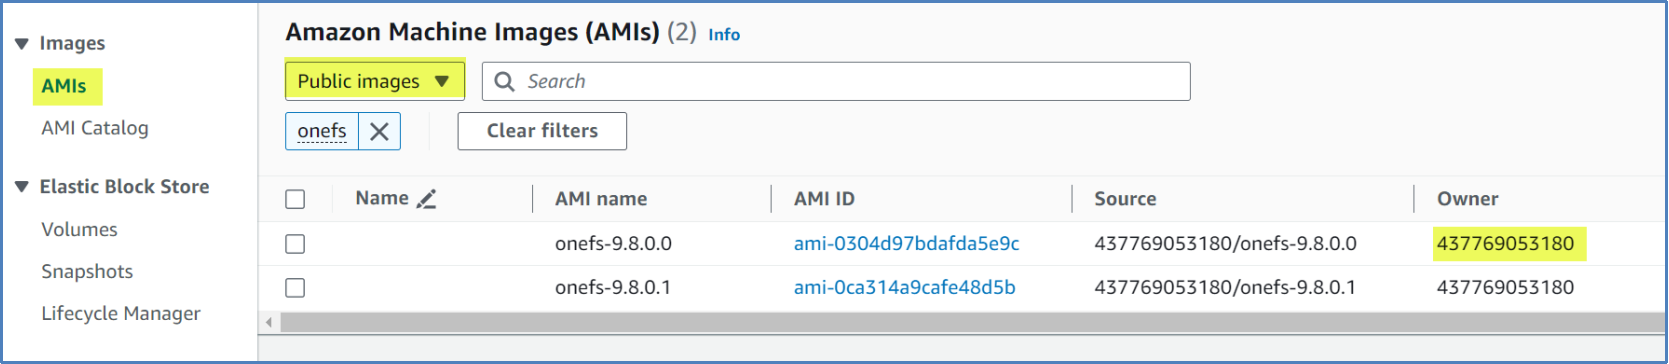
Figure 17. OneFS AMI image
AWS CLI instructions
Use the following steps to create the cluster nodes with the AWS CLI.
- In this guide, we use C:\json-files-template as an example directory which stores all of the required .json files, including block device mappings and user data for each node. Open your OS CLI which has AWS CLI ready (Windows CMD in this example) and change your current directory to C:\json-files-template.
> cd C:\json-files-template
- To create the cluster nodes, run the following command by replacing the <onefs_ami_id>, <onefs_instance_type>, <cluster_name>, <internal_network_interface_id>, <external_network_interface_id>, <aws_region>, and <node_number> with your settings. To manage cluster nodes conveniently in the future, it is recommended that you add the two tags which contain the cluster name and node number information.
aws ec2 run-instances --image-id <onefs_ami_id> --instance-type <onefs_instance_type> --placement GroupName=<cluster_name>-onefs-placement-group --network-interfaces NetworkInterfaceId=<internal_network_interface_id>,DeviceIndex=0 NetworkInterfaceId=<external_network_interface_id>,DeviceIndex=1 --region <aws_region> --iam-instance-profile Name=onefs-runtime-instance-profile --user-data file://user-data-node-1.json --block-device-mappings file://block-device-mappings.json --tag-specifications "ResourceType=instance,Tags=[{Key=cluster-name,Value=<cluster_name>},{Key=Name,Value=<cluster_name>-node<node_number>}]"
The following example shows how to create cluster node1, node2, node3, and node4.
Create first node - node1:
> aws ec2 run-instances --image-id ami-0ca314a9cafe48d5b --instance-type m5dn.12xlarge --placement GroupName=vonefs-cfv-onefs-placement-group --network-interfaces NetworkInterfaceId=eni-044ba549fc8239cec,DeviceIndex=0 NetworkInterfaceId=eni-0e21d2c270a4b64de,DeviceIndex=1 --region us-east-1 --iam-instance-profile Name=onefs-runtime-instance-profile --user-data file://user-data-node-1.json --block-device-mappings file://block-device-mappings.json --tag-specifications "ResourceType=instance,Tags=[{Key=cluster-name,Value=vonefs-cfv},{Key=Name,Value=vonefs-cfv-node1}]"
Create second node - node2:
> aws ec2 run-instances --image-id ami-0ca314a9cafe48d5b --instance-type m5dn.12xlarge --placement GroupName=vonefs-cfv-onefs-placement-group --network-interfaces NetworkInterfaceId=eni-0d947a68641d2db6f,DeviceIndex=0 NetworkInterfaceId=eni-02929b093d9cfaccc,DeviceIndex=1 --region us-east-1 --iam-instance-profile Name=onefs-runtime-instance-profile --user-data file://user-data-node-2.json --block-device-mappings file://block-device-mappings.json --tag-specifications "ResourceType=instance,Tags=[{Key=cluster-name,Value=vonefs-cfv},{Key=Name,Value=vonefs-cfv-node2}]"
Create third node - node3:
> aws ec2 run-instances --image-id ami-0ca314a9cafe48d5b --instance-type m5dn.12xlarge --placement GroupName=vonefs-cfv-onefs-placement-group --network-interfaces NetworkInterfaceId=eni-0371c901933c7ec28,DeviceIndex=0 NetworkInterfaceId=eni-03aa64794d62b76af,DeviceIndex=1 --region us-east-1 --iam-instance-profile Name=onefs-runtime-instance-profile --user-data file://user-data-node-3.json --block-device-mappings file://block-device-mappings.json --tag-specifications "ResourceType=instance,Tags=[{Key=cluster-name,Value=vonefs-cfv},{Key=Name,Value=vonefs-cfv-node3}]"
Create fourth node - node4:
> aws ec2 run-instances --image-id ami-0ca314a9cafe48d5b --instance-type m5dn.12xlarge --placement GroupName=vonefs-cfv-onefs-placement-group --network-interfaces NetworkInterfaceId=eni-09c1b9a66c08e969d,DeviceIndex=0 NetworkInterfaceId=eni-0bf4fee125a58dffe,DeviceIndex=1 --region us-east-1 --iam-instance-profile Name=onefs-runtime-instance-profile --user-data file://user-data-node-4.json --block-device-mappings file://block-device-mappings.json --tag-specifications "ResourceType=instance,Tags=[{Key=cluster-name,Value=vonefs-cfv},{Key=Name,Value=vonefs-cfv-node4}]"
AWS Management Console instructions
Use the following steps to create the cluster nodes with the AWS Management Console.
- Sign into the AWS Management Console and open the EC2 console at https://console.aws.amazon.com/ec2/.
- Choose Instances, and then Launch instances.
- For the Name and tags, choose Add additional tags.
- The tag key is Name, and the tag value is instance name. It is highly recommended that you add this Name tag with the format <cluster_name>-node<node_number>, so that you can identify the node easily in the future for management.
- Choose Add tag. The tag key is cluster-name, and the tag value is your OneFS cluster name. Figure 18 is an example for the first node of the cluster.
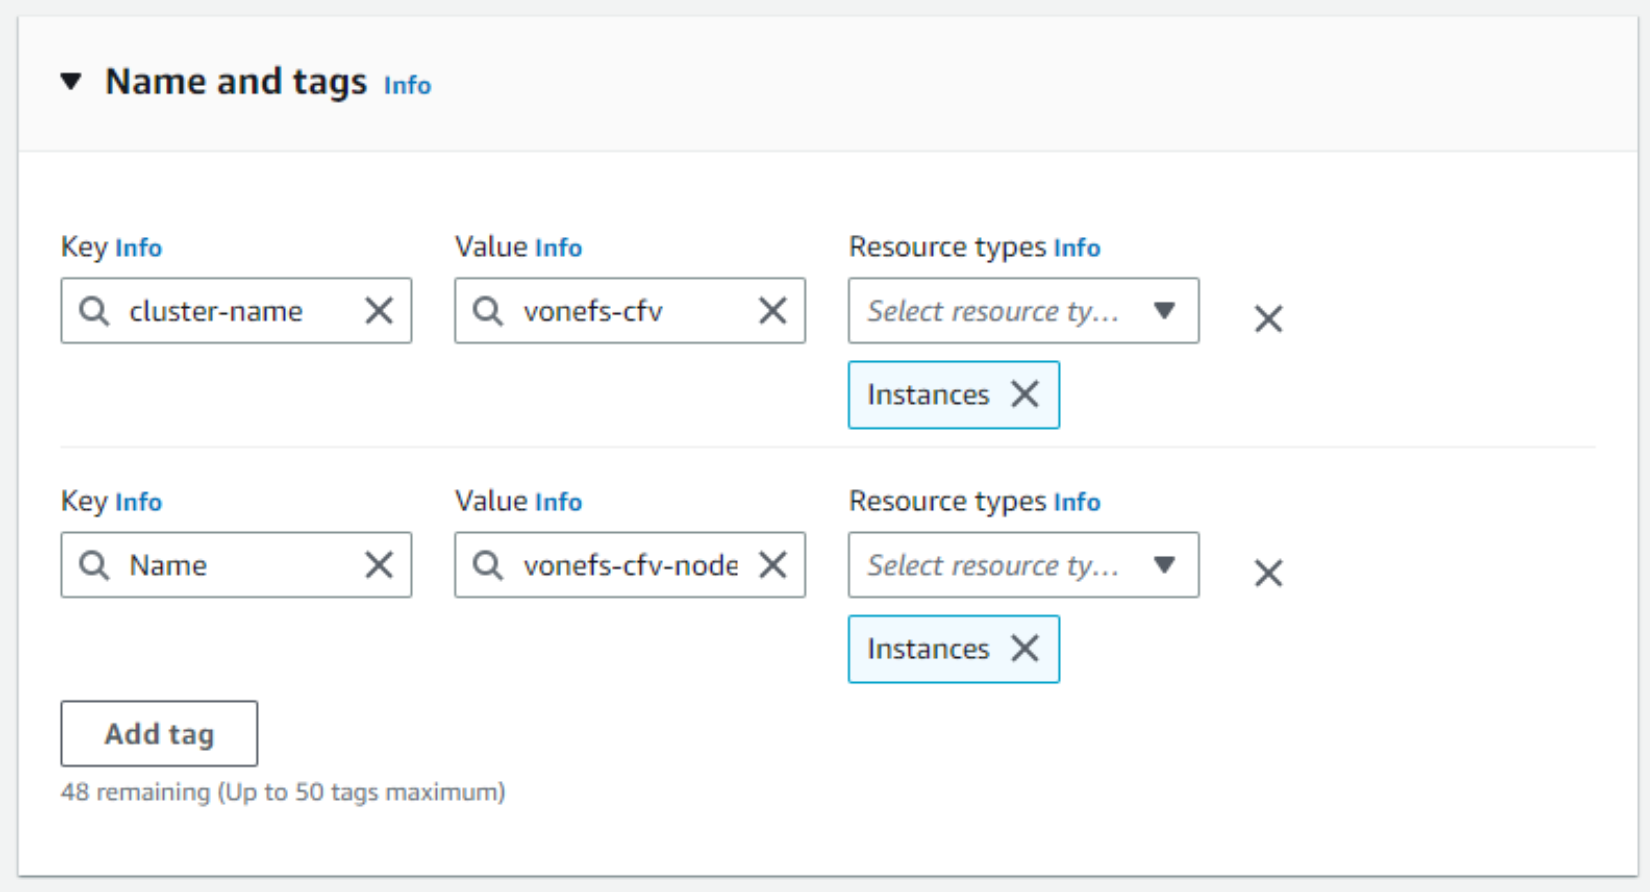
Figure 18. Tags for cluster node
- For the Application and OS Images (Amazon Machine Image), choose My AMIs, and then choose Shared with me. Finally select the OneFS AMI with the AMI ID in section Find the OneFS AMI ID. Figure 19 is an example.
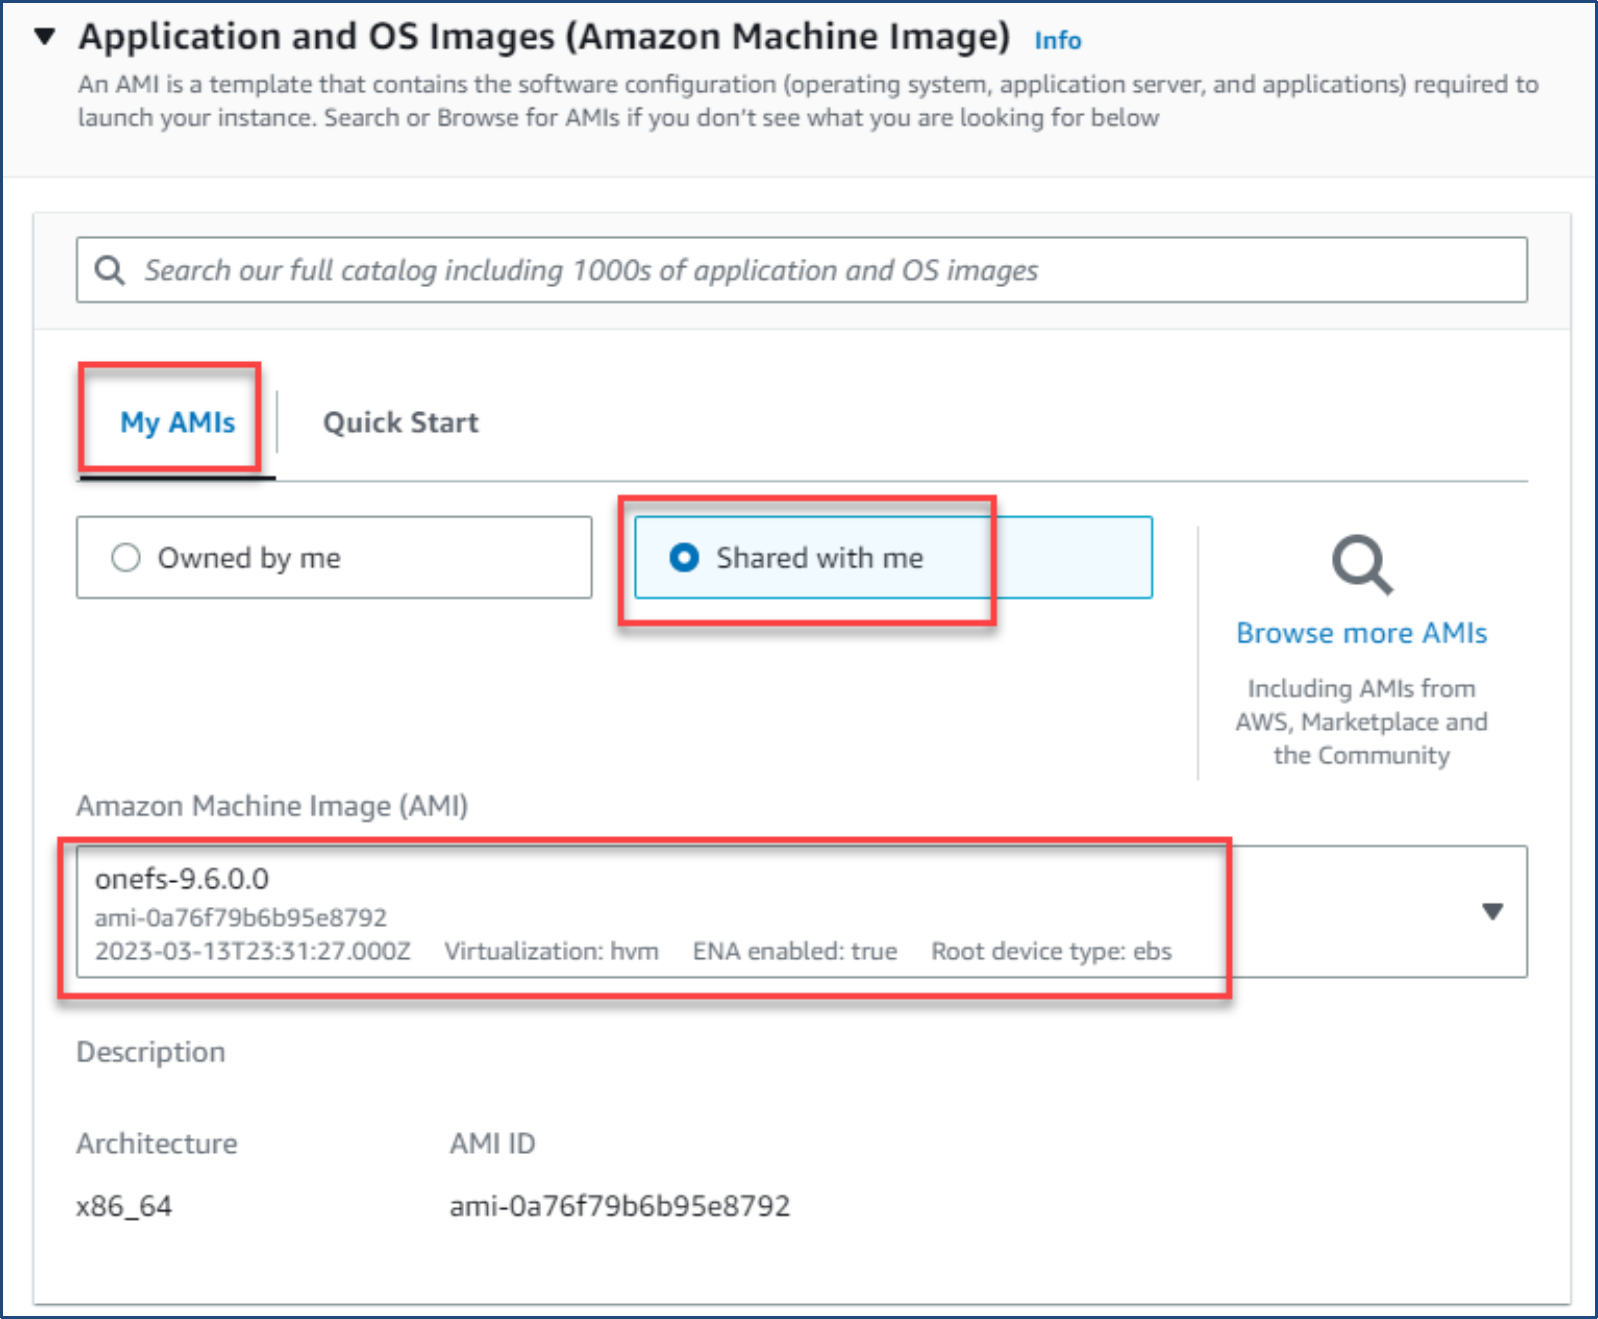
Figure 19. Choose OneFS AMI
- For Instance type, choose an instance type for your deployment. Figure 20 is an example. All cluster nodes must use a same instance type.
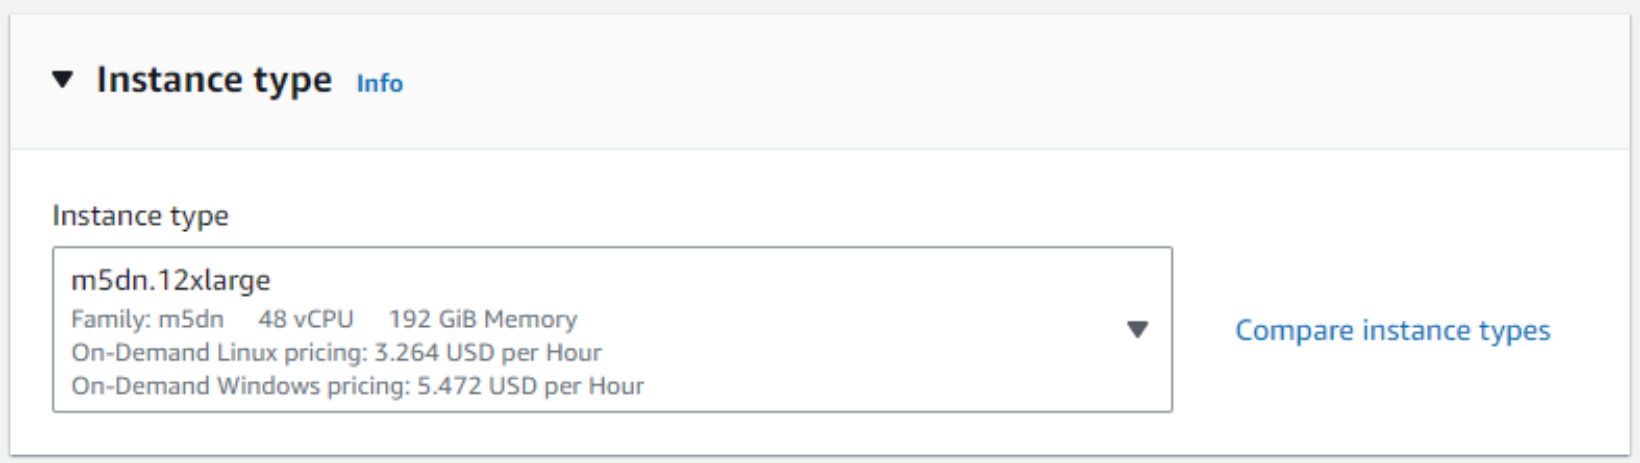
Figure 20. Instance type
- For the Key pair (login), choose Proceed without a key pair.
- For Network settings, choose your VPC, and choose your subnet (Note: you should choose your cluster internal subnet). Choose Select existing security group, and then choose Advanced network configuration.
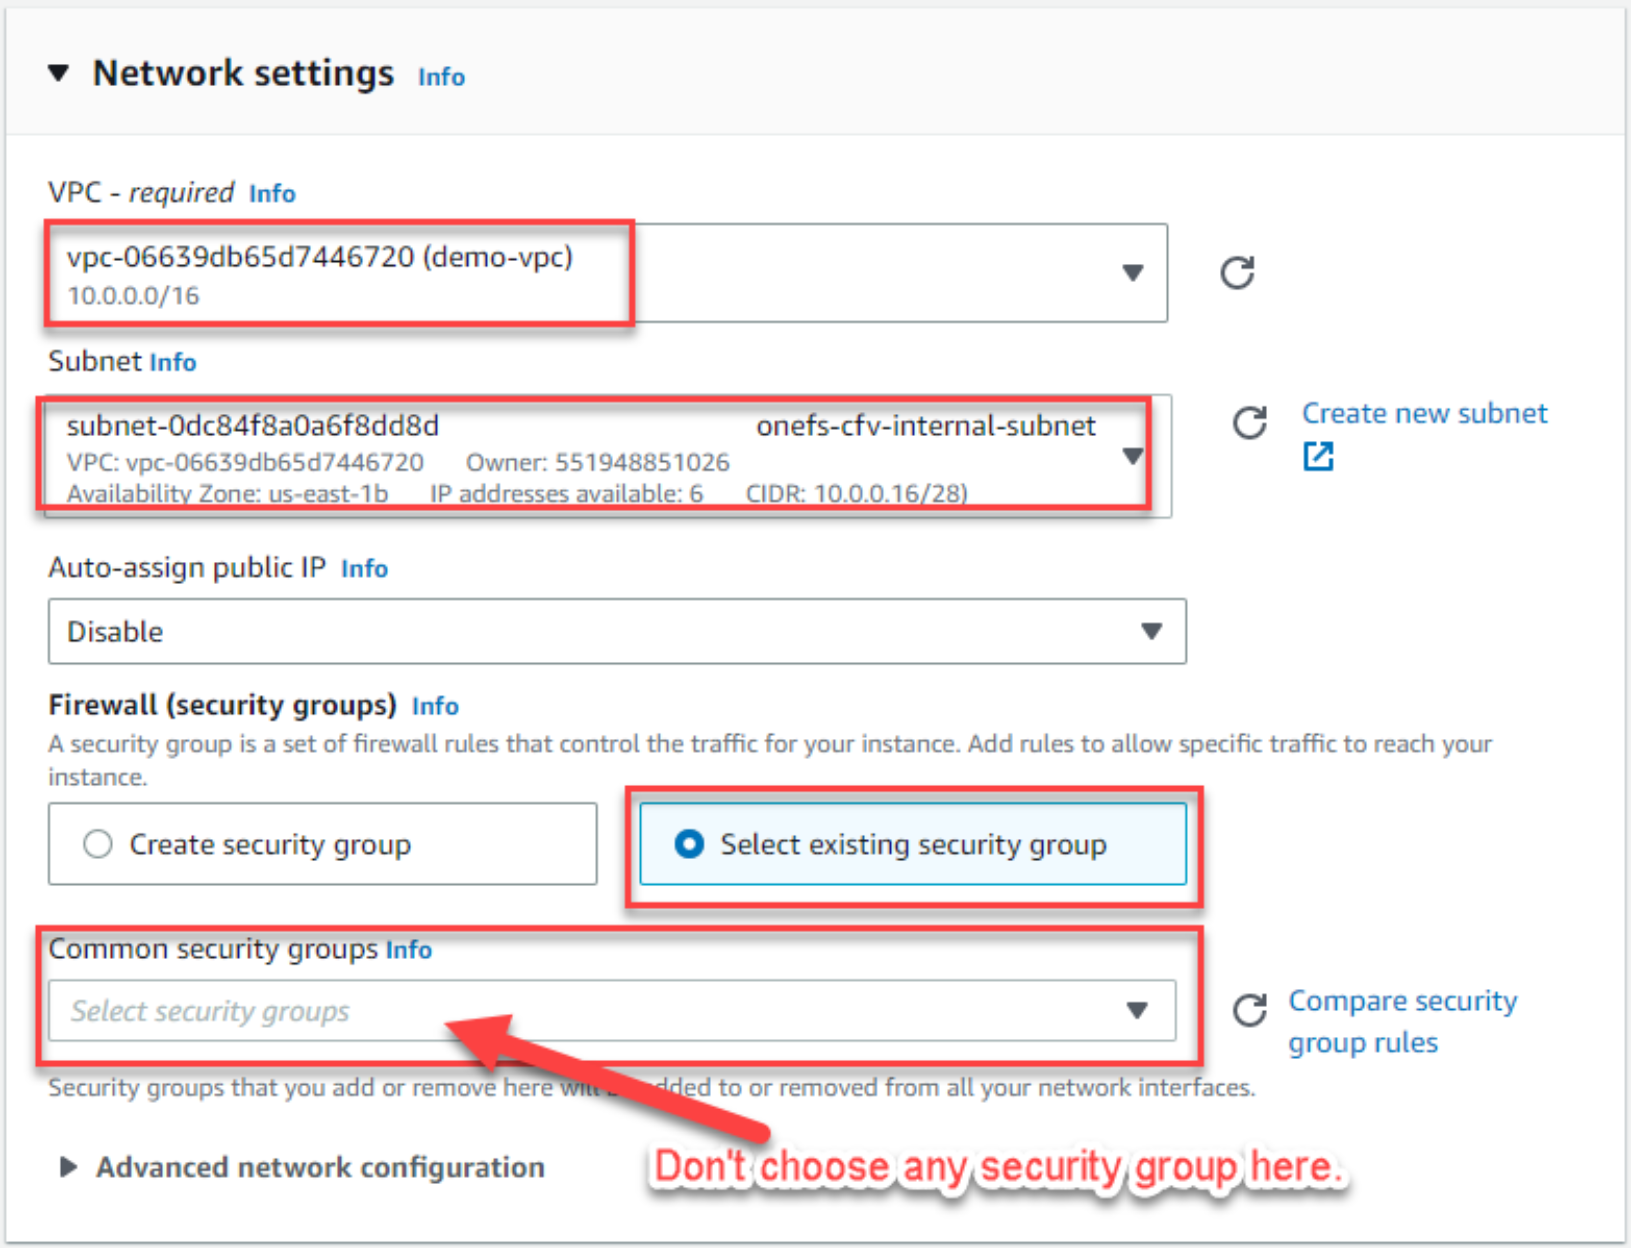
Figure 21. Network setting
- Under Advanced network configuration, choose the cluster node internal network interface which is created in section Create cluster internal network interfaces. Then choose Add network interface. Figure 22 is an example for the cluster first node internal network interface. Ensure you add the internal network interface as the instance first network interface.
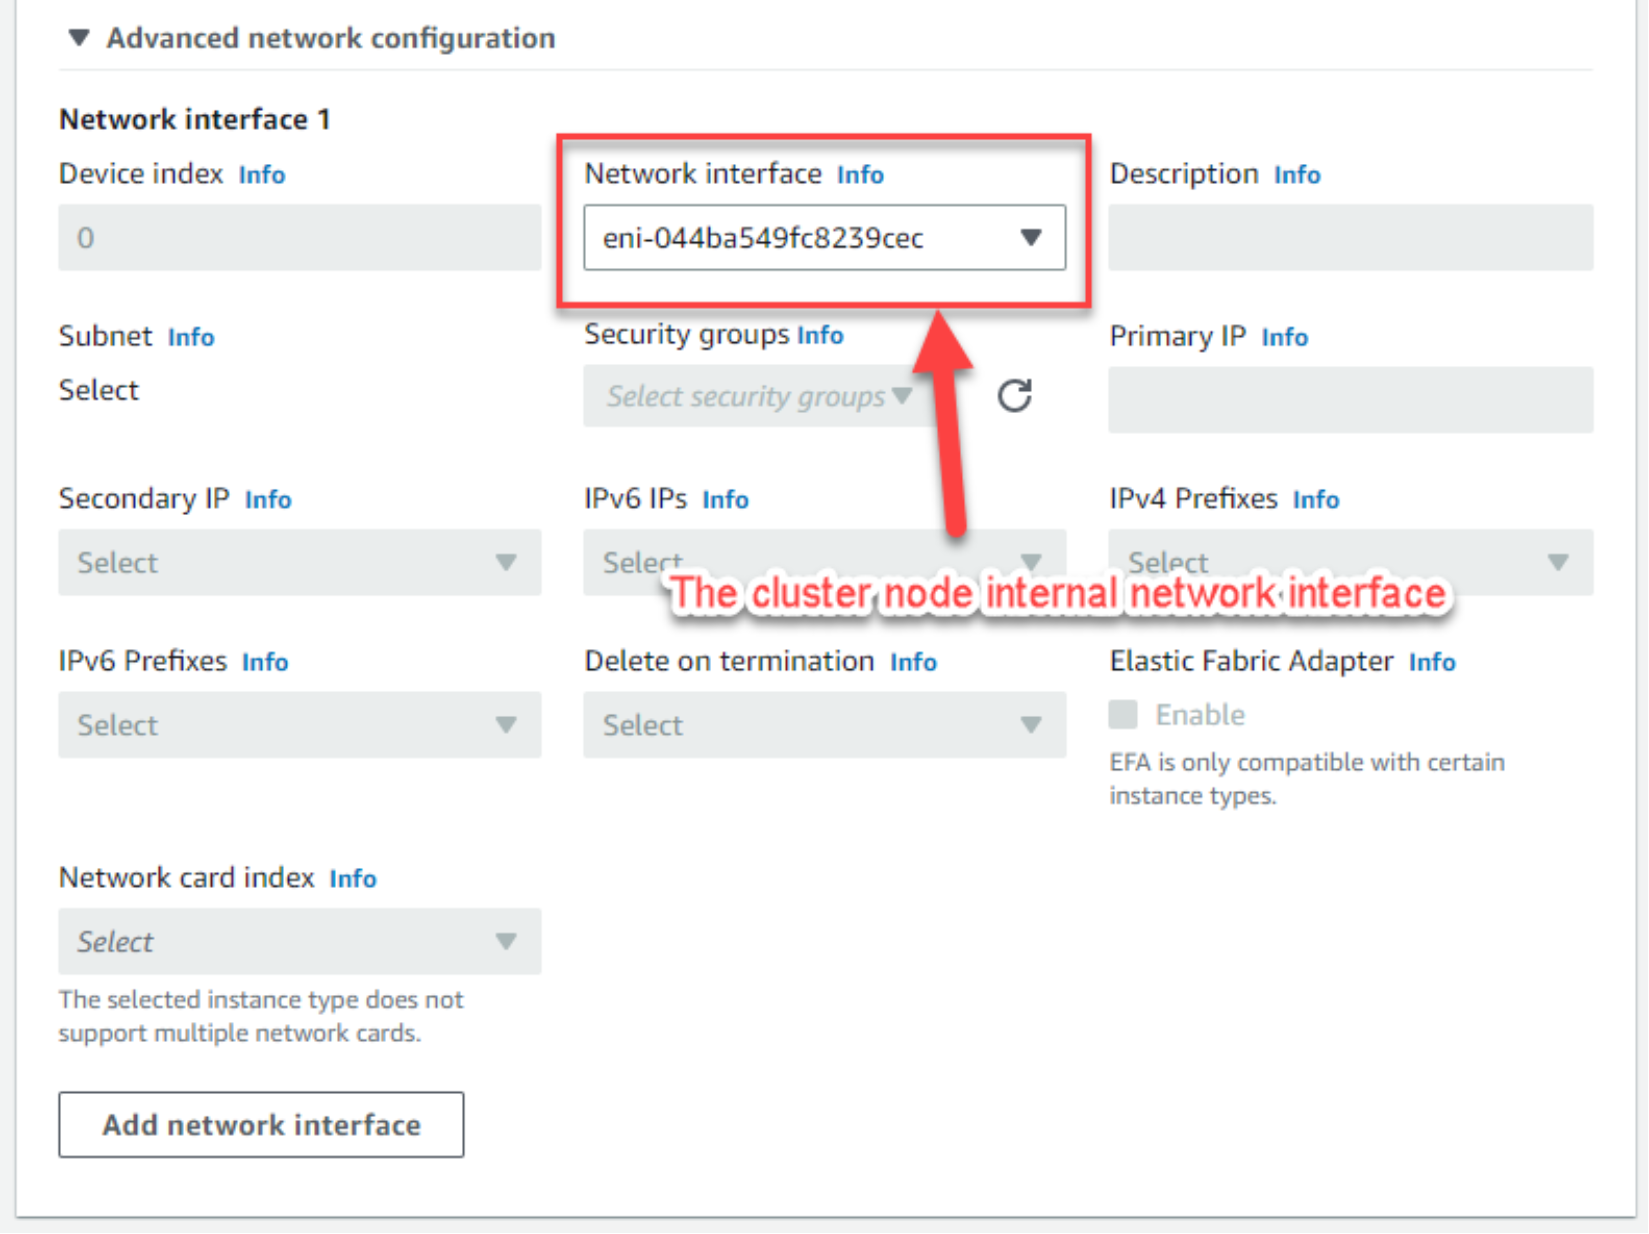
Figure 22. Add internal network interface
- Choose the cluster node external network interface which is created in section Create cluster external network interfaces. The Figure 23 is an example for the cluster first node external network interface.
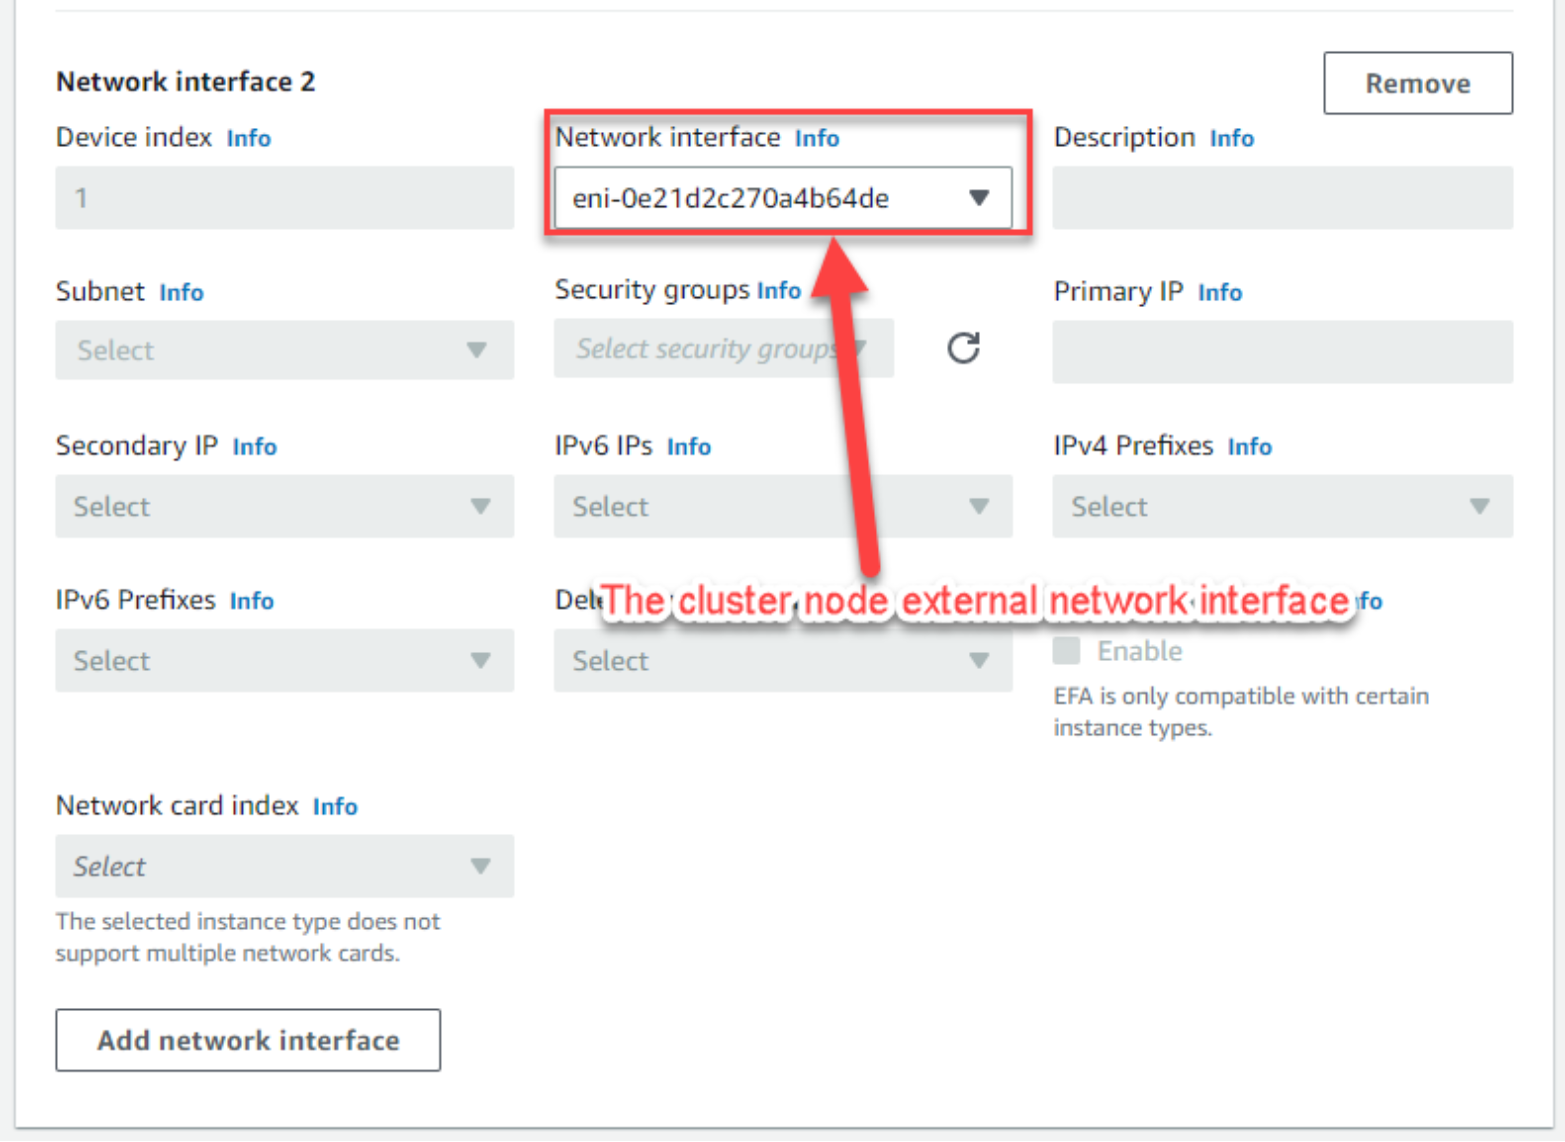
Figure 23. Add external network interface
- For Configure storage, choose Advanced. Keep the default first 48GB gp3 OS volume and do not make any changes. The volume is used by the OneFS operating system. Then choose Add new volume to add data volumes for the cluster. See Figure 24 for an example.
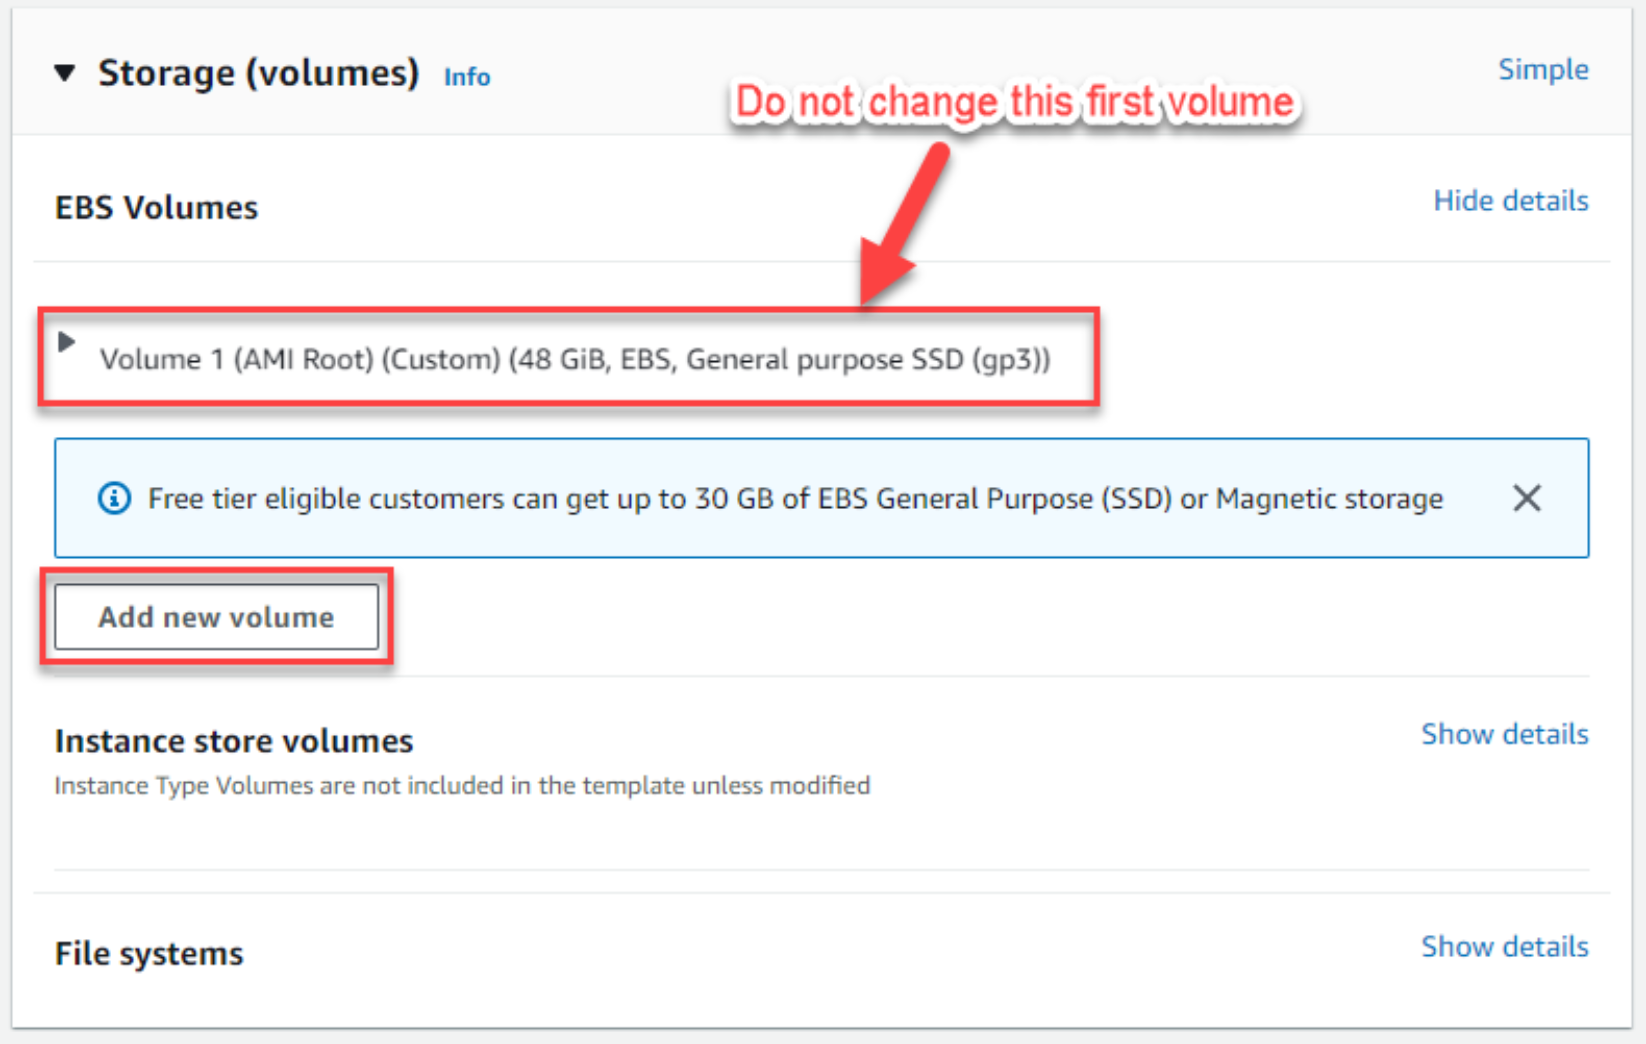
Figure 24. Advanced storage configuration
For the volume 2, which is the first data volume of the cluster node, specify a custom Device name: xvda, and then choose your planned volume size, volume type. Then choose Yes for the Delete on termination field. This option can help you to delete the volume automatically when you terminate your cluster node in the future. Otherwise, choose No if you want to keep the volume, even after you have terminated the cluster node. Figure 25 is an example.
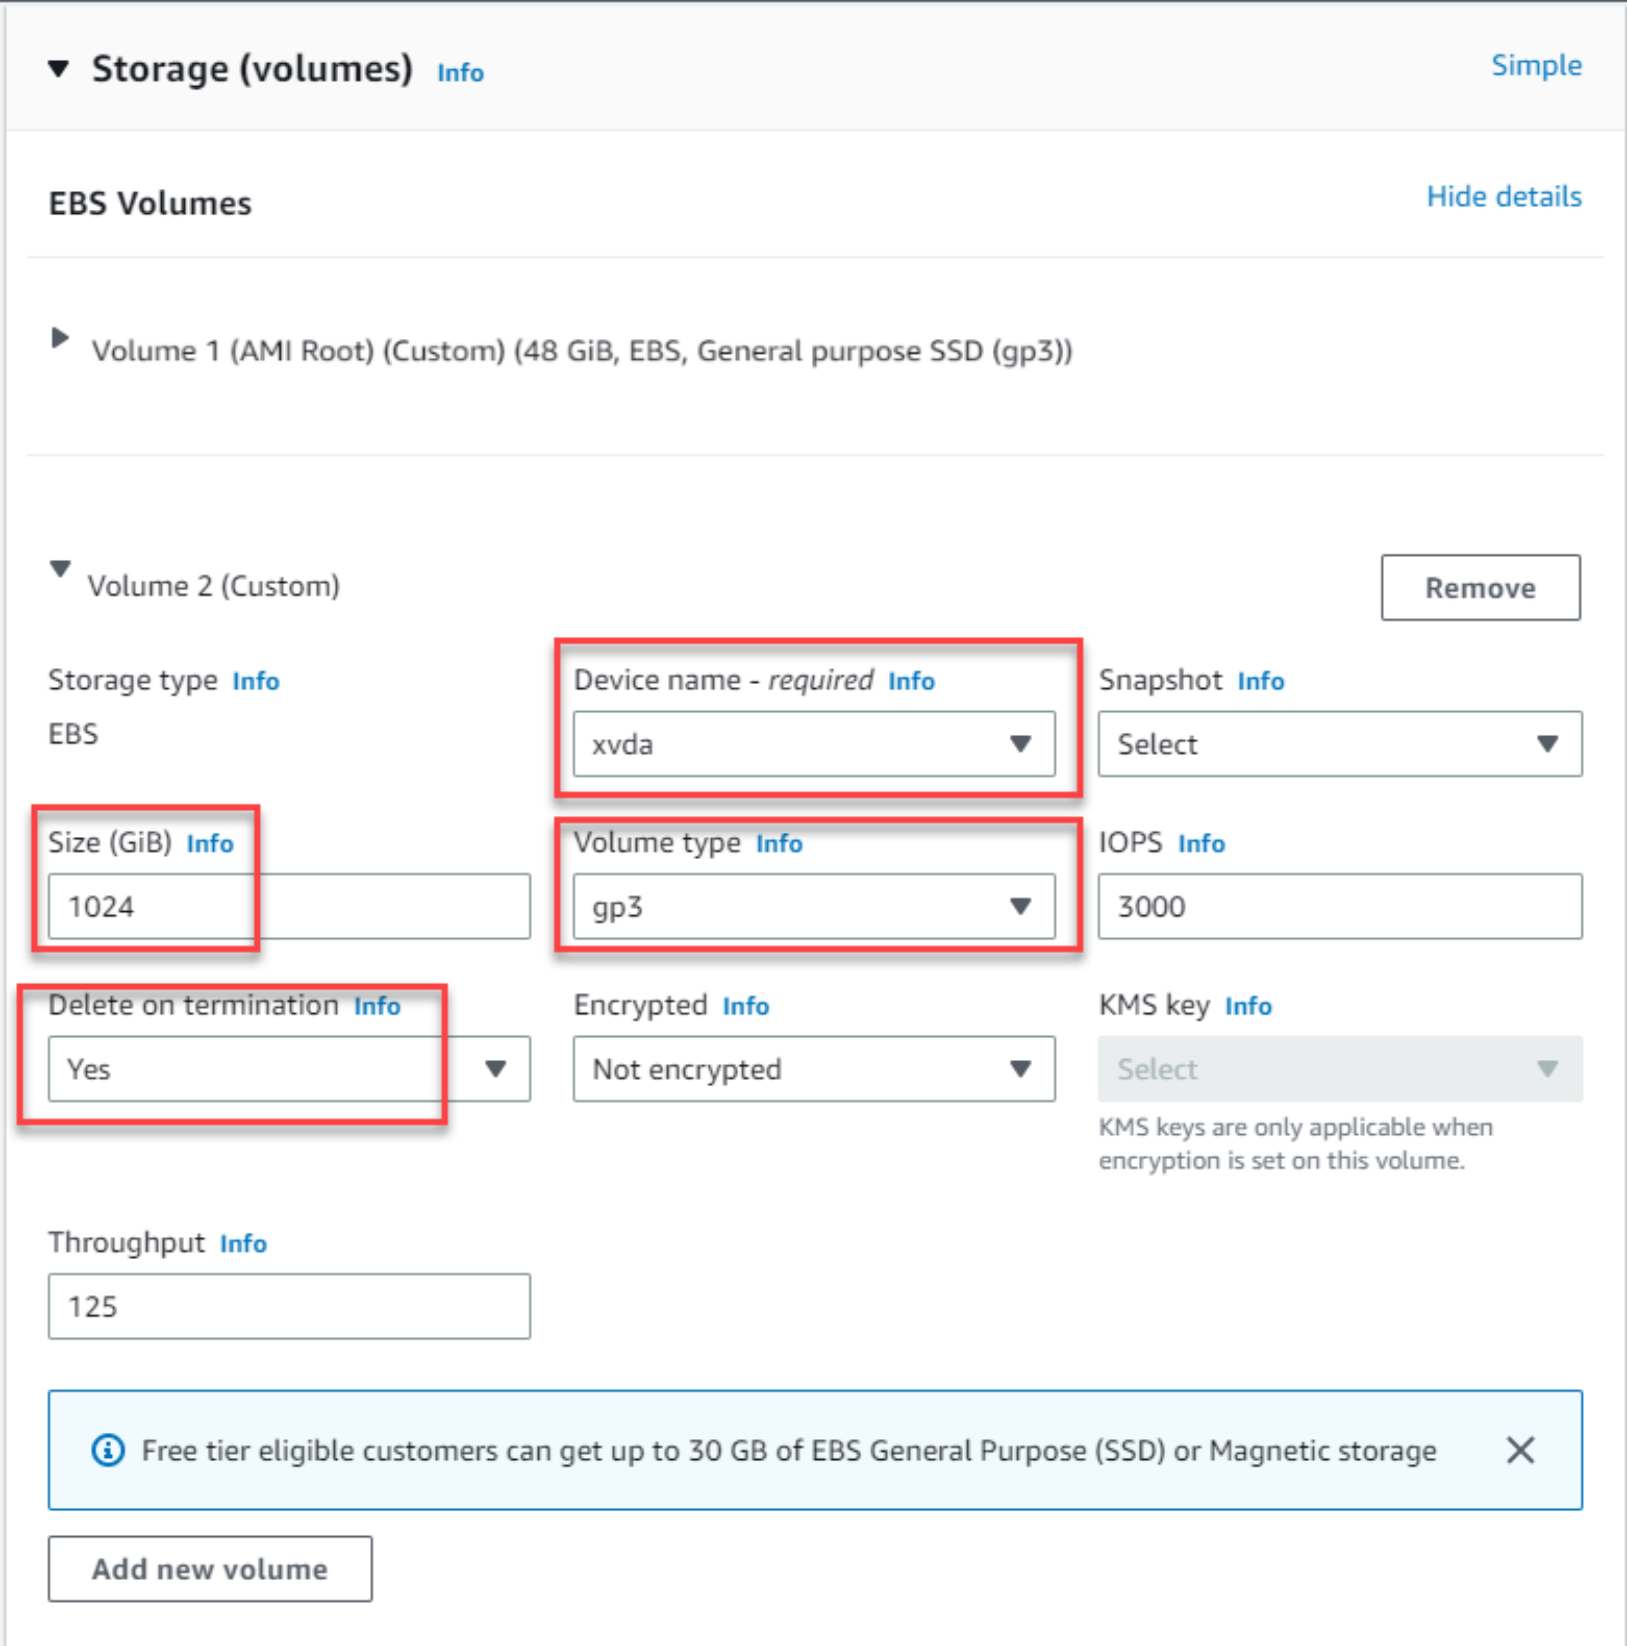
Figure 25. Add first data volume
- Choose Add new volume to add more volumes with the custom Device name: xvdb, xvdc, xvdd, xvde, xvdf, and so on. Ensure that all volumes use the same configuration for all cluster nodes. Figure 26 is an example to add a second data volume.
Note: while adding volumes with the device names of xvdb, xvdc, and so on, you might see a warning: “The selected AMI does not support this device name.” This is expected behavior, and you can ignore it.

Figure 26. Add second data volume
- The Figure 27 is a volume example of the cluster first node.
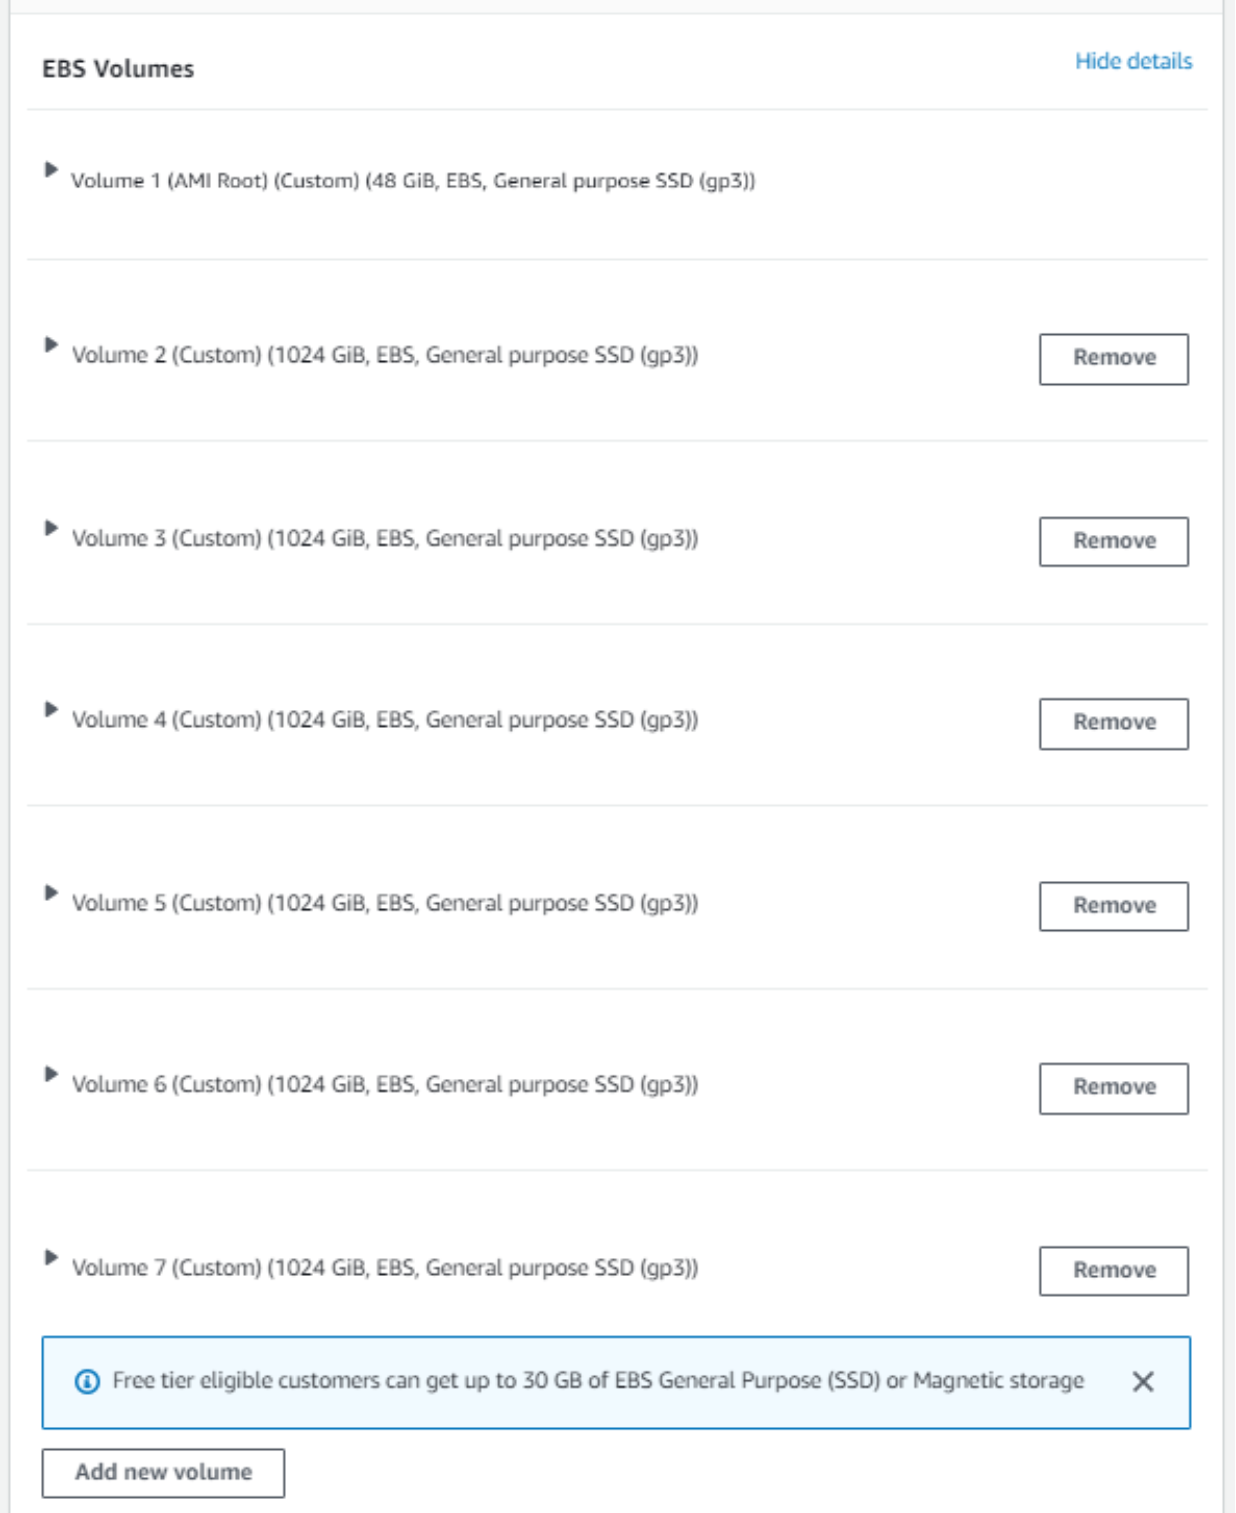
Figure 27. Data volumes of first node
- Scroll down to Advance Details, choose the instance profile created in the section Create IAM policy, role, and instance profile for the IAM instance profile field and select placement group created in section Create a placement group for the Placement group field. Figure 28 and Figure 29 are examples.

Figure 28. Add instance profile

Figure 29. Add placement group
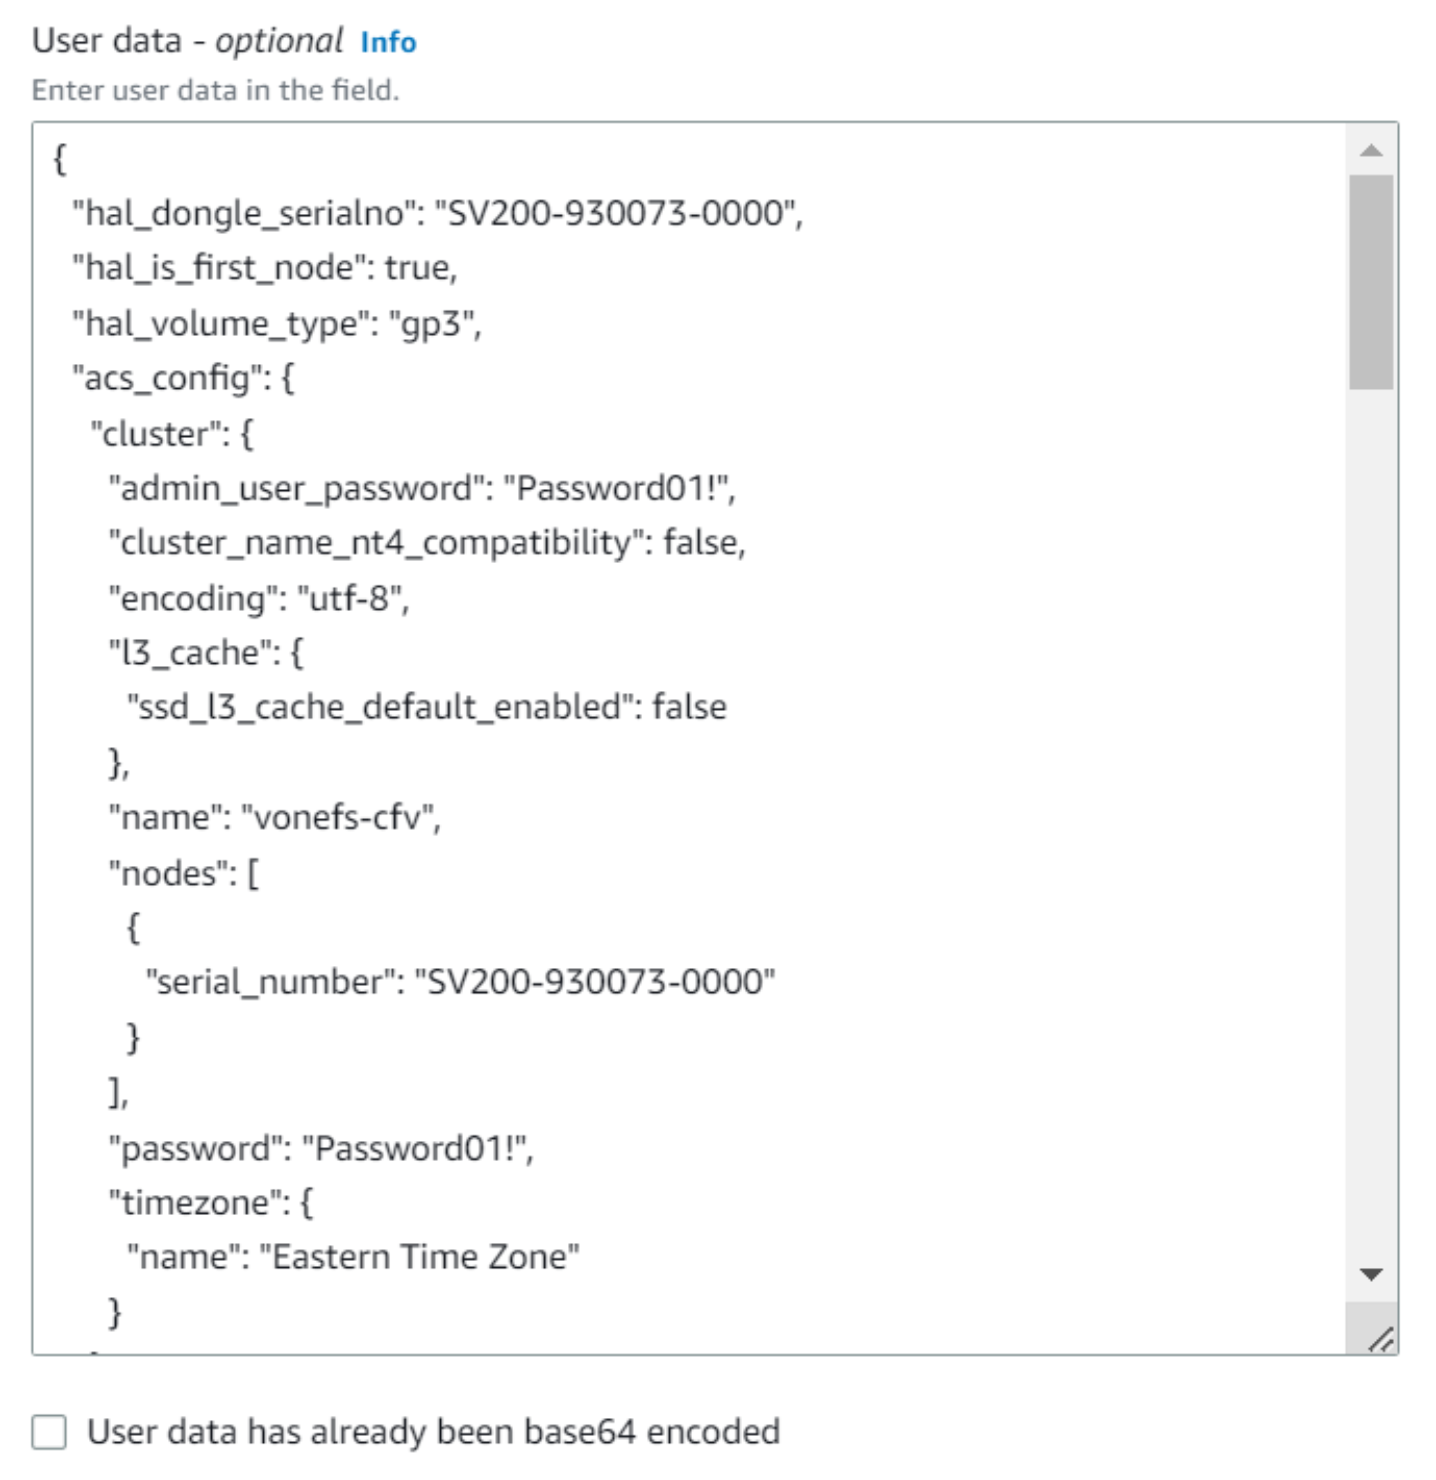
- Scroll down to the end of Advance Details. For the User data field, copy and paste the user data of each node prepared in sections Prepare the EC2 instance user data for the first node and Prepare the EC2 instance user data for additional nodes. Figure 30 is an example of cluster first node.
Figure 30. User data for the cluster first node
- Click Launch instance to proceed.
- Repeat the previous steps (Step 1 through Step18) to launch the remainder of the cluster nodes.
Note: After instances creation, please enable EC2 termination protection and stop protection to protect your instances from unexpected deletion and stopping. Refer to AWS documentation for the details: Enable Termination Protection and Enable Stop Protection.