Assets

Managing your on-premises infrastructure with HashiCorp - Part 4
Wed, 18 Sep 2024 17:09:05 -0000
|Read Time: 0 minutes
This is the fourth blog post in a series with the goal to introduce infrastructure admins and engineers to Terraform. In the series, we are explaining how to use it to manage on-prem physical infrastructure in a data center. It is highly recommended that you quickly review the previous post before proceeding with this one.
- Terraform on-premises infrastructure
- Terraform Dell PowerStore
- Terraform resource dependencies
- Terraform variables
- Terraform Dell PowerMax
In this post, we are going to discuss variables. These make our terraform plans more dynamic and flexible. Until now, we have always been creating the same 8GB volume over and over. If we wanted to create a different size volume, we would have to either modify the file or create a new file that reflects the required size. Variables allow us to make our code more reusable and flexible.
Terraform offers local and input variables. The difference between the two types is important when you have complex plans with multiple “modules”. You can read more about the different types of variables in the Terraform official documentation. In this post we are focusing mainly on input variables.
Single variable and var flag
Variables can be of simple types like string, numbers of boolean, but there are also more complex types like lists, sets, and more. The type is defined by the “type” parameter. Additionally, we have been using the parameter “default” which defines the default value of the variable. This block can go inside the “main.tf” or in the “variables.tf” alongside the connection variables required for the PowerStore provider.
variable "vol_size" {
description = "Size of volume to create"
type = number
default = 8
}
Now, in the resource block we can refer to the variable using the “var.” notation as follows.
resource "powerstore_volume" "testvol" {
name = "alb-tf-testvol"
size = var.vol_size
capacity_unit = "GB"
}
Once the variable is defined in this way, we can override the “default” value at runtime. One way of doing this would be with the “-var” flag.
terraform plan -var "vol_size=16"
As you can see in the output, the volume will be 16GB because the 16 we are specifying in the CLI, overrides the default value of 8 defined in the resource block.
root@alb-terraform:~/powerstore# terraform plan -var "vol_size=16"
Terraform used the selected providers to generate the following execution plan. Resource actions are indicated with the following symbols:
+ create
Terraform will perform the following actions:
# powerstore_volume.testvol will be created
+ resource "powerstore_volume" "testvol" {
+ app_type = (known after apply)
+ app_type_other = (known after apply)
+ appliance_id = (known after apply)
+ capacity_unit = "GB"
+ creation_timestamp = (known after apply)
+ description = (known after apply)
+ host_group_id = (known after apply)
+ host_id = (known after apply)
+ id = (known after apply)
+ is_replication_destination = (known after apply)
+ logical_unit_number = (known after apply)
+ logical_used = (known after apply)
+ name = "alb-tf-testvol"
+ nguid = (known after apply)
+ node_affinity = (known after apply)
+ nsid = (known after apply)
+ performance_policy_id = "default_medium"
+ protection_policy_id = (known after apply)
+ sector_size = 512
+ size = 16
+ state = (known after apply)
+ type = (known after apply)
+ volume_group_id = (known after apply)
+ wwn = (known after apply)
}
Plan: 1 to add, 0 to change, 0 to destroy.
Tfvars file
In more complex scenarios, we might have many variables like volume name and so on. In that case, we would need to have a separate the “-var” flag for each variable.
terraform plan -var "vol_size=16" -var "vol_name=vol1"
If you have many variables, this method can be tedious. The alternative is to use a “tfvars” file. This is a file that contains multiple variables. For example, we could create “values.tfvars” like in the following:
vol_size = 16
vol_name = "vol1"
In order to use this, let’s define the new variable and change the resource block.
variable "vol_size" {
description = "Size of volume to create"
type = number
default = 8
}
variable "vol_name" {
description = "Name of volume to create"
type = string
default = "testvol1"
}
resource "powerstore_volume" "testvol" {
name = var.vol_name
size = var.vol_size
capacity_unit = "GB"
}
Then, we can invoke it at runtime with the “-var-file” flag.
root@alb-terraform:~/powerstore# terraform plan -var-file values.tfvars
Terraform used the selected providers to generate the following execution plan. Resource actions are indicated with the following symbols:
+ create
Terraform will perform the following actions:
# powerstore_volume.testvol will be created
+ resource "powerstore_volume" "testvol" {
+ app_type = (known after apply)
+ app_type_other = (known after apply)
+ appliance_id = (known after apply)
+ capacity_unit = "GB"
+ creation_timestamp = (known after apply)
+ description = (known after apply)
+ host_group_id = (known after apply)
+ host_id = (known after apply)
+ id = (known after apply)
+ is_replication_destination = (known after apply)
+ logical_unit_number = (known after apply)
+ logical_used = (known after apply)
+ name = "vol1"
+ nguid = (known after apply)
+ node_affinity = (known after apply)
+ nsid = (known after apply)
+ performance_policy_id = "default_medium"
+ protection_policy_id = (known after apply)
+ sector_size = 512
+ size = 16
+ state = (known after apply)
+ type = (known after apply)
+ volume_group_id = (known after apply)
+ wwn = (known after apply)
}
Plan: 1 to add, 0 to change, 0 to destroy.
Notice how both the values of size and the name in the “values.tfvars” file have overridden the respective default values.
It is important to note that parameters specified with the “-var” flag take precedence. So, in the same variable is defined also in a “tfvars” file then the value defined using “-var” is the one that counts.
Environment variables
Variables can also get their value from the “environment”. Environment variables must follow a strict naming convention. Terraform expects environment variable names to start with the prefix “TF_VAR_”. Otherwise, they won’t be recognized. So, for example, if we want to define the variable “vol_size”, we should create an environment variable named “TF_VAR_vol_size”.
In terms of precedence, environment variables are at the very end, behind “var”, “tfvars”, and even “default”. So, only If the values are not provided in the.tfvars file, or as defaults, or as CLI arguments, it falls back on TF_VAR_ environment variables.
In my plan, I have now commented out the default values for both variables. Let’s define the environment variables and run it again.
root@alb-terraform:~/powerstore# export TF_VAR_vol_size=20
root@alb-terraform:~/powerstore# export TF_VAR_vol_name=envvol
root@alb-terraform:~/powerstore# terraform plan
Terraform used the selected providers to generate the following execution plan. Resource actions are indicated with the following symbols:
+ create
Terraform will perform the following actions:
# powerstore_volume.testvol will be created
+ resource "powerstore_volume" "testvol" {
+ app_type = (known after apply)
+ app_type_other = (known after apply)
+ appliance_id = (known after apply)
+ capacity_unit = "GB"
+ creation_timestamp = (known after apply)
+ description = (known after apply)
+ host_group_id = (known after apply)
+ host_id = (known after apply)
+ id = (known after apply)
+ is_replication_destination = (known after apply)
+ logical_unit_number = (known after apply)
+ logical_used = (known after apply)
+ name = "envvol"
+ nguid = (known after apply)
+ node_affinity = (known after apply)
+ nsid = (known after apply)
+ performance_policy_id = "default_medium"
+ protection_policy_id = (known after apply)
+ sector_size = 512
+ size = 20
+ state = (known after apply)
+ type = (known after apply)
+ volume_group_id = (known after apply)
+ wwn = (known after apply)
}
Plan: 1 to add, 0 to change, 0 to destroy.
Environment variables are potentially the safest way to pass credentials to Terraform, like those used by the PowerStore provider. But remember, to do so you must define the variable in your code but not have any default value for it.
Finally, if we don’t provide the values in any of the ways discussed above, Terraform will ask for the values interactively when we run plan and apply. Let’s remove the two environment variables and see what happens.
root@alb-terraform:~/powerstore# unset TF_VAR_vol_size
root@alb-terraform:~/powerstore# unset TF_VAR_vol_name
root@alb-terraform:~/powerstore# terraform plan
var.vol_name
Name of volume to create
Enter a value: newname
var.vol_size
Size of volume to create
Enter a value: 15
Terraform used the selected providers to generate the following execution plan. Resource actions are indicated with the following symbols:
+ create
Terraform will perform the following actions:
# powerstore_volume.testvol will be created
+ resource "powerstore_volume" "testvol" {
+ app_type = (known after apply)
+ app_type_other = (known after apply)
+ appliance_id = (known after apply)
+ capacity_unit = "GB"
+ creation_timestamp = (known after apply)
+ description = (known after apply)
+ host_group_id = (known after apply)
+ host_id = (known after apply)
+ id = (known after apply)
+ is_replication_destination = (known after apply)
+ logical_unit_number = (known after apply)
+ logical_used = (known after apply)
+ name = "newname"
+ nguid = (known after apply)
+ node_affinity = (known after apply)
+ nsid = (known after apply)
+ performance_policy_id = "default_medium"
+ protection_policy_id = (known after apply)
+ sector_size = 512
+ size = 15
+ state = (known after apply)
+ type = (known after apply)
+ volume_group_id = (known after apply)
+ wwn = (known after apply)
}
Plan: 1 to add, 0 to change, 0 to destroy.
As expected, it asks us to enter the value for both variables.
Resources
- Part 1: Managing your on-premises infrastructure with HashiCorp Terraform | Dell Technologies Info Hub – Part 1
- Part 2: Managing your on-premises infrastructure with HashiCorp Terraform | Dell Technologies Info Hub – Part 2
- Part 3: Managing your on-premises infrastructure with HashiCorp Terraform | Dell Technologies Info Hub – Part 3
Author: Alberto Ramos, Principal Systems Engineer

Managing your on-premises infrastructure with HashiCorp - Part 3
Wed, 18 Sep 2024 16:40:15 -0000
|Read Time: 0 minutes
This is the third blog post in a series in which we are introducing Terraform to infrastructure admins and engineers. We go into depth to explain how to use Terraform to manage on-prem physical infrastructure in a datacenter. It is highly recommended that you quickly review the previous posts before proceeding with this one.
- Terraform on-premises infrastructure
- Terraform Dell PowerStore
- Terraform resource dependencies
- Terraform variables
- Terraform Dell PowerMax
Provisioning storage in any storage platform typically requires creating different resources such as hosts, volumes, and more. The actual resources and their name vary between platforms. Sooner or later, you will face with the problem having dependencies between these resources. For example, before mapping a volume to a host, the host must exist. Terraform might try to do the creation of both resources and the mapping in parallel but it might take the storage array a second to complete the creation of the resources. In that case your “terraform apply” will fail.
For this example, we are going to add a new resource to the Terraform. We will add the “host” resource. You can see what attributes the Terraform provider for PowerStore supports by looking at the documentation page. This is in the “docs” folder in GitHub. This screenshot shows part of the schema of the “volume” resource.

As you can see, in PowerStore you can map a volume to “host” or a “host group”. In both cases, you can use the “id” or the “name” to refer to the target.
This is the portion of a new plan to create both resources. Notice the “host_name” attribute in the “powerstore_volume” resource block. It is specifying that the volume must be mapped to the host specified in the first block.
resource "powerstore_host" "test" {
name = "alb-host"
os_type = "Linux"
description = "Creating host"
host_connectivity = "Local_Only"
initiators = [{ port_name = "12:34:56:78:ab:cd:ef:10"},{ port_name = "12:34:56:78:ab:cd:ef:11"}]
}
resource "powerstore_volume" "volume" {
name = "alb-test-vol"
size = 8
capacity_unit = "GB"
host_name = "alb-host"
}
Let’s see what happens when we apply this plan.
Plan: 2 to add, 0 to change, 0 to destroy.
powerstore_host.test: Creating...
powerstore_volume.volume: Creating...
powerstore_host.test: Creation complete after 1s [id=446594c0-8411-4bdc-9b7f]
╷
│ Error: Error creating volume
│
│ with powerstore_volume.volume,
│ on main.tf line 26, in resource "powerstore_volume" "volume":
│ 26: resource "powerstore_volume" "volume" {
│
│ Could not create volume, Invalid host name
Terraform starts the creation of both resources right away, but the volume creation fails because the host creation hadn’t yet been completed. Because of the declarative and idempotent nature of Terraform, if you run it again, the host resource will be there, and it will complete successfully. Notice how the plan realized that only the volume resource had to be added.
Plan: 1 to add, 0 to change, 0 to destroy.
powerstore_volume.volume: Creating...
powerstore_volume.volume: Creation complete after 2s [id=ea134c40-df5f-470c-bdd2]
Apply complete! Resources: 1 added, 0 changed, 0 destroyed.
The problem shows up also when destroying resources because dependencies also matter in that case. You cannot delete the host if the un-mapping is not complete.
Plan: 0 to add, 0 to change, 2 to destroy.
powerstore_volume.volume: Destroying... [id=ea134c40-df5f-470c-bdd2-ffd22ae15aa0]
powerstore_host.test: Destroying... [id=446594c0-8411-4bdc-9b7f-9d2434eef32c]
powerstore_volume.volume: Destruction complete after 1s
╷
│ Error: Error deleting host
│
│ Could not delete hostID 446594c0-8411-4bdc-9b7f-9d2434eef32c: Host alb-host is attached to one or more volumes. Please detach it before deleting.
Again, if we retry it will realize the mapping and volume are gone and it will execute a plan to destroy only the host resource. However, clearly, we don’t want to be relying on retries.
Plan: 0 to add, 0 to change, 1 to destroy.
powerstore_host.test: Destroying... [id=446594c0-8411-4bdc-9b7f-9d2434eef32c]
powerstore_host.test: Destruction complete after 0s
Destroy complete! Resources: 1 destroyed.
Declaring dependencies
Terraform offers two ways of declaring dependencies: implicit and explicit.
Implicit dependencies
This is the preferred method of declaring dependencies according to Terraform. Implicit dependencies are done by including in a resource block, a reference to another resource, or typically, one of its attributes. Notice how the “host_name” attribute in the “volume” resource block is referring to the name of the “host” created in the first block. It refers to it using the “internal name” of the “powerstore_host” resource, which is “test”. The reference is constructed using a dot notation: resource_type . internal_resource_name . attribute. From this reference, Terraform can realize that the volume depends on the host and, therefore it must wait until the host creation is complete, hence the name “implicit”.
resource "powerstore_host" "test" {
name = "alb-host"
os_type = "Linux"
description = "Creating host"
host_connectivity = "Local_Only"
initiators = [{port_name = "12:34:56:78:ab:cd:ef:10"},{ port_name = "12:34:56:78:ab:cd:ef:11"}]
}
resource "powerstore_volume" "volume" {
name = "alb-test-vol"
size = 8
capacity_unit = "GB"
host_name = powerstore_host.test.name
}
Let’s run it and see what happens.
Plan: 2 to add, 0 to change, 0 to destroy.
powerstore_host.test: Creating...
powerstore_host.test: Creation complete after 1s [id=0ffc844e-d6b1-459f-be17]
powerstore_volume.volume: Creating...
powerstore_volume.volume: Creation complete after 1s [id=5c8ffb25-eeb6-4e1b-a62a]
Apply complete! Resources: 2 added, 0 changed, 0 destroyed.
In the output you can see the sequence of events. Notice how the volume creation is not started until the host creation is complete. With this technique, it successfully completes every time. The same happens with the “Destroy” operation. It takes the steps in reverse, and it doesn’t start the host deletion until the volume has been destroyed.
Explicit
An explicit dependency is when you explicitly call out a dependency between two resources by using the “depends_on” attribute. In the code below, notice the last line where it states that the volume depends on the host creation. As with the earlier examples, you must specify the resource using the internal resource name, which is “test” in this case. Also, it is important to note that the dependency is enclosed in square brackets “[]”. This tells us that this attribute is a list and therefore allows you to put multiple dependencies separated by commas.
resource "powerstore_host" "test" {
name = "alb-host"
os_type = "Linux"
description = "Creating host"
host_connectivity = "Local_Only"
initiators = [{ port_name = "12:34:56:78:ab:cd:ef:10"},{ port_name = "12:34:56:78:ab:cd:ef:11"}]
}
resource "powerstore_volume" "volume" {
name = "alb-test-vol"
size = 8
capacity_unit = "GB"
host_name = "alb-host"
depends_on = [powerstore_host.test]
}
Let’s run it and see what happens.
Plan: 2 to add, 0 to change, 0 to destroy.
powerstore_host.test: Creating...
powerstore_host.test: Creation complete after 2s [id=afd95a69-0cb3-4875-99c5]
powerstore_volume.volume: Creating...
powerstore_volume.volume: Creation complete after 1s [id=0fa06428-3008-4b1d-9b9e]
Apply complete! Resources: 2 added, 0 changed, 0 destroyed.
As you can see it behaves exactly as it did with the “implicit” dependency and waits until the host is created before the volume creation starts. So, this is another valid way of doing it, but remember that “implicit” declaration is Terraform’s preferred method.
Terraform Graph
In addition to init, plan, apply and destroy, the terraform tool supports other modes of operation. A handy one is “terraform graph” which allows us to visualize the dependencies. The following shows output when we run it for our existing terraform configuration file. It looks a bit complex at first sight, but you can quickly see that it is defining two nodes in a graph, with their respective labels and then it tells us that the volume depends on the host based on the direction of the arrow.
root@alb-terraform:~/powerstore# terraform graph
digraph G {
rankdir = "RL";
node [shape = rect, fontname = "sans-serif"];
"powerstore_host.test" [label="powerstore_host.test"];
"powerstore_volume.volume" [label="powerstore_volume.volume"];
"powerstore_volume.volume" -> "powerstore_host.test";
}
That output by itself can be very hard to read when you have a configuration file with many resources. However, there are tools that allow you to create an actual image of the graph. One such tool is the “dot” command line utility from Graphviz. This is how you install it and how you run it to create a graphical representation of your resources and their dependencies.
apt install graphviz
terraform graph | dot -Tpng >graph.png
This is what the “graph.png” image looks like. It shows both resources and how the volume depends on the host.

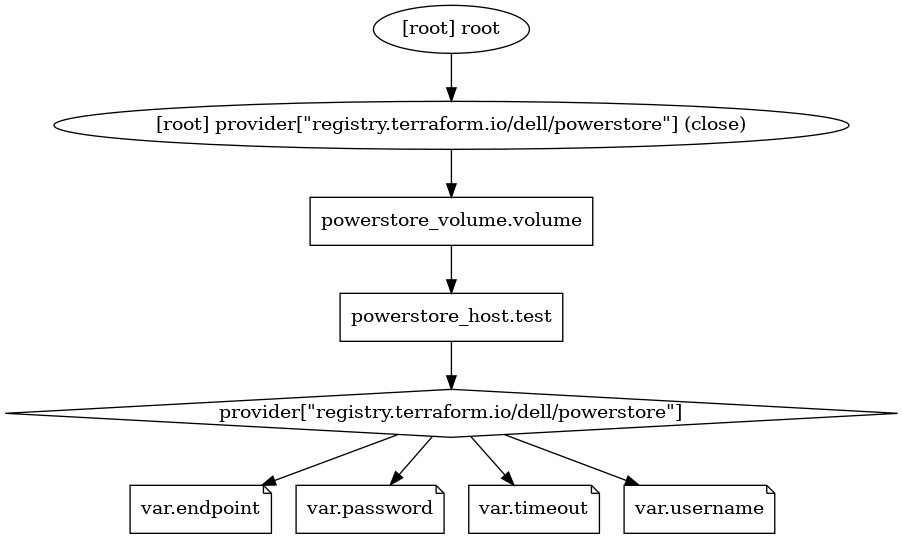
Terraform graphs can also be used to graph the entire plan, which includes other information such as the provider and variables.
root@alb-terraform:~/powerstore# terraform graph -type=plan
digraph {
compound = "true"
newrank = "true"
subgraph "root" {
"[root] powerstore_host.test (expand)" [label = "powerstore_host.test", shape = "box"]
"[root] powerstore_volume.volume (expand)" [label = "powerstore_volume.volume", shape = "box"]
"[root] provider[\"registry.terraform.io/dell/powerstore\"]" [label = "provider[\"registry.terraform.io/dell/powerstore\"]", shape = "diamond"]
"[root] var.endpoint" [label = "var.endpoint", shape = "note"]
"[root] var.password" [label = "var.password", shape = "note"]
"[root] var.timeout" [label = "var.timeout", shape = "note"]
"[root] var.username" [label = "var.username", shape = "note"]
"[root] powerstore_host.test (expand)" -> "[root] provider[\"registry.terraform.io/dell/powerstore\"]"
"[root] powerstore_volume.volume (expand)" -> "[root] powerstore_host.test (expand)"
"[root] provider[\"registry.terraform.io/dell/powerstore\"] (close)" -> "[root] powerstore_volume.volume (expand)"
"[root] provider[\"registry.terraform.io/dell/powerstore\"]" -> "[root] var.endpoint"
"[root] provider[\"registry.terraform.io/dell/powerstore\"]" -> "[root] var.password"
"[root] provider[\"registry.terraform.io/dell/powerstore\"]" -> "[root] var.timeout"
"[root] provider[\"registry.terraform.io/dell/powerstore\"]" -> "[root] var.username"
"[root] root" -> "[root] provider[\"registry.terraform.io/dell/powerstore\"] (close)"
}
}
root@alb-terraform:~/powerstore# terraform graph -type=plan | dot -Tpng >graph2.png
In the last command, we passed the output through the “dot” tool and created a new image called “graph2.png”. This is what it looks like.
Hopefully this post helps you understand Terraform dependencies.
What we have done so far is great, but we keep creating and changing the same volume because it is hard-coded in our HCL configuration file. It would be better to treat parameters like name and size as variables so that we can make our code more flexible. Let’s explore that in the next post.
Resources
- Part 1: Managing your on-premises infrastructure with HashiCorp Terraform | Dell Technologies Info Hub
- Part 2: Managing your on-premises infrastructure with HashiCorp Terraform | Dell Technologies Info Hub
Author: Alberto Ramos, Principal Systems Engineer

Managing your on-premises infrastructure with HashiCorp Terraform - Part 2
Wed, 18 Sep 2024 13:49:37 -0000
|Read Time: 0 minutes
Most of the Terraform content out there targets developers and public cloud. In contrast, this blog focuses on Terraform as an automation tool for system and storage admins and infrastructure engineers operating physical hardware.
- Terraform on-premises infrastructure
- Terraform Dell PowerStore
- Terraform resource dependencies
- Terraform variables
- Terraform Dell PowerMax
This post is the second in a series. In the previous blog post, we provided an introduction to Terraform.
In this blog post, we will focus on Dell PowerStore volumes. We will showcase some examples of popular hardware one can find in a data center. This blog will also highlight the “Declarative” nature of Terraform. Let us get to it!
To follow along with the examples, you can get the Terraform for PowerStore in Dell GitHub page or in Terraform registry. The repository also contains documentation and a folder with examples.
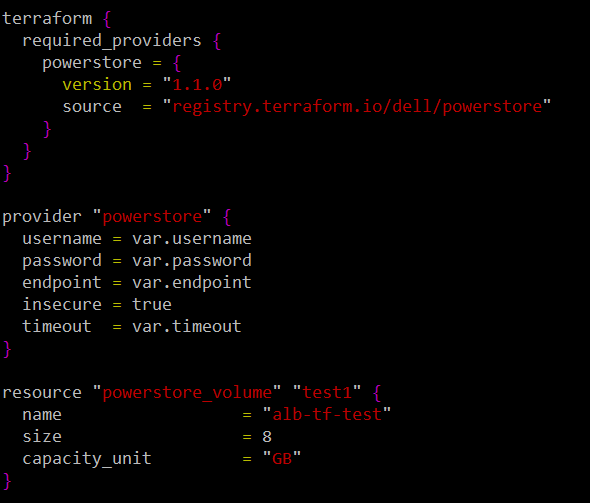
Let us continue with a simple terraform configuration to create a volume. The “variables.tf” we showed in the previous post remains the same. The following is our “main.tf”. It will create an 8GB volume called “alb-tf-test”.
terraform {
  required_providers {
    powerstore = {
      version = "1.1.0"
      source  = "registry.terraform.io/dell/powerstore"
    }
  }
}

provider "powerstore" {
  username = var.username
  password = var.password
  endpoint = var.endpoint
  insecure = true
  timeout  = var.timeout
}

resource "powerstore_volume" "test1" {
  name                  = "alb-tf-test"
  size                  = 8
  capacity_unit         = "GB"
}
After running “terraform init” and “terraform plan” it is the turn of “terraform apply”.
root@alb-terraform:~/powerstore# terraform apply

Terraform used the selected providers to generate the following execution plan. Resource actions are indicated with the following symbols:
  + create

Terraform will perform the following actions:

  # powerstore_volume.test1 will be created
  + resource "powerstore_volume" "test1" {
      + app_type                   = (known after apply)
      + app_type_other             = (known after apply)
      + appliance_id               = (known after apply)
      + capacity_unit              = "GB"
      + creation_timestamp         = (known after apply)
      + description                = (known after apply)
      + host_group_id              = (known after apply)
      + host_id                    = (known after apply)
      + id                         = (known after apply)
      + is_replication_destination = (known after apply)
      + logical_unit_number        = (known after apply)
      + logical_used               = (known after apply)
      + name                       = "alb-tf-test"
      + nguid                      = (known after apply)
      + node_affinity              = (known after apply)
      + nsid                       = (known after apply)
      + performance_policy_id      = "default_medium"
      + protection_policy_id       = (known after apply)
      + sector_size                = 512
      + size                       = 8
      + state                      = (known after apply)
      + type                       = (known after apply)
      + volume_group_id            = (known after apply)
      + wwn                        = (known after apply)
    }
Plan: 1 to add, 0 to change, 0 to destroy.

Do you want to perform these actions?
  Terraform will perform the actions described above.
  Only 'yes' will be accepted to approve.

  Enter a value: yes

powerstore_volume.test1: Creating...
powerstore_volume.test1: Creation complete after 1s [id=da01758b-c009-44c6-9999-11b1b821af61]

Apply complete! Resources: 1 added, 0 changed, 0 destroyed.
Firstly, it shows changes is about to do and asks for confirmation. Then I pressed yes and in less than a second the volume was created as you can see in this screenshot.

Terraform is a modern infrastructure-as-code tool that uses a declarative syntax. This means that as a user you specify the “end-state” as opposed to the procedure to arrive to that end-state. In other words, you say WHAT you want instead of HOW to get it.
An analogy of this is going to a restaurant and ordering Bolognese pasta instead of giving the waiter a written recipe on how to cook it. As you can imagine the former is much easier and more convenient.
What happens now if we apply the same configuration again. Terraform will check the current state of the PowerStore and it will see if it is different from the desired end-state. Given that the volume exists already it should not do anything. Let us see.
root@alb-terraform:~/powerstore# terraform apply
powerstore_volume.test1: Refreshing state... [id=da01758b-c009-44c6-9999-11b1b821af61]

No changes. Your infrastructure matches the configuration.

Terraform has compared your real infrastructure against your configuration and found no differences, so no changes are needed.

Apply complete! Resources: 0 added, 0 changed, 0 destroyed.
Notice how it did not even ask for confirmation because it found no differences.
So, what happens now if we decide to expand that volume. Let us say we want to make it 16 GB. This is what the “powerstore_volume” resource looks like. The rest of our “main.tf” remains the same.
resource "powerstore_volume" "test1" {
  name                  = "alb-tf-test"
  size                  = 16
  capacity_unit         = "GB"
}
Let us run it and see what happens.
root@alb-terraform:~/powerstore# terraform apply
powerstore_volume.test1: Refreshing state... [id=da01758b-c009-44c6-9999-11b1b821af61]

Terraform used the selected providers to generate the following execution plan. Resource actions are indicated with the following symbols:
  ~ update in-place

Terraform will perform the following actions:

  # powerstore_volume.test1 will be updated in-place
  ~ resource "powerstore_volume" "test1" {
      + app_type                   = (known after apply)
      + app_type_other             = (known after apply)
      ~ appliance_id               = "A1" -> (known after apply)
      ~ creation_timestamp         = "2024-05-02T23:44:43.197463+00:00" -> (known after apply)
      + description                = (known after apply)
      + host_group_id              = (known after apply)
      + host_id                    = (known after apply)
      ~ id                         = "da01758b-c009-44c6-9999-11b1b821af61" -> (known after apply)
      ~ is_replication_destination = false -> (known after apply)
      ~ logical_unit_number        = 0 -> (known after apply)
      ~ logical_used               = 0 -> (known after apply)
        name                       = "alb-tf-test"
      ~ nguid                      = "nguid.45d6df86642a6e988ccf0968001eef0f" -> (known after apply)
      ~ node_affinity              = "System_Select_At_Attach" -> (known after apply)
      ~ nsid                       = 21902 -> (known after apply)
      + protection_policy_id       = (known after apply)
      ~ size                       = 8 -> 16
      ~ state                      = "Ready" -> (known after apply)
      ~ type                       = "Primary" -> (known after apply)
      + volume_group_id            = (known after apply)
      ~ wwn                        = "naa.68ccf0980045d6df86642a6e981eef0f" -> (known after apply)
        # (3 unchanged attributes hidden)
    }
Plan: 0 to add, 1 to change, 0 to destroy.

Do you want to perform these actions?
  Terraform will perform the actions described above.
  Only 'yes' will be accepted to approve.

  Enter a value: yes

powerstore_volume.test1: Modifying... [id=da01758b-c009-44c6-9999-11b1b821af61]
powerstore_volume.test1: Modifications complete after 1s [id=da01758b-c009-44c6-9999-11b1b821af61]

Apply complete! Resources: 0 added, 1 changed, 0 destroyed.
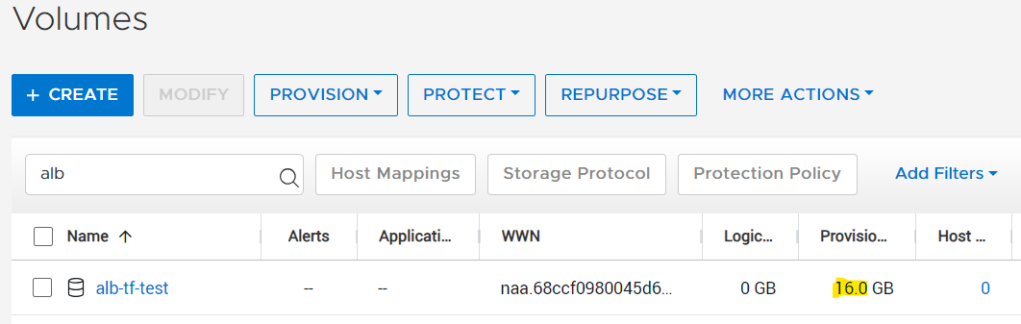
Notice how it is telling us it is about to change the size of the volume. After the confirmation it went ahead and made the changes. This is what PowerStore Manager shows now.
What about reducing the size? Let us modify the “powerstore_volume” resource to shrink it to 10GB.
resource "powerstore_volume" "test1" {
  name                  = "alb-tf-test"
  size                  = 10
  capacity_unit         = "GB"
}
Now we run “terraform apply” again. It informs us again of the changes that are about to be made.
root@alb-terraform:~/powerstore# terraform apply
powerstore_volume.test1: Refreshing state... [id=da01758b-c009-44c6-9999-11b1b821af61]

Terraform used the selected providers to generate the following execution plan. Resource actions are indicated with the following symbols:
  ~ update in-place

Terraform will perform the following actions:

  # powerstore_volume.test1 will be updated in-place
  ~ resource "powerstore_volume" "test1" {
      + app_type                   = (known after apply)
      + app_type_other             = (known after apply)
      ~ appliance_id               = "A1" -> (known after apply)
      ~ creation_timestamp         = "2024-05-02T23:44:43.197463+00:00" -> (known after apply)
      + description                = (known after apply)
      + host_group_id              = (known after apply)
      + host_id                    = (known after apply)
      ~ id                         = "da01758b-c009-44c6-9999-11b1b821af61" -> (known after apply)
      ~ is_replication_destination = false -> (known after apply)
      ~ logical_unit_number        = 0 -> (known after apply)
      ~ logical_used               = 0 -> (known after apply)
        name                       = "alb-tf-test"
      ~ Nuguid                      = "nguid.45d6df86642a6e988ccf0968001eef0f" -> (known after apply)
      ~ node_affinity              = "System_Select_At_Attach" -> (known after apply)
      ~ nsid                       = 21902 -> (known after apply)
      + protection_policy_id       = (known after apply)
      ~ size                       = 16 -> 10
      ~ state                      = "Ready" -> (known after apply)
      ~ type                       = "Primary" -> (known after apply)
      + volume_group_id            = (known after apply)
      ~ won                        = "naa.68ccf0980045d6df86642a6e981eef0f" -> (known after apply)
        # (3 unchanged attributes hidden)
    }
Plan: 0 to add, 1 to change, 0 to destroy.

Do you want to perform these actions?
  Terraform will perform the actions described above.
  Only 'yes' will be accepted to approve.

  Enter a value: yes

powerstore_volume.test1: Modifying... [id=da01758b-c009-44c6-9999-11b1b821af61]
╷
│ Error: Failed to update all parameters of Volume, updated parameters are [] and parameters failed to update are [name,size,protection policy,performance policy, description]
│
│   with powerstore_volume.test1,
│   on main.tf line 18, in resource "powerstore_volume" "test1":
│   18: resource "powerstore_volume" "test1" {
│
│ Failed to Update : The operation cannot be completed on volume alb-tf-test (id: da01758b-c009-44c6-9999-11b1b821af61) because the requested size 10737418240 is less
│ than the minimum allowed or volume's current size 17179869184.
After the confirmation, it attempts to make the modification, but it fails because volumes cannot be shrunk in PowerStore. Since PowerStore is a REST API-first product, the Terraform provider uses the PowerStore REST API to make changes, the same as the GUI and all other management interfaces. The REST API does not allow us to shrink volumes. So, this is the right expected behaviour.
As a last step for this post, let us run the “terraform destroy”. Now, the Terraform will look at the current state and remove the resources that were previously created. Notice how, once again, it lists the changes to be made and looks for confirmation.
root@alb-terraform:~/powerstore# terraform destroy
powerstore_volume.test1: Refreshing state... [id=da01758b-c009-44c6-9999-11b1b821af61]
Terraform used the selected providers to generate the following execution plan. Resource actions are indicated with the following symbols:
- destroy
Terraform will perform the following actions:
# powerstore_volume.test1 will be destroyed
- resource "powerstore_volume" "test1" {
- appliance_id = "A1" -> null
- capacity_unit = "GB" -> null
- creation_timestamp = "2024-05-02T23:44:43.197463+00:00" -> null
- id = "da01758b-c009-44c6-9999-11b1b821af61" -> null
- is_replication_destination = false -> null
- logical_unit_number = 0 -> null
- logical_used = 0 -> null
- name = "alb-tf-test" -> null
- nguid = "nguid.45d6df86642a6e988ccf0968001eef0f" -> null
- node_affinity = "System_Select_At_Attach" -> null
- nsid = 21902 -> null
- performance_policy_id = "default_medium" -> null
- sector_size = 512 -> null
- size = 16 -> null
- state = "Ready" -> null
- type = "Primary" -> null
- wwn = "naa.68ccf0980045d6df86642a6e981eef0f" -> null
}
Plan: 0 to add, 0 to change, 1 to destroy.
Do you really want to destroy all resources?
Terraform will destroy all your managed infrastructure, as shown above.
There is no undo. Only 'yes' will be accepted to confirm.
Enter a value: yes
powerstore_volume.test1: Destroying... [id=da01758b-c009-44c6-9999-11b1b821af61]
powerstore_volume.test1: Destruction complete after 0s
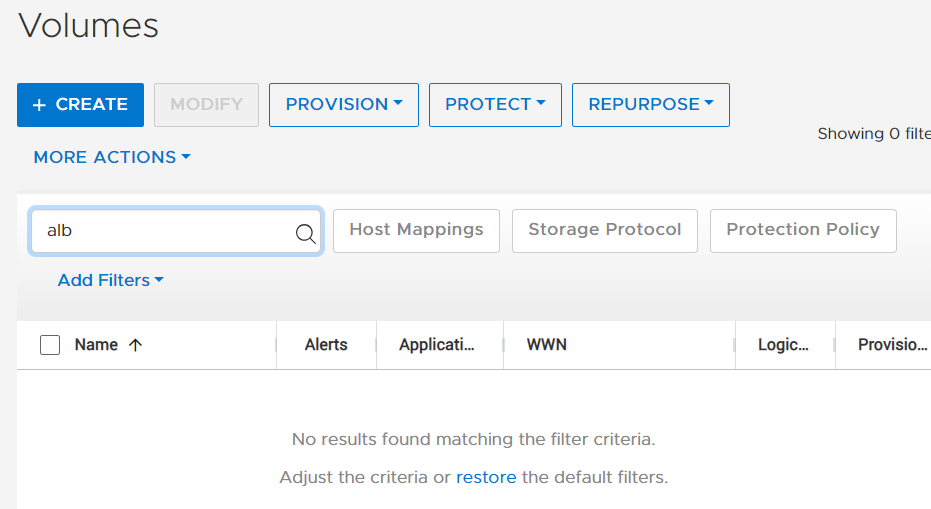
Destroy complete! Resources: 1 destroyed.As expected, in PowerStore Manager we can no longer find the volume.
In this post we have seen the declarative nature of Terraform by creating and modifying a volume in Dell PowerStore. However, provisioning storage typically requires also to create a “host” and to map the “volume” to it. From a Terraform perspective there is a dependency involved, since you cannot attempt to do the mapping until the host exists. In the next post we will learn about defining dependencies between resources.
Author: Alberto Ramos

Managing your on-premises infrastructure with HashiCorp Terraform - Part 1
Mon, 16 Sep 2024 16:13:41 -0000
|Read Time: 0 minutes
As I search the internet for “Terraform” I see plenty of examples for AWS, Azure, GCP and other public clouds. Developers use it a lot to provision virtual infrastructure and applications in public cloud, but what does it mean to you and me? What does it mean to system admins, and infrastructure engineers that work every day with physical infrastructure in our own data center? If you want to learn how to get started with Terraform to manage your physical servers, networks, and storage on-premises, this is introduction for you.
This is a series of blog posts that will cover: the basics, several examples of on-premises data center appliances, and finally how to use Ansible to provide better governance to Terraform.
- Terraform on-premises infrastructure
- Terraform Dell PowerStore
- Terraform resource dependencies
- Terraform variables
- Terraform Dell PowerMax
If you have been doing automation on-premises, there is a high chance you have been using Ansible. From my experience, Ansible is more common amongst system admins and infrastructure engineers operating a physical data center, but eventually you might be exposed to Terraform because developers already use it. I will not dig deep into details, but there are two approaches to Infrastructure-as-Code (or IaC for short). Terraform and Ansible are the leaders of these two approaches: provisioning vs config management, respectively. Depending on your goals it will be more advantageous to use one or the other but very often they are used together.

Providers and Resources
Part of Terraform’s success is the availability of an extensive list of “providers.” These are plugins that allow Terraform to understand and interact with the APIs of cloud platforms, SaaS providers, and other infrastructure tools. For example, the Terraform provider for AWS allows developers to provision VM instances. In the same way a storage admin can use the Terraform provider for Dell PowerStore to provision storage volumes and more. In Terraform speak, the VM instances and the PowerStore storage volumes are referred to as “resources.” Each “provider” typically exposes access to multiple resources or individual infrastructure elements.
Terraform configuration files
Unlike Ansible’s, which uses YAML files, Terraform uses HCL configuration files to define and manage infrastructure. HCL stands for Hashicorp Configuration Language, and it is a declarative language. This means that you “declare” the end-state of the infrastructure, as opposed to the procedure to get to that end-state.
There can be more than these, but these two are the most basic files in Terraform:
- “main.tf“. This is the entry point. It contains blocks of code of diverse types, including “providers,” “resources”, “data”, “modules”, “output” … “resource” blocks specify the resource type, properties, and desired state.
- “variables.tf“. This file serves as the central location for defining variables used in your infrastructure configuration. This makes Terraform code more flexible and enables us to manage critical information like credentials in a more secure way. It is important to note that using a variables file is a best practice, but it is not mandatory. You could also define variables in the “main.tf” file.
These two files are stored together in the same directory, and they are jointly referred to as a “Terraform module.”
The following is a basic example of a “main.tf” file that creates a volume in a Dell PowerStore storage array. Notice how the first block (terraform) is requesting a specific version of the PowerStore provider. The second block (provider) is initializing the provider. Notice how the provider uses the “var.” notation. This instructs Terraform to get the actual value from the “variables.tf” file.
The final block (resource) provides the details of the volume to be created. In this example, all three attributes for this resource are hardcoded. We will see in the next blog post how to turn these into variables as well. The two strings before the curly bracket are the resource type (“powerstore_volume”) and the internal name (“test1”) of this resource while terraform is running. You will use this internal name for example, if you want to grab a piece of information from that resource once it is created to pass as an attribute for the creation of another resource.
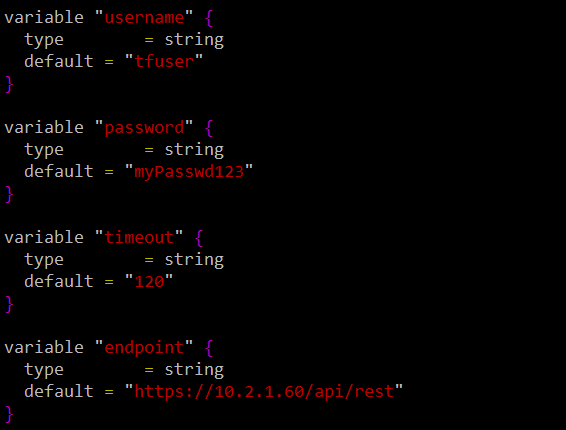
This is the corresponding “variables.tf” file that defines the values of the variables used in “main.tf.” Notice how the value of the variable is defined in the “default” property.
Terraform operations
Once you create these HCL files, Terraform allows you to perform four actions:
- “terraform init“: This is the first step. It creates the necessary folder structure and configuration files, and it downloads the plugins of any providers specified in your configuration files.
- “terraform plan“: As its name suggests, this is like a dry run. Terraform analyses your configuration files and compares them to the current state of your existing infrastructure. Based on this comparison, it generates an execution plan that shows the changes required and their impact.
- “terraform apply “: This command takes the plan generated with “terraform plan” and executes it. Based on the differences between your desired state and the current infrastructure, it creates added resources, modifies existing ones, or removes resources that are no longer needed. It uses the relevant provider plugins to talk to the target cloud or device to make changes. It stores the resulting state in a file called “terraform.tfstate.” By default, it stores the state file in the same directory where the configuration files are, but a customary practice is to store them in an S3 bucket. This enables multiple Terraform scripts (aka configurations) to operate the same infrastructure.
- “terraform destroy“: It terminates all the resources that have been created previously and deletes the state file.
The following screenshot shows the execution of “terraform init.” Notice how it downloads and installs the provider automatically.
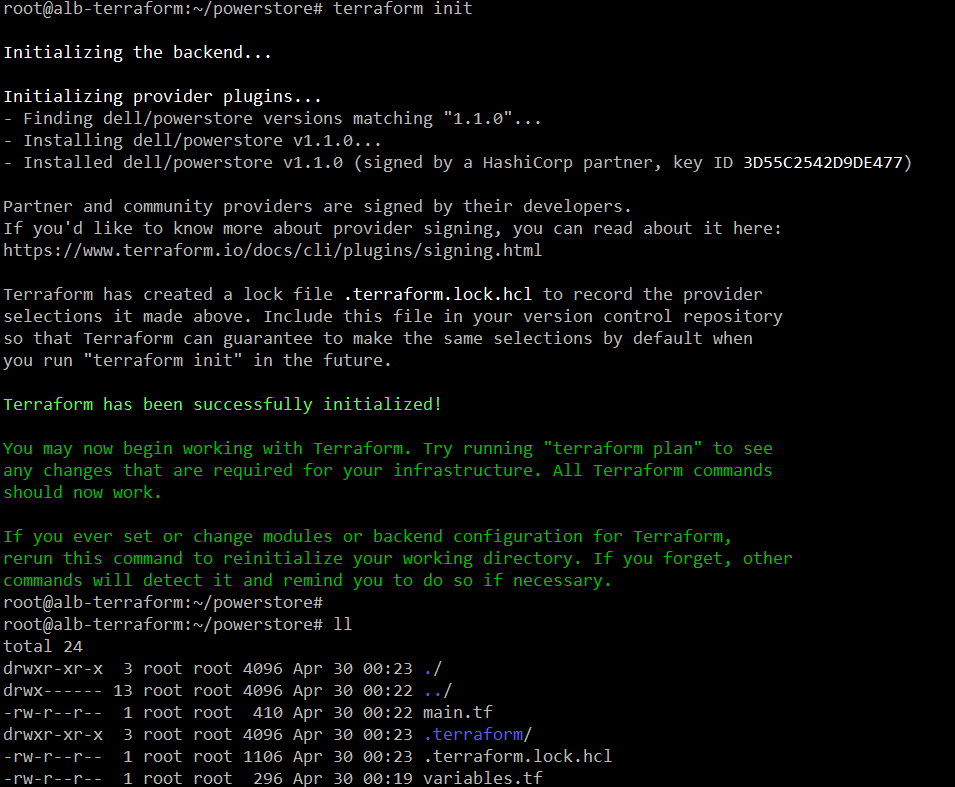
Notice how it has created the “terraform” folder and the “lock” file.
The following is a screenshot of the execution of “terraform plan.” We only specified three attributes to create the volume, but you can see here that this resource type has many more attributes or properties.
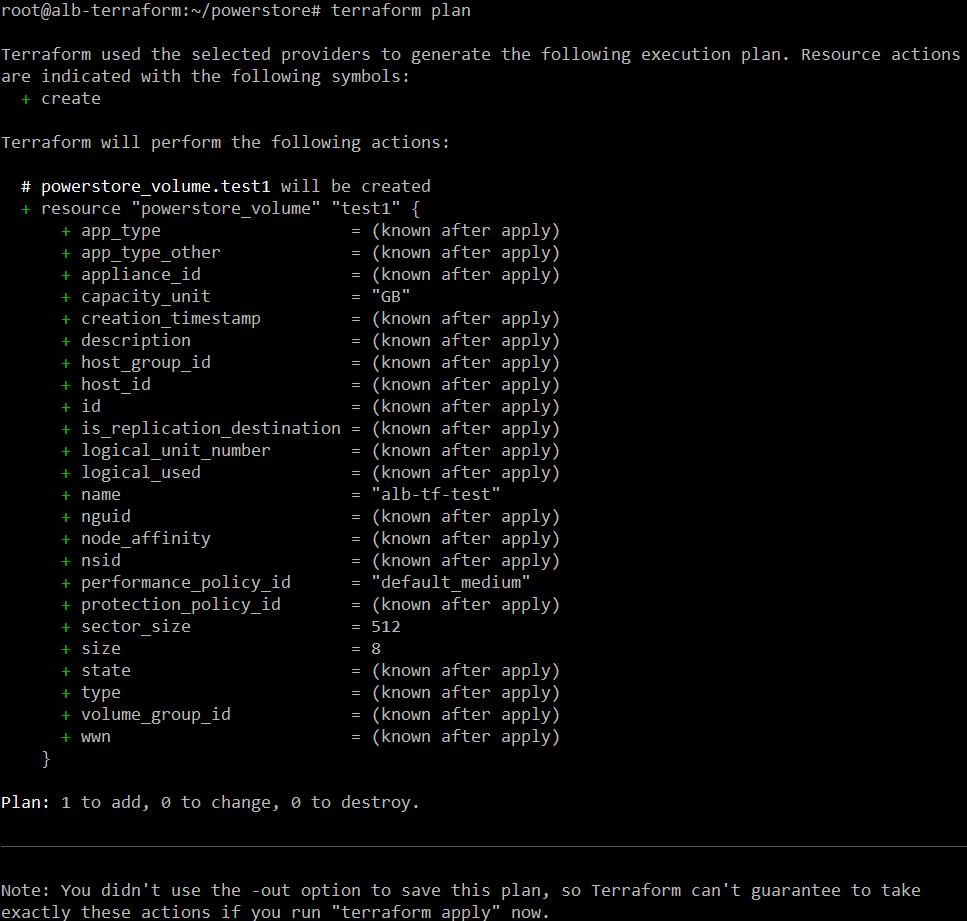
At the end it provides a summary of how many resources will be added, changed to destroyed once “terraform apply” runs.
That is a lot for a single post. In the next post we will see “apply” and “destroy” in action using PowerStore as an example.
Resources
- https://developer.dell.com
- https://github.com/dell
Author: Alberto Ramos, Principal Systems Engineer

Multicloud Object Storage as a Service
Thu, 29 Jun 2023 22:12:00 -0000
|Read Time: 0 minutes
As the use of cloud computing continues to grow, more and more organizations are adopting a multicloud strategy. This means that they are using multiple cloud providers, each with its own strengths and weaknesses. This can be a great way to get the best of both worlds, but it also comes with its own challenges.

One of the biggest challenges of multicloud is managing complexity. With multiple cloud providers, there are multiple sets of APIs, policies, and security controls to manage. This can make it difficult to keep track of everything and ensure that everything is configured correctly.
Another challenge of multicloud is cost. Each cloud provider has its own pricing model, and it can be difficult to decide what is the most suitable location for a particular workload. This can lead to unexpected expenses at best and massive cost overruns at worst.
Finally, multicloud can also make it difficult to ensure compliance. With data spread across multiple clouds, it can be difficult to keep track of where data is located and how it is being used. This can make it difficult to comply with regulations such as GDPR and CCPA.
This video provides an example of how to solve these challenges. This is the second video in a series of multicloud videos. You can read about the previous Kubernetes as a Service video in this article and you can watch the video in YouTube
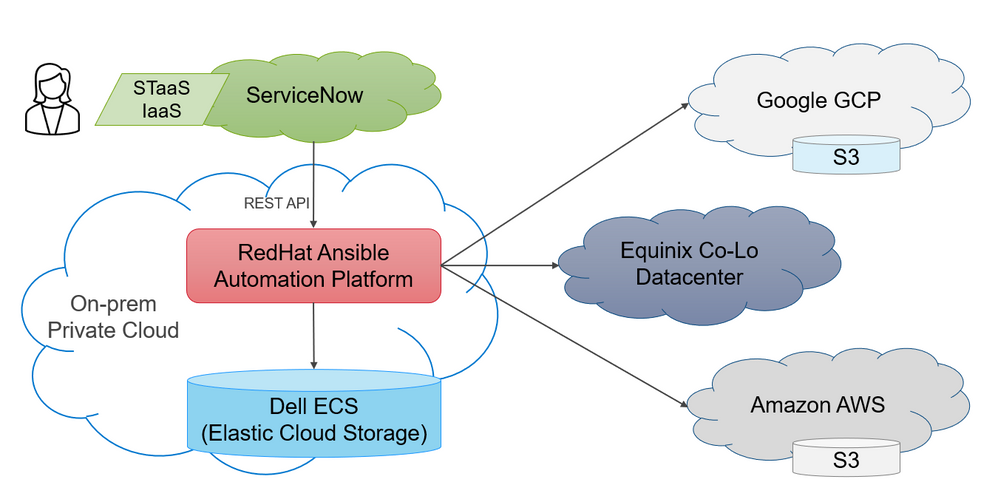
The solution proposed in the video addresses the challenges of multicloud by providing a single pane of glass for managing storage across multiple clouds. The solution uses ServiceNow and Redhat Ansible Automation Platform (AAP) to automate the provisioning and management of storage resources.
ServiceNow provides a self-service catalog for end-users, so they can request storage resources without having to go through IT. AAP is used to automate the provisioning of storage resources in private and public clouds. This automation helps to reduce complexity and improve efficiency.
The solution also leverages S3 object storage offerings available in public cloud. In private cloud the solution uses Dell Technologies Elastic Cloud Storage (ECS). Dell ECS is typically more cost effective and provides better service levels than public cloud offerings. This gives customers the flexibility to use the best cloud provider for their needs.

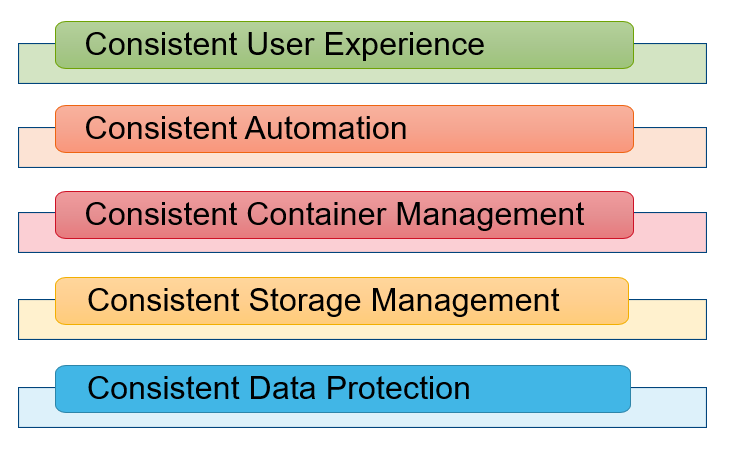
The solution proposed in the video offers a number of benefits to customers, including:
- Unified end-user experience from a single pane of glass
- Unified governance regardless of where resources are provisioned
- Unified operations management by using the resources everywhere for day 1 and day 2 tasks
Stay tuned for the next video in this series

Multicloud Kubernetes as a Service
Thu, 16 Feb 2023 23:12:00 -0000
|Read Time: 0 minutes
Digital Transformation is still on everyone's mind. Not surprisingly, organizations seek to improve developer agility in the hope that they can react faster to market changes. This is especially important in the current geopolitical and economic environment. Kubernetes is gaining more popularity as it helps shorten software’s time-to-market.
Organizations that adopt a multi-cloud strategy for Kubernetes have a comparative advantage as they can place workloads in the location that best meets their requirements. This strategy is also tames the fear of vendor lock-in. The concerns with Public Cloud don't end there. There are also performance limitations and challenges to meet ever increasing compliance. We see new testimonials of public cloud customers who are repatriating their workloads due to massive overspending. A multi-cloud approach can help them keep costs down and predictable
Most of these challenges are easily addressable with private infrastructure, but end-users expect to consume it in a self-service manner and with the same agility they get from the public cloud. The key technology that can make this happen is Infrastructure as Code. In the "IaC Avengers" team we have demonstrated before how to do this for many use cases and across all products in the Dell Technologies portfolio. You can find our demos on our YouTube channel.
However, we have now taken this one step further. Our customers want a multi-cloud future where their end-users can choose the right location for their workloads by themselves and in an agile way. This is exactly what this demo shows.
>>>Embedded content : https://www.youtube.com/watch?v=MLkEBOWGqks
Dell partnered with RedHat, Equinix, and Intel to build an environment where we could show this and other use cases.
In this demo, we use ServiceNow as a single self-service portal for multiple services (VMs, Storage, Kubernetes …) no matter where they run (public cloud, private cloud, and co-lo). This provides a consistent user experience and allows the opportunity to compare costs across clouds for the same service. This, in conjunction with a chargeback mechanism, will no doubt drive sensible consumption of IT resources and keep costs down.
The demo uses RedHat Ansible Automation Platform to do the automation. Ansible follows a simpler but powerful declarative syntax that is easy for IT engineers to learn. Ansible allows them to achieve consistent automation that is agile and seamless to the end user.

Regarding Kubernetes, we have deployed RedHat OpenShift Cloud Platform in all clouds. RedHat is the market leader for Kubernetes platforms with a strong presence in both public and private cloud environments. Having a single platform across the board allows customers to enjoy consistent container management.
The project was implemented in an Equinix datacenter in Singapore and it included the Equinix Cloud Fabric solution that provides high-bandwidth low-latency connectivity to all 3 main public cloud providers. This is no small feat because it helps us provide persistent storage for our Kubernetes workloads from a single storage system located in the co-lo datacenter. We often referred this to as "cloud adjacent storage". The benefits of this design are immense. We are no longer exposed to expensive egress charges because the storage sits outside the public cloud. This also makes it easier to meet data sovereignty requirements.
For this demo, we have used a Dell PowerFlex storage system, which provides unmatched performance and scalability. Many organizations are using this design to replicate to/from on-prem datacenters to implement robust and affordable disaster recovery. Having a single storage system for all workloads, regardless of location, means consistent storage management.
Finally, one of the biggest challenges in a multi-cloud world is data protection as this can become very complex. Dell PowerProtect Data Manager allows our customers to protect their workloads regardless of where they run. In the particular case of Kubernetes environments, Dell PPDM can protect all namespace resources, such as pods, secrets, and even persistent volumes.